Showing posts with label Thinking of You. Show all posts

Saturday, January 13, 2024

Thinking of You bird - Try a Sketch on Tuesday # 638 and #156 Background Personality

 For this challenge TSOT is partnering with Double  Trouble. Double Trouble is recognizing  World Introvert Day using he sketch from TSOT #638.

A background used  that uses bright, bold colours, represents an extrovert personality; whereas the use of soft, pastel colours is indicative of an introvert personality.


c


My personality tends to vacillate between introvert and extrovert depending on the occasion/situation.  Today, from the look of the background of my card, I am an introvert.

The background for this card was made using a stencil and embossing paste to which I added a purple glitter glue for colour.  I really love the way it turned out.  Before adding it to a Boho Blue card base, I sponged the edges with Boho blue ink.


The focal point of the card was created using layering square dies in the following colours: the largest scallop square one is Boho Blue, the smaller one is Bubble Bath, and the smallest one is Basic White which I embossed with an Altered Hexagon embossing folder.  All layers were sponged with Boho blue ink before adhering them together. This layered square was adhered tat an angle o the card front near the top using dimensionals.

The bird and branch with flowers was fussy cut from the Flight and Airy DSP (SAB paper) and adhered to the top of layered square using dimensionals.


The sentiment (from Garden Meadow) was stamped using Boho  Blue ink and matted with Boho Blue cardstock before adding it to the card front again using stencils.

To finish the card, I made a small bow using some Glittered Organza ribbon which I added below the bird using a glue dot.  Then I added 3 pastel pearls and applied Wink of Stella to the flowers.

Supplies Used:

Stamp:  Garden Meadow

Inks:  Boho Blue

Papers:  Boho Blue, Bubble Bath, Basic White, Flight & Airy DSP (SAB)

Accessories:  Embossing paste (with purple glitter glue floral stencil (SU), Layering square dies, Altered Hexagon embossing folder, Pastel Pearls, dimensionals, Wink of Stella

Tuesday, April 13, 2021

The Beauty of Friendship - another catalogue sneak peak

 Just when one gets excited about the launch date of a new catalogue, you find out the launch has been delayed by a month.  This is due to supply problems related to the pandemic. So rather than frustrate everyone by lack of availability, back orders etc, Stampin' Up decided to postpone the launch date by one month ie June 4 instead of May 4.

However, I do have some new products to create projects with, and will be showing them on this blog.

Today I made a card featuring the Beauty of Friendship stamp set as well as the Beauty of the Earth DSP, both products of the upcoming now delayed catalogue.


Soft Suede and Old Olive are the two colours used for this image.  The tree was stamped with Soft Suede with the canopy stamped twice - the first layer in Old Olive with the second more distinctive layer stamped with Soft Suede.  This actually was not something I planned.  My plan was to stamp the canopy with a darker shade of green rather than Soft Suede, but I like my 'mistake' better.

Using the 'blotch' stamp, I stamped some Old Olive and Soft Suede around the tree.

The completed image was die cut using the Stitched So Sweetly die, mounting this using dimensionals onto a piece of the Beauty of the Earth DSP. This is turn was added to a Basic White layer on top of a Mossy Meadow card base.


 A bow with the braided linen trim was added just below the canopy, fraying the ends a bit, and two left over copper embellishments were added.

The sentiment is from the stamp set, with the edges sponged with Soft Suede ink before adding to the card front below the canopy.

Supplies Used:

Stamp:  The Beauty of Friendship

Inks:  Soft Suede, Old Olive

Papers:  Mossy Meadow, Basic White, Beauty of the Earth DSP

Accessories:  Stitched So Sweetly die, Dimensionals, 1/8" Braided Linen trim

Thursday, February 11, 2021

A Butterfly flew in......with a link to a video

 A gorgeous butterfly bundle flew in today and when they landed on my desk  with a flurry of activity.

This Butterfly Brilliance Bundle is an early release from the new Annual catalogue 2022-2023 (with the exception of the Butterfly Bijou DSP).  The stamp is one big background stamp, which coordinates with one large die that cuts all these stamped butterflies.  This die also die cuts butterflies from the Butterfly Bijou DSP.

So I decided to make a slimline card with the background created using the new blending brushes.  See video made by my team mate on the use and care of blender brushes here

The colours I used for the background were selected from those used in the Buttrfly Bijou DSP - Bermuda Bay, Mint Macaron, Calypso Coral and Daffodil Delight.

The Corner Bouquet stamp set (SAB) was black embossed on the upper and lower left corners.  The sentiment, from "Rooted in Nature" was also black embossed just off center on the card front.
Using the large single "Butterfly Wings" die, 6 butterflies were die cut from the DSP- each one a different size and colour.  In addition, 3 smaller non detail butterflies were die cut from the reverse side of the DSP.  These little butterflies can be seen emerging from the bottom right of the card next to the embossed image.
The other 3 butterflies were added as seen in the picture. Note:  they were only adhered by their bodies. Black faceted dots were added randomly.
This now finished card front was matted with Whisper White, and then to a Bermuda Bay base.

Dimensions:
Bermuda Bay 7 by 9" scored at 3 1/2"
Whisper White 3 1/4 by 8 3/4"
Whisper White 3 by 8 1/2" - art piece

Stamps:  Rooted in Nature, Butterfly Brilliance
Inks:  Versa Mark, Bermuda Bay, Mint Macaron, Calypso Coral, Daffodil Delight
Papers:  Bermuda Bay, Whisper White, Butterfly Bijou DSP.
Accessories:  Black embossing powder, Blender brushes, Faceted dots, Brilliant Wings Dies


Saturday, February 6, 2021

Z Fold Card Using Art Gallery Bundle with Video

 Today I am working with 2 of my loves - working with the Art Gallery bundle and making a video (although I have a long way to go there).  I thought I would make a video tutorial on how to make a Z-fold card aimed at the not so experienced crafter


Stamp:  Art Gallery

Inks:  Flower 1:  Poppy Parade and Merry Merlot with Night of Navy in center
          Flower 2:  Bumblebee and Pumpkin Pie with Night of Navy inside
          Flower 3 (in video) Daffodil Delight and Pumpkin Pie & Night of Navy 
          Stem and leaves:  Pool Party
          Sentiment: Pool Party


The link to the video below is here


Here are the dimensions:

Thick Whisper White 4 1/4 by 11 - scored at 5 1/2 & 2 3/4"  - card base

Pool Party 4 by 5 1/4" - inside

Pool Party 2 1/2 by 4" (2 pieces) - one for each of front panels - mat for DSP

Pool Party  3 3/4  by 2 1/4  "    (2 pieces) - one as mat for art piece on front of card, and the other as mat for sentiment on inside of card

Whisper White  3 1/2 by 2"  (2 pieces) - one for art piece and one for sentiment inside

Whisper White 4 by 5 1/4 " - stamp flowers and leaves

Whisper White - scrap for sentiment

Designer Series Paper (DSP): 3 3/4 by 5" for inside

DSP  2 1/4 by 3 3/4" (2 pieces) on front panels

Gold Foil  3 by 3 to punch stems

Whisper White A2 envwlope


Picture above shows the various papers used in this card.

To decorate the envelope a piece of the reverse side of the DSP was adhere to the flap of the envelope.  Cut a piece that extends beyond the sides of the envelope flap by at least 1/2", and extends beyond the end of the flap by about 1/2".  The other end, is lined up with the fold line of the envelope flap.
Conversely the flap could be stamped.


Accessories:
Floral Gallery dies
Sprig punch
Dimensionals
Gilded Leafing embellishment
Gilded Gems


Wednesday, July 15, 2020

Good Morning Tulle Shaker Card

I really love making shaker cards.  Usually I make them using window sheets, but today I am making a shaker card using glitter tulle instead of window sheet.  The use of tulle for shaker cards was inspired by Jennifer McGuire here .  Check out her video on how to make tulle shakers.


Stamp:  Good Morning Magnolia
Inks: Mossy Meadow, Petal Pink
Papers:
  • Petal Pink- 4 1/4 by 5 1/2" - card base
  • Petal Pink - 4 1/8 by 5 3/8" - inside
  • Whisper White 4 by 5 1/4" - card base layer and one for inside
  • Magnolia DSP 3 3/4 by 5 - adhere to Whisper White layer.
  • Magnolia DSP 3/4 by 5 1/4" for inside
  • Scrap of Whisper White for sentiment and to punch 4 flowers using Perennial Flower punch
  • Scrap of Daffodil Delight to punch flower centers
  • Scrap of Mossy Meadow - punch 3 leaves using Leaf Punch

Accessories:
  • Stitched Nested Label Dies
  • Tasteful Label Dies
  • Perennial Flower Punch
  • Leaf Punch
  • Snowflake punch- flower centers
  • Shimmer Crystal Effects
  • Dazzling Diamonds
  • 3/4" White petal pink edged ribbon
  • Champagne rhinestones
  • Glimmer tulle
  • Dimensionals
  • Shaker elements


Thursday, July 2, 2020

Birds and Branches -Thinking of You

This card was cased by one I saw on Pinterest.  It features the Birds and Branches stamp set with its coordinating dies Birds and more.  For the sentiment, I use the "Many Mates" stamp set.


The Early Espresso card base is layered with Whisper White .  On the Whisper White layer, is added a central Early Espresso panel with strips of In Good Taste DSP (wood grain pattern)

The nesting birds etc, are built on a stitched circle die (the largest).  The birds, nest and eggs are stamped and coloured on a separate piece of Whisper White and then die cut - the birds with watercolour pencils (Daffodil Delight, Coastal Cabana), nest with Soft Suede, and the eggs with Sahara Sand) branches of leaves were die cut with Old Olive card stock.


Early Espresso ink was used to stamp the sentiment; the splatter with Crumb Cake.


Supplies Used:
Stamps:  Birds and Branches, Many Mates
Inks:  Early Espresso, Soft Suede, Crumb Cake, Watercolor Pencils (Daffodil Delight, Coastal Cabana)
Papers:  Early Espresso, Whisper White, In Good Taste DSP, Old Olive
Accessories:  Birds and More dies, Stitched Circle die, Linen Thread, Dimensionals.

Monday, November 4, 2019

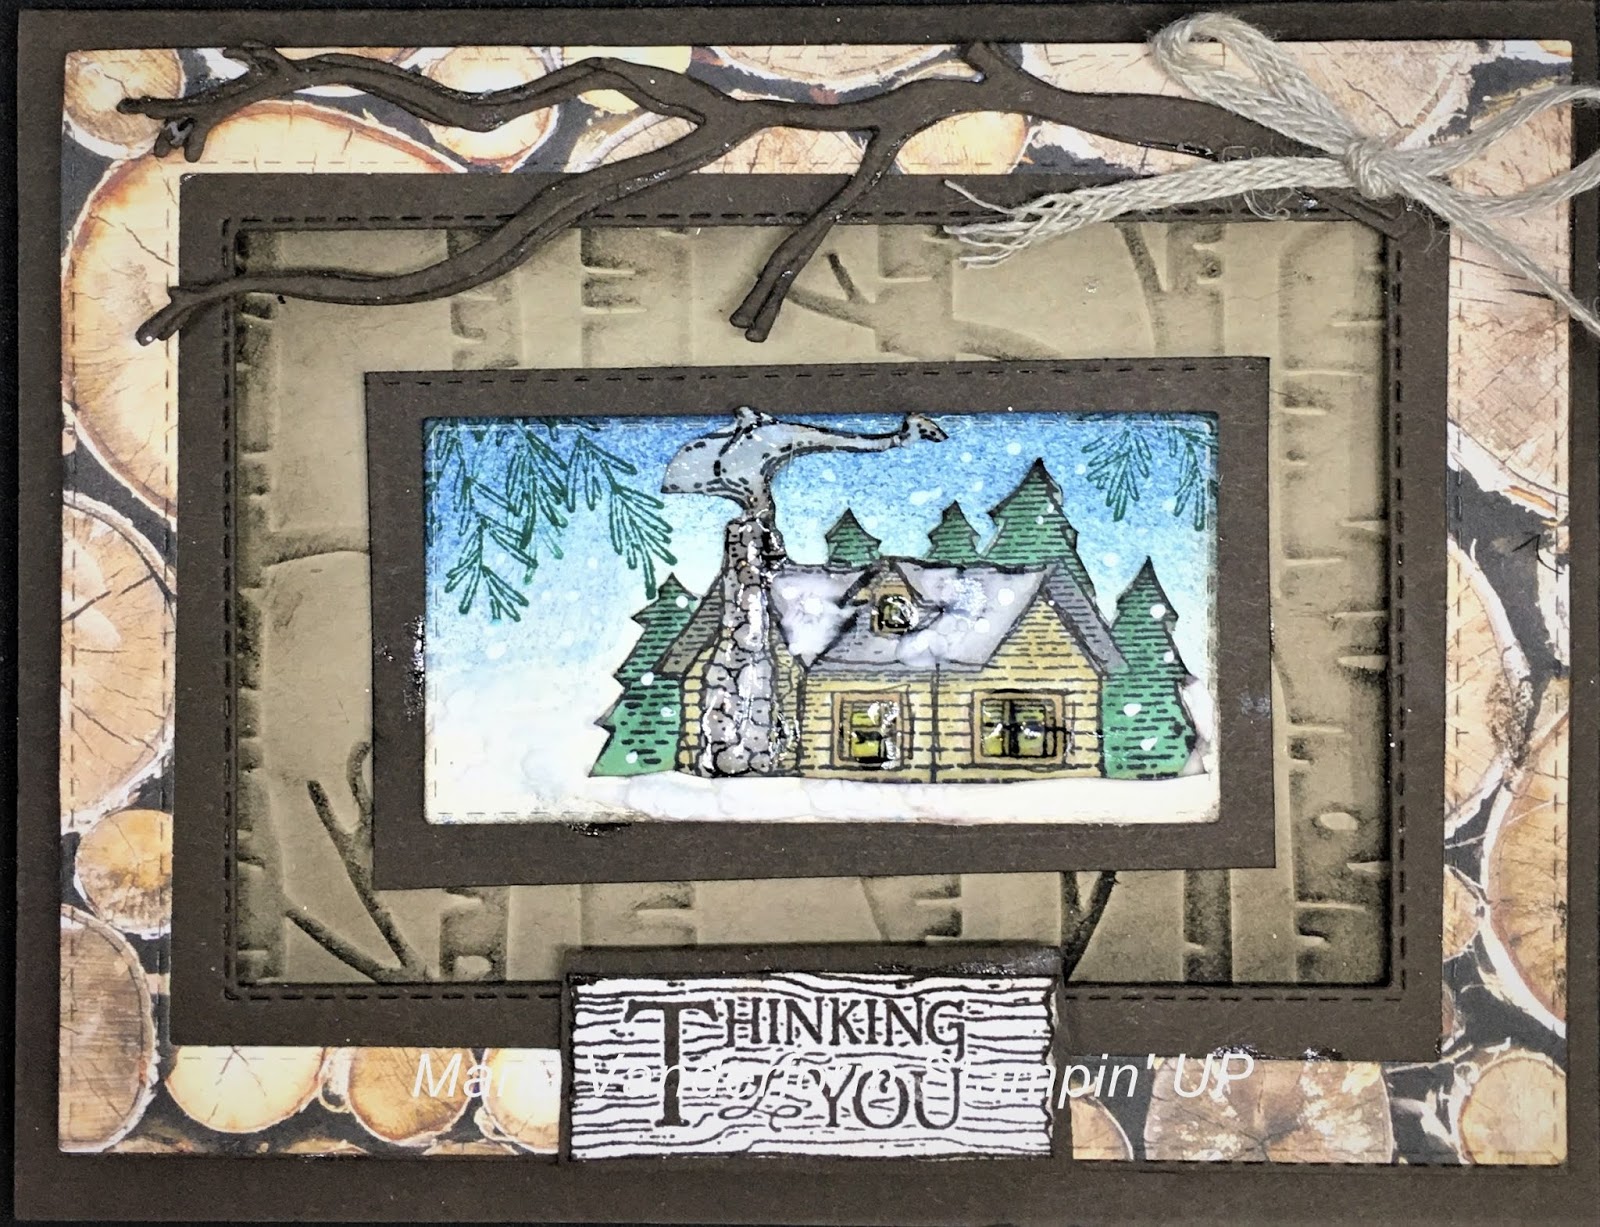
Cabin in the Woods - Paper Craft Crew Challenge #357

I've always wanted a cabin in the woods, a place to escape, to regroup, or just to enjoy nature.  Thus the challenge at Paper Craft Crew Challenge this week peaked my interest.

The challenge at the Paper Craft Crew Challenge this week is a Tic Tac Toe Challenge, and after pondering the choices, I chose the column from the upper left to the lower right - found in the forest, rustic , sponging.

I chose the stamp set "Rustic Retreat"


The card itself is a rustic picture frame, showing elements of items found in the forest namely branches and logs.  The frame was made using two different sizes of stitched rectangle dies and Wood Texture DSP matted with Early Espresso card stock.  This was mounted on a piece of Crumb Cake card stock using foam adhesive strips.  This crumb cake card stock was embossed with the Woodlands embossing folder and sponged lightly to enhance the impressions.


In the center of the frame a picture of a rustic cabin in the woods with smoke coming from the chimney into a sponged blue sky,  trees around it and snow on the ground. A 3 dimensional branch, die cut from a Seasonal Layer die, adorns the frame top.


A sentiment, stamped on a background that looks like a board, is attached to the bottom of the frame.

This frame is adhered to an Early Espresso card base.

Supplies Used:
Stamp:  Rustic Retreat
Inks:  Black Memento, Early Espresso,  Balmy Blue, Blueberry Bushel, Shaded Spruce, Crumb 
cake
Papers:  Early Espresso, Crumb Cake, Very Vanilla, Wood Texture DSP,
Accessories:  Woodlands embossing folder, Stitched Rectangle Dies, Seasonal Layer Die, 3/16" Braided Linen Thread, Puff Paint, Foam Adhesive Strip

Tuesday, July 23, 2019

Magnolia in Gold

Today I chose to play with the Magnolia Embossing Folder and ended up making a simple but beautiful card.


Gold Foil was embossed with the Magnolia Embossing Folder.  To enhance the embossed lines, I rubbed a Black Stazon ink pad lightly over the embossed surface and let it dry before I cut the flowers out.


Dimensionals were used to adhere the flowers to some Basic Black card stock, which in turn was added to a Gold Foil Edged card base.


A gold embossed sentiment from Good Morning Magnolia was added to the upper left of the card front. Some gold glitter gems were also added.

Supplies Used:
Stamp:  Good Morning Magnolia
Inks:  Versa Mark, Black Stazon
Papers:  Gold Foil Edged Card and Envelope, Basic Black, Gold Foil
Accessories:  Magnolia Embossing Folder, Gold embossing powder, Dimensionals, Gold Glitter Gems

Sunday, February 24, 2019

Sandpipers By the Bay

Yesterday I posted a card featuring the scenic building on a cliff here

Today's card, still using the "By the Bay"  (SAB) stamp set, features the sand pipers on the shore.


Using Watercolor Pencils and an Aqua Painter a lightly coloured background wash was created on a piece of Whisper White card stock.

The Sand Pipers were stamped three times at various levels on this background, and were lightly coloured with a Basic Gray watercolour pencil.  Some blending was done using the Aqua Painter.

Three separate panels were die cut using the Stitched Rectangle Framelits and matted with Basic Gray card stock.

These were adhered to a panel stamped with the cliff side image of the larger stamp.  Instead of adhering them in a straight line, they were added with the two outer panels lower than the middle one.

After matting this panel with Basic Gray card stock, it was adhered to the Whisper White card front. The lower 1/3 portion of this piece was embossed with the Seaside Embossing Folder and the upper stamped with the sea birds from "High Tide".

A metal embellishment of a crab was added above the left panel.

All edges were sponged with Basic Gray card stock.


Supplies Used:
Stamps:  By the Bay, High Tide
Inks:  Black memento, Basic Gray, Watercolour Pencils
Papers:  Basic Gray, Whisper White
Accessories:  Stitched Rectangle Framelits, Seaside Embossing Folder, Dimensionals, Aqua painter.

Tuesday, November 27, 2018

Thinking of You - FabFriday #151

Masculine Cards are traditionally difficult to make, so for the sketch challenge with Fab Friday #501
I used several stamps to make  this  "Thinking of You" card.


The card base is Soft Suede which I embossed using the Rooted in Nature framelits (the leaves) and the Big Shot Embossing Mats.  The Whisper White art piece matted with Crumb cake card stock was adhered to this card front using dimensionals.

The art piece was created using the following:
  • Water - Bermuda Bay and Waterfront stamp set
  • Shore rocks - Soft Suede and Waterfront stamp set
  • Two trees - Rooted in Nature and Mossy Meadow ink
  • Sun - Waterfront Stamp set and Crushed Curry ink.

At the bottom of the Whisper White art piece I added 2 pieces of  3/8" Shimmer basic gray ribbon, with some 1/16" braided twine tied in a bow at the left edge.

The sentiment was stamped in Soft Suede ink using Teeny Tiny wishes, & punched with the Classic Label punch.  Before adhering it to the art piece above the ribbons I sponged the edges with the same colored ink.

Supplies Used:
Stamps:  Waterfront, Teeny Tiny Wishes, Rooted in Nature
Inks:  Bermuda Bay, Soft Suede, Mossy Meadow, Crushed Curry
Papers:  Soft Suede, Crumb Cake, Whisper White
Accessories:  Rooted in Nature framelits, Big Shot Embossing mats, Classic Label Punch, 3/8" shimmer Basic Gray ribbon, Braided Twine

Wednesday, July 4, 2018

Rooted in Nature - Thinking of You

The Rooted in Nature stamp set and coordinating framelits is the most versatile stamp set I have worked with so far since the Annual catalogue was launched the beginning of June.  I think I have made a card for each stamp in the set, and today is no different.

Today I stamped the individual leaf with Mossy Meadow ink onto Whisper White card stock die cut with the stitched square framelits.  After mounting them with Mossy Meadow cardstock they were adhered to a Whisper White square, also matted with Mossy Meadow.  This art piece will be mounted onto the card front using dimensionals.


The card front is Mossy Meadow, layered with Crumb cake card stock embossed with the Basket Weave embossing folder.

On the left I stamped a Whisper White panel randomly with pine trees and branches and layered it with Mossy Meadow card stock, then wrapped  some Crumb Cake twine around it tying it in a bow near the top before adhering it to the card front.


The art piece was added to the card front overlapping this stamped panel.

The sentiment is from Teeny Tiny Wishes punched with the Classic Label punch mounted on a Mossy Meadow small oval punch.

Supplies Used:
Stamp:  Rooted in Nature, Teeny Tiny Wishes
Inks:  Mossy Meadow
Papers:  Mossy Meadow, Crumb Cake
Accessories:  Square stitched framelits, thick Crumb Cake twine, Basket Weave embossing folder, dimensionals.


Friday, June 22, 2018

Sunset at the Cottage

I love sunsets - always have, and lately the sunsets have been so beautiful.

I've been making a lot of cards using Rooted in Nature suite, and today I combined the stamp set with two other stamp sets, Waterfront, and High Tide - to create a sunset scene at the cottage


I was a bit hesitant about the effectiveness of the sponge brayers, but I used them today (along with some of the new colors) to create this beautiful sunset and was pleasantly surprised.  So, using this tool, I applied the following colors for the sky:  Mango Melody, Poppy Parade and Highland Heather. I added some birds and clouds from High tide.

Coastal Cabana was used for the water, with the horizon  identified using a Coastal Cabana marker.  Details in the water was created by using the water stamp High Tide.

The two trees were stamped one at a  time and side by side using Mossy Meadow.  A stamp from Waterfront, stamped in Soft Suede,  was  to create the rocky knol upon which the trees were growing.

The focal image was trimmed, then matted with Basic Black card stock, adhered to a Whisper White layer which was added to the Basic Black card base

An Adirondack chair, die cut in Highland Heather cardstock, was adhered to the lower right card front to complete the cottage image.

Supplies Used:
Stamps:  Rooted In Nature, High Tide, Waterfront
Inks:  Mango Melody, Poppy Parade, Highland Heather, Coastal Cabana, Soft Suede, Mossy Meadow, Basic Gray, Coastal Cabana marker
Papers:  Basic Black, Whisper White, Highland Heather, dimensionals
Accessories:  Colorful Seasons framelits, Sponge Brayer


Tuesday, October 17, 2017

Thinking of You with Count Your Blessings - Try Stampin or Not on Tuesday #344

This week's theme with the sketch challenge with Try Stampin' or Not on Tuesday #344 is "Autumn".  Autumn cards make wonderful Sympathy or Thinking of You cards so for this sketch challenge I made a "Thinking of You" card.

The sketch this week is by Kaylin.


The Chocolate Chip card stock base is layered with a Very Vanilla layer with stamped images covering it.  The edges are also sponged with Crumb Cake ink.

Near the bottom I added a strip of  Painted Autumn DSP that has images  of acorns all over it - fitting in very nicely with the images on my art piece.

On top of that is an angled piece of the reverse side of the DSP, and the two art piece panels are added to that.

Inside the art piece panels I separated the image of the acorn from "Count Your Blessings" and coloured them with the new Stampin' Blends alcohol markers. To add some glitter I added Clear Wink of Stella to the images.

All edges are sponged with Crumb Cake ink.

The sentiment is from "Basket of Wishes", stamped in Chocolate Ink and added to the card front with dimensionals.

Supplies Used:
Stamps:  Count Your Blessings, Basket of Wishes
Inks:  Black Memento, Chocolate Chip, Crumb Cake, Stampin' Blends (Old Olive, Crumb Cake)
Papers:  Chocolate chip, Very Vanilla, Painted Autumn DSP
Accessories:  Dimensionals, Clear Wink of Stella.

Monday, July 3, 2017

Climbing Orchid - Hand Stamped Sentiments #267

I made this orchid card for the color challenge with Hand Stamped Sentiments
This is a stamp set I have wanted to play with ever since the new catalogue came out, but life happened.
When I saw the color challenge:  Lemon Lime twist, Rich Razzelberry, and Dapper Denim I knew I had my chance.  One of my down line told me today that her orchid is blooming today and in exactly these colors.


The orchids were first stamped with Rich Razzelberry and lightly colored in  the center and edges with a Lemon Lime Twist marker.  The center part of the flower was stamped with Lemon Lime Twist with the stamens stamped in Rich Razzelberry.  These  flower parts were die cut using the Orchid Builder Framelits. I also stamped and die cut two buds.

The center was added to each flower with a dimensional and Wink of Stella applied


To make a stem for the orchids, I die cut a branch from Layering Seasons Framelits in Dapper Denim and inserted it in a jar stamped with "Jar of Love framelits" and die cut with the "Everyday Jar Framelits".  Using a blender pen I colored with jar edges while the ink was still wet.  I also stamped in some water for the jar bottom , added some dot stamps from Timeless Texture and applied some Wink of Stella.

Before adding the branch in the jar, I stamped two floral images (not the stems) from the Jar of Love stamp set in Lemon Lime Twist. Then I added the flowers to the branch with dimensionals.

The buds were adhered to the top of the branch of the stem.

Finally, I stamped, die cut, and adhered a Dapper Denim bow at the neck of the jar.

Supplies Used:
Stamps:  Climbing Orchid, Jar of Love, Timeless Texture
Inks:  Lemon Lime Twist, Dapper Denim, Rich Razzelberry
Papers:  Dapper Denim, Lemon Lime Twist, Whisper White
Accessories:  Orchid Builder Framelits, Everyday Jar Framelits, Layering Seasonal Framelits, Dimensionals, Wink of Stella (clear)