Showing posts with label Tasteful Label Dies. Show all posts

Sunday, January 23, 2022

A Gumball Machine Shaker Valentine Card

 As soon as I saw this stamp/die set on Page 12 of the new Mini catalogue I knew I wanted to get it and make some wonderful cards. If you like making 3D cards, and shaker cards, this is the set for you.  If you don't, this is the set for you.  I showed my finished card to a neighbour and she can't wait for me to make a card for her great grandson.


Don't those little frosted gum balls look real?

For my card base I used Magenta Madness layered with Sunshine and Rainbow DSP (SAB). Those multicolored stripes gave me lots of options for colours for the Gum ball machine - but in the end I chose Magenta Madness. I did not immediately add these two layers together, so I set them aside for now

To start, I die cut all the pieces I thought I would need.  I wasn't sure what went where, but the pieces for the base were easy to figure out. These I die cut in Magenta madness, with the exception  of the metallic part in the front, which I die cut using a metallic piece of card stock I had left over from a winter project.  I added that to the base with dimensionals, and popped the little trap door below it open.  An extra handle was die cut and I popped it on top of the original.
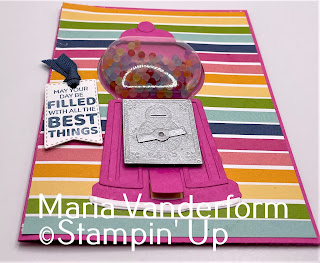

To determine where I would have to die cut an aperture for the Gumball Machine shaker box, I placed the completed base on the DSP which would be adhered to the card front and penciled lightly where the aperture would be. After I die cut the aperture, I removed the adhesive cover on the top of  the shaker box and  inserted it into the aperture from the back to the front.

Now comes the fun part.  I turned the shaker box upside down and removed the bottom adhesive.   I added frosted gum balls and covered the opening closed with a piece of window sheet. That way the gum balls would not roll all over the place when I turned the box over to finish the rest of the card.


Using tombo, the DSP was adhered to the card front, after which the rest of the Gum ball machine was added.

The sentiment was stamped with Misty Moonlight ink on a Tasty Label die cut, and added to the left of the machine.

Supplies Used:

Stamp:  Gumball Greetings

Inks:  Misty Moonlight

Papers:  Magenta Madness, Basic White, Sunshine and Rainbow DSP

Accessories:  Gumball Machine Dies, Frosted Beads Assortment, Tasteful Label dies, Gumball Machine Shaker, Misty Moonlight ribbon

Sunday, October 11, 2020

Gold and White Anniversary

For this card a large delicate single leaf from the Laser cut DSP was added or Whisper White card stock embossed with the Coastal Weave embossing folder.   

White on white cards are gorgeous, and add gold to that you have a "wow" card. 

 The gold leaf is from the Laser Cut DSP and was very carefully adhered to an embossed Whisper White piece of card stock layering the Thick Whisper White card stock base.


Using the Tasteful Labels Dies a stitched scalloped circle was die cut in gold foil, and a smaller one in Whisper White. A gold trim bow is added at the top of the circles with a glue dot,
These were added to the base of the leaf with dimensionals between them.
The sentiment, from Itty Bitty Greetings, was gold embossed on a narrow piece of whisper White card stock notched at both ends, and then added to those layered circles with dimensioals.
Gilded Gems were added randomly on the circles and sentiment.

Supplies Used:
Stamp:  Itty Bitty Greetings
Inks:  Versa Mark
Papers;  Thick Whisper White, Whisper White, Gold Foil, Laser Cut Specialty DSP
Accessories:  Gold embossing powder, Gold trim, Tasteful Label Dies, Coastal Weave embossing powder, Gilded Gems, Dimensionals


Wednesday, July 15, 2020

Good Morning Tulle Shaker Card

I really love making shaker cards.  Usually I make them using window sheets, but today I am making a shaker card using glitter tulle instead of window sheet.  The use of tulle for shaker cards was inspired by Jennifer McGuire here .  Check out her video on how to make tulle shakers.


Stamp:  Good Morning Magnolia
Inks: Mossy Meadow, Petal Pink
Papers:
  • Petal Pink- 4 1/4 by 5 1/2" - card base
  • Petal Pink - 4 1/8 by 5 3/8" - inside
  • Whisper White 4 by 5 1/4" - card base layer and one for inside
  • Magnolia DSP 3 3/4 by 5 - adhere to Whisper White layer.
  • Magnolia DSP 3/4 by 5 1/4" for inside
  • Scrap of Whisper White for sentiment and to punch 4 flowers using Perennial Flower punch
  • Scrap of Daffodil Delight to punch flower centers
  • Scrap of Mossy Meadow - punch 3 leaves using Leaf Punch

Accessories:
  • Stitched Nested Label Dies
  • Tasteful Label Dies
  • Perennial Flower Punch
  • Leaf Punch
  • Snowflake punch- flower centers
  • Shimmer Crystal Effects
  • Dazzling Diamonds
  • 3/4" White petal pink edged ribbon
  • Champagne rhinestones
  • Glimmer tulle
  • Dimensionals
  • Shaker elements


Sunday, July 12, 2020

Blossoms & Blooms Anniversary card - a tutorial

This bundle has got to be one of my favourite bundle of the Annual Catalogue.  It is so versatile!

Today I made an Anniversary card using tone on tone card stock with Platinum foil and gold ink.


Measurements:
  • Thick Very Vanilla card stock 4 1/4 by 11" scored at 5 1/2" to form a top fold card. - card base
  • Very Vanilla 3 3/4 by 5" - art piece 
  • Very Vanilla 4 1/4 by 5 1/2" - to die cut bottom blossom layer)
  • Platinum foil - 4 by 5 1/4" ( I die cut the center out to use on another project) - mat for art piece
  • Platinum foil - 4 1/4 by 5 1/2" to die cut top blossom layer
  • Scrap piece of Very Vanilla to die cut sentiment using Tasteful Labels dies
  • Scraps of Platinum foil to die cut small leaves - Forever Flourish Dies
Stamps:
  • Blossoms & Blooms
  • Many Mates
Inks:
  • Gold 
  • Versa Mark
Accessories:
  • Many Layered Blossoms dies
  • Tasteful Labels Dies
  • Forever Flourish Dies
  • 1/4" Very Vanilla gold edged ribbon
  • Dimensionals
  • Gold embossing powder
  • metallic faceted dots
Putting card together:
  • Die cut the center out of the 4 by 5 1/4" piece of Platinum foil  Do not add to card base yet
  • Using gold ink, stamp the image of the blossoms on the 3 3/4 by 5" piece of Very Vanilla
  • Die cut both pieces of Blossom dies. Note:  do not remove centers of flowers die cut pieces.
  • Adhere together using tombo glue and a sponge matching leaves and flowers
  • Adhere to art piece matching stamped image

  • Add ribbon to bottom half of card front wrapping edges around very Vanilla and platinum foil layers.
  • Add these layers to card base.
  • Emboss sentiment with gold embossing powder on scrap piece of Very Vanilla and die cut with the Tasteful Labels Die.

  • Die cut 3 small leaves from scrap Platinum foil
  • Adhere to bottom of die cut sentiment
  • Add sentiment to card front over ribbon towards the right using dimensionals.
  • Adhere ribbon to left of sentiment.

  • Finish card by adding metallic faceted dots where desired.
  • Finish inside as desired.


Sunday, July 5, 2020

Watercolour Blossoms and Blooms

I can't seem to get enough of the Blossoms and Blooms stamp set.  There are so many ways to create beautiful cards.
Today I used my stamparatus and spritzer to create a watercolour look.


1. Start with a piece of Whisper White cardstock 3 3/4 by 5”
2. Place on Stamparatus
3. Position stamp on glass plate
4. Add Rocco Rose ink to stamp.  Spritz lightly with water
5. Stamp.
5. Clean stamp.
6.Using a sponge or finger dauber add Rich Razzelberry ink to the centers of the flowers only.
7. Spritz lightly and stamp.  Clean stamp.
8. Using a finger dauber add Blackberry Bliss to the flower centers taking care to stay in the centers.      Spritz and stamp.
    Stamp centers of flowers with Daffodil Delight
9. Repeat for leaves.  Stamp first with Pear Pizzaz followed by Old Olive
10.  Add 3 small flowers stamping and spritzing first with Balmy Blue and then Pacific Point
11. Fill in white spaces using Crumb Cake and splatter stamp from Forever Fern.

Stamp sentiment with Rich Razzelberry ink and die cut with the Tasteful Label Dies. Using another die, die a label with Vellum

Add sentiment label with Vellum label and adhere to card front over ribbon.


Mat with Rocco Rose card stock and before adhering to Pear Pizzazz card base add some ribbon near bottom.
Ribbon is Whisper White stamped with a leaf stamp and Pear Pizzazz ink.

Finish card by adding Guilded Gems.

Supplies Used
Stamps:  Blossoms and Blooms, Forever Fern
Inks: Rocco Rose, Rich Razzelberry, Blackberry Bliss, Daffodil Delight, Balmy Blue, Pacific, Point, pear Pizzazz, Old Olive, Crumb Cake
Papers: Whisper White, Rocco Rose,Vellum, Pear Pizzazz
Accessories: Stamparatus, Spritzer, Tasteful Label Dies,1/4” Whisper White ribbon,Guilded Gems

Tuesday, May 26, 2020

Bird and Branches - another catalogue sneak peak - Paper Craft Crew Challenge #377

I have a nest of Robins in the tree in my back yard and their comings and goings provide endless entertainment for myself as I garden.

The Birds and Branches bundle in the upcoming catalogue evoked memories of this, so I decided to use this bundle for the horizontal sketch challenge with the Paper Craft Crew Challenge #337.


Paper Craft Crew Horizontal Sketch Challenge PCC377

On an Early Espresso card base, layered with Calypso Coral card stock, is an embossed Whisper White layer upon which the focal image is built.  Both the Whisper White and Calypso Coral layer are die cut using the Rectangle Stitched dies.


The images are stamped on a separate piece of Whisper White, except the branches which were die cut with Mossy Meadow card stock.  They were then added to the lower left of the embossed layer as shown.


The images were stamped as follows and then die cut with the Birds and Blooms dies:
Nest:  Crumb Cake, and sponged with Soft Suede
Eggs:  Pool Party
Bird:  Crumb cake.  Breast coloured with Calypso Coral Stampin Blend, sponged with Soft Suede
Feet in Black Memento,
Sentiment:  stamped in Mossy Meadow and die cut with Tasteful Label Die.

Summary of Products Used:
Stamp:  Birds and Branches
Inks:  Soft Suede, Crumb Cake, Early Espresso, Pool Party, Calypso Coral
Papers:  Early Espresso, Calypso Coral, Whisper White, Mossy Meadow
Accessories:  Birds and More dies, Layered Leaved Embossing Folder, Tasteful Label Die, Dimensionals

Inks:  Soft Suede, Crumb Cake, Calypso Coral, Pool Party, Early Espresso