Showing posts with label Seasonal Layers Thinlets. Show all posts

Monday, November 4, 2019

Cabin in the Woods - Paper Craft Crew Challenge #357

I've always wanted a cabin in the woods, a place to escape, to regroup, or just to enjoy nature.  Thus the challenge at Paper Craft Crew Challenge this week peaked my interest.

The challenge at the Paper Craft Crew Challenge this week is a Tic Tac Toe Challenge, and after pondering the choices, I chose the column from the upper left to the lower right - found in the forest, rustic , sponging.

I chose the stamp set "Rustic Retreat"


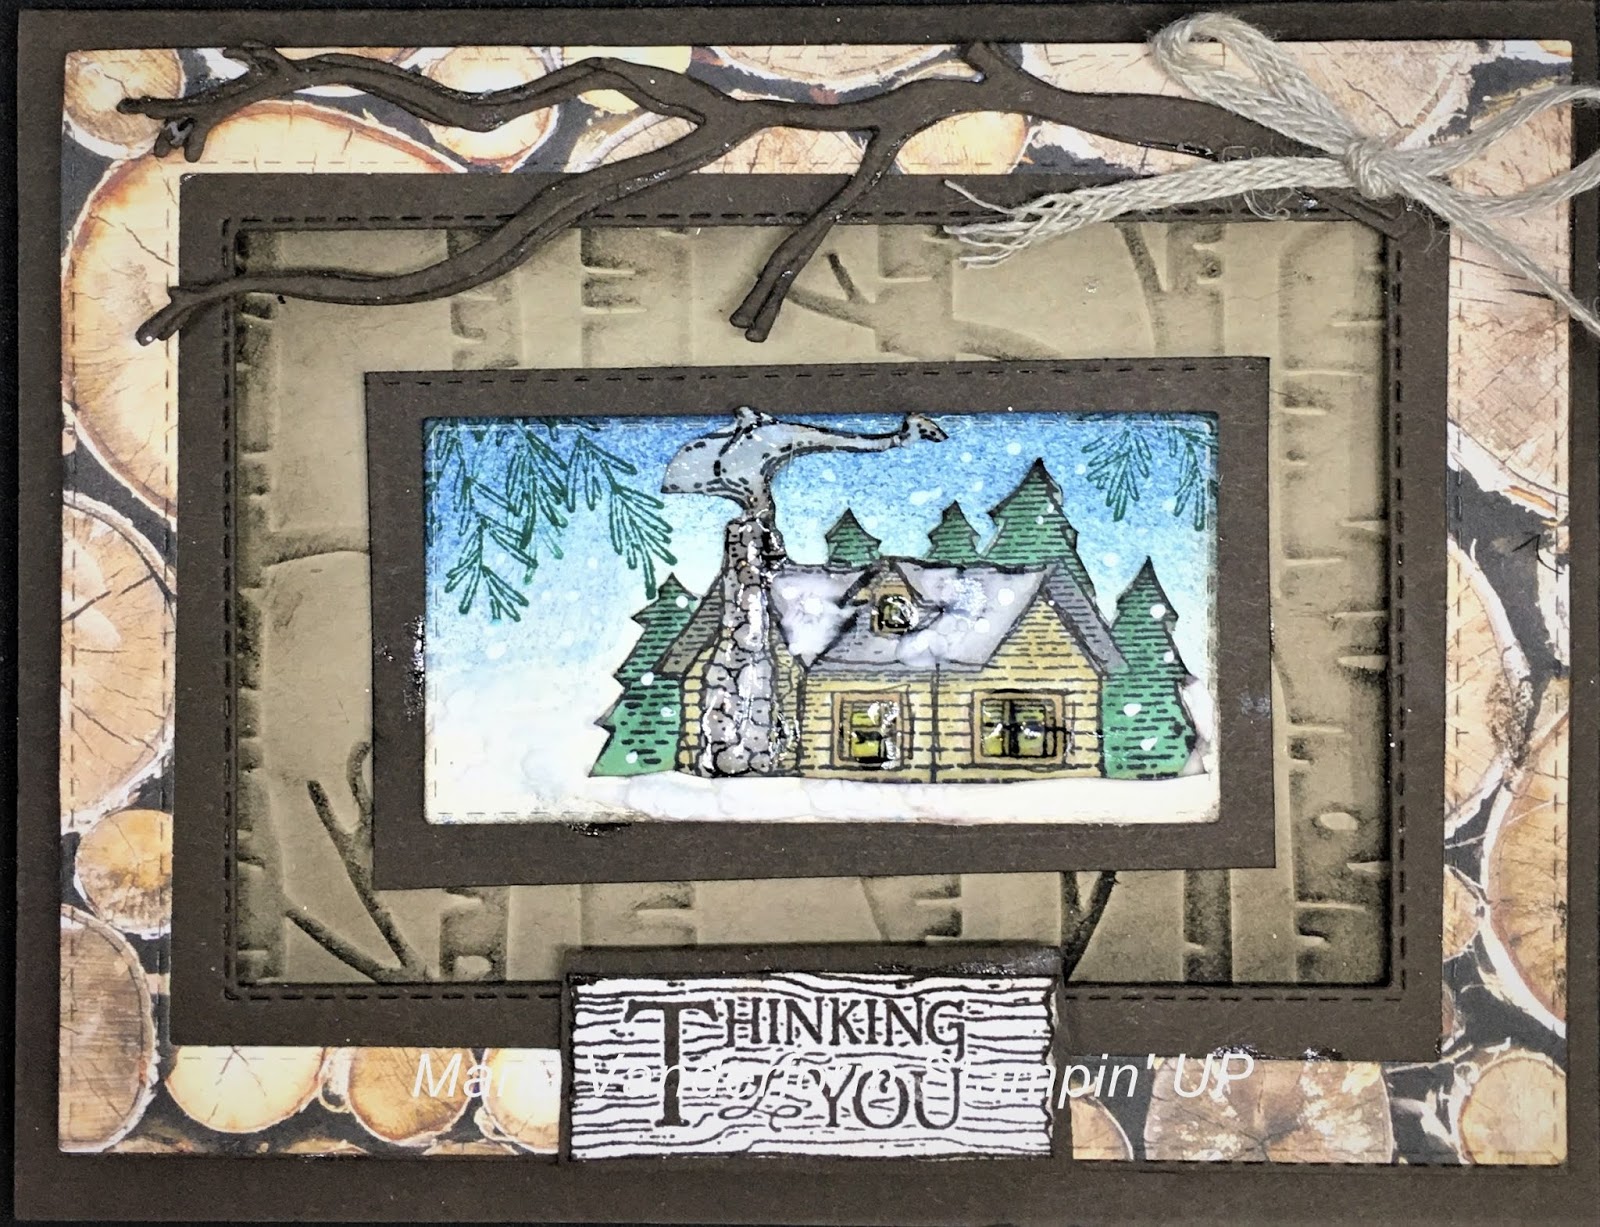
The card itself is a rustic picture frame, showing elements of items found in the forest namely branches and logs.  The frame was made using two different sizes of stitched rectangle dies and Wood Texture DSP matted with Early Espresso card stock.  This was mounted on a piece of Crumb Cake card stock using foam adhesive strips.  This crumb cake card stock was embossed with the Woodlands embossing folder and sponged lightly to enhance the impressions.


In the center of the frame a picture of a rustic cabin in the woods with smoke coming from the chimney into a sponged blue sky,  trees around it and snow on the ground. A 3 dimensional branch, die cut from a Seasonal Layer die, adorns the frame top.


A sentiment, stamped on a background that looks like a board, is attached to the bottom of the frame.

This frame is adhered to an Early Espresso card base.

Supplies Used:
Stamp:  Rustic Retreat
Inks:  Black Memento, Early Espresso,  Balmy Blue, Blueberry Bushel, Shaded Spruce, Crumb 
cake
Papers:  Early Espresso, Crumb Cake, Very Vanilla, Wood Texture DSP,
Accessories:  Woodlands embossing folder, Stitched Rectangle Dies, Seasonal Layer Die, 3/16" Braided Linen Thread, Puff Paint, Foam Adhesive Strip

Monday, February 11, 2019

Flowers on Shadow box card lid - SUO Challenges #216

Anyone who knows me know that I love flowers, and next to growing plants under lights, or  nurturing flowers in my garden, making paper flowers is the next thing.

I am submitting the flowers from this project to the "paper" challenge at SUO challenges

In class this week, participants made a shadow box card, complete with flower embellishments.  Check the post here

Because this is a 3D item I made a box to put the card in (the participants did not make this box).

The lid of the box, like the card itself have hand made flowers embellishments on the.

Below is a picture of the Shadow box card:


In the lower left corner are two flowers made using the Pop of Petals stamp set and the coordinating 4 Petal punch. The 3rd flower was made using the flower framelit from the 


Each flower was made by stampin two flowers with Black Memento ink, then coloured with Highland Heather and Gorgeous Grape ink with Mango Melody in the center.  The leaves, also from the Pop of Petals stamp set,  were coloured with Old Olive and Mossy Meadow inks using daubers.

After spritzing, drying, and shaping each flower, the two were adhered together offsetting the petals. The leaves were fussy cut and, after receiving the same treatment, were added to the back of each flower.  3D lacquer was applied to each flower to help them retain their shape and protect from handling.  While the lacquer was wet some Dazzling Diamonds was sprinkled over them.


I made the rose by die cutting 5 of the flower die from the Seasonal Layers framelits.  Again, after colouring each flower, spritzing and drying, each was shaped, with each flower shaped progressively 'tighter', with the 5th curled up the tightest (actually rolled in between my fingers).  The flowers are then adhered together  from less to most shaped, offsetting the petals.


Below is a top view of the lid of the box


Supplies Used:
Stamp:  Pop of Petals
Inks:  Highland Heather, Gorgeous Grape, Old Olive, Mossy Meadow, Mango Melody
Papers:  Whisper White
Accessories:  4 Petal Punch, 3D Lacquer, Dazzling Diamonds, Seasonal Layers Framelits, Flower shaping tools (non SU), water spritzer

Tuesday, January 29, 2019

An Easter Butterfly Shadow Frame

I found this 3 1/2" by  5 1/2" shadow box frame in the dollar store.  There were only 2 left, one bright green and one orange, and were being sold for the grand price of $1 each.  Needless to say I grabbed them up.
The first thing I did was sand them down and paint them first with a coat of white paint followed by 2 coats of black.

I made one of the two frames into an Easter shadow box.

The background is a piece of Petal Promenade DSP which I sponged with Daffodil Delight, Mango Melody, Balmy Blue , Crumb Cake and Basic Gray to create the colourful backdrop for the beautiful butterflies.

The branch looks real enough, but honestly it is made out of paper.  Five branches were die cut using Early Espresso card stock using the Seasonal layers Thinlet dies These were adhered  together to give the branch a 3D look.  The leaves were made by cutting apart a leaf punchie.  Each leaf was then folded in half to give the leaf a more realistic look.

Another branch was made for across the bottom, and 3 real chocolate Easter eggs were adhered to this.

Using the butterfly duet punch, four butterflies were punched out of the SAB Butterfly Gala DSP, and another two were fussy cut. All had their edges sponged with Basic Gray ink.  The butterflies were adhered one on top of the other and then to the background by the thorax only.  Another butterfly was punched to be placed on the outside of the frame.

I made 2 small roses to add to the outside frame underneath the butterfly.

All I had to do now was place the butterfly background into the shadow box frame----


Friday, December 1, 2017

Wrapped in the Warmth of Christmas

I like sweaters, and in my high school year book I was once called the "sweater girl".

All of my sweaters, when I was growing up, were nice ones because there was no money to buy "ugly" ones.  For years there was no money for Christmas presents let alone sweaters that one couldn't wear on a day to day basis.

To this day I don't have an "ugly" Christmas sweater and I don't intend to get one. 

I don't find any of the sweaters in the stamp set "Christmas Sweaters" that ugly! My son said that I made these sweaters look too nice!!  I guess I don't do ugly very well.

For this card I stamped a selection of sweaters and added them to a panel on the card front.

After colouring each of the sweaters with the new Stampin' Blendabilities, they were cut out and added (some with dimensionals) to a 1 3/4 by 5" panel of Whisper White card stock. I added some Dazzling Diamonds to some aspect of each sweater.


Some Silver Glimmer card stock, die cut with the scallop die from the Seasonal Layer Thinlet die, was adhered  at both the top and bottom of this strip.

The card base is Old Olive card stock which I layered with Whisper White and then Merry Wishes DSP.

Supplies Used:
Stamp:  Christmas Sweaters, Snowflake Sentiment
Inks:  Black Memento, Stampin' Blendabilities
Papers:  Old Olive, Whisper White, Be Merry DSP, Silver Glimmer, Cherry Cobbler
Accessories:  Seasonal Layers Thinlets, Dazzling Diamonds, Dimensionals

Tuesday, October 24, 2017

Creep it Real - Try Stampin' on Tuesday or Not #345

Halloween is less than 3 weeks away, so this Halloween card made for Challenge #345 at Try Stampin or Not on Tuesday is quite appropriate and was a lot of fun to make.

The sketch is by Kaylin.


The card base of Cajun Craze is layered with Spooky Night DSP.  Towards the left is a piece of Cajun Craze card stock, and the art piece is built on this.

I started by die cutting a branch in Basic Black using the Seasonal Layers Thinlet Dies. This was adhered to a Daffodil Delight moon punched using the 2 1/2" Circle Punch. The edges were sponged with Crushed Curry ink.

An owl (from Spooky Cat) was stamped on a separate piece of Whisper White, fussy cut and adhered on the moon so that it is sitting on the branch.  I stamped 3 bats (from Sweet Home stamp set) onto the moon the up the spooky factor.

At the bottom of the Cajun Craze piece I also stamped some rats (they creep me out!)

Supplies Used:
Stamps:  Creep it Real, Spooky Cat, Sweet Home
Inks:  Black Memento, Smoky Slate, Basic Gray, Crushed Curry
Papers:  Cajun Craze, Spooky Night DSP, Daffodil Delight, Very Vanilla, Whisper White
Accessories: 2 1/2" Circle Punch, Seasonal Layers Thinlets, Dimensionals.

Tuesday, September 19, 2017

Detailed Gate Christmas Card

If the Detailed Gate Thinlet die were in another section of the catalogue rather than the Halloween section would you look at it differently?
I took a hard look at this die and decide that it had a lot of possibilities, one of which was that it would make a beautiful Christmas card.

I die cut the gate is Dazzling Diamond glimmer paper, then cut the gate in the middle.
I also scored and burnished each end of the outer edges of the gate so that I could wrap the edge of the gate around the edge of the DSP.

Hint:  When die cutting the detailed gate, run it through the Big Shot using the Precision Plate multiple times, each time changing the position of the die, rotating it from left to right etc.  Look at the back of the piece you are cutting to make sure everything has been die cut.
After it has been cut to your satisfaction, using the brush and foam pad poking only the stubborn remaining bits.

Tear and tape adhesive was used on the burnished edges to adhere them to the back of the Christmas Around the World DSP. The gate and DSP were then adhered to a Whisper white card stock base.
A piece of 1/8" silver ribbon was attached to the left gate,  slit made in the fold of the card base, and the ribbon inserted through that , wrapped around the back and brought to the front where it was tied into a bow.
The sentiment was White embossed on Soft Sky card stock, punched with the Every Day Label Punch and matted with Dazzling Diamond Glimmer Paper. It was added to the gate front with glue dots, and to prevent this from sticking to the card front, I added a punched Whisper white piece and adhered it to the backside of the gate. An identical size label punch was adhered to the DSP right
 behind the front sentiment.


Two snowflakes die cut with the Layering Seasonal Framelits were added to the side of the sentiment and the top of the DSP


Supplies Used:
Stamp:  Snowflake Sentiments
Inks:  Versa Mark
Papers:  Thick Whisper White, Dazzling Diamonds Glimmer Paper, Christmas Around the World DSP
Accessories:  Detailed Gate Thinlet Die, Seasonal Layers Thinlet Dies, 1/8" silver taffeta ribbon, Every Day Label Punch

Wednesday, September 6, 2017

Seasonal Lantern Autumn Greetings

I love this stamp set and coordinating framelit because of its versatility. The word "Seasonal" says it all as it can be used for fall and Christmas.
For today's card, the focus is Autumn.

First of all I die cut a large "Lots of Labels" framelit in Very Vanilla card stock to become the basis for the art piece.  The Lantern was built on that.

After die cutting the lantern in Basic Black card stock, and hanging it from a branch I die cut using the Seasonal Layers Thinlets, I added a candle and 3 gourds to the inside. and a bow, two pine cones and 2 branches on the bottom, each of which were double stamped (with the exception of the leaves)

Some non SU glass beads were applied to the lantern top.

Because the sentiment is rather long, I cut it into 2 words, matted them with Chocolate Chip card stock, and adhered them side ways on each side of the lantern.

Clear Wink of Stella was applied to all of the main elements.

The base is Early Espresso card stock, layered with Very Vanilla card stock and then 2 patterns of the Painted Autumn DSP.  Some Burlap ribbon was placed over the seam of the 2 patterns.

The art piece was added to the card front using dimensionals.

Supplies Used:
Stamp:  Seasonal Lantern
Inks:  
Candle - Daffodil Delight, Crushed Curry, Pumpkin Pie
Gourds - Pumpkin Pie, Tangerine Tangelo, Old Olive marker
Bow - Crumb Cake, Pumpkin Pie
Pine Cones - Crumb Cake, Soft Suede
Sentiment - Pumpkin Pie
Papers:  Early Espresso, Very Vanilla, Basic Black, Whisper White, Garden Green, Chocolate Chip, Painted Autumn DSP
Accessories:  Layering Season Framelits, Lantern Builder Framelits, Burlap ribbon, Dimensionals, Clear Wink of Stella, glass beads (non SU). Lots of Labels Framelits.

Wednesday, August 30, 2017

Elegant Thinking of You

This card is a more elegant version of the card I made yesterday, where I embossed and bleached the image from "Count Your Blessings".  The combination of Very Vanilla, gold and a touch of green makes this card "elegant".

I apologize for the weird colors.  Shiny foil paper does not photograph very well.

The base card is Wild Wasabi card stock, layered with Very Vanilla embossed with the Layering Leaf embossing folder.

In the center is a strip of Painted Autumn Specialty DSP with gold foil scallops (die cut using the Layering Seasons Framelits) on both sides.

The art piece image in the upper circle was initially stamped and coloured with water colour crayons and an Aqua painter. It was die cut with layering circles framelits, and layered with a slightly larger gold foil circle. 

I stamped the image a second time and embossed it with gold embossing powder.  After colouring it with water colour pencils, it was fussy cut and layered over the original image using dimensionals.  Some 1/8" gold taffeta ribbon was tied into a bow and added to the stem with a glue dot.


I gold embossed the sentiment, die cutting it with layering oval framelits and matting the oval with a gold foil scallop paper.

Supplies Used:
Stamp:  Count Your Blessings
Inks:  Versa Mark, Soft Suede, Water Color Pencils
Papers:  Wild Wasabi, Very Vanilla, Painted Autumn Specialty DSP, Gold Foil
Accessories:  Seasonal Layer Framelits, Layering Circle Framelits, Layering Oval Framelits, 1/8" gold taffeta ribbon, Gold embossing powder, Dimensionals, Layering Leaves Embossing Powder

Sunday, August 13, 2017

Climbing Orchid Swap cards

These are my 3 swap cards with my Yahoo group. I elected to use the Climbing Orchid stamp set with its coordinating Orchid Builder framelits seeing as the focus was to be on using dies/punches on our cards.

As an extra feature I added an Embossing Paste background using the Brick Decorative Mask.  The embossing paste was coloured with Tangerine Tango re-inker.


Supplies Used:
Stamps:  Climbing Orchids
Inks:  Berry Burst, Lemon Lime Twist, Rich Razzelberry, Garden Green, Black Memento, Tangerine Tango re-inker
Papers:  Whisper White, Berry Burst, Garden Green, Chocolate Chip
Accessories:  Embossing Paste, Brick Wall Decorate Mask, Seasonal Layers Framelits, Orchid Building Framelits, Metallic Enamel Shapes, Nuvo Glitter Drops (non SU), Dimensionals

Saturday, May 20, 2017

Life is a Beautiful Thing

In less than 2 weeks the new catalogue officially launches.  Have you made a list  yet  from the sneak peak products revealed so far?

For this card I wanted to highlight the stamp set "Colorful Seasons" and its coordinating die set "Layering Seasons Framelits".  To do so I brought in an oldie but goodie "High Tide" to help me out.


I spent many a happy hour on an Adirondack chair watching sunsets/sunrises over Georgian Bay or Lake Simcoe, both favourite summer vacations spots of mine.

Against the background of the colorful sponged sky I placed 2 die cut Adirondack chairs - on sand banks created thanks to High Tide

Supplies Used
Stamps Colorful Seasons, High Tides
Inks: Basic Gray, Crumb Cake, Old Olive, Marina Mist, Melon Mambo, Daffodil Delight, Pacific Point
Papers: Whisper White, Crumb Cake,
Accessories: Seasonal Layers Thinlets


Friday, May 19, 2017

Watercolor Sunset - Fab Friday # 112 & SUO challenge #174

I have always loved the colors in sunsets  Nature has such a wonderful color palate!

For this card I combined 2 challenges - the colors of the Fab Friday challenge - Rich Razzelberry, Calypso Coral and Pacific Point with the watercoloring technique with  SUO Challenges. 

I used 2 different water coloring techniques - the first using a wash to create the sunset; the second a stamped image to create blended colors for the die cuts. Both use water color paper.


Creating the butterfly and flowers:

1.  On a piece of watercolor paper I used the large blotch stamp  from the "Happy Celebrations" to stamp the 3 colors, as shown below.


2. The stamped images were spritzed generously with water allowing the colors to run and blend together
3.  After drying with the heat tool. the butterfly image and 6 flowers (from Seasonal Layer thinlets) were die cut.


The Butterfly Thinlet was die cut in Pacific Point card stock and adhered to the die cut Butterfly framelit die cut (in the middle only).  Some pearls were placed on the body of the butterfly.


Watercolor Background: 

Water was applied to the surface of a piece of  White Shimmer paper.  Each color was then applied in a wash one color at a time.  An Aqua painter can be used, but I used a wide brush.


The watercolor background was cut to 3 3/4 by 5". embossed with the gently falling embossing folder,and then scored 1/2" all the way around. It was matted with Whisper White and then mounted on a Calypso Coral card base.

Completing the Card
 
After placing the butterfly on this piece I realized I needed something else on the card.  So, I die cut a tree branch with Rich Razzelberry card stock (Seasonal Layer Thinlets), adhered it to the card front and clustered the die cut flowers around it.

The sentiment is from Colorful Seasons.

Supplies Used:
Stamp:  Colorful Season, Happy Celebration
Inks:  Calypso Coral, Rich Razzelberry, Pacific Point
Papers: Calypso Coral, Shimmer White, Watercolor Paper, Pacific Point, Rich Razzelberry
Accessories:  Pearls, Gently Falling Embossing Folder, Seasonal Layer Thinlets, Bold Butterfly framelits, Butterfly thinlets, classic Label punch, dimensionals, Home made shimmer mist.

Thursday, May 18, 2017

A quick birthday with Birthday Framelits - a catalogue sneak peak

Sometimes we just need a quick birthday card, and this is the perfect solution.


Die cut the "Happy Birthday"  sentiment in the color of your choosing - adhere it a piece of "Color Theory" DSP - a bit of decoration and you're done!

The flowers were die cut with another new catalogue product, the "Seasonal Layers Thinlets". and a  similar color glitter enamelit (also new) was placed in their centers

The strip at the bottom was punched with the new ticket tear punch.


Supplies Used:
Papers: Berry Burst card stock, Whisper White, Color Theory DSP
Accessories: Happy Birthday Thinlet, Seasonal Layers Thinlets, Glitter Enamelit, Ticket Tear Punch