Showing posts with label Winter Woods. Show all posts

Wednesday, October 21, 2020

Nature's Beauty - Snow Bunny

 This is the second card I made using the bunny from the Nature's Beauty stamp set. This time I paired the bunny with the Winter Wonder stamp set and the Stitched  Nesting Dies Label Dies


All the stamping is done on Crumb Card card stock And the white colouring on the bunny and birch  trees is done with a white deco pen as my white gel pen had dried up

The birch trees were stamped using tab stamping on the stamparatus. 

The bunny and twigs were stamped onto a nesting label die cut. The bunny was coloured white , Puffs of snow were added to the twigs and snowflakes added to the sky.

 The die cut has a double stitched edge. The outer stitched edge was cut away so that another same size die cut in dazzling glimmer paper could peek out along the edges.

This was added to a piece of Crumb Cake cardstock stamped all along the long side with birch trees. The stamp used is from Winter Woods. The stamp has 3 tree stems on it so I used the Stamparatus to help with the even spacing. Again the white deco pen was used to add the white birch markings. Then I used the fine tip pen to add tiny snow markings between the trees.

Dimensionals were used to add this to the DSP layered onto a Crumb Cake cardstock base


Supplies Used:

Stamps:  Nature’s Beauty, Winter Woods. Itty bitty Greetings

Inks: Black Memento, White Deco pen

Papers: Crumb Cake, Dazzling Diamond glimmer paper, In Good Taste DSP

Accessories:  Stitched Nesting Label Dies, Dimensionals


Saturday, September 21, 2019

Northern Light Technique with Winter Woods

In my previous post I used the Northern Light technique with the Snow Front Stamp set

For this card, I also created a Northern Light background, but using the row of trees from the Winter Woods stamp set.


Before starting on the sky, I masked off the snowy foreground using copy paper.

For the sky, I used the same colours as before, but instead of swiping, I created patches of colour. Instead of stars, using white acrylic paint and the end of a paint brush, I placed fluffy snow flakes in the sky.

The shadows of the snowbanks were created using both Dark and Light Seaside Spray and light Smokey Slate

The sentiment, from "Itty Bitty Christmas" is matted with Night of Navy and adhered just below the trees.

Snow has to sparkle, so I added Dazzling Diamonds to all the white areas, then spitzed the entire art piece with my homemade spritz (made with Shimmer Paint and alcohol).

On a Night of Navy card base, I added a frame of Sparkle Glimmer Paper which was made using the largest of the Stitched Rectangle Die with  third largest of the dies, thus cutting out the center and making the frame.  This saves on paper and the center rectangle can be used for another project.  The art piece was die cut with the second largest Stitched Rectangle die and then adhered to the card front with the edges slightly overlapping the Sparkle Glimmer frame.


Supplies Used:
Stamps:  Winter Woods, Itty Bitty Christmas
Inks:  Black Memento, Daffodil Delight, Old Olive, Rich Razzelberry, Night of Navy, Seaside Spray Smokey Slate
Papers:  Night of Navy, Whisper White
Accessories:  Stitched Rectangle Dies, Dazzling Diamonds

Sunday, November 25, 2018

A Wintery Thank You - Hand Stamped Sentiments #303

The challenge at Hand Stamped Sentiments #303 is an Inspirational one.  And, since I am finished making my Christmas cards, I thought I would make a Thank you card.


The base card is Mossy Meadow, and the art piece was built on a 3 3/4 by 5" piece of Whisper White card stock.

I used the large tree stamp from "Winter Woods", stamping it with Mossy Meadow ink, and then stamping it and second and third time without inking up again.  On the ground below the trees I added some dazzling diamonds.

The bird was stamped and coloured with Stampin' Blends (Calypso Coral, Crumb Cake, Daffodil Delight) on a separate piece of Whisper White card stock, then fussy cut and mounted , using dimensionals, on a die cut circle  embossed with the Layered Leaf embossing folder.  I added a tiny pearl to emphasize the eye of the bird. This circle was matted with Lucky Limeade card stock using dimensionals and added to the card front.


Three Holly and Ivy images were stamped from "Spirited Snowmen", colored with Stampin' Blends, then fussy cut and added above and below the bird.


The sentiment is from "All Things Thanks"

Supplies Used:
Stamps:  All Things Thanks, Winter Woods, Bird by Stacey Stamps, Spirited Snowmen
Inks:  Black Memento, Stampin Blends:  Bird:  Calypso Coral (light and dark), Crumb Cake (light), Basic Black marker;   Holly and Ivy:  Granny Apple Green (light and dark), Cherry Cobbler (light and dark), Mossy Meadow
Papers:  Mossy Meadow, Whisper White, Lucky Limeade
Accessories:  Layering Circle Framelits, Dazzling Diamonds, Red Glitter, Layering Petals Embossing Folder, Small Pearl

Saturday, October 6, 2018

Winter Woods Meets Sheltering Trees

Ah! Two of my favourite trees finally meet.  I suppose it was only a matter of time.

  • On a panel of Whisper White I covered the entire surface with  Balmy Blue and Gorgeous Grape ink 
  • Then using Early Espresso ink, I stamped the trees from Winter Woods twice side by side.
  • Using the "leaf stamp" from Sheltering Tree I first stamped with Crushed Curry, then rotated the stamp and stamped with Pumpkin Pie and finally another rotation and Cajun Craze ink.
  • The panel was matted with Crushed Curry card stock and added to a Thick Whisper White card stock base.
  • The sentiment, from Sheltering Tree, was stamped using Early Espresso ink just below the panel.
Supplies Used:
Stamps:  Winter Woods, Sheltering Tree
Inks:  Early Espresso, Crushed Curry, Pumpkin Pie, Cajun Craze, Balmy Blue, Gorgeous Grape
Papers:  Thick Whisper White, Whisper White, Crushed Curry
Accessories:  Brayer

Winter Woods and Joseph's Coat technique - a case

I remember doing this technique for the first time when I went to a Demonstrator training session a number of years ago.  I loved  it then an I love it now.  I had forgotten about it until I saw a card made by.Kristi


On a Thick Very Vanilla card base I layered a 4 by 5 1/4" piece of Very Vanilla embossed with the Pinewood planks embossing folder.

The art piece consists of a 3 by 3 1/8" piece of Very Vanilla card stock matted with Pumpkin Pie (4 1/8 by 3 1/4")

On the art piece do the technique in the following way:
  • with a sponge for each color of Pumpkin Pie, Cajun Craze and Daffodil Delight, apply each color randomly over the entire surface of the Very Vanilla art piece.  This is done as smoothly as possible without leaving any streak marks.
  • using Versa Mark, stamp the image of the trees from Winter Woods and emboss with clear embossing powder.
  • then sponge Early Espresso ink generously over the entire art piece
  • once done wipe the area with a paper towel to remove the ink over the embossed trees to reveal the brilliant Autumn colors (emboss resist).
  • mat the art piece with Pumpkin Pie card stock, wrap some braided twine  around the lower part and add it to the card front.
  • use an Early Espresso and Pumpkin pie markers color the sentiment from "Country Home" and add to the card front using dimensionals.
  • Stamp two leaves from "Colorful Seasons" - one in Daffodil Delight and one in Pumpkin Pie.  Die cut using the coordinating framelits and add to the left end of the sentiment strip.  Make a bow with the  braided twine and add to stems of leaves.    


Supplies Used:
Stamps:  Winter Woods, Country Home, Colorful Seasons
Inks:  Daffodil Delight, Cajun Craze, Pumpkin Pie, Early Espresso, Versa Mark, SU markers (Early Espresso, Cajun Craze)
Papers:  Thick Very Vanilla, Very Vanilla, Pumpkin Pie
Accessories:  Plank embossing folder, Clear embossing powder,  Colorful Seasons coordinating      framelits, Dimensionals, Braided twine


Friday, October 5, 2018

Winter Woods Pop & Twist Card

Winter Woods is such a versatile stamp set and today I used the stamp set with its coordinating framelits in a pop and twist card.

I had previously made all the components of this interactive card just waiting for an inspiration to finish it.  Today I finished it.

The Pop &Twist card is made using Garden Green card stock  All the DSP used is the Warmth & Cheer DSP, now retired.

The card front depicts a 2 layer dimensional tree against a plaid DSP.  The sentiment "Merry" is from the Merry Christmas Framelits  and is die cut using the Sparkle glimmer paper.

The card is kept closed using  a 1" Garden Green band, which is wrapped around the card and kept closed with tiny magnets.  This embellishment on the  front consists  of a 1 3/4" scallop circle layered with  a 1 1/2" glimmer paper circle and a 1 1/4" circle with the sentiment "Peace" stamped on it.  Some green rhinestones adds a bit of bling.

Opening the card reveals 4  pop up panels.

At the top is another Whisper White tree with a branch next to it. This image as do other images stand on snow in the form of Sparkle glimmer paper; at the bottom a large oval for the sentiment .

Some Frost White shimmer paint was lightly daubed over the trees and  directly onto the DSP.

On the two end panels I add a leafless tree die cut in Whisper White; the middle two I stamp the image of the birch trees multiple times with Crumb Cake on Whisper White.  For the left one I white emboss a sentiment on Garden Green and die cut it with the frame framelits found in the Merry Christmas framelit set.


On the other panel I adhere a wreath made with the single pine branch and a template using the Stamparatus.  After it was finished I die cut it using a circle framelit, added some real red berries with a marker, and added "Joy" in the middle with a strip notched at both ends.

The magic of this card is in the opening and closing.

Supplies Used:
Stamps:  Winter Woods, Holly Jolly Greetings (retired)
Inks:  Garden Green, Versa Mark, Real Red SU Marker, Crumb Cake
Papers:  Garden Green, Whisper White, Sparkle shimmer paper, Warmth & Cheer DSP (retired)
Accessories:  Merry Christmas Framelits, In the Woods Framelits, Frost White Shimmer paint, White embossing powder, Stamparatus, Circle framelits, Layering Oval Framelits, Dimensionals, punches (1 3/4" scallop circle, 1 1/2 and 1 1/4" circle)


Friday, September 28, 2018

A Snowy Forest Background - with lights

For the last couple of weeks I have been challenging myself with lights!

Yes, lights!  On cards, in shadow boxes, wherever!  You've probably seen a couple of shadow boxes I have made.

Today I made a card that lights up.

Using the tree stamp from Winter Woods, I stamped one tree using Mossy Meadow ink on a separate piece of Shimmer White and without reinking the stamp I stamped 2 more trees on a 4 by 5 1/4" piece of Shimmer White - the card front. The first tree was die cut , and using a sponge I dabbed Frosty White shimmer paint lightly over the tree as well as on the other two trees.  When dry it was added to the card front using dimensionals. Using a 1/8" hand held punch, I punched a hole at the top of the tree and covered it on the back with some vellum and on the front with an acrylic star.  This is where the light will shine through.


The sentiment was embossed in gold.

Using square framelits a 4 by 5 1/4" piece of  gold foil was made into a frame and then added to the card front.

Behind the card front, in a raised bed lies the battery operated single light operated by a press switch (see "press here" on the card front).

When this switch is pressed, the card lights up and it looks like there's a blizzard happening!


This layer is adhered to a top folding Thick Whisper White card stock base.

Supplies Used:
Stamps:  Winter Woods
Inks:  Mossy Meadow, Versa Mark
Papers:  Thick Whisper White card stock, Shimmer card stock, Gold foil, Vellum
Accessories:  Gold embossing powder, Frost White Shimmer paint, 1/8" hand held punch, Acrylic star, In the Woods Framelits, lights (battery operated), Square framelits

Saturday, September 22, 2018

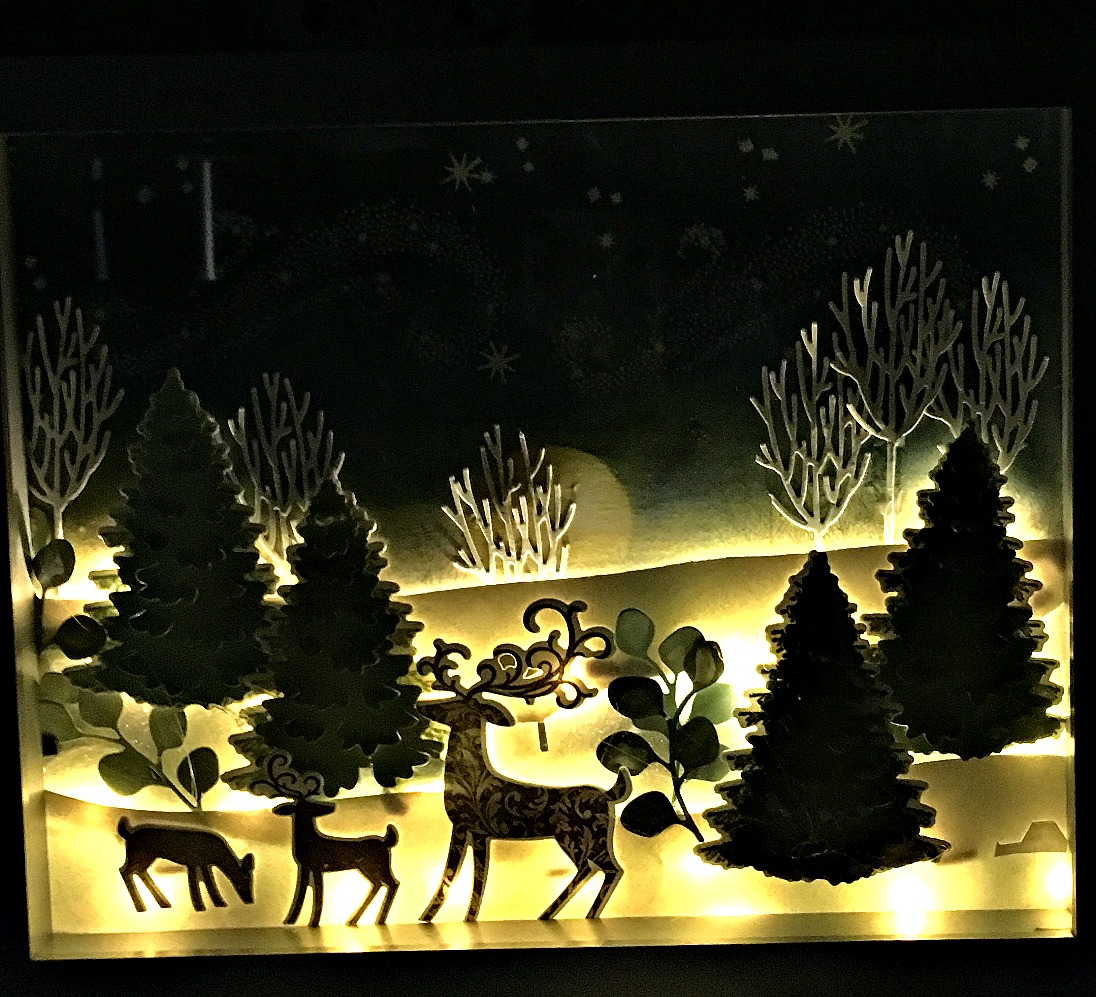
Winter Woods & Dashing Deer Lighted Shadow Box

This 8 by 10" lighted shadow box was an idea that was brewing in the back of my mind for quite some time. Today I made one after an extensive search for the battery operated string lights which I put in a "safe place".

As I mentioned, this is a metallic rimmed 8 by 10 shadow box which I purchased on sale at a competitor's store at the end of last season.  I somehow knew I was going to make a lighted shadow box even then.

Here's what the finished product looks like from the side:

\

And from the front:
Supplies Used:
Stamps:  Winter Woods, Star Light, Dashing Deer
Inks:  Sky:  Balmy Blue, Pacific Point, Night of Navy, Daffodil Delight, Petal Pink
          Trees and Leaf Clusters:  Mint Macaron, Pear Pizzazz, Old Olive, Mossy Meadow
          Deer:  Soft Suede
          Moon:  Daffodil Delight, Crushed Curry
Papers:  Shimmer White, Whisper White, Mint Macaron, Pear Pizzazz, Old Olive, Mossy Meadow,            Sparkle glimmer paper
Accessories:  White embossing powder, 1 1/4" circle punch (mask for moon), In the Woods                           Framelits, Dashing Deer Framelits, string of mini lights with battery, 8 by 10" shadow box                   frame, dimensionals, hot glue. Frost White Shimmer Paint


Here's what the shadow box looks like lit up:


Shimmery Trees and Joyeus Noel DSP - a case

I used the Frosty White sShimmer paint to create a shimmery Christmas card, one that I saw in this month's Stampin' Success (see below)


I did make a few changes as you can see in the above picture from the Success Magazine.   Instead of Pacific Point ink, I used  Balmy  Blue reinker and by varying the mixture of Frost White Shimmer paint and reinker I was able to get the ombre effect on the sentiment (from Merry Christmas thinlets). The paint was applied using an Aqua painter and when dry the sentiment was adhered to a piece of Vellum over the DSP.


The leaves were die cut from "Rooted from Nature".  Frost White Shimmer paint was added to the leaves with a sponge.  I also added some paint to the die cut tree.

The tree was added to the Joyous Noel DSP banner and the two leaf clusters above and below the Vellum over lay.


Supplies Used:
Stamp:  
Ink: Balmy Blue Reinker
Papers: Balmy Blue, Whisper White, Mossy Meadow, Joyous Noel DSP, Vellum
Accessories:  Frost White Shimmer Paint, Aqua painter,  ribbon, dimensionals, Merry Christmas Thinlet dies. Nature's Roots Thinlets

Friday, September 21, 2018

Winter Woods and All is Bright - a case

I cased this from a card I saw on Pinterest, but I made a few alterations.  I'm making as many cards as I can using the Winter Woods and coordinating framelits for a project for my Open House on Oct. 13.  That deadline looms closer and closer every day.

The base card is Thick Very Vanilla card stock layered with Gold Foil paper and then a layer of All is Bright DSP.

The tree is stamped with Mossy Meadow ink and die cut using the "In the Woods" framelits.  It is adhered to a Very Vanilla scalloped oval layered with a Gold Foil oval.  This is adhered to the center of the card front.


The sentiment, die cut twice - once with Very Vanilla and once with Gold foil- are adhered together slightly off set from each other,  It is adhered across the oval art piece with a gold embossed sentiment adhered underneath it.

Supplies Used:
Stamp:  Winter Woods
Inks:  Mossy Meadow, Versa Mark
Papers:  Thick Very Vanilla, Very Vanilla, Gold Foil, All is Bright DSP
Accessories:  In the Woods Framelits, Scallop Oval Franelits, Layering Oval Framelits, Merry Christmas Thinlets, Gold Embossing Powder.

Tuesday, September 11, 2018

Merry Christmas in Winter Woods - Stamp, Ink, Paper Challenge #167

This is my first time entering a challenge at Stamp, Ink, Paper.

The challenge this week is to use a large sentiment on my card.  Since I was making cards using the Winter Woods stamp set for a display board for my Open House, I used this card and added one of the new Merry Christmas Thinlet dies on it.


I used the color layering technique to color the trees and I just love the effect.  To do this the Stamparatus is required, as well as a number of different colors of green and brown SU markers. Thanks to Patty Bennett for showing me this technique.


Once the trees were colored, I die cut the word "Merry" from the Christmas Thinlet die collection in gold foil paper and adhered it over top of the trees.  The smaller word "Christmas" is from "Holly Jolly Greetings".  It was gold embossed  and  die cut using a framelit included with the Merry Christmas thinlets.


This 3 3/4 by 5" Whisper White art piece was adhered to a 4 by 5 1/4" piece of Gold Foil card stock, and then added to a Mossy Meadow base.

Supplies Used:
Stamps:  Winter Woods, Holly Jolly Greetings
Inks:  SU Markers:  Mint Macaron, Pear Pizzazz, Old Olive, Mossy Meadow, Cajun Craze, Soft Suede, Early Espresso, Versa Mark
Papers:  Mossy Meadow, Gold Foil, Whisper White
Accessories:  Stamparatus, Merry Christmas Thinlet dies, Gold Embossing Powder

Monday, September 10, 2018

Happiest Christmas Wishes

A number of my customers have asked me "what do you do with the stamp with the Birch trees on them?" from the Winter Woods stamp set?
So I made a card showing one way to use this stamp.


I started with a card base of Night of Navy card stock, layering it with Silver Foil card stock and then the art piece upon the scene is built.

On a piece of 2 by 3 1/2" piece of Night of Navy card stock, I stamped the image of the birch trees twice with Versa Mark and embossed them with White embossing powder.
Then I die cut two leafless trees with Whisper White card stock and adhered them in front of the birch trees.


Before adding the glitter texture paste I stamped the small deer from "Dashing Deer"in Night of Navy ink, embossed it with clear embossing powder, and then die cut it using the coordinating framelit. Using Smoky Slate ink I stamped the "shadow" and then adhered the die cut deer on the card front above the shadow.
Glitter texture paste, to mimic snow, was then added to the base of the birch trees extending to the ground underneath the deer and to the other end of the card.

The sentiment, from "Versatile Christmas" was stamped with Versa Mark and Night of Navy inks on Whisper White card stock, and embossed with Clear embossing powder.  This piece was matted with Night of Navy card stock and added to the card front above the deer.

Supplies Used:
Stamps:  Winter Woods, Dashing Deer, Versatile Christmas
Inks:  Night of Navy, Versa Mark
Papers:  Night of Navy, Silver Foil, Whisper White, Night of Navy
Accessories:  In the Woods Framelits, Detailed Deer Thinlets, Clear Embossing Powder, White Embossing Powder, Glitter Texture Paste

Winter Woods in Vanilla and Gold - a case

There are a number of examples of this card design, using the Winter Woods stamp set and coordinating framelits, on Pinterest - some made using gold foil, some using silver foil. Personally, I find Vanilla and Gold an elegant combination and I'd like to thank Mary Fish for her lovely card, which I was able to case thanks to her wonderful tutorial.

Thick Very Vanilla card stock was used as the card base upon which I placed a layer of Gold card stock. In the center I adhered a smaller piece of regular weight Very Vanilla card stock, upon which  the rest of the card is built.

Two trees were die cut in Very Vanilla, using the coordinating framelits.  The second tree is slightly smaller and has 3D branches on it.  Once die cut I used a stylus to curl these branches out a bit.
After adhering the two trees together (next time I would use mini dimensionals) I applied clear Wink of Stella around the edges of the larger tree as well as the 3D branches of the smaller tree.


The sentiment was gold embossed and attached to the underside of the tree with a couple of dimensionals.

Using the curved die strip, I shaped a piece of Very Vanilla card stock which I had embossed with the Gently Falling embossing folder.  This was adhered to some Vellum, which was added to some Very Vanilla card stock cut slightly larger than the Very Vanilla card stock.

I tied a 3/8" gold edged ribbon around the Very Vanilla, & Vellum and tied it in a bow at the right edge.

Dimensionals were used to add the tree to the card front and the card is done.

Supplies Used:
Stamp:  Winter Wood
Ink: Versa Mark
Papers:  Thick Very Vanilla, Very Vanilla, Gold Foil, Vellum
Accessories:  3/8" gold edged ribbon, Gently Falling embossing folder, In the Woods Framelits, Clear Wink of Stella, Gold embossing powder, dimensionals.


Monday, September 3, 2018

Joy and Peace - Spirited Snowman meets Winter Woods

I hate the thought of winter coming, yet I would be happy to say good bye to the relentless heat and humidity of this past summer.  Weather forecasters predict a very cold winter and lots of snow- starting in November and not letting up until March.

Which means that this card will soon depict some sort of reality.


Doesn't the snowman look happy?  Like he's almost dancing.

He was stamped and colored with blends on a separate piece of Whisper White, then fussy cut and placed against this backdrop of winter trees.


The trees, from "Winter Woods, was stamped in various ink strengths with Shaded Spruce ink.  Two other trees were stamped on a separate piece of  Whisper White card stock and die cut with the "In the Woods Framelit".  One I left the same size; the other I made smaller by cutting it  off 1/3 from the bottom.

I added the larger tree with dimensionals against the backdrop of the other trees.  To mimic snow I added some glitter texture paste and let it dry before adding the smaller tree more to the front.
The snowman was added, again with dimensionals, in front of both trees.  He appears to be holding the sign "Joy & love".


Using Pool Party ink, I stamped snowflakes in the sky above the trees.  Dazzling diamonds was applied to the snowflakes.


Supplies Used:
Stamps:  Winter Woods, Spirited Snowman
Inks:  Shaded Wood, Pool Party, Black Memento, Stampin' Blends (Pumpkin Pie, Cherry Cobbler, Granny Apple Green, Crumb Cake, Smoky Slate )
Papers:  Shaded Spruce, Whisper White
Accessories:  In the Woods Framelits, Glitter texture paste, dimensionals, Dazzling Diamonds

Saturday, August 25, 2018

'Tis the Season

Another day, and another card made with the Winter Woods stamp set.

For this card I stamped 3 of the larger tree stamp on Whisper White using Mossy Meadow ink.  Then I die cut using the coordinating framelits.

These die cut trees are adhered to a prepared background made by sponging Pool Party, Balmy Blue, Pacific Point, and Night of Navy.  Some white acrylic paint was added using the end of a paint brush to simulate snowflakes.

Some Sparkle glimmer paper was cut into layers and adhered under the trees to simulate snow banks and thick white Baker's twine was wrapped around the bottom and tied into a bow.

Supplies Used:
Stamp:  Winter Wood
Inks:  Mossy Meadow, Pool Party, Balmy Blue, Pacific Point, and Night of Navy
Papers:  Night of Navy, Whisper White, Sparkle glimmer
Accessories:  Winter Wood Franelits, Whisper White thick Baker's Twine, Dazzling Diamonds, white acrylic paint (non SU)

Thursday, August 23, 2018

Winter Woods

The minute I saw this stamp set in the Holiday catalogue I knew I had to have it.
It arrived yesterday - so guess what I've been doing today?  Yes, playing with this and other Christmas stamps.


The five trees were stamped with Shaded Spruce ink onto a 3 1/2 by 3 1/4" piece of Whisper White card stock.  Using one of the dies from "In The Woods Framelit Dies" (long curved die) I cut a sloped piece of Sparkling glimmer paper and added it below the trees.

This piece was matted with 3 3/4 by 3 3 1/2" piece of Shaded Spruce card stock.

The card base consists of a piece of  Thick Whisper White card stock.  On the front of the card I stamped two images of the 5 tress side by side - again using Shaded Spruce ink. The stamparatus was helpful in lining the trees up.

The image piece was adhered to the card front over these stamped trees, using dimensionals.

For the sentiment I used only one portion of the sentiment that comes with the stamp set.  I punched it out with the Classic Label punch, matting it with Shaded Spruce as well.

Supplies Used:
Stamp:  Winter Woods
Ink:  Shaded Spruce
Papers:  Shaded Spruce, Whisper White (thick), Whisper White, Sparkle glimmer paper
Accessories:  In the Woods Framelit dies, Dimensionals, Stamparatus