Showing posts with label Autumn. Show all posts

Saturday, September 30, 2023

Slimline Pumpkin Thanksgiving Card - Hand Stamped Sentiments #423

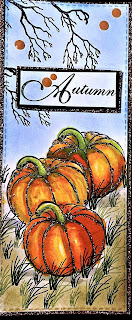
 The challenge at Hand Stamped sentiments #423 is a theme challenge. I decided to make a slimline card featuring pumpkins.


I used the Pretty Pumpkins stamp set as well as Nature Prints.  Dies used include:  Detailed pumpkin dies, Vine slimline die, Stylish Shape Dies.  For papers I used Very Vanilla, Mossy Meadow, All About Autumn (wood grain for under pumpkins). Underneath the pumpkins I added leaves die cut using Autumn Leaves dies.  I used the copper oxidized paper.


Monday, September 25, 2023

Fractured Card Technique, aka Faux Shutter Technique a Tutorial

 This technique is a simple and fun technique that I used to show case one of the patterns of the All About Autumn DSP.


Supplies:
Stamp:  Autumn Leaves
Inks:  Pebble Path, Versa Mark
Papers:
  • Thick Very Vanilla 5 1/2 by 8 1/2" Scored at 4 14 to form an A2 card base
  • 1 piece of All About Autumn DSP 4 by 5 1/4"
  • 4 strips of Pebbled Path Cardstock 1/4 by 6"
  • Very Vanilla square 2 by 2"
  • Scrap of Very Vanilla cardstock for sentiment
  • Scrap of Copper Clay cardstock for mat for sentiment
  • 1 die cut leaf, and 1 paired leaf die.  Die cut veins using  Oxidized Copper DSP.  Sponge edges with Pebbled Path ink
Accessories:
  • Autumn Leaf dies
  • Copper embossing powder
  • Copper & Natural Ribbon Combo pack
  • Adhesive backed speckled dots
  • Adhesive sheets
Method:
  1.  Adhere 4 by 5 1/4" DSP to card front
  2.  Adhere 2 by 2" piece of Very Vanilla to the left side with the point up (see picture)
  3.  Starting at the top right of the square line up the Pebbled Path  strip to the top edge of the square. Go clockwise lining up the strips until you are done. Turn card over and cut off exce.ss.
Decorate:
  1. Cut 3 1/4" piece of Natural ribbon in half and fray the end
  2.  Tie  a copper ribbon around the bottom and form into a bow.
  3.  Adhere this to the 2 by 2" piece at an angle.
  4.  Add a veined leaf and a paired leaf using dimensionals.
  5.  Emboss the sentiment using copper embossing powder.
  6.  Die cut with one of the Nested Essential Dies.  Cut an extra die, trim off ends and place under Very Vanilla sentiment to mat it.  Add sentiment to bottom of card using dimensionals.
Finish card by adding 3 Speckled dots.


Embossed Scrap Card- a tutorial

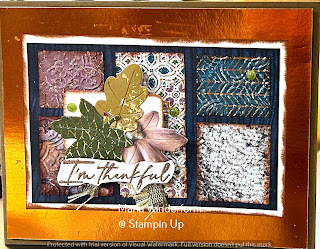
 This card was cased  and adapted from a card demonstrated on Maker Mania 8 (Sept . 15-17. 2023). This card is made using scraps of DSP left over from earlier projects.


Stamp:  Autumn Leaves
Inks:  Copper Clay, Versa Mark
Papers:  Pecan Pie (card base), Copper foil, Very Vanilla, All About Autumn DSP, Scraps of DSP
Accessories:  Autumn Leaves Dies, Copper Embossing Powder, Adhesive backed Speckled Dots, Dimensionals, 3D Distressed Tile Embossing Fold. 1" Natural ribbon, Oxidized  Copper Specialized DSP
  1. Score 4 1/4 by 11 Very Vanilla card stock at 5 1/2".  Burnish fold
  2.  Adhere 4 by 5 1/4" piece of Copper Foil to card front.  This is 1st mat.:
  3. Adhere 4 1/2 by 3 piece of blue patterned DSP to a 4 3/4 by 3 1/4" piece of Very Vanilla card stock.  Adhere pieces of DSP to patterned DSP.    Sizes of scraps are as follows:  you will need 5 scraps:  1 3/8 x 1 1/4 (2 pieces)  1 1/4 x 1 (2 pieces)  1 1/8 x 2 1/2  (1 piece).  Emboss all pieces with the 3D Distressed Tile Embossing Folder.
  4. Sponge edges of all scraps and Very Vanilla pieces with Copper Clay ink
  5.  Die cut  a Very Vanilla piece using the Nested Essentials Die.  Sponge edges
  6.  Adhere to Blue DSP.  See photo above for placement.
  7. Cut a 4" piece of Natural ribbon in half and fray edges.  Fold in half and adhere to left side of card.
  8.  Arrange 3 die cut leaves and adhere to this die cut piece,
  9. Adhere over folded ribbon using dimensionals
  10. Emboss sentiment with Copper embossing powder and fussy cut around it.
  11. Adhere below leaves using dimensionals.
  12. Add 3 speckled dots.
  13. Add a 4 by 5 1/4" piece of Very Vanilla to the inside.  Add a 1" strip of left over DSP to the left side and a left over maple leaf.


Sunday, September 24, 2023

Thankful for You- a fall fun fold card

 Today is the last day of summer. Tomorrow is the start of fall, a time when trees change color and everyone frantically put their gardens to bed.

That’s what I was doing but my back got sore so I went. Inside to make a fall card, using the autumn Leaf bundle. Below is the card I made:


I don’t know the name of the fold so I called it a front accordion fold

Supplies
Stamp:  Autumn Leaves
Inks: Copper Clay, Versa Mark, Stampin Blends: Daffodil Delight, Pumpkin Pie, Old Olive, Mossy Meadow
Papers:  Pebbled Path, Basic White, Copper Clay, All About Autumn DSP, Vellum, Scrap Daffodil Delight, Oxidized Copper
Accessories: Autumn Leaves Dies, Cheerful Daisies die, Copper embossing powder,  Adhesive backed Speckled Dots, Copper Metallic Enamel Effects, Dimensionals

1.  Score 4 1/4 by 11" piece of Pebbled Path cardstock at 1 3/4, 3 1/2, 5 1/4, 7.  Fold mountain, valley, mountain, valley.  Burnish folds well
2.  Score 3 by 6" piece of Pebbled Path cardstock at 3".  Fold in half.
3.  Copper Clay 2 1/2 by 2 1/2"  mat for art piece
4.  Very Vanilla 2 1/4 by 2 1/4"   art piece
5.  Very Vanilla 3 3/4 by 5 1/4 for inside
6.  DSP: 1 1/2 by 5 1/4 (4 pieces)

Die Cuts:
3 Maple Leaves from DSP and/or Oxidized Copper paper
Fussy cut pumpkin from DSP
Die cut 3 Vellum Daisies and 1 leaf pair.  Color vellum daisies with Daffodil Delight/pumpkin pie Stampin Blends; leaves with Old Olive/Mossy Meadow. Spritz with water, shape petals, and adhere together alternating petals to form a sunflower.  Apply copper metallic effects i
n center of flower.

Putting card together:
1. Adhere DSP between card folds
2.  Sponge edges of Very Vanilla for inside of card with Copper Clay ink and add to inside.  Add strip of DSP to left edge."
3.  Create art piece.  Sponge edges of Very Vanilla with Copper Clay ink, Curl edges of die cut leaves up and add to 2 1/4" square Very Vanilla piece using dimensionals.  Add Crushed Curry stems.
4.  Add fussy cut pumpkin with dimensionals.
5.  Add Vellum flowers


6.  Adhere Very Vanilla to Copper clay layer, and this to the left side of the 3 by 6" Pebbled Path piece.
7.  Adhere this art piece to the card as shown, with the left side to the first fold, and the right side to the the fourth fold.  See below

8.  Add a couple of die cut leaves to the inside of the card.
9.  Add 3 of the speckled dot embellishments.


Thursday, September 23, 2021

Spooky Pumpkin Patch

 It’s almost October and with that comes Halloween so today I’m making Halloween  cards. The stamps used are from Frog's Whisker's Ink in Campbellford, Ont.


It's a slimline card the base of which is Early Espresso layered with Pumpkin Pie glitter paper (retired).  The art piece itself is Basic white and was die cut with a Tutti Slimline  Stitched stitched die.


Three pumpkins are masked together on a Crumb Cake field.  The sky was was created using blender brushes and Balmy Blue ink.

The following Stampin' Blend colours were used to colour the pumpkins:  Light and Dark Pumpkin Pie, Light and Dark Mossy Meadow.  The grass stamped with Mossy Meadow ink is from the stamp set "High Tide"


The spooky branch is from Stampscapes and was stamped with Early Espresso ink.

After I was finished colouring, I applied Nuvo Golden Sunset drops on the pumpkin and stems.


Tuesday, November 3, 2020

For You - a Fall Card - SUO Challenges #261

 Most of the leaves have fallen off the trees after a splendid showing in October.  Now they form a carpet on our roads and sidewalks.

The theme for the challenge at SUO is the beautiful Fall/ Autumn season - and there is so much to celebrate.

The colours of the leaves have been absolutely stunning this fall so for this challenge I decided to focus on trees/ leaves and some of their wonderful colours.


On a piece of shimmer White card stock, trees from "Nature's Beauty" were stamped with Early Espresso ink.  Fall colours were added to the trees with Stampin Blends ( Pumpkin Pie, Real Red, Daffodil Delight, and Old Olive) dabbing them around the branches until each tree was full.  

At this time of year, the sky is a Robin Egg blue, quite a spectacular back drop against the colourful foliage,  Trying to imitate this some Balmy Blue inks was sponged around the trees When finished Balmy Blue ink was sponged in the sky around the trees.  

To create the focal point,  it was die cut in the shape of a  Maple Leaf   A second leaf was die cut using Terra Cotta Tile card stock and  this was adhered behind and slightly off set from the other leaf. The edges of both leaves were sponged with Early Espresso ink.


These leaves were added to a card front panel which was create using strips of  4 patterns of Autumn Splendor DSP adhered to a  piece of Terra Cotta card stock.  Behind this panel a piece of Early Espresso card stock was added slightly offset at an angle. Again, all edges were sponged with Early Espresso ink.    A strip of Early Espresso card stock with some 1/2" ribbon was added near the bottom of this panel.  A bow made of the same ribbon was added at the base of the leaves                          


Dimensionals were used to add the completed panel to the DSP on the Early Espresso card base.

A sentiment, from Itty Bitty Greetings , stamped with Early Espresso on Terra Cotta card stock, was die cut using the Ornate frame die, and added near the bow.

Gilded Gems added randomly complete the card front.

Supplies Used:
Stamp:  Nature's Beauty, Itty Bitty Greetings
Inks:  Early Espresso, Stampin Blends (Old Olive, Pumpkin Pie, Real Red, Daffodil Delight)
Papers:  Early Espresso, Autumn Splendor DSP, Terra Cotta, Whisper White
Accessories:  1/2" crumb cake ribbon, Dimensionals, Ornate frame dies, Metallic gems


Tuesday, September 12, 2017

Autumn Leaves - Try Stampin ' or Not on Tuesday #339

We can't stop the world turning.  Autumn is making a come back again.  As I post, the leaves are already starting to turn; the daylight is getting shorter, and the nights are definitely getting cooler.  What happened to summer?

The sketch with Try Stampin' or Not on Tuesday this week has a fall theme, so I pulled out some extra leaves I had made earlier and used them on this card.

The sketch is by Kaylin.


Earlier I had make a background using reinkers and a spritzer filled with water.  When dry I used the Colorful Season Layering framelits to die cut 3 sizes of leaves.  These I used in my art piece, but before I did, I gold embossed the edges of each leaf.

The leaves were arranged on a 2 1/4 by 2 1/4" piece of Very Vanilla card stock embossed with the Woodlands embossing folder and adhered with a glue dot.  The surface (and the edges) was lightly sponged with Soft Suede ink to bring out the details. Gold glitter Baker's twine tied into a bow was added to the stems of the leaves.

This art piece was added to a square of Cajun Craze turned onto it's side with the right edge cut even with the card edge.

The basic card is Cajun Craze card stock, layered with Very Vanilla card stock, and then a retired fall DSP.  I sponged all these edges with Soft Suede ink.

In the middle I added a 2" strip of Gold Glimmer paper.  This ties all the gold elements together.

The 3/8" Crushed Curry Mini Chevron ribbon is placed over the glitter paper, the Cajun Craze card stock and underneath the art piece.

For the sentiment I highlighted the word "Autumn"  from a sentiment that reads:  "Autumn is a second spring when every leaf is a flower".  The entire sentiment is stamped on the inside of the card.

Supplies Used:
Stamps:  Autumn (Rosewood stamps)
Inks:  Cajun Craze, Soft Suede, Versa Mark
Papers:  Cajun Craze, Very Vanilla, Gold Glimmer, Shiny card stock background previously made, retired Autumn DSP
Accessories:  Woodlands embossing folder, Gold embossing powder, Gold glitter Baker's twine, 3/8" Crushed Curry mini chevron ribbon, dimensionals. Layering Seasonal Framelits

Wednesday, September 6, 2017

Seasonal Lantern Autumn Greetings

I love this stamp set and coordinating framelit because of its versatility. The word "Seasonal" says it all as it can be used for fall and Christmas.
For today's card, the focus is Autumn.

First of all I die cut a large "Lots of Labels" framelit in Very Vanilla card stock to become the basis for the art piece.  The Lantern was built on that.

After die cutting the lantern in Basic Black card stock, and hanging it from a branch I die cut using the Seasonal Layers Thinlets, I added a candle and 3 gourds to the inside. and a bow, two pine cones and 2 branches on the bottom, each of which were double stamped (with the exception of the leaves)

Some non SU glass beads were applied to the lantern top.

Because the sentiment is rather long, I cut it into 2 words, matted them with Chocolate Chip card stock, and adhered them side ways on each side of the lantern.

Clear Wink of Stella was applied to all of the main elements.

The base is Early Espresso card stock, layered with Very Vanilla card stock and then 2 patterns of the Painted Autumn DSP.  Some Burlap ribbon was placed over the seam of the 2 patterns.

The art piece was added to the card front using dimensionals.

Supplies Used:
Stamp:  Seasonal Lantern
Inks:  
Candle - Daffodil Delight, Crushed Curry, Pumpkin Pie
Gourds - Pumpkin Pie, Tangerine Tangelo, Old Olive marker
Bow - Crumb Cake, Pumpkin Pie
Pine Cones - Crumb Cake, Soft Suede
Sentiment - Pumpkin Pie
Papers:  Early Espresso, Very Vanilla, Basic Black, Whisper White, Garden Green, Chocolate Chip, Painted Autumn DSP
Accessories:  Layering Season Framelits, Lantern Builder Framelits, Burlap ribbon, Dimensionals, Clear Wink of Stella, glass beads (non SU). Lots of Labels Framelits.

Thursday, June 15, 2017

Colorful Seasons - Fall - Baby Wipe Technique

For the second class card featuring the Colorful Seasons stamp set and its coordinating framelits, the baby wipe technique was used to create the lovely fall colors.  Two cards were made, the second one being a bonus card.

If you're not familiar with the Baby Wipe Technique, check out the tutorial hereThe author did the technique a bit different than the way I did it in class.  For example, I used a large stamping block to put the baby wipes on, and then used one baby wipe folded in 4 to create my "ink pad".
The re-inker colors I used were as follows:  Daffodil Delight, Cherry Cobbler, and Cajun Craze (about 3-4 drops of each color, applied close together).
I stamped 3 large leaves down the left side, and then added 3 small ones.  Some black "dots" were added using the "dot stamp" from "Timeless Texture"
After stamping the sentiment, the art piece was matted with Basic Black cardstock, and added to the Cajun Craze card front using dimensionals.
Before adding the art piece, some 1/4" copper trim was wrapped around the card front and tied at the right side.
This card was a top fold card, so the ribbon was easy to wrap around, but if it was a side fold card, a tiny slit would have to be made in the middle fold so the ribbon could be inserted though that.

Similar stamping was done on the inside, and the sentiment "Thinking of you" , from the same stamp set, was used.
Supplies Used:
Stamps: Colorful Seasons, Timeless Texture
Inks:  Black Memento, Reinkers (Cherry Cobbler, Cajun Craze, Daffodil Delight)
Papers:  Cajun Craze, Whisper White, Black Memento
Accessories:  1/4" copper trim, dimensionals, baby wipes

This is another version of the front of the card, where a different sentiment (from "Just Add Text" is stamped on a separate piece of Whisper White and punched with the new Pretty Label Punch".  The edges are sponged with Cajun Craze ink before adding to the art piece with dimensionals.


Which do you like better?

Tuesday, September 22, 2015

A Fall Scene - The Paper Players #263

One thing I have a hard time with is creating clean and simple cards.  I tend to fuss too much, and add some things to the card, then I add some more and before I know it the card is beyond clean and simple.
The challenge with The Paper Players is to make a clean and simple card with the theme of a fall scene.
I think I accomplished the task, but my Obsessive Compulsive self is telling me to do something else with this card.  However, I am not.


  • The base card is Old Olive cardstock, layered with Whisper White.  On the Whisper white, I used the Stamp set "Work of Art" to lay down 3 colours:  Old Olive, Pumpkin Pie, and Marina Mist.
    The fall image from "Happy Scenes" was stamped over top of these colours.
    The sentiment is from Happy Scenes as well.

    Supplies Used:
     
    Built for Free Using: My Stampin Blog


Monday, September 21, 2015

Pumpkin Fall - Partial Inlaid Die cutting Technique

I thought I would try a new technique today - Inlaid Die Cutting Technique.  The pumpkins and their leaves were done using this technique. This video outlines this technique from beginning to end.

  • I used the Hardwood background stamp with Soft Suede ink on Very Vanilla cardstock for the background
  • The stamp set "Fall Fest" and its coordinating framelits was used to inlay the pumpkins and the leaves.
  • The leaves were die cut in Very Vanilla, coloured with various ink colours, scrunched up and adhered to a linene thread swag at the top of the card.
  • The grass was made using the scallop border punch.
Supplies Used:

Built for Free Using: My Stampin Blog

Thursday, August 20, 2015

Vintage Leaves

It's amazing how the time is just flying by.  Pretty soon the kids are back at school, and Thanksgiving will be on our doorstep.
I have to prepare Thanksgiving cards on 2 fronts - for craft shows and for classes.
Here is one of the ones I created so far, using "Vintage Leaves" and the coordinating framelits.

  • I prepared the leaves first because they needed time to dry.
  • Three different leaves were stamped with Chocolate Chip ink, then die cut using the coordinating framelits.  I also die cut a fourth leaf using Gold glimmer paper.
  • Each leaf was then sponged first on the outer edges with Soft Suede ink, and then on the inside with several different Autumn colours:  Real Red, Hello Honey, Old Olive, Cajun Craze, and Chocolate Chip.
  • They were then placed on a waterproof surface,spritzed with a fine mist of water, and crumpled into a ball.  They were left that way for a few minutes, then they were unfurled leaving a lot of creases in them.
  • Because I was impatient, I used the embossing tool on low setting to dry the leaves.  Then some Chocolate chip ink was applied to the tips of the leaves.
  • The base card is Always Artichoke, layered with Whisper White and a piece of In the Woods DSP.  Both pieces had their edges sponged with Always Artichoke ink.
  • Using the smallest leaf and Old Olive ink, a background was created.  Each leaf was stamped off before stamping randomly onto the background.  This was done before the DSP was attached.
  • I cut a piece of Burlap ribbon in half, pulling strands of the ribbon off to fray the edges.  This frayed ribbon was adhered to the card over the seam of the DSP.
  • The leaves were now ready to be attached to the card.  To do this I used a hot glue gun. After they were all on, I used the pulled off strands from the burlap ribbon, tied them in a knot and adhered them to the stems of the leaves at the top.  I wanted to make a bow, but my recent surgery wouldn't let my hand do this.
  • My Crystal Effects was all plugged up and no amount of poking and prodding was going to get some out.  I wanted to make some water drops on the leaves.  Instead I put drops of gold dazzling details.
  •  The sentiment "Thanks" was one of the Expressions Natural Elements.
Supplies Used:
Built for Free Using: My Stampin Blog


Thursday, September 26, 2013

Autumn Pop Up Card

Last night's class was all about autumn.  One of the cards the students made was a pop up card.  I did a lot of research before making a sample card for the students but couldn't find many pop up cards that weren't complex.  Even the new labels pop up die was difficult to figure out and I spent hours on it before I finally gave up the ghost (so to say).  I wanted something simple that everyone in my class could make with out too many complex measurements and folds.
Finally I figured out just what I was wanting.  The class just loved it. And along the way some techniques were taught.


This is the front of the card.  The maple leaf was die cut using the Autumn accents die and sponged using various colours of ink.  Then the leaf was enamelled using the double embossed enamel technique as described in the Splitcoast stamper tutorial here

The inside of the card shows the pop up and the cluster of leaves.  The pop up was made by measuring 1" from the outside of a folded crumb cake card, then using the Word Window punch to create the slits.
The leaves were run through a paper crimper than colour sponged and arranged on a 2 1/2" scallop circle.  The scallop circle was attached to the bottom pop up using dimensionals.
The top and bottom of the inside were stamped with the Gorgeous Grunge stamp set and Chocolate chip ink.
Crystal effects was added to the bottom portion of the acorn.

This is a close up of the upper inside of the card giving a better view of the treatment of the leaves and the pop up.

This shows the lower portion of the inside.

Stamps: Gorgeous Grunge, Label Love
Inks: Chocolate chip, Old Olive, Cherry Cobbler, Tangerine Tango, Summer Starfruit, Soft Suede
Papers: Crumb Cake, Very Vanilla, Sweather Weather DSP
Accessories: Artisan Label punch, Autumn Accents die, Word Window punch, 1 1/4" Burlap ribbon, Utee, paper crimper, dimensionals, ruler and pencil, Crystal Effects


Wednesday, September 11, 2013

Gently Falling - an Autumn Card case

I saw this card on Pinterest and tried to track down the original artist but could not find out who it was.  This card is almost a CASE of this card.  I did change a few things.
If you recognize this card as yours will you please get in contact with me and I will give you credit.


Technique:
The card itself - I embossed a second Very Vanilla layer with the Fancy Fan folder and die cut a Label framelit shape in the middle of it.  Into this shape I stamped the sentiment.
The leaves were stamped with Chocolate Chip ink onto Whisper White paper and sponged different colours on them before cutting them out.  I used a combination of Summer Starfruit, Tangerine Tango and Old Olive.
After cutting them out, I adhered them to the outer left edge of the die cut.

Stamps: Gently Falling, Word Play
Inks: Chocolate Chip, Summer Starfruit, Tangerine Tango, Old Olive
Papers: Early Espresso, Very Vanilla, Whisper White
Accessories: Fancy Fan embossing folder, Labels Framelits, Victorian crochet ribbon, Naturals Button

Thursday, August 29, 2013

Wonderfall Thanks - Hand Stamped Sentiments # 167

It's not quite fall here yet!  First of all it's too hot and muggy; second the leaves on the trees are just starting to turn different colours; third it's not even September; fourth I'm not ready for the end of summer.
However, that doesn't stop me from making fall cards as I have done today for the sketch challenge with Hand Stamped Sentiments here


Technique:
First I die cut some leaves using Very Vanilla card stock and the Autumn Accents die.  These leaves I stamped using the Waterfall stamp set - after which the edges were sponged with Soft Suede ink.  In addition I put some Crystal Effects on the acorn.
The moon was die cut using the circles framelits.  I coloured the pearls dark brown with a copic marker to coordinate with the rest of the card.
The sentiment is from the Harvest of Thanks stamp set.  I just cut out the word I needed.

The background is Early Espresso Core-dination card stock which I embossed with the words embossing folder and then sanded.

Stamps: Waterfall, Harvest of Thanks
Inks: Early Espresso, Old Olive, Crushed Curry, Soft Sueded, Cajun Craze
Papers:Old Olive, Very Vanilla, Early Espresso Core-dination card stock, So Saffron
Accessories: Autumn Accents die, Expression folder, Circles Framelits, 1 1/4" Burlap ribbon, Natural fiber ribbon, Crystal Effects, dimensionals

Tuesday, August 27, 2013

Grateful Greetings - Try Stampin' on Tuesday #177

What a hot muggy day it's been today!  And I notice the leaves are starting to turn on some of the trees.  Whether that is due to the lack of rain we have been having or a signal that fall is about to start I don't know.  For the sketch challenge with Try Stampin' on Tuesday here    
I made a fall card.


Technique:   
Background:
On a piece of Very Vanilla card stock I first inked up the "Off the Grid" stamp set using Soft Suede ink, stamped off once before stamping it onto the card stock.  Then, using the Gorgeous Grunge stamp set I stamped 3 areas.

Image:
The image of the Maple Leaf was stamped 3 times onto Very Vanilla card stock - once in Crushed Curry, once in Tangerine Tango, and once in Cajun Craze.  Each leaf was cut out and the edges sponged with Soft Suede ink.  The leaves were attached to the background using dimensionals.

Stamps: Gorgeous Grunge, Off the Grid, Magnificent Maple, Grateful Greetings
Inks: Soft Suede, Crushed Curry, Tangerine Tango, Cajun Craze
Papers: Soft Suede, Very Vanilla, Sweater Weather DSP
Accessories: Natural Trim Ribbon, Bronze button, dimensionals