Showing posts with label Stitched Rectangle Thinlet die. Show all posts

Sunday, May 19, 2019

Hello Enjoy Today Another Magnolia Card

The Magnolia DSP is absolutely gorgeous!
Quite by accident I discovered that one of the dies can be used to die cut one of the Magnolia flowers directly from the DSP.


Below is the card I made using these die cuts


The base card is a top fold Basic Black, layered first with Whisper White and then Magnolia Lane DSP which had been matted with Mossy Meadow card stock.

Some Mossy Meadow Baker's twine was wrapped around the DSP/Mossy Meadow piece before it was adhered to the card front.

The art piece is a rectangle of Whisper White with a Balmy Blue washed background.  A Basic Black stitched frame encases this background.


The  sentiment is Black embossed on the lower part, and three die cut Magnolia buds are adhered with dimensionals at the top.

This art piece is adhered to the card front at an angle.

On the inside I place a strip of DSP as well as another floral die cut.


Supplies Used:
Stamp:  Good Morning Magnolia
Inks:  Black Memento, Versa Mark, Balmy Blue
Papers:  Basic Black, Whisper White, Mossy Meadow, Magnolia Lane DSP
Accessories:  Stitched Rectangle Framelits, Magnolia Memory Dies, Mossy Meadow Baker's Twine, Dimensionals, Black Embossing Powder, Aqua painter

Thursday, May 16, 2019

Lean on Me - Fab Friday #163

Lyrics
Sometimes in our lives we all have pain
We all have sorrow
But if we are wise
We know that there's always tomorrow
Lean on me, when you're not strong
And I'll be your friend
I'll help you carry on
For it won't be long
Till I'm gonna need
Somebody to lean on
Please swallow your pride
If I have things you need to borrow
For no one can fill those of your needs
That you don't let show
Lean on me, when you're not strong
Lyrics
Sometimes in our lives we all have pain
We all have sorrow
But if we are wise
We know that there's always tomorrow
Lean on me, when you're not strong
And I'll be your friend
I'll help you carry on
For it won't be long
Till I'm gonna need
Somebody to lean on
Please swallow your pride
If I have things you need to borrow
For no one can fill those of your needs
That you don't let show
Lean on me, when you're not strong
"Lean on me when you're not strong,
And I'll be your friend
I'll help you carry on
For it won't be long
Till I'm gonna need
Somebody to lean on.
…..
Lean on me when you're not strong"

Lyrics by Bill Withers 2010

Can't you just hear Bill Withers singing this song?

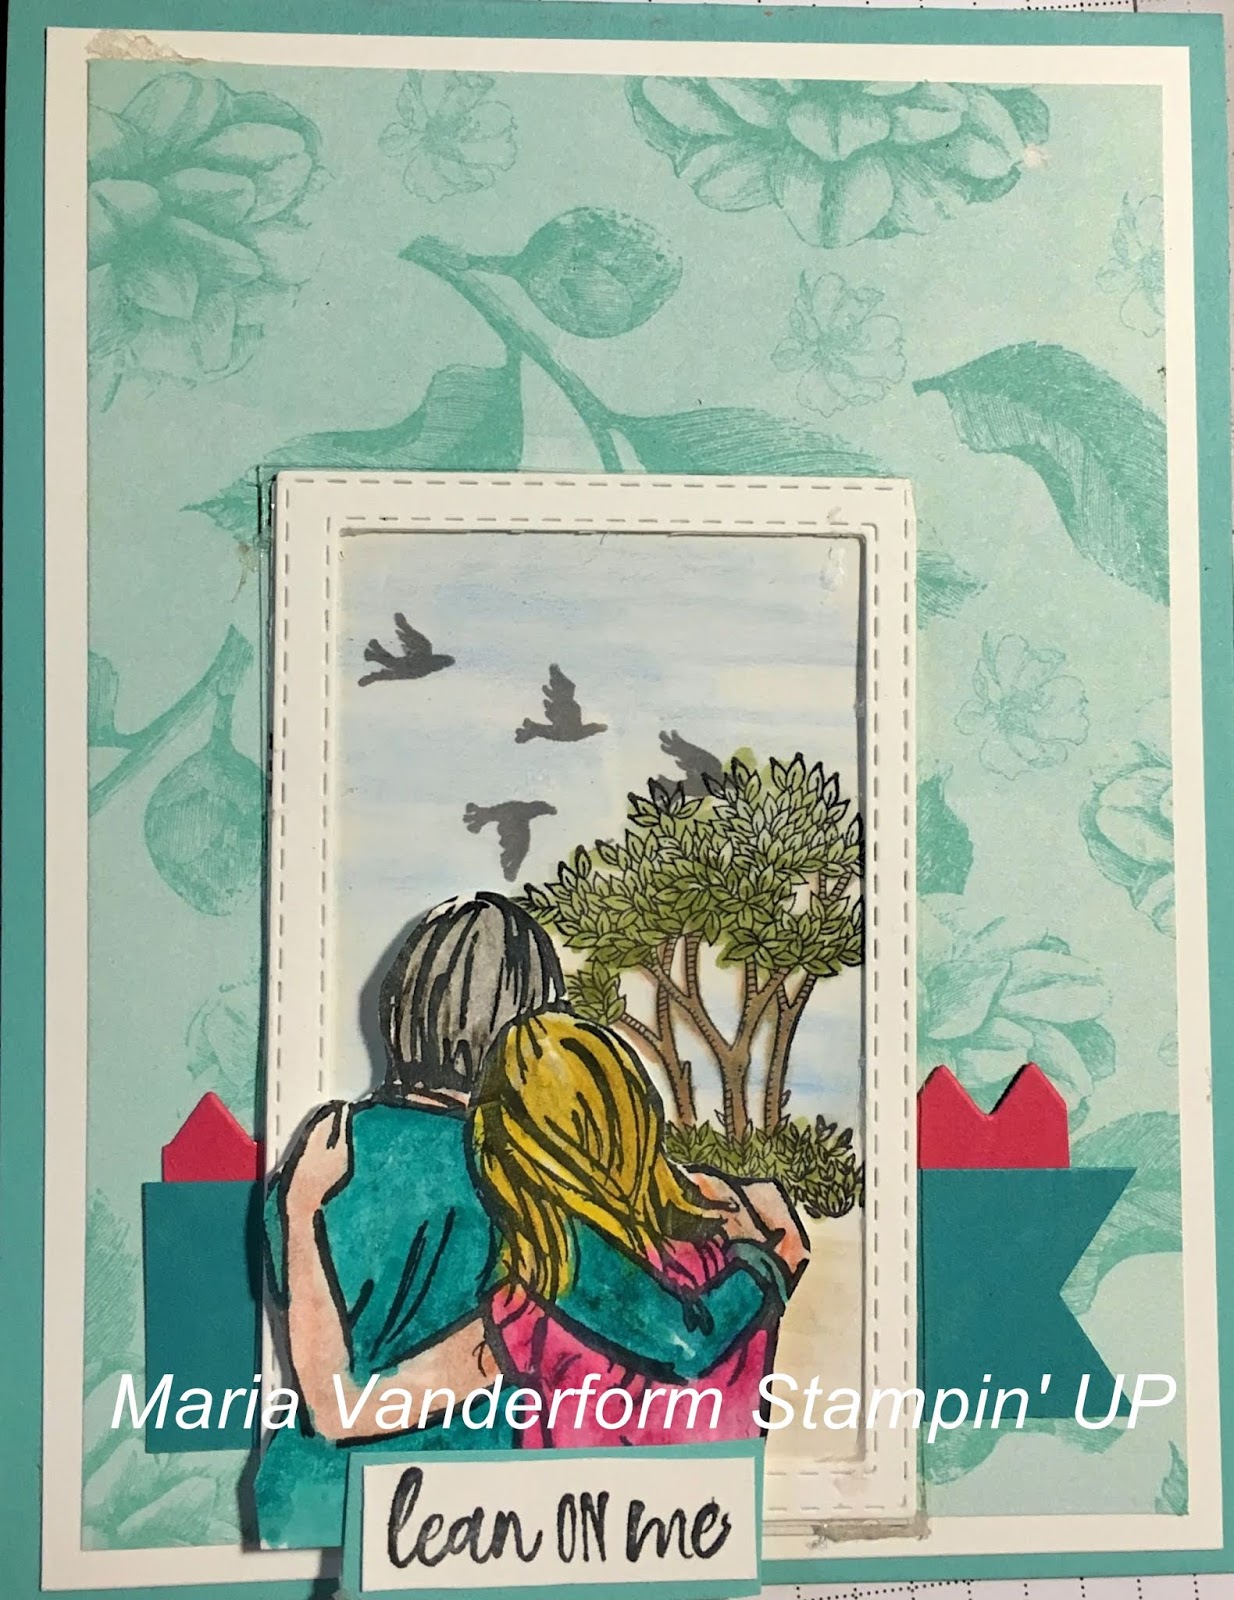
This card was made for the sketch challenge with Fab Friday #163 for a special friend who has  been diagnosed with cancer and in the last month has had two surgeries.  Because she had always been the strong one in the family, the one everyone came to with their problems, it was extremely hard for her to lean on someone else.  

This card is for you my friend.


The base card is Coastal Cabana layered with Whisper White and then Tea Time DSP.

In the lower part is a framed window with scenery from "Golden Afternoon".  The frame is made by die cutting two sizes of stitched rectangle framelits and to complete the illusion of a window, a piece of window sheet is placed between the frame and the water coloured scene.

The two individuals, leaning on each other, are from "Artistically Aware". After water colouring them, they are fussy cut and placed in front of the window using dimensionals.

Behind the window is a strip of Bermuda Bay card stock flagged at one end.  On top of that is a strip of Melon Mambo card stock notched at the top.

Supplies Used:
Stamps:  Artistically Aware, Golden Afternoon
Inks:  Black Memento, Watercolour Pencils, Basic Gray
Papers:  Coastal Cabana, Whisper White, Tea Time DSP, Bermuda Bay, Melon Mambo
Accessories:  Stitched Rectangle framelits, Window sheet, Blender Pen, Dimensionals,


"Please swallow your pride
If I have things you need to borrow
For no one can fill any of those needs
That you don't let show.

Lean on me when you're not strong"

Monday, March 18, 2019

Friends Furever - cats meet dogs - a pop up

For this card I not only made a pop up on the inside, but I also incorporated some cats into the picture. I know cats and dogs traditionally do not like each other, but I have seen some beautiful friendships between these animals.

Card Front:
The card base of Early Espresso is layered with  Smokey Slate card stock embossed with the Dot to Dot embossing folder.  At the bottom is a strip of Wood grain DSP with a 1/8" strip of Early Espresso at the top.
Two dogs punched n Early Espresso using the Dog punch,  face each other between a friendship sentiment contained in a Tailored Tag punchie.  Notice I changed the word "forever" to "furever"

Inside:
Open the card, and ---surprise, a pop up I! -- two dogs and a dog house.  But the cutest thing is what is peeking out at them through a window!

The Pop Ups

Using the stamparatus, one of the dogs was stamped with brown spots; the other dog on Crumb Cake card stock.  Both were punched with the dog punch and set aside.  The dog house was stamped with Cherry Cobbler ink, with Black Memento details on top.  It was fussy cut.

The 3 pop ups, were made using a non Stampin' Up die. The dogs and dog house were adhered to these pop ups.

Below the pop ups is the sentiment, with paw prints moving off to the side.


Cats in the Window:

The cats were stamped using the stamparatus and punched using the cat punch.  Only the top half of the cats were placed in a window created in the Woodgrain DSP with the Stitched Rectangle framelit and window sheet. It looks like they are watching the dogs below.


Supplies Used:
Stamps:  Nine Lives, Happy Tails
Inks:  Black Memento, Soft Suede, Cherry Cobbler, Cajun Craze
Papers:  Early Espresso, Smokey Slate, Crumb Cake, Woodgrain DSP
Accessories:  Dog punch, Cat punch, Tailored Tag punch, Stitched Rectangle Dies, Window Sheet, Dot to Dot Embossing Folder, Dimensionals.

Friday, March 1, 2019

Happy Anniversary - A View of the Bay

If you're like me, you have a variety of punchies, die cuts and/or stamped images left over from previous projects.  And, every once in a while, these "left overs" are incorporated in the design of a new project.

That's what happened with this card.

I had stamped and coloured the image of the man and the woman, the man having his arm around her shoulders.  Facing away from me I wondered what they were looking at. A blank card didn't seem too exciting.  Glancing up I saw the image from "By the Bay" a SAB stamp set - one that was left over from a previous project- lying on my work space.

Idea!!! Below is the card I came up with.

A window frame was made using two sizes of the stitched rectangle framelits and Soft Suede card stock. After adhering a window sheet behind the frame, the scene with the sand pipers along the shore was added.  The light from the camera in the upper right looks like the sun shining through the window.


The images of the two individuals were coloured with the stampin' blends and then fussy cut. They were positioned in front of the window and adhered to the card front using dimensionals.

Above the window a cluster of brightly coloured flowers were added.


The card base is Fresh Fig card stock, layered with first the barn board pattern from the Floral Romance DSP and then with the floral patterned paper.

The anniversary sentiment, stamped on Whisper White card stock and matted with Fresh Fig, was added just below the happy couple with  dimensionals.

Supplies Used:
Stamps:  To Have and to Hold, By the Bay
Inks:  Black Memento, Stampin' Blends, Watercolour pencils
Papers:  Fresh Fig, Whisper White, Floral Romance DSP, Soft Suede
Accessories:  Stitched Rectangle Framelits, Window Sheets, Dimensionals, Stamparatus.


Wednesday, February 27, 2019

Painted Seasons and Lovely Lipstick Foil

The Painted Seasons stamp set is one of the new 2nd release items and the Lipstick Foil, a SAB offering which unfortunately is sold out, creates a backdrop for the flowers in this stamp set. This set comes with framelits which are sold separately.


The stamparatus was used to stamp 3 flowers and three fern -like leaves.  The flowers were stamped using Berry Burst ink; the leaves with Mossy Meadow.  The Four Seasons framelits were used to die cut these images.  In addition three leaves were die cut in the Lipstick foil.

The die cut images were built on a Pearlized doillie adhered to a Whisper White panel die cut using the stitched rectangle framelit.


This focal point was adhered to a layer of Lovely Lipstick foil embossed with the Petal Burst embossing folder This was adhered to a Thick Whisper White top fold card base.


The sentiment is from another second release stamp set: Part of My Story


Supplies Used:
Stamps:  Painted Seasons, Part of My Story
Inks:  Black Memento, Berry Burst, Mossy Meadow
Papers:  Thick Whisper White, Whisper White, Lovely Lipstick Foil
Accessories:  Stitched Rectangle Framelits, Petal Burst embossing folder, Pearl Doillie, Dimensionals,  Four Seasons Framelits


Saturday, February 23, 2019

A Shaker Birthday Cake

What is there about approaching Spring that causes one to start cleaning and sorting??

Today I was sorting through my stamps selecting ones to place in a stamp sale.  I came across a stamp set and coordinating framelit I had not even opened!  So I stopped all my cleaning and sorting and 'played' with my new found treasure...….

…...and made this shaker birthday (or it could be an anniversay or wedding ) cake.

Using the coordinating framelits, the various cake layers were die cut in Blushing Bride card stock; using the stamp set, the various layers were stamped on a Whisper White piece that would be placed behind the die cut, with the shaker elements between. The stamping can be seen in the picture below.

The cake became the shaker with a window sheet adhered behind the die cut layers, foam adhesive strips and shaker elements. Scallop strips in Blushing Bride glimmer paper were added below each layer; a glimmer bow at the cake top, and the cake is help up with a Blushing Bride cake base. White organza ribbon was attached to the left side of the die cut piece, with a triple ribbon added near the top. Rich Razzelberry flowers with tiny pearl centers adorn the right side of the cake.


The shaker unit was matted with Blushing Bride glimmer paper and this was added to the card front adhered with Romance Floral DSP, Powder Pink card stock and Thick Whisper White.


The sentiment, stamped using Rich Razzelberry ink, was added side ways to the left of the cake using dimensionals, because it did not fit anywhere else.  I rather like it there. (See second picture).

Supplies Used:
Stamp:  Shake & Celebrate
Inks:  Powder Pink, Rich Razzelberry
Papers:  Whisper White, Blushing Bride, Powder Pink, Floral Romance DSP, Thick Whisper White, Rich Razzelberry, Blushing Bride Glimmer Paper
Accessories:  Window sheet, Foam adhesive strips, Shaker Elements, Tiny pearls, Stitched Rectangle Framelits, dimensionals, 1/4" White Organza ribbon, Shaker Framelits

Will this stamp set and coordinating framelits be part of my stamp sale the end of March?  Highly unlikely.
I continue my sorting, hoping to sell enough to finance my trip to Vancouver where I will attend On Stage.

Thursday, February 21, 2019

Mr. Ed and friends - SUO Challenge #217

It was really difficult to narrow down a favourite stamp/item from the Occasions and /or SAB catalogues for the SUO Challenge #217 here , and I finally narrowed it down to the horse stamp "Let's Ride".

As I mentioned in my previous post here seeing the horses on this set takes me back to a time when my daughter was young and 'horse crazy'.

For this card, I incorporated the "Sliding Barn Door" framelit and coordinating stamp set with the "Let's Ride" set.

Three horse heads stamped using the Stamparatus were coloured with watercolour pencils and a blender pen as well as Stampin' Blends. Each was fussy cut and the edges sponged.

A window was die cut  in a 4 by 5 1/4" piece of Crumb Cake using the Rectangle Stitched framelit and the horses were placed as above like they were looking out the window. Mr. Ed is the one at the lower front.


Using the Sliding Door Framelits, the door was die cut in Early Espresso and embossed with the Barn Door Embossing Folder.  The sliding mechanism and hardware were die cut in basic Black card stock and attached to the Crumb Cake layer over the die cut window on the left side of the card.  The door looks like it should move but it doesn't.

The 'hello' sign, stamped in Cherry Cobbler ink using the "Barn Door" stamp. was added to the door front.

On the right of the window is attached a piece of Woodgrain DSP

This Crumb Cake layer was adhered to another piece of Crumb Cake card stock using the foam adhesive strips which in turn was added to an Early Espresso card base.

Supplies Used:
Stamps:  Let's Ride, Barn Door
Inks: Black Memento, Watercolour Pencils, Stampin' Blends (Light and Dark Soft Suede, Light and Dark Crumb Cake), Cherry Cobbler
Papers:  Early Espresso, Crumb Cake, Whisper White, Woodgrain DSP
Accessories:  Sliding Door Framelits, Rectangle Stitched Framelits, Foam Adhesive Strips, Woodgrain Embossing Folder

Wednesday, February 20, 2019

If Flowers Were Hugs....

If only flowers were hugs I would be getting hugs all summer long.  But for now I have to be content with flowers on my cards.  And since flowers attract humming birds - bonus!!!

The Humming Along stamp set also features a Humming Bird, who is the star of this card.  I haven't made a shaker for a while and had the urge to do so for this card.

 The card base is Coastal Cabana.

To create the shaker, some Tea Room DSP is first adhered to some Very Vanilla card stock.  The window for the shaker is created using a stitched rectangle framelit which die cut through both layers. Before adding the window sheet it was placed over a same size piece of Very Vanilla and  the boundaries of the window were drawn with a pencil mark.

Window sheet was then adhered on the wrong side of this window and foam adhesive tape applied all the way around it, as well as the card edges.

On the piece of Very Vanilla card stock with the pencil lines marked on it, images from Abstract Impressions were stamped randomly in Melon Mambo, Costal Cabana, and Granny Apple Green, stamping just beyond the pencil marked boundary.

Shaker Elements were comprised of Sprinkle Embellishments as well as tiny butterflies left over from an earlier project. A few tiny butterflies were saved to apply to the card front (see picture below).

The flowers and leaves decorating the outside of the shaker are from Abstract Impressions and were fussy cut.


The die cut  brightly, multicoloured hummingbird was adhered over the shaker close to the larger of the two flowers as if it were eating nectar from the flowers.

Clear Wink of Stella was applied to the entire tiny bird.


Self adhesive sequins, as well as tiny butterflies, were added to the card front as indicated by the various pictures.


Supplies Used:
Stamps:  Humming Along, Abstract Impressions
Inks:  Black Memento, Stampin Blends for the bird, Melon Mambo, Granny Apple Green, & Coastal Cabana for behind the shaker, Melon Mambo for the larger flowers & Pear Pizzazz for the leaves.
Papers:  Coastal Cabana, Whisper White, Tea Room DSP, Melon Mambo, Gorgeous Grape
Accessories:  Humming Along Framelits, Stitched Rectangle Framelit Dies, Butterfly Pretty Framelit Dies, Window Sheet, Foam adhesive strips, Sprinkle Embellishments, Clear Wink of Stella, Dimensionals, Self Adhesive Sequins


Monday, February 18, 2019

Best Catch in a Diorama card

Diorama a noun that means . A three-dimensional display of a scenery, often having a painted background in front of which models are arranged, or a small scaled replica of a scene.

There are a plethora of tutorials for Diorama cards but the one I found most helpful was made by Amanda Fowler, an Australian Demonstrator.  You can find her video tutorial here

There are also various types of Diorama cards. Some have two layers; some are three. All have an aperture through which the scene is viewed.

My Diorama card has three layers, a front and middle piece through which an opening is die cut and a back piece upon which the scene is built.


Although it looks bulky, it lies flat for mailing. But because this makes it a larger size, an envelope was made using the Envelope Punch Board.


From front to back, the layers are as follows:

Front layer:  Crumb Cake
Middle Layer:  Old Olive
Back Layer:  Thick Whisper White 


Two different sizes of the Stitched Rectangle framelits were used to die cut the apertures in the front and middle layers - the smaller framelit for the middle layer.

On the back layer, a mountain and water scene was created providing a lovely back drop for the fisherman who was casting his fishing line in the water. The Waterfront stamp was used to create the mountains.

This is a view from the left side of the Diorama card. You can see the 3 layers as well as the embellishments on the outside.
The 3 small fish were held in a bunch with Old Olive linen thread , the fishing hook  looks like its holding them up.

Above is the left side, which displays the 3D look of the card.  The cluster of reeds and bull rushes, adhered to the top and middle layer help to create this 3D look.  The rainbow trout adhered to the top of the card looks like it has jumped out of the water

Before entering the water, the fisherman left an extra hat which I placed on one corner of the sentiment, which was also die cut with the Stitched Rectangle Framelit.  The basket is waiting for his catch.

Supplies Used:
Stamps:  Best Catch, Waterfront
Inks:  Black Memento, Stampin' Blends, Basic Gray,  Balmy Blue, Pacific Point, Mossy Meadow, Soft Suede
Accessories:  Best Catch Framelit dies, Stitched Rectangle Framelit dies, Old Olive Linen Thread

Hibiscus - I Yearn for My Garden

Another Colorado low , is heading our way - the second one in as many weeks, bringing with it lots of snow.  Soon we will be running out of places to put the  shovelled  snow.  This has been a brutal winter so far and its not over yet.

At times like this I yearn for my garden.  The "Humming Along" stamp set does that for me, especially the Hibiscus.  So I made a birthday card featuring this flower.

The front of a top fold Thick Whisper White card base was embossed with the Swirls and Curls Embossing Folder.

On top of this was added a Melon Mambo frame, made by die cutting two sizes of the Stitched Rectangle framelits. 

The Hibiscus flower, as well as an extra leaf, was stamped and coloured on a separate piece of Whisper White card stock.  Both light and dark Melon Mambo blendabilites were used for the flower; Daffodil Delight on the large stamen; and Night of Navy in the center.  The stem and leaves were coloured with Granny Apple Green and light Daffodil Delight.

After die cutting the flower and extra leaf with the Humming Framelit dies (there is a die for the flower and leaf) it was added to the card front using dimensionals.  The extra leaf was attached to the stem adjacent to the other leaf.

No card is complete without bling, so Dazzling Diamonds was applied to the flower only.

The sentiment, die cut using this shaped framelit, had its edges sponged lightly with Melon Mambo ink before it was added to the card front above the flower also with dimensionals (see picture below)


Close up showing die cut sentiment and stitched Rectangle frame


Close up showing Dazzling Diamonds on flower as well as embossing


Supplies Used:
Stamp:  Humming Along
Inks: Black Memento, Melon Mambo, Stampin' Blends (Light & Dark Melon Mambo, Light & Dark Granny Apple Green, Light & Dark Daffodil Delight, Light Night of Navy)
Papers:  Thick Whisper White, Melon Mambo, Whisper White
Accessories:  Humming Along Framelit Dies, Dazzling Diamonds, Swirls & Curls Embossing Folder, Dimensionals, Stitched Rectangle Framelit/dies.


Sunday, February 17, 2019

Home to Roost - Roo has a Friend

I introduced you to Roo in the last post here.  He was alone there, but in today's card he has a friend.

The base card stock for this card is Old Olive layered with Whisper White.

Using the stamparatus, the cluster of wheat stamp was coloured with a Mossy Meadow and Crushed Curry markers and peg stamped across the width of the Whisper White layer.

The checkboard DSP is from the SAB Botanical Butterfly DSP.  Two different sizes of Stitched Rectangle framelits was used to die cut the DSP into an outer frame.  This frame is slightly smaller than the width of the Whisper White  allowing the clusters of wheat to show outside the frame.

The two roosters were stamped on a separate piece of Whisper White and coloured with various colours of Stampin' Blends - each bird coloured slightly differently.
They were then fussy cut and added to the card front as shown in the picture.

A small Balmy Blue butterfly, punched from the Botanical Butterfly DSP using the Butterfly Duet punch, was added to the top left just below the sentiment.

Supplies Used:
Stamp:  Home to Roost
Inks:  Black Memento, Stampin' Blends ( Bird 1: Cherry Cobbler, Cajun Craze, Soft Suede, Bermuda Bay  - Bird 2: In addition to same colours as Bird 1 Crushed Curry was used), Stampin' Markers (Mossy Meadow and Crushed Curry)
Papers:  Old Olive, Whisper White, Botanical Butterfly Gala DSP
Accessories:  Stamparatus, Stitched Rectangle Framelits, Butterfly Duet punch

Wednesday, February 13, 2019

Butterflies and more Butterflies

Butterflies have flown into my life!  And I love everyone of them!  The new Butterfly Beauty framelits in the Occasions catalogue and absolutely gorgeous and make such beautiful cards.  The UPS truck delivered them on Monday and I've been playing with then ever since.

The first card is a white on white card featuringf the larger of the butterfly beauty framelits on a watercolour background.


I used a Stitched Rectangle thinlet die to cut the center of a top fold Thick Whisper White card front, creating a frame.

Behind this frame I adhered a watercolour background, which was created by randomly sponging the following colours:  Melon Mambo, Gorgeous Grape, Daffodil Delight, Granny Apple Green on watercolour paper.  Water was spritzed on it to allow the colours to blend, and once it was dry it was adhered it to the underside of the frame.

The Butterflies were die cut using Whisper White card stock and then adhered  to the front of the card.

I chose not to use a sentiment.