Showing posts with label Abstract Impressions. Show all posts

Sunday, March 10, 2019

Spring Time Diorama

I was challenged to make another Diorama card by a Facebook friend. In February I made my first Diorama card featuring the Big Catch stamp and it was very well  received.  The link to that post is here.

This time my card has a Spring theme. Like many, I am snow weary and yearn for warmer weather .

 I used the following stamp sets:  Abstract Impressions, Enjoy Life, and Petal Palettes.


Although this is a bulky card, it folds flat for mailing (see below).  However, an envelope will have to made using the Envelope punch board to accommodate the different envelope size.  I would recommend using a bubble envelope to mail this card.


The impetus for this card, and the colour scheme used, was a background technique I demonstrated in class on Wednesday.  This technique involved randomly applying the following colours on a piece of Whisper White card stock:  Melon Mambo, Daffodil Delight, Highland heather, and Granny Apple Green, then spritzing the colours with water to blend them.  

I found this finished background piece lying on my desk this morning, and recalling the challenge I was given, I started making this card.

This card is by no means a 'quick' card and it did take me most of the morning to make.

The dimensions for the 3 layers to this card are as follows:
  • Front:  Very Vanilla 10 1/2 by 5" scored at 2 and 8 1/2"
  • Middle: Gorgeous Grape 8 1/2 by 5" scored at 1 and 7 1/2"
  • Back (scene) 10 1/2 by 5" scored at 2 and 8 1/2"
Layering circle framelits were used to die cut circular apertures in the front and middle layers - a larger one in the front, and a smaller one in the middle.


Scene:
On the finished background piece, and using the stamparatus, the leaves and flowers from the Abstract Impressions stamp set were stamped across the bottom - the leaves in Pear Pizzazz and Old Olive, and the flowers in Highland Heather and Gorgeous Grape.

Then some butterflies from "Enjoy Life" were stamped randomly above the flowers using Gorgeous Grape ink.

This was added to the back layer.

Middle Layer:  Around the circular aperture yellow flowers from Petal Palette were adhered - a total of 4 stamped, coloured and die cut images.  You can see the flowers around the middle circle in the picture above. At the bottom of the circle was added the silhouette of the individual raising his hands up as well as a cyclist going by.  Both of these are from "Enjoy Life"


Front of Card:
Prior to die cutting the circle, some Garden Impressions DSP was adhered to the front. Flowers stamped, coloured and die cut using the Petal Palette stamp and die set were arranged around the circle.  Two birds were also added.
A butterfly left over from another project was added to the left side.

To finish the card, rhinestones were added to the tiny butterflies in the scene, and in the centers of the flowers and butterfly on the front.

Close up of left front

Close up of right front

Some Whisper White card stock decorated with a strip of DSP was added to the back of the card. Also added were some extra flowers that were not used to decorate the card.


Supplies Used:
Stamps:  Abstract Impressions, Enjoy Life, Petal Palette
Inks:  Black Memento, Gorgeous Grape, Highland Heather, Old Olive, Pear Pizzazz, Various colours of Stampin' Blends
Papers:  Very Vanilla, Gorgeous Grape, Whisper White, Garden Impressions DSP
Accessories:  Layering Circles Framelits, Springtime Garden Thinlets, Petals & More Framelits, Rhinestones, Stamparatus


Wednesday, February 20, 2019

If Flowers Were Hugs....

If only flowers were hugs I would be getting hugs all summer long.  But for now I have to be content with flowers on my cards.  And since flowers attract humming birds - bonus!!!

The Humming Along stamp set also features a Humming Bird, who is the star of this card.  I haven't made a shaker for a while and had the urge to do so for this card.

 The card base is Coastal Cabana.

To create the shaker, some Tea Room DSP is first adhered to some Very Vanilla card stock.  The window for the shaker is created using a stitched rectangle framelit which die cut through both layers. Before adding the window sheet it was placed over a same size piece of Very Vanilla and  the boundaries of the window were drawn with a pencil mark.

Window sheet was then adhered on the wrong side of this window and foam adhesive tape applied all the way around it, as well as the card edges.

On the piece of Very Vanilla card stock with the pencil lines marked on it, images from Abstract Impressions were stamped randomly in Melon Mambo, Costal Cabana, and Granny Apple Green, stamping just beyond the pencil marked boundary.

Shaker Elements were comprised of Sprinkle Embellishments as well as tiny butterflies left over from an earlier project. A few tiny butterflies were saved to apply to the card front (see picture below).

The flowers and leaves decorating the outside of the shaker are from Abstract Impressions and were fussy cut.


The die cut  brightly, multicoloured hummingbird was adhered over the shaker close to the larger of the two flowers as if it were eating nectar from the flowers.

Clear Wink of Stella was applied to the entire tiny bird.


Self adhesive sequins, as well as tiny butterflies, were added to the card front as indicated by the various pictures.


Supplies Used:
Stamps:  Humming Along, Abstract Impressions
Inks:  Black Memento, Stampin Blends for the bird, Melon Mambo, Granny Apple Green, & Coastal Cabana for behind the shaker, Melon Mambo for the larger flowers & Pear Pizzazz for the leaves.
Papers:  Coastal Cabana, Whisper White, Tea Room DSP, Melon Mambo, Gorgeous Grape
Accessories:  Humming Along Framelits, Stitched Rectangle Framelit Dies, Butterfly Pretty Framelit Dies, Window Sheet, Foam adhesive strips, Sprinkle Embellishments, Clear Wink of Stella, Dimensionals, Self Adhesive Sequins


Thursday, August 9, 2018

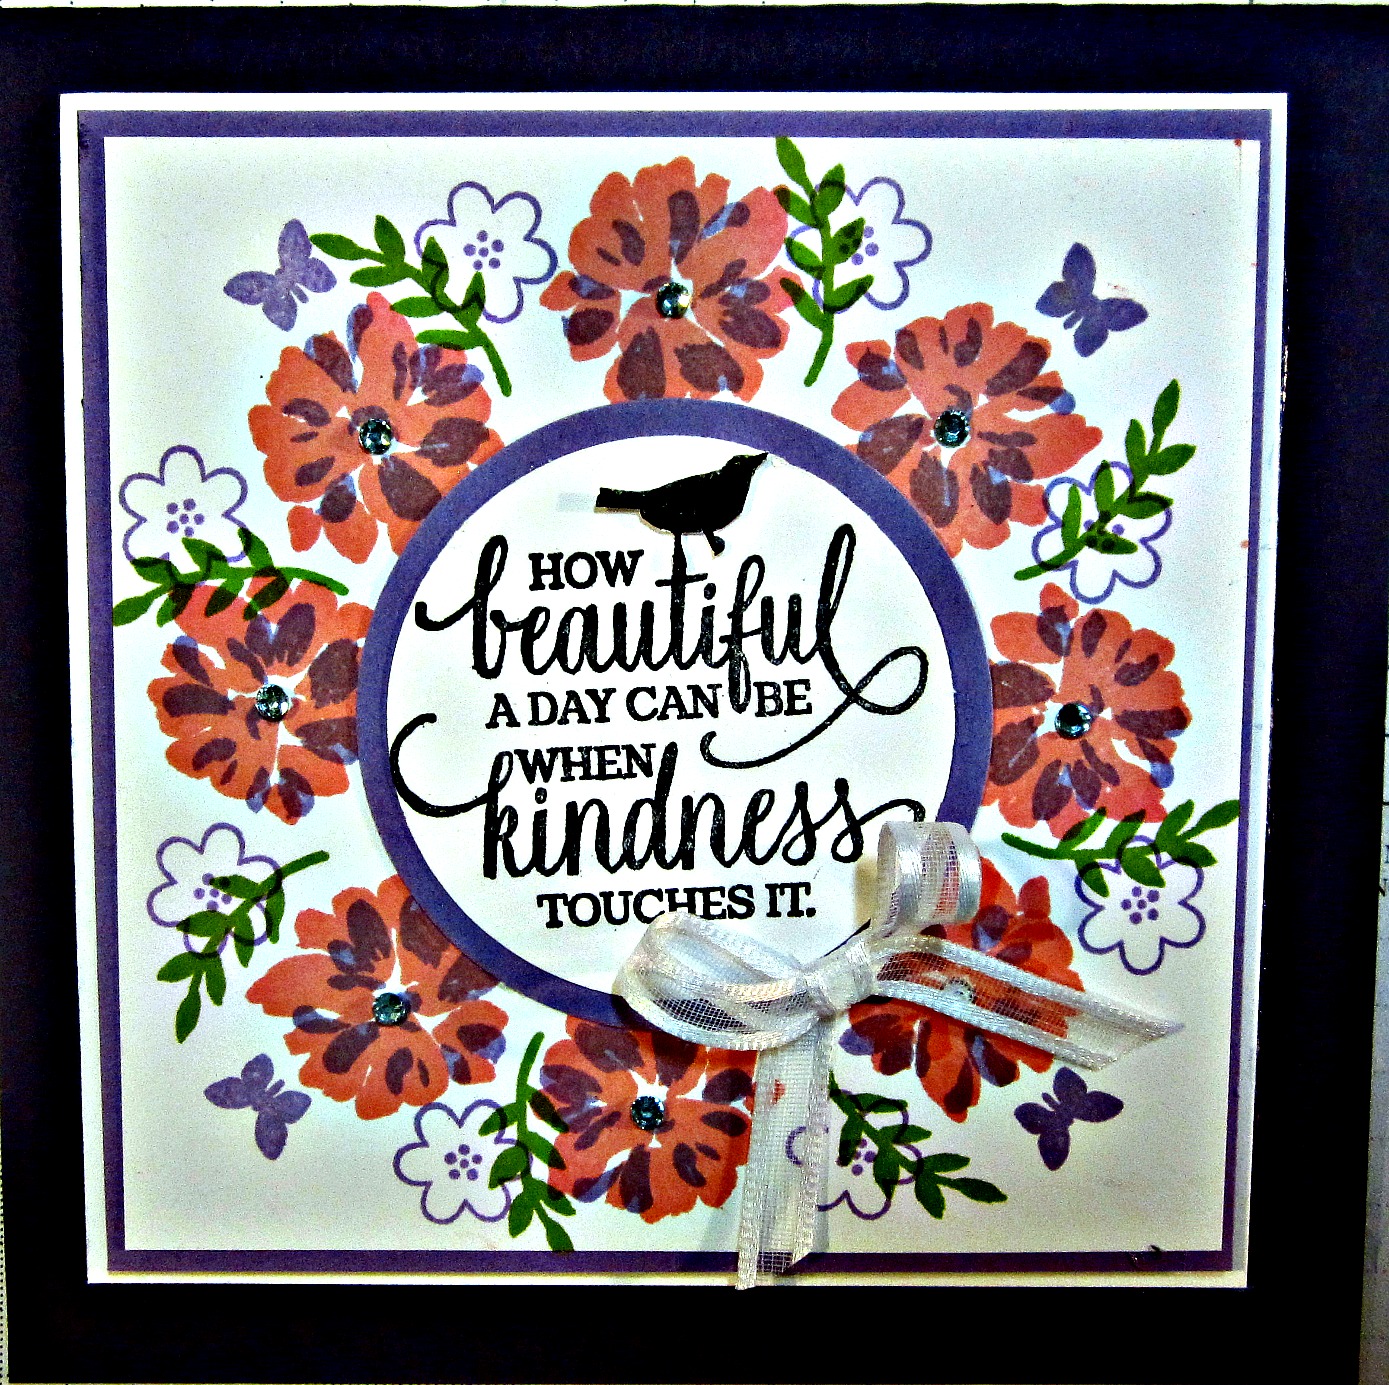
Floral Wreath - Circle Stamping with Stamparatus

Pinterest is full of examples of wreath and/or circle stamping using a template with the Stamparatus.  It took a few practice attempts, but I finally managed to make a wreath.
But first I had to make the template.
Again, there are many examples of how to make templates, and once I figured out the principles I was able to make my own. Making a template will be part of a separate post


This is a 5 by 5" square card with an Elegant Eggplant base.

The wreath was built on a 4 by 4" piece of Whisper White card stock, using the following stamps: Abstract Impressions, Enjoy Life, Varied Vases, and Love What You Do. Smaller stamps seem to work best.

The larger flowers were double stamped with Flirty Flamingo and Highland Heather from the Abstract Impressions stamp set.

The smaller flower is stamped in Highland Heather and is from Varied Vases; the butterflies from "Enjoy Life"; and the leaf stamped in Granny Apple Green from the stamp set "Love What You Do"

Small rhinestones were placed in the center of the larger flowers.

The sentiment in the center is from "Enjoy Life", stamped in Black Memento, punched with a 2" circle punch which is matted with a 2 1/4" circle punched in Highland Heather. On top of the sentiment I placed a black bird stamped and fussy cut from the Enjoy Life stamp set.

A bow make with white organza ribbon is attached to the lower right. of the wreath.

The 4 by 4" focal piece is matted with Highland Heather card stock, and adhered to a Whisper White layer with dimensionals.  This is added to an Elegant Eggplant base.

Supplies Used:
Stamps:  Enjoy Life, Love What You Do, Abstract Impressions, Varied Vases
Inks:  Flirty Flamingo, Highland Heather, Granny Apple Green, Black Memento
Papers:  Elegant Eggplant, Whisper White, Highland Heather
Accessories:  Stamparatus, Template, 2" circle punch, 2 1/2" circle punch, rhinestones, 1/4" white organza ribbon, dimensionals

Friday, July 13, 2018

Embossing with the Big Shot Embossing Mats

I love learning about ways that I can use Stampin' Up products in a different, new way.

One of the new products in the Annual Catalogue is Embossing Mats.  Okay, I didn't know what they were either, and I must admit it took me some time to figure it out.  However, using the mats to create a wonderful embossed image/background, proved to be decidedly easy.

Below is a video made by Stampin' Up explaining these mats and how to  use them.


Here's a card I made using the Embossing mats and the Springtime Impressions Thinlets.


The card base is Blueberry Bushel, layered with Whisper White embossed with the Springtime Impressions Thinlets.
Some 1/8" Blueberry Bushel Grosgrain ribbon was added along the left side, with a double bow added near the bottom.
A butterfly was die cut with the same color of card stock, and again with Vellum.  The two were adhered together at the body only, and then added to the card front.
The sentiment was stamped in the upper right using Blueberry Bushel ink.

Supplies Used:
Stamp:  Abstract Impression
Inks:  Blueberry Bushel
Papers:  Blueberry Bushel, Whisper White, Vellum
Accessories: Springtime Impression Thinlets, Embossing mats, 1/8" Blueberry Bushel Grosgrain ribbon,


Wednesday, July 4, 2018

Abstract Impressions Note Cards

With this stamp set, the Stamparatus is invaluable.  With 4 stamping surfaces it was very easy to make 4 note cards.


Thank You : stamped first with Black Memento
Flowers:  Pool Party and Balmy Blue
Leaves:  Pear pizzazz and Old Olive

The image was die cut with the square framelits, matted with Balmy Blue and added to the front of a note card.  I made 4 of these for a set.

Supplies Used:
Stamp:  Abstract Impression
Inks:  Black Memento, Pool Party, Balmy Blue, Pear Pizzazz, Old Olive
Papers:  Whisper White Note Cards, Whisper White, Balmy Blue
Accessories:  Stamparatus, Square framelits


Yellow Flower - Rooted in Nature

I found a new way to use the leaf stamps in the Rooted in Nature stamp set.  Before I started I visualized a Sunflower, but once the flower was completed it looks more like a yellow Poinsettia.  So this flower would be perfect for Christmas - just make the leaves red.

This is a 5 by 5" Crumb Cake card, layered with Whisper White with a strip of "Love What You Do" DSP (two patterns)
Then I stamped 8 large leaves and 7 small leaves using Daffodil Delight sponging the edges with Crushed Curry.  Two additional large leaves with Mossy Meadow, sponging the edges with Mossy Meadow as well.
Then punch 2 circles - a 1 3/4" in Crumb Cake and 3/4" in Mossy Meadow
Using a stylus, each leaf was scored down the middle and folded and then shaped on both sides. Each large petal was adhered to the 1 3/4" circle with a hot glue gun; the smaller ones on top of the large ones alternating petals.  Add the 2 leaves last - to the upper right.
In the center I places a 1" mossy green circle with a Tropical Elements button with a linen thread bow added to it


The sentiment is from Abstract Impressions.

Three glossy enamel dots were added to the upper right.

Supplies Used:
Stamps:  Rooted in Nature, Abstract Impressions
Inks:  Daffodil Delight, Crushed Curry, Mossy Meadow, Black Memento
Papers:  Crumb Cake, Whisper White, Mossy Meadow
Accessories:  Natures Roots Framelits, 1 3/4" circle, 3/4' circle punches, Linen Thread, Tropical Elements button, Hot glue gun, stylus, dimensionals, Glitter Enamel dots