Showing posts with label Up & Away Thinlets. Show all posts

Saturday, May 27, 2017

Flying Miss Piggy - a sliding card

"She believed she could ...so she did"

Yes, pigs can fly - at least on my card!

Don't you love Miss Piggy in a tutu skirt?  Actually, its some retired ribbon, but its perfect for the occasion.
After coloring Miss Piggy, I cut her out, and placed the ribbon (skirt) around her.

Then I proceeded to make a sliding card using the Sliding Star framelit die, 2 pennies and dimensionals.

The pennies are adhered together using a dimensional, inserted into the slot, and Miss Piggy is adhered to that.

The slider aperture was made in Pool Party card stock embossed with the Gently Falling Embossing Folder.  Some clouds, die cut using the Up & Away Thinlet Die, were added to the card front as well. This is matted with Basic Black card stock and then adhered to a Pool Party card base.

Tip:  To make the slider work really well, use 3 or 4 dimensionals one on top of the other.  This gives the pennies plenty of room to slide.

Supplies Used:
Stamp: This Little Piggy
Inks: Black Memento, Blushing Bride, Smoky Slate
Papers: Pool Party, Whisper White, Basic Black
Accessories: Up & Away Thinlet Dies, Sliding Star Framelit Die, Gently falling embossing folder, Pennies (2) non SU, ruffled ribbon (retired), dazzling details, dimensionals.


Thursday, May 11, 2017

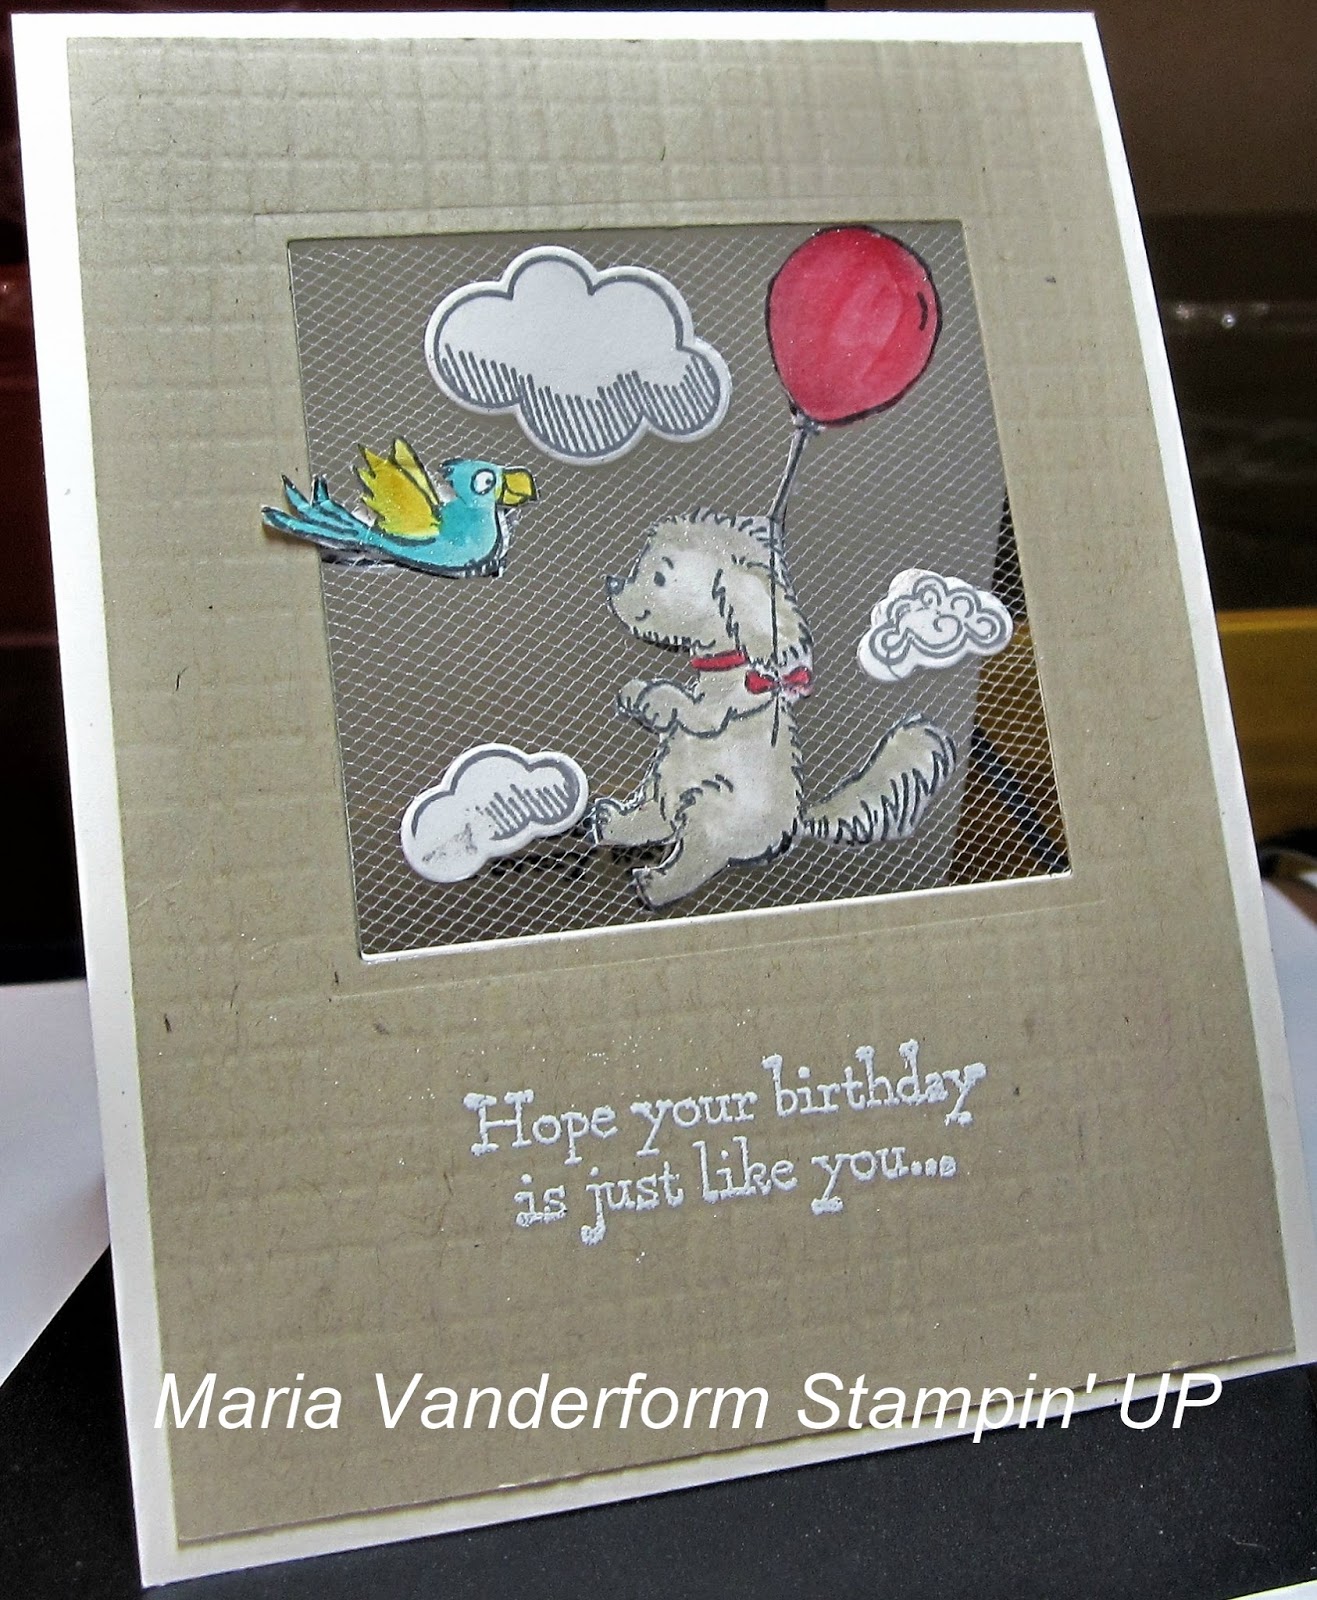
Belle & Friends Tulle Window Card

Using Tulle instead of window sheets to make both window and shaker cards was inspired by watching some videos by Jennifer McGuire.
It was actually quite easy to use tulle, which I was able to obtain rather inexpensively.  I will also be using the tulle to wrap and decorate packages for my craft shows, so this is just one more idea for this product.
For today's purpose I used plain white tulle, although there is tulle which has glitter embedded in it.


A 4 by 5 1/4" piece of Crumb Cake card stock was temporarily adhered to a 4 1/4 by 11" Very Vanilla base.  The square stitched framelit was used to die cut an opening in the two layers.

A piece of tulle was cut slightly larger than the opening of the window.

The two layers were separated, and tear & tape adhesive was applied around the openings and edges on the wrong side of the Crumb Cake piece only. After removing all the tape covers, the tulle was added over the opening, making sure there was no slack in the tulle.

This crumb cake layer is now added to the card front.


The images from "Belle & Friends" were stamped on White Glimmer Paper and colored with ink pads and a Clear Wink of Stella brush.  This gives such a lovely glitter effect.

They were fussy cut, and I mean fussy cut!!  I had surgery to my right thumb a week ago,  and I have a difficult time holding scissors.  I managed, but some of the edges are a bit rough.  I stamped and cut out a second set of images to place on the other side of the tulle. These were not colored.

The clouds were stamped using the "Lift Me Up" stamp set and die cut using the coordinating stamp set. A second set of clouds were die cut without stamping as well.

After applying adhesive to the back of each image, they were attached to the tulle window as shown in the card.  The uncoloured images and clouds were adhered on the other side of the tulle so that they would not stick to the inside of the card. Below is a close up of the tulle window.  The images look like they are floating!


The sentiment, from "Pretty Kitty" was embossed with white embossing powder.

Supplies Used:
Stamps: Belle & Friend, Pretty Kitty, Up in the Air
Inks: Black Memento, Basic Gray, Crumb Cake, Real Red, Bermuda Bay, Crushed Curry, Versa Mark
 Papers: Very Vanilla, Crumb Cake, White Shimmer
Accessories: Stitched square framelits, white embossing powder, tulle (white) non SU. Up and Away Thinlet dies.

This window card can be made using Window Sheet as well.


Thursday, March 30, 2017

Succulents You Lift Me Up

On Pinterest I have seen many hot air balloons made into 3D objects, so today I decided to make my own- plus more.

I die cut 6 hot air balloons using the following colours:  Delightful Dijon, Calypso Coral and Night of Navy folded them in half, and adhered them together to form this 3D object.

Then I made a little basket using Crumb Cake card stock. It was attached it to the balloon using thick Smoky Slate Baker's twine. The basket was decorated with a 1/4" strip of So Succulent DSP which was adhered around the bottom and a strip of Calypso Coral around the top.

Inside of the basket, I placed some dried moss and hot glued some smaller succulent plants made using Mint Macaron and Sweet Sugar Plum card stock.  I made a few "babies" extending over the side. See the close up below.


Supplies Used:

Papers:
  • Hot Air Balloon: Night of Navy, Delightful Dijon, Calypso Coral
  • Basket: Crumb Cake, Calypso Coral, So Succulent DSP
  • Succulents: Mint Macaron, Sweet Sugarplum
Inks: Old Olive, Tip Top Taupe, Rich Razzelberry

Accessories:
  • Hot air balloon: Up & Away Thinlet dies, thick Baker's Twine (Smokey Slate)
  • Succulents:  Succulent framelits, Linen Thread to hold "baby plants"
  • Other:  1/8" hand held punch to punch holes in basket to insert Baker's Twine

Tuesday, March 28, 2017

Balloon Birthday - Try Stampin' on Tuesday #315

The sketch challenge with Try Stampin' on Tuesday this week is just crying for balloons.  However, I did have to make some strategic changes to Vicki's sketch, which I hope she doesn't mind.


The optional theme for this sketch was to use 3 different patterns.
As you can see from my card, instead of circles I used balloons of different sizes and patterns, and I placed them on the upper left of the card.

To do this I used balloons from 2 different stamp sets:  Celebrate today (the larger balloon) and Balloon Adventure (2 other balloons).

After stamping the balloons on a piece of Whisper White cardstock, the larger one was die cut using the Balloon Framelit Dies: the smaller balloons with the Balloon Bouquet punch.
 
The sentiment was stamped on the larger balloon
with Black Memento ink before it was adhered to the upper left of a Very Vanilla Art piece. A curly balloon string was stamped from the larger balloon. The other two balloons were adhered using dimensionals. A fine tipped marker was used to hand draw balloon strings from these two balloons to merge with the curly one.

Two Bermuda Bay glimmer bows were added two places along the balloon strings.

After I finished this, I felt the card lacked something, so I die cut some clouds using the Up & Away Thinlets, sponged them with Basic Gray and adhered them to the card.

Supplies Used:
Stamps: Celebrate Today, Balloon Adventures
Inks: Calypso Coral, Black Memento, Crushed Currie, Bermuda Bay, Basic Gray
Papers:  Calypso Coral, Whisper White, Very Vanilla, Bermuda Bay glimmer paper
Accessories: Balloon Framelit dies, Balloon Bouquet Punch, Up & Away Thinlets, dimensionals.

Now its your turn.  Create a project using Vicki's sketch.  Then download it to the Try Stampin' on Tuesday blog or their Facebook Page.  Remember that you have 2 weeks to complete your project. I look forward to seeing your projects.


Sunday, March 26, 2017

Celebrate Beautiful You

I was working with the Up & Away thinlets for another project when the hot air balloon die cut fell on one of the images from the stamp set "Beautiful You".  It looked just like a balloon skirt, so the idea for this card was born.

I die cut the hot air balloon using the Playful Palette DSP, turned it upside down, trimmed off the basket, and made a pleat (to fit the waist better) in the middle.  Because this die cut was very transparent, I lined it with filter paper cut to shape.
Watercolor pencils were used to colour in the bodice of the dress and hat, selecting the colours from the Playful Palette DSP.
The skirt was added using glue dots.
Two tiny holes were punched on either side of the waist and a piece of 1/4" very vanilla ribbon was inserted through them (from the back), and tied at the waist in the front.

The 2 3/4 by 3 3/4" art piece was matted with Basic Black cardstock before adding it to the card front.

The flower embellishments were made using the Botanical framelits.

Supplies Used:
Stamps: Beautiful You
Inks: Black Memento, Watercolor pencils
Papers: Peek-a-boo Peach, Whisper White, Playful Palette, Basic Black, Emerald Envy, filter paper
Accessories: Botanical  Builder Framelits, Up & Away Framelits, Corner Rounder punch, dimensionals, glue dots, rhinestones, Classic Label Punch.

Friday, March 24, 2017

Pop & Twist Lift Me Up Birthday

Pop & Twist, or is it Twist & Pop....
What's in a name?
This card was made as a swap card in a technique swap.


A Pop & Twist card has a unique "twisting" mechanism that "pops" when the card is opened. It absolutely delights recipients when the unexpected elements are exposed.
As my son stated when I opened the card "Well that was unexpected, but absolutely delightful!"

The card base is Basic Gray card stock, which is 4 by 12", scored at 6" for make a 4 by 6" card.

This picture shows the card front and a belly band which keeps the card closed.


The card front is layered first with Whisper White, followed by the SAB Carried Away DSP.

The Art Piece is Whisper White matted with Night of Navy card stock.

On the background of sunshine and sea birds(from High Tide) I placed two hot air balloons around clouds.

The largest hot air balloon is die cut using Night of Navy card stock, with different die cut pieces of Carried Away DSP adhered behind it.

The smaller balloon is first stamped with Calypso Coral ink and then die cut with the Up & Away Thinlet dies.

All cardstock and die cut images are sponged with Basic Gray ink (except the smaller balloon)


Open the card, and this is what is revealed - 4 pop up decorated panels.

I decorated them using Layering Oval framelits, die cut images using Up & Away Thinlet dies, sentiments and bird images from "High Tide" on a Whisper White background and Carried Away DSP.


This is a close up of the inside upper panel of the card.


The lower panel is similar to the upper panel.


The two right panels of the pop mechanism.


The two left panels.


Close up of belly band showing die cut hot air balloon, a cloud, a punched balloon and the sentiment.

The belly band is closed at the back with Velcro


Supplies Used:
Stamps: Lift Me Up, High Tide, Balloon Celebration
Inks: Black Memento, Basic Gray, Calypso Coral, Mint Macaron, Crushed Curry, Peek-a-boo Peach, Markers (Basic Black, Basic Gray)
Papers: Basic Gray, Whisper White, Calypso Coral, Night of Navy, Carried Away DSP, Mint Macaron Glimmer Paper
Accessories: Balloon Builder Punch, Up & Away Thinlet dies, Timeless Type Junior Alphabet dies, scoring tool, Velcro (non SU). Layering Oval Framelits.



Tuesday, March 21, 2017

Hello New Baby, Try Stampin' on Tuesday #314

The sketch challenge with Try Stampin' on Tuesday has a baby animals theme, but I decided to use an actual human baby.  The sketch is by Vicki          


I started by punching one end of two pieces of 1 5/8 by 2 1/2" pieces of Whisper White card stock with the angle top tag punch. The edges of both tags were sponged with Mint Macaron ink.

Tag 1:  A strip of Up and Away DSP was attached to the bottom end.  Three clouds were die cut with the Up and Away Thinlet dies and the edges were sponged with Mint Macaron. They were attached to the tag with a glue dot.  The baby was added with dimensionals.
This tag was added to the card front with tombo- at an angle.

Tag 2:  Some  Pear Pizzaz glimmer paper was die cut with the oval die in the Timeless Tags Thinlets,  This was matted with a Whisper White oval tag that looks like sunrays. The center sentiment was stamped first and then die cut using the same thinlet. It was added to the Pear Pizzazz glitter backing using dimensionals. This unit was added to the Angle top tag using dimensionals.
The entire tag was attached to the card front with dimensionals, slightly overlapping the other tag, again at an angle

A 1/4" Mink Macaron double bow was added to the tag fronts.

The card base is Mint Macaron, layered with Whisper White, and then a piece of Whisper White stamped with Mint Macaron ink and the background stamp "Brush Strokes"

Supplies Used:
Stamps: Moon Baby, That's the Tag, Brushstrokes Background
Inks: Black Memento, Mint Macaron, copics
Papers: Mint Macaron, Whisper White, Pear Pizzazz glimmer paper, Up & Away DSP
Accessories: Up & Away Thinlets, Timeless Tags Thinlets, 1/4" Mint Macaron ribbon, Angle top tag punch, dimensionals, glue dots

Now it is your turn to create something using this sketch.  As usual you have 2 weeks to make something.  When done, upload it to the Try Stampin on Tuesday blog or its Facebook page. While you are either site, take some time to check the work of the other designers and leave them some comments.


Thursday, January 19, 2017

Happy Birthday - an Interactive card that Lights up - Just Add Ink #341

The challenge with Just Add Ink is to create a project that has an interactive element in it, whether it be a shaker, slider, pop up, or a light up element.
For about 3 months I have been working with putting lights in cards and have been moderately successful.  The technology initially intimidated me (and it still does) but I move forward, now using easier technology.
This card has a battery cell and a thin wire that has seven tiny lights along its lengths. Tiny holes are punctured in the card front to allow the light to shine through.

The card front is Night of Navy, layered with Whisper White and then Serene Scenic DSP.

The Lift Me Up stamp set and coordinating Up & Away thinlets were used to create the art piece of this card.  The large hot air balloon was die cut in Night of Navy cardstock, with the following colours built behind it: calypso coral, night of navy, peekaboo peach, and marina mist.

The medium balloon was stamped with Night of Navy ink; the smaller balloon in Calypso coral.  Both were die cut and adhered to the card front. 

Before adhering the large balloon, some clouds were stamped, die cut and added to the sky.  The balloon was then added using dimensionals.

After the lights were positioned behind the card front, some holes were poked in some strategic areas.  If you look closely you can see the pin prick holes.

A switch at the side turns the light on and off.

Isn't that terrific?

Supplies Used:
Stamp: Lift Me Up
Ink: Basic Gray, Night of Navy, Calypso Coral
Papers: Night of Navy, Whisper White, Serene Scenery DSP, Calypso Coral, Peekaboo Peach
Accessories: Up & Away Framelits, dimensionals, battery cell and wires with lights


Friday, January 6, 2017

Cost Effective Altered Journal for SUO Challenges

The challenge this week with SUO Challenges is to create something using the "stuff" from the Occasions and/or SAB catalogue. Since I had products from both catalogues I decided to use both to alter a journal. Because I sell the journals, I like to keep the cost down as much as possible by purchasing inexpensive journals (and make them look like a million dollars), and decorate them using retired products purchased from the clearance rack plus scraps from my scrap bin.


I purchased this journal from the Dollar store.  Because I like to braid the spine ribbon, I choose journals that have a wire spine.

The front and back cover of the journal were covered with "Carried Away" SAB designer paper, and I used the colours in that paper to decorate the journal. The insides were covered with coordinating Mint Macaron card stock.

Art Piece:
One wonderful thing about this year's Occasion and SAB catalogues is the cooperative interplay between the two.

The DSP from the SAB catalogue features hot air balloons, so naturally the "Lift Me Up" stamp set from the Occasions catalogue, with its coordinating framelits (Up & Away Thinlet dies), was used to create the scene on the front of the journal.

The edges of the Whisper White piece were first distressed with Basic Gray ink using the Timeless Texture stamp set.  Some large and small clouds were stamped randomly on the art piece as well as on separate scrap pieces of Whisper White card stock. The ones on the scrap piece were die cut and placed aside. Once I knew the placement of the hot air balloons, three birds (from "Wherever You Go) were stamped between the clouds.

Three balloons were die cut - the large one with Night of Navy card stock, backed with die cut pieces of various patterns of the SAB Designer paper.  The medium and smaller ones were die cut with the SAB designer paper. Three balloon baskets were die cut with Night of Navy scraps.  One was adhered to the larger balloon; the other two were cut to fit the other balloons.  The edges of the two smaller balloons were sponged with Calypso Coral ink.

After the balloons were adhered to the art piece with dimensionals (except the smallest) the die cut clouds were also adhered with dimensionals among the stamped clouds.

The art piece was matted with Calypso Coral card stock and adhered to the front of the journal.


Decorating the rest of the Journal:
The Tasteful Trim die (retired) was used to cut the Night of Navy trim which was adhered next to the spine, on both the front, back and inside.

The sentiment was punched with the Classic Label punch and matted with a Night of Navy modern word label punchie.

This was adhered to the top of the art piece.

Spine:
Four rows of retired Calypso Coral seam binding was used to braid the spine.  The ends were left a bit longer because I like to attach beads to them.  But because this is a SU only challenge, I used 2 retired Antique brads hot-glued together and to the ribbon end.


Book Mark
As a bonus, I made a book mark using 1/4" strips of the same DSP and the Calypso coral card stock.  These were braided together.  The top was decorated with  2 Calypso Coral and 1 Mint Macaron flowers die cut using the Succulent framelits. The center of the flower was punched in Night of Navy card stock using a 3/4" circle punch.  Before adhering them together with Tombo glue the edges were curled up with a bone folder.
After attaching the flower to the top of the book mark, dazzling details was applied to the edges and center of the flower


Supplies Used:
Stamps: Lift Me Up (Occasions), Timeless Texture (Annual), Wherever You Go (Annual)
Inks: Basic Gray, Calypso,
Papers: Carried Away DSP, Night of Navy, Mint Macaron, Calypso Coral, Basic Gray, Whisper White
Accessories: Up & Away thinlets dies, Succulents framelits dies, Classic Label punch, Modern Word Label punch, 3/4" circle punch, 1/2" Calypso Coral seam binding (R), Antique brads (R), dimensionals, Tasteful Trim die (R), dazzling details.

Wednesday, December 21, 2016

A Light Up Balloon Birthday

Today, December 21is the first official day of winter.  It is also known as Winter Solstice.
The word solstice comes from the Latin words for “sun” and “to stand still.” In the Northern Hemisphere, as summer advances to winter, the points on the horizon where the Sun rises and sets advance southward each day; the high point in the Sun’s daily path across the sky, which occurs at local noon, also moves southward each day.
At the winter solstice, the Sun’s path has reached its southernmost position. The next day, the path will advance northward. However, a few days before and after the winter solstice, the change is so slight that the Sun’s path seems to stay the same, or stand still. The Sun is directly overhead at “high-noon” on Winter Solstice at the latitude called the Tropic of Capricorn.

I looked up some folklore and sayings related to winter and found the following sayings:

Winter Folklore and Verse

Deep snow in winter; tall grain in summer—Estonian proverb
Visits should be short, like a winter’s day.
A fair day in winter is the mother of a storm—English proverb
Summer comes with a bound; winter comes yawning.
Onion skins very thin, mild winter coming in. 

I can't say that I've heard any of these sayings before, have you?

In honour of Winter Solstice I made a card with lights on it.

To make the best use of the Lift Me Up stamp and coordinating framelits I viewed the video made by Stampin' Up which I have imbedded below:


The basic card is Island Indigo, layered with Whisper White and then Scenic Scenes DSP.  The DSP provided the back drop for the scene created.

The large hot air  balloon was die cut using Night of Navy card stock and a balloon shaped layers of colour (Mint Macaron, Watermelon Wonder, Night of Navy, Delightful Dijon)was placed behind it.

On a separate piece of card stock two other balloons were stamped - one with Night of Navy and one with Watermelon Wonder.  After die cutting the edges were sponged with Basic Gray.  Some clouds were also stamped and die cut.

The lights for the card were built on a Whisper White layer below the card front.  The lights are battery  operated with an on/off switch on the left side.

The balloons and clouds were arranged as indicated in the picture above.  Some tiny holes were poked in various places on  the finished scene so that the lights can shine through them.

Here is a picture of the card with the lights dimmed so that the lights can be seen.


Supplies Used:
Stamps: Lift me Up
Inks: Night of Navy, Watermelon Wonder, Basic Gray, Basic Black marker
Papers: Whisper White, Island Indigo, Night of Navy, Scenic Scenes DSP, Mint Macaron, Watermelon Wonder, Peach Parfait
Accessories: Up & Away thinlets, paper piercing tool, string of lights & battery unit (non SU)