Showing posts with label Layering Circles framelits. Show all posts

Sunday, March 10, 2019

Spring Time Diorama

I was challenged to make another Diorama card by a Facebook friend. In February I made my first Diorama card featuring the Big Catch stamp and it was very well  received.  The link to that post is here.

This time my card has a Spring theme. Like many, I am snow weary and yearn for warmer weather .

 I used the following stamp sets:  Abstract Impressions, Enjoy Life, and Petal Palettes.


Although this is a bulky card, it folds flat for mailing (see below).  However, an envelope will have to made using the Envelope punch board to accommodate the different envelope size.  I would recommend using a bubble envelope to mail this card.


The impetus for this card, and the colour scheme used, was a background technique I demonstrated in class on Wednesday.  This technique involved randomly applying the following colours on a piece of Whisper White card stock:  Melon Mambo, Daffodil Delight, Highland heather, and Granny Apple Green, then spritzing the colours with water to blend them.  

I found this finished background piece lying on my desk this morning, and recalling the challenge I was given, I started making this card.

This card is by no means a 'quick' card and it did take me most of the morning to make.

The dimensions for the 3 layers to this card are as follows:
  • Front:  Very Vanilla 10 1/2 by 5" scored at 2 and 8 1/2"
  • Middle: Gorgeous Grape 8 1/2 by 5" scored at 1 and 7 1/2"
  • Back (scene) 10 1/2 by 5" scored at 2 and 8 1/2"
Layering circle framelits were used to die cut circular apertures in the front and middle layers - a larger one in the front, and a smaller one in the middle.


Scene:
On the finished background piece, and using the stamparatus, the leaves and flowers from the Abstract Impressions stamp set were stamped across the bottom - the leaves in Pear Pizzazz and Old Olive, and the flowers in Highland Heather and Gorgeous Grape.

Then some butterflies from "Enjoy Life" were stamped randomly above the flowers using Gorgeous Grape ink.

This was added to the back layer.

Middle Layer:  Around the circular aperture yellow flowers from Petal Palette were adhered - a total of 4 stamped, coloured and die cut images.  You can see the flowers around the middle circle in the picture above. At the bottom of the circle was added the silhouette of the individual raising his hands up as well as a cyclist going by.  Both of these are from "Enjoy Life"


Front of Card:
Prior to die cutting the circle, some Garden Impressions DSP was adhered to the front. Flowers stamped, coloured and die cut using the Petal Palette stamp and die set were arranged around the circle.  Two birds were also added.
A butterfly left over from another project was added to the left side.

To finish the card, rhinestones were added to the tiny butterflies in the scene, and in the centers of the flowers and butterfly on the front.

Close up of left front

Close up of right front

Some Whisper White card stock decorated with a strip of DSP was added to the back of the card. Also added were some extra flowers that were not used to decorate the card.


Supplies Used:
Stamps:  Abstract Impressions, Enjoy Life, Petal Palette
Inks:  Black Memento, Gorgeous Grape, Highland Heather, Old Olive, Pear Pizzazz, Various colours of Stampin' Blends
Papers:  Very Vanilla, Gorgeous Grape, Whisper White, Garden Impressions DSP
Accessories:  Layering Circles Framelits, Springtime Garden Thinlets, Petals & More Framelits, Rhinestones, Stamparatus


Saturday, April 14, 2018

Cupcake Birthday

I still remember Sheila demonstrating techniques with this stamp set at On Stage, and that memory returns whenever I use this set.

But, unfortunately all good things come to an end.  This set and its coordinating framelits, are on the retirement list.   So, one last card - for the road.


Cupcake:
Icing:
Using the Stamparatus, the icing was stamped first with Pink Pirouette (retiring colour), Sweet Sugarplum (also retiring) and finally Rich Razzelberry. Sprinkles of candy were stamped with Rich Razzelberry.

Cone:
This was stamped in Crumb Cake and Early Espresso

Both the cupcake icing and cone were die cut using the Cupcake Cut outs Framelits and added to a Whisper White Stitched Circle die cut - the icing with dimensionals.  The stitched circle was matted with a Sweet Sugarplum scallop circle the two of which were adhered together using dimensionals. The sentiment, stamped in Rich Razzelberry on Whisper White, was made into a banner and added to the side of the cone with some mini dimensionals.


The card front is comprised of a 4 1/4 by 11 thick Whisper White top fold card.  Before adding the strip of Party Time DSP (retiring) to the left side, some texture was stamped in Rich Razzelberry ink using the dot stamp from Timely Texture (also retiring)  A strip of Burlap ribbon as well as metallic edge Berry Burst ribbon added over and on the edge of the DSP help to unite the colours in the card.

The focal image was added to the card front using dimensionals. Adhesive backed Tutti-Fruitti sequins were adhered at random providing some sparkle and colour.


Supplies Used: 
Stamps:  Sweet Cupcake, Timeless Texture
Inks:  Pink Pirouette, Sweet Sugarplum, Rich Razzelberry, Crumb Cake, Early Espresso
Papers:  Thick Whisper White, Whisper White, Sweet Sugarplum, Party Time DSP
Accessories:  Cupcake Cut outs Framelits, Stitched Circle Framelits, Layering Circle Framelits, Burlap ribbon, 1/4" metallic edge Berry Burst ribbon, adhesive backed Tutti-Fruitti sequins, Dimensionals, Stamparatus

Thursday, March 22, 2018

Apron Pop Up Card

To make this card I used the tutorial on Splitcoast Stampers here


On the front flap of a 4 1/4 by 11 top fold card, I due cut a circle using the Layering Circle Framelits.

The pop up was made by  folding a piece of Whole Lot of Lovely DSP into 3 and die cutting all 3 layers at once using the Apron Framelit.  Two of the aprons were folded in half and then adhered to the back of the unfolded one.

The apron was decorated with an apron, cooking tools, as well as the neck and other ties.


After applying adhesive on the back of the apron it was positioned through the front of the circle and adhered to the back of the card.

Open the card and the apron stays adhered to the inside of the card.


Supplies Used:
Stamp:  Apron of Love
Ink:  Tranquil Tide
Papers:  Thick Whisper White, Whole Lot of Lovely DSP, Cherry Cobbler, Basic Black
Accessories:  Layering Circles framelits, Apron Builder Framelits


Wednesday, October 11, 2017

Merry Patterns - Copper Deer

The Merry Patterns stamp set arrived on Tuesday and today was the earliest I had time to play with it.  The  Year of Cheers DSP also arrived, and all that copper and silver inspired me to make this card. It was really hard to take a picture with good exposure because of the metallic nature of the paper.

The image of the deer was embossed with copper embossing powder on Basic Black card stock and then die cut using the layering circles framelits.
This I adhered to the card front - the beautiful metallic Year of Cheers DSP - with dimensionals. This DSP was layered onto a 5 by 5" Basic Black card base.
Before adhering the DSP to the card front some 1/4" Basic Black Shimmer ribbon was adhered to the center and a bow added to he right side.

The sentiment was embossed with copper embossing powder, punched with the Classic Label punch and adhered to the card front at the bottom left circle.

Supplies Used:
Stamp:  Merry Patterns
Inks:  Versa Mark
Papers:  Basic Black, Whisper White, Year of Cheer DSP
Accessories:  Copper Embossing Powder, Classic Label Punch, Layering Circles Framelits, Dimensionals, 1/4" Basic Black Shimmer Ribbon

Tuesday, October 10, 2017

Comfort & Healing to You - Try Stampin' on Tuesday or Not #343

This week the optional theme with the sketch challenge is "leaves", and I made it into a sympathy card. The sketch is courtesy of Kaylin


I had earlier die cut some leaves from a background I created using the Baby Wipe technique.  These leaves came in handy for this card and became the art piece.

The card base is Cajun Craze card stock, layered with Whisper White card stock.

To the left are some retired DSP with leaf patterns on it.  The edges of these pieces were sponged with Cajun Craze ink and then mounted on Cajun Craze card stock.

The die cut leaves were arranged on the art piece, which is the reverse side of the retired DSP.  This was also matted with Cajun Craze card stock before adding it to the card front with dimensionals.
Attached to the right side of the art piece are 2 notched Gold Glimmer banners.

The sentiment. from "Flourishing Phrases" was stamped with Cajun Craze ink, punched with the 1 3/4" circle punch and matted with a Gold Glimmer scallop circle.

Supplies Used:
Stamp:  Flourishing Phrases
Inks:  Cajun Craze
Papers:  Cajun Craze, Whisper White, Autumn DSP (retired), Gold Glimmer, Whisper White
Accessories:  Seasonal Layers Framelits, Layering Circles Framelits, dimensionals.

Tuesday, September 26, 2017

Snow Man Ornament


I'm having a lot of fun with the Seasonal Chums stamp set with the coordinating Seasonal Tags Framelit dies. They make lovely gift tags, but can also be used to make ornaments, as well as cards.

Today I used the Snow man "Chum" to make a couple of  Ornaments. All die cuts in this ornament were made using the Seasonal Tags framelit dies.

I  stamped, coloured, and die cut only the front half of the snow man and tucked him in some curved layers of Dazzling Diamond glimmer paper the bottom edge of which was die cut to fit the Night of Navy base.

The 3 Garden Green trees were added in layers  along side the snow man and 2 snowflakes were placed in the sky.

Some white glitter beads were added to the ornament before it was sealed onto the Dazzling Diamond scallop circle base.

Supplies Used:
Stamp:  Seasonal Chums
Inks:  Black Memento, SU markers
Papers:  Whisper White, Night of Navy, Dazzling Diamond Glimmer Paper, Garden Green
Accessories:  Layering Circle Framelits, Seasonal Tags Framelits dies, White glitter beads (non SU), hot glue gun, dimensionals


Tuesday, August 22, 2017

Count Your Blessings - Try Stampin' or Not on Tuesday #336

For my design team card this week I thought I would make a Fall/Thanksgiving card.  The optional theme for this week's challenge for Dawn's sketch is "Fun Florals"


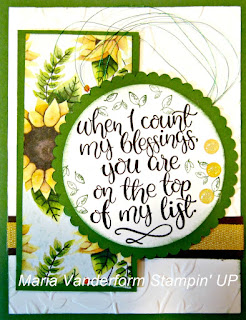
The sentiment from "Count My Blessings" was made the focal point.  This sentiment was stamped on Early Espresso on Whisper White card stock, and die cut with the Layering Circles Framelits and matted with a Garden Green scallop circle. The edges of the Whisper White circle were sponged with Garden Green ink and some tiny leaves were stamped around the periphery. Three Crushed Curry Enamel dots were added at the outer edge of the circle.

The basic card is Garden Green card stock, layered with Whisper White card stock embossed with the Layered Leaves Dynamic Embossing Folder.

Some 3/8" Crushed Curry Mini Chevron ribbon was attached to a  3/4" strip of Early Espresso card stock and added to the card front near the bottom of the art piece.

A piece of Painted Autumn Harvest DSP featuring Sunflowers, matted with Garden Green Card stock, was adhered to the left side of the card front using dimensionals. I added the art piece with dimensionals.as well. Near the top of the sentiment circle I added some Green Metallic Thread.

Supplies Used:
Stamp:  Count My Blessings
Inks:  Early Espresso, Garden Green
Papers:  Garden Green, Whisper White, Painted Autumn Harvest DSP, Early Espresso
Accessories:  Layering Leaves Dynamic Embossing Folder, 3/8" Crushed Curry Mini Chevron ribbon, Green Metallic Thread, Crushed Curry  enamel dots, dimensionals, Layering Circles Framelits

Now let's see you create something using Dawn's sketch and upload it to the Try Stampin' or Not on Tuesday blog or Facebook site.


Tuesday, July 25, 2017

Summer in the Garden - Try Stampin' or Not on Tuesday #331

My design team card for this week's sketch challenge at Try Stampin' or Not on Tuesday has a theme of  "summer".
This is what I visualized.


The flowers in the stained glass window is a Frog's Whisker's Ink stamp and I already had it coloured so used it with this sketch challenge.  It was matted with a Basic Black scallop circle and added to the card front using dimensionals.

Beside the stain glass window I placed a white Adirondack chair, a place where one could sit and reflect on the summer outside.

The basic card is Marina Mist, layered with Whisper White embossed with the Ruffled Embossing Folder.  Across the middle I added a 1 1/4" striped Marina Mist ribbon with one end distressed.  On the upper edge I added a 1/4" ombre Island Indigo ribbon.  From the chair, this ribbon combo looks like water in a distance. 

I deliberately decided not to use a sentiment with this card.

Supplies Used:
Stamp:  Stained glass flower (Frog's Whisker's Ink)
Inks:  Copic markers, Black Memento
Papers:  Marina Mist, Whisper White, Basic Black
Accessories:  Layering Seasonal Framelits, 1 1/4" Marina Mist grosgrain ribbon, 1/4" ombre Island Indigo ribbon, dimensionals, Layering  Circles Framelits, Ruffles embossing folder.

Sunday, April 16, 2017

Cascading Truck Bouquet Birthday - Fusion Card Challenge

This is the first time I have participated in the Fusion Challenge.  I just love having the options to create something using just their sketch, or be inspired by the photo, or do both.

I decided to do both.

 
I was inspired by the cascading flowers from the truck window to make a card using the sketch provided.

I die cut a circular window surrounded by a scallop circle in the top half of the DSP strip. At the bottom of the window I placed a 3D flower which I made using the Pansy Punch.

Cascading down from this flower are numerous smaller flowers made using the Itty Bitty punch. They spill over the sentiment which is from "Cottage Greetings"

The main card consists of a Sweet Sugar plum base, layered with Whisper White card stock.  In the center is a strip of Sweet Sugar plum DSP with decorative die cut strips on both sides.

Supplies Used:
Stamps: Cottage Greetings
Inks: Black Memento, Rich Razzelberry, Daffodil Delight, Old Olive
Papers: Sweet Sugarplum, Whisper White, Sweet Sugarplum DSP, Mint Macaron, Old Olive
Accessories: Layering circles framelits, Pansy Punch, Botanical Builder framelits, Itty Bitty flower punch, pearls, gold dazzling details.

Saturday, April 15, 2017

Best Bird Birthday - Just Add Ink #355

I think spring is finally arriving. The temperature has been in the double digits the last couple of days, birds are coming to the bird bath, and squirrels are digging up their buried "spoils". The buds on the trees are starting to swell, but not too much is happening in the garden yet.  I guess that's to be expected because it was only a week ago that we had 2" of snow on the ground.

It's really nice to see and hear the spring birds when I go in the back yard - the fat robins, raucous black birds, chick-a-dees, nut hatches etc. Plus I still hear the Cardinals calling to each other across neighbours' yards.

When I saw the sketch challenge with Just Add Ink, I immediately visualized birds.  Crazy huh??

After building the card base using Soft Suede cardstock layered with Very Vanilla and Scenic Scenery DSP, I stamped and coloured the bird, flowers, and branch.  They were die cut using the coordinating framelits and the edges sponged to take away from the "cut" look and to give dimension to the images.

I used the layering circle framelits to die cut a circle from a piece of Very Vanilla cardstock that had been embossed with the chevron embossing folder.  The edge was sponged with Soft Suede ink.

A piece of burlap ribbon was adhered to the card front, and the branch and flowers were attached just below it and slightly overlapping it at one end.

The circle was added with dimensionals; the bird was added using dimensionals as well.  I placed a flower with a bud in the bird's mouth. And of course there are the rhinestones which I placed in the center of each flower.

The sentiment was added to the upper left circle.

Supplies Used:
Stamp: Best Bird
Inks: Black Memento, Crumb Cake, Soft Suede, Daffodil Delight, Basic Black marker, Melon Mambo, Old Olive
Accessories: Chevron embossing folder, Layering circles framelits, Birds & Blooms Thinlet dies, rhinestones, Burlap ribbon, dimensionals.


Friday, April 14, 2017

Flower Pot Card

I had some fun today making flowers using various stamp sets, and punches, some of which are retiring and some are not.
I had quite a number when I was done, so make a flower pot easel card, the template for which I got at my local craft store.


The card base is Cajun Craze cardstock, layered with Moroccan Series DSP.  I used a template from a local craft store to make this flower pot shaped easel card.

I stamped floral images from various stamp sets (Flower Shop, Grateful Bunch), punched some of the others using the Petite Petal Punch, Bunch Punch, the Scallop circle framelit, and Botanical Framelits. Some flowers were made into tiny roses, or a Chrysanthemum.  Most of the floral centers have pearls in them, but some have small brads.

The sentiment is from "Blossom Birthdays"

Here is the side view.

And a close up of the flowers:

Supplies Used:
Stamps: Grateful Bunch, Flower Shop, Birthday Blossoms
Inks: Daffodil Delight, Delightful Dijon, Old Olive, Pool Party, Bermuda Bay, Black Memento
Papers: Cajun Craze, Moroccan DSP, Calypso Coral, Chocolate Chip, Basic Black, Daffodil Delight, Whisper White
Accessories: Petite Petal Punch, Bunch Punch, Botanical Framelits, Layering Circles framelits, Pearls, small brads