Showing posts with label Circle framelits. Show all posts

Tuesday, December 18, 2018

Hey Love, Hey Valentine - an Occasions catalogue sneak peak

I know!  You don't have to take my temperature!  I am well aware that we are a week away from Christmas and here I am making a Valentine's Day card!

Frankly, it's not so crazy, as classes start early in the New Year and I am getting a head start on making class samples. Plus you're getting a sneak peak at one of the stamps in the Occasions catalogue, as well as some of the new DSP.

I made this card using a template on the Stamparatus enabling me to stamp this little Valentine's Day character in a circle. And let me say that the new cling stamps work just as marvellously with the Stamparatus as with the stampin' blocks.


After stamping the bird in a circle, I die cut the 4" square with a circle framelit and matted it with a Scallop circle in Lovely Lipstick card stock.  Each image was coloured with  a Stampin' Blend (Daffodil Delight, Pumpkin Pie, and Lovely Lipstick).  Some red glitter was added to each of the little hearts held in the little bird's beak.  Once the glitter was dry, I added the sentiment, which I flagged at both ends, in the circle center using dimensionals.  A small real red ribbon was adhered to the lower end.


The 5 by 5" Lovely Lipstick card base is matted with Whisper White, upon which I added a strip of "All My Love" DSP which has some Red Glimmer Glitter paper added to the op and bottom.

The art piece is added to the card front using dimensionals.

Supplies Used:
Stamp:  Hey Love
Inks:  Black Memento, Stampin' Blends
Papers:  Lovely Lipstick, Whisper White, All My Love DSP, Red Glitter 
Accessories:  Stamparatus, Circle framelits, Scallop Circle Framelits, Dimensionals, Red Glitter, 1/8" Real Red satin ribbon.

Wednesday, September 26, 2018

Stylish Christmas - The Paper Players #411

For the sketch challenge with The Paper Players here I pulled out the Stylish Christmas stamp set as I had not used it yet and thought it might look perfect with the sketch.


I decided to keep the circle shape for my main art piece, so I die cutting a circle using the circle framelit.  On the circle  I stamped the leaves for the flower twice at opposite ends using Mossy Meadow ink.  The flower was stamped with Merry Merlot ink on a separate piece of Whisper White and fussy cut before mounting it on this circle using dimensionals. I coloured the center of the flower with a Daffodil Delight marker, and the berries among the leaves with a Merry Merlot marker.


Because the color scheme of this card is copper, Merry Merlot and shite, I therefore copper embossed the edge of the circle to make it blend with the rest of the color scheme.

On the top of the card front I added some Joyous Noel DSP. On the lower section I created my own background using the large stylish stamped in various directions and  embossing it with copper embossing powder.


Between the two areas I added some 5/8" Merry Merlot reverse Copper ribbon, adding a bow at the left side of the circle.


The sentiment, also embossed with copper, is matted with copper foil and added to the lower card front with dimensionals.

The card front is added to some Copper Foil, which is added to a Merry Merlot card base.

Supplies Used:
Stamp:  Stylish Christmas
Ink:  Versa Mark, Merry Merlot, Mossy Meadow, SU Markers (Daffodil Delight, Merry Merlot)
Papers:  Merry Merlot, Copper Foil, Shimmer White card stock, Joyous Noel DSP
Accessories:  Copper embossing powder, 5/8" Merry Merlot & Copper reverse ribbon, Circle Framelits, dimensionals

Thursday, June 1, 2017

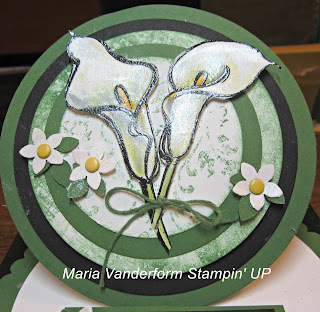
Circle Easel Sympathy Card

I seem to be in an easel making mood so after my class on Saturday, which ironically was on making Easel cards, I made this sympathy card -another scallop circle easel card.

Again, I used the retired Circle framelits only because the circles are larger in diameter.

 The Calla Lilies (from Remarkably Yours) were embossed with black embossing powder, colored,  cut out, and placed upon a Whisper White circle stamped with the Timeless Texture stamp set.
This circle was matted with a larger Garden Green circle, which was adhered to an again larger Whisper White circle sponged with Garden Green ink and then a Basic Black and finally a Garden Green circle.

Here's how the easel was made.

A large circle was die cut with one end of the circle was placed slightly over the edge of a folder Whisper White piece.  This results in two Whisper White circles joined in the middle.  One of the circles is folded in half towards the inside- this becomes the Easel.  The other half of the circle is adhered to the bottom large scallop circle.

The art piece is adhered to the folded circle half - and your card is done.

The flowers are punched using the Daisy Bunch Punch with Daffodil Delight candy dots placed in their centers.

The sentiment is from Floral Phrases.

Supplies Used: Remarkably You, Timeless Texture, Floral Phrases
Inks:  Versa Mark, Pear Pizzazz, Old Olive, Garden Green, Daffodil Delight
Papers:  Garden Green, Whisper White, Basic Black
Accessories:  Circle Framelits (retired), Daisy Bunch Punch, dimensionals, Garden Green thick Baker's twine

Saturday, November 12, 2016

Snowplace Christmas Ornament

Today was ornament making day, and I made several different kinds but the ornament I like the best was the one I made using the Snow Place Stamp set and half of a plastic ornament.


After stamping and die cutting the small snow man and the penguin, I die cut the following using the retired circle framelits:
.one scallop circle
.2 of the largest circle framelits in Whisper White
.2 of the same size in Dazzling Diamond glimmer paper
Other supplies needed:  blue sequins, mica powder, embossing buddy. 1/2 of a large plastic ornament, some decorative ribbon, tombo glue, hot glue gun.

On one of the Whisper White circles, snowflakes were randomly stamped with Versa Mark and embossed with White embossing powder.  The entire circle was then sponged with Night of Navy ink and then wiped with a paper towel to bring out the white snowflakes.

Then both dazzling diamond glimmer circles were cut in a curvy manner in 3 different layers, each layer being shorter than the other. They were adhered to the embossed Night of Navy background circle.

The Penguin was placed on top of the second layer; the small snowman on the lower layer. Tombo glue was used to adhere all these layers. This art piece circle was adhered to a second Whisper White circle and then to the Scalloped Circle. Clamps were used to keep the layers together until the adhesive dried.

Sequins and snow was piled on top of the images, and a layer of glue was placed around the edges of the circle.  Before attaching the 1/2 ornament to the image circle, it was wiped with the embossing buddy.  This prevents the "snow" from attaching to the inside of the ornament.

After adhering the ornament to the prepared circle, it was allowed to dry, and then some decorative ribbon was adhered to the outside and a bow placed on the top.

Supplies Used:
Stamps: Snow Place 
Inks: Black Memento, Real Red, Pumpkin Pie marker, Versa Mark, Night of Navy
Papers:Whisper White, Dazzling Diamond Glimmer Paper
Accessories: Circles Framelits (retired), 1/2 large plastic ornament (non SU), sequins, mica flakes, White embossing powder, embossing buddy, Snow place framelits

Here's another one, using the larger snowman from the same stamp set:


Sunday, June 12, 2016

With Sympathy - another Telescoping Technique

I knew there was a name for the technique that I called "layering" but could not remember it yesterday.  Today I remembered.  It's called Telescoping technique.
Today I made a sympathy card using the Calla Lily stamp from the Remarkably You stamp set, using that technique.
I don't know why I chose to make a sympathy card today, but I know why now.  I just finished watching a news broadcast about the mass shooting in a nightclub in Orlando, Florida - and the arrest of another terrorist who intended to do harm at a Gay Pride Parade in California.  I have friends in both Florida and California, and if any of you are reading this post, please contact me and let me know you are all right. 

This Sympathy card again features a stamp from the "Remarkably Yours" stamp set, and again I use the Telescoping technique.


The image is stamped on a 3 1/4 by 4 1/2" piece of Whisper White cardstock, and coloured with a blender pen and ink pads (Sweet Sugarplum and Old Olive).  Because I wanted to use the telescoping technique, I made 2 coloured images on the same size of cardstock - one to die cut and one to build the die cut pieces onto.

Selecting one of the pieces of cardstock, and using circle framelits, the image was die cut as shown in the picture below.

On the wrong side of the die cuts pieces, 1/2 pieces of dimensionals were attached, and one at a time these pieces were built on the remaining coloured images, carefully matching the images.


Here's a side view of the completed telescopic images.  You can't see it very well, but clear Wink of Stella glimmer was added to the sides and stems of the images.

This Whisper White image piece was matted with a 3 3/8" by 4 7/8" piece of Sweet Sugarplum cardstock.
This was adhered with dimensionals onto a Sweet Sugarplum cardstock base layered with Sweet surgarplum DSP
All layers were sponged with Sweet Sugarplum ink.

The sentiment and label is from the "Rose Wonder" stamp set.  They were stamped with Black Memento ink, and die cut.  Holes were punched at both ends of the label, and a 1/4" piece of white cotton ribbon was inserted in it, underneath it, out the other side, and then around the matted image piece and tied into a kot at the right front.


Supplies Used:
Stamps: Remarkedly Yours, Rose Wonder
Inks: Black Memento, Sweet Sugarplum, Old Olive, Hello Honey
Papers: Sweet Sugarplum, Whisper White, Sweet Sugarplum DSP
Accessories: Rose Garden thinlet dies, 1/4" white cotton ribbon, Circle framelits, blender pen, Wink of Stella clear glimmer brush, dimensionals.


Sunday, December 13, 2015

Snowflake Shaker card - Try Stampin' on Tuesday #248

That's one thing we have had very little of this winter (so far) - is snow.  Not that I'm complaining!  I prefer this to shoveling and slipping and sliding.

The challenge with Try Stampin on Tuesday is a sketch challenge - snowflakes can be added if we wished to.  Guess what, I wished to.  I decided to make a snowflake shaker card.


  • This is a 5 by 5 Pacific Point base card which has had a shaker element built into the front of it.
  • I used Fun Foam to make the shaker, die cutting the circle using the Circle Framelits.  The Whisper White front layer was die cut at the same time.  I also die cut a piece of Christmas DSP that had snowflakes in the pattern- to place behind the shaker.
  • A window sheet, die cut with the circle framelits was attached to the wrong side of the whisper white layer using the Fine Tip glue pen.
  • The die cut fun foam was adhered to the DSP which was attached to a piece of Whisper White cardstock slightly smaller than the card size.
  • Frosted Sequins were used as the shaker elements.
  • On the right side I used the embossed resistance technique using Plenty of Wishes embossed with white embossing powder and then the panel sponged with Pacific Point ink.  A paper towel was used to make the snowflakes "pop".  A circle framelit was used to cut the circle around the shaker, and it was then adhered to the front of the card.  A piece of silver ribbon was adhered to the edge of this panel.
  • The rest of the Whisper White card front was stamped randomly with the snowflake stamp from Happy Scenes in Pacific Point ink.
  • Before adding the snowflake embellishments, I die cut a circle of dazzling diamond glimmer paper (use 2 sizes of circles and die cut at the same time) and adhered it around the periphery of the shaker circle.
  • The embellishment consists of a small snowflake punched in Pacific Point using the Snow Flurry punch.  On top of that, and adhered with a glue dot is a snowflake punched in dazzling diamond glimmer paper, using a non SU punch.  In the center is a silver sequin.

  • Only the first part of the sentiment is on the front of the card.  The rest is on the inside.
Supplies Used: 
Stamps: Flurry of Wishes, Happy Scenes, Sentiment (unknown)
Inks: Versa Mark, Pacific Point, Black Memento
Papers: Pacific Point, Whisper White, Fun Foam, Dazzling Diamond Glimmer paper, Window sheet
Accessories: Circles Framelits, Frosted Sequins, Snow Flurry Punch, snowflake punch (unknown), glue dots, silver sequin, silver ribbon.


Friday, November 13, 2015

A Christmas Wish for You - Paper Craft Crew Card Sketch #70

For the sketch challenge with the Paper Craft Crew Card Sketch challenge I chose to use the cardinal in the Joyful Season stamp set.

 Paper Craft Crew Card Sketch 170. #papercraftcrew #cardsketch
  • The base card is Pool Party, layered with Real Red and then Whisper White cardstock. 
  • The card is built on this Whisper White layer.
  • Using the background stamp of the "I've Got You" stamp set, and Pool Party ink, I stamped off once and then stamped in the middle of the Whisper White cardstock.
  • The branch of the stamp set "Joyful Season" was stamped using Soft Suede
  • Then I took the "Gorgeous Grunge stamp set, some Real Red ink, and stamped the image of the larger blots twice on the card front.
  • A banner from "Sweet Lil Things" DSP made, and a smaller red one was adhered to the bottom left of this banner.  It was then adhered to the front of the card about 1/2" from the edge of the Whisper White cardstock.
  • On a separate piece of paper, the cardinal was stamped twice with Memento ink.  One of the birds was coloured with a Real Red marker, with Daffodil Delight on the beak.  It was then cut out.  The other cardinal was die cut using the Circles framelits.  The coloured bird was then adhered to the bird in the circle die cut - the tail sticking out of the circle a bi
  • Then using various colours of markers, I created small dots around the bird, and then did faux stitching around the edge of the circle with the Real Red marker.

  • The circle was adhered to the banner and card front using dimensionals.
  • Cherry Cobbler dazzling details was added to the top of the cardinal and the berries.
  • The sentiment, from the same stamp set, was stamped and matted in Real Red and adhered to the card front using dimensionals.

  • All the layers were then adhered together.
Supplies Used: 
Stamps: Joyful Season, Gorgeous Grunge, You've Got This
Inks: Black Memento, Pool Party, Real Red, Basic Black marker, Daffodil Delight marker
Papers: Pool Party, Real Red, Whisper White, Sweet Lil Thing DSP
Accessories: Cherry Cobbler Dazzling Details, Circle Framelits, Dimensionals


Friday, January 9, 2015

Altering a Composition Book

In class this week, students will be altering a notebook which is smaller than this composition book. I picked several of these up in the Dollarama store.

Today, I altered one of the Composition Books.  My new video camera came today and I'll try and do a video tutorial in the next week or so.  I think learning the operation of this camera will be a steep learning curve.


This is what the book looked like before alteration:


I covered the outside of the book in 3 stages.  Measurements were very carefully made.
I measured from the front inner edge to the edge of the black binding, and added 1".
Then I measured from the top edge to the bottom edge and added 2" (an inch for the top and an inch for the bottom.
Here are the materials used:


Built for Free Using: My Stampin Blog


I also used a paper crimper.

Wednesday, October 8, 2014

Poinsettia card

What's Christmas without a poinsettia plant.  I always get a number of them to put around the house, and they provide such a splash of colour in an otherwise gray(or white) world.
For this card I did a lot of embossing and a lot of cutting, but it was worth it.  I love the way the poinsettia from the Joyful Christmas stamp set turned out.

Stamps: Joyful Christmas, More Merry Messages
Inks: Versa Mark
Papers: Cherry Cobbler, Whisper White, Trim the Tree DSP, silver glimmer paper, dazzling diamond glimmer paper, Pear Pizzazz
Accessories: Circle framelit, Starburst framelit, Project life framelit, Small star punch, Gold embossing powder, pearls, dimensionals


Saturday, September 13, 2014

Joyful Christmas

So far, so good.  I have been able to stay focused on making Christmas cards.  This is my second one.


The image of the Poinsettia was stamped with Versa Mark twice and embossed with gold embossing powder.  One entire flower was coloured with Cherry Cobbler blendabilities; only the middle flower was coloured in the second flower.  The middle flower was then cut out and attached to the larger flower using dimensions.  I put some gold glitter in the center.

The leaves were also embossed with gold embossing powder and coloured with Old Olive blendabilities, and then cut out.  They were attached to the underside of the flower using glue dots.

The completed flower was attached to a circle of Champagne glitter paper die cut using the Circles framelit.

The base card is Real Red, layered with Whisper White embossed with On Point embossing folder.  The designer paper was die cut using the square framelits and layered with Real Red card stock.  At one end is a strip of Old Olive paper embossed with the polka dot embossing folder.  A strip of red scalloped cardstock is attached to the outer side of the panel.  The ribbon is red satin.

Stamps: Joyful Christmas, Petite Pairs
Inks: Versa Mark, Cherry Cobbler & Old Olive Blendabilities, Basic Black
Papers: Real Red, Whisper White, Old Olive, Nordic Noel DSP, Champagne Glimmer Paper
Accessories: Gold embossing powder, Circle Framelits, Square Framelits, gold glitter, Red Satin ribbon, Scallop border punch, dimensionals, small oval punch, medium oval punch

Wednesday, September 3, 2014

Rosette Wreath - a CASE

I saw this Rosette wreath on Pinterest and was absolutely fascinated by it, so I made one too.  It was originally created by Mary Haugan (I think that's the name), and what a wonderful job she did.
Here is mine.  It is not exactly the same, but close enough.


The Rosette is made using Flowerpot DSP.  The center is made using the framelets from Starburst Sayings and Circle Framelits.  The sentiment was embossed with white embossing powder on Crumb Cake card stock and die cut using the Apothecary accent framelit.  A piece of burlap ribbon is adhered behind the center piece.  A rose made with the Spiral Flower die completes the wreath.

Stamp: Kinda Eclectic
Inks: Versa Mark, Crumb Cake, Hello Honey
Papers: Tangelo Tango, Lost Lagoon, Whisper White, Flowerpot DSP, Crumb Cake
Accessories: Rosette die, Starburst framelit, Circle framelits, Apothecary Accent framelit, Burlap ribbon, Small butterly punch, Medium butterly punch, Spiral Flower die, hot glue gun

I enjoyed making it so much I made one with Christmas paper.

Friday, August 29, 2014

Hello Fall - Technostamper 329

I'm not really saying hello to Fall, not yet anyway!  Although all the signs are there - the changing colours of the leaves, the cool nights, the decline of the blooms in my garden, and of course, back to school.
Fall is associated with change.  And there has been a lot of change in my life lately.  My favourite craft store has closed; a friend has sold her house and moved; my son's place of employment closed and he is returning to college for a fresh start; and my daughter and her husband are undergoing an acrimonious divorce.  The latter has been very disturbing as there are 3 young children involved.

I decided to made a card with 3 feathers on it - one for each of my grandchildren who are going to have to be tough like these feathers.
I used the sketch from Technostamper here to make this card.


Stamps:  Four Feathers, For All Things
Inks: Bravo Burgundy, Mossy Meadow, Smoky Slate
Papers: Bravo Burgundy, Very Vanilla, Whisper White, Color Me Autumn DSP
Accessories: Four Feathers Framelits, Circle Framelits, Fringe Scissors, Gold Metal Button, Twine, Toothpick (non SU), Fancy Fan Embossing Folder, 1/8" Very Vanilla taffeta ribbon

Saturday, August 16, 2014

Joy, Friendship, Peace, Love, Happiness

These are the words that Santa is holding over his head in the new stamp set "Get Your Santa On".  I'm still taking advantage of the overcast cool day to make Christmas cards.

Stamp: Get Your Santa On
Ink: Black Memento, Blendabilities
Papers: Real Red, Whisper White, Very Vanilla, Basic Black, Typset Specialty DSP
Accessories: Scallop border punch, 3/8" woven Real Red ribbon, Circle Framelits, Scallop Circle framelits, dimensionals, Liquid Applique, Dazzling diamonds

Wednesday, July 23, 2014

Flower Patch Decorated Note Pad - Technostamper #324

I'm busy making items for my craft table as I am continually selling out of items.  Today I am stocking up on covered note pads, as I sold my last one yesterday.  For this one I decided to decorate the cover using the sketch challenge with Technostamper here


Stamp:  Flower Patch
Inks: Lost Lagoon, Hello Honey
Papers: Lost Lagoon, Whisper White, Hello Honey, Pistachio Pudding, All Abloom Designer Paper Pack
Accessories: Paper Doilie, Circles framelits, 1 3/4" circle punch, Fancy Fan folder, Paper Piercer mat pack and paper piercer, dazzling details, 3/8" Lost Lagoon stitched satin ribbon, Flower Patch framelits, dimensionals

Thursday, December 26, 2013

Best of Sale-a-Bration Thanks

This is the last stamp set of the "Best of" series - and I have enjoyed them all.
Making a card is still a challenge for me because my work area is under construction.  You will recall that I had a leak in my basement foundation which was repaired in the summer.  Now the inside wall of the basement is being repaired.  At the same time repairs are being done on the bathroom, and since I only have one bathroom this has been a bit of an inconvenience.  And the mess!!  Any of you who have undergone construction know what I am talking about.

Despite all of the above, I managed to do a card for the Fab Fri sketch challenge here


Stamps:  Best of Sale-a-Bration, Lots of Thanks
Inks: Soft Suede, SU Markers ( Coastal Cabana, Green Gumball)
Papers: Coastal Cabana, Very Vanilla, Whisper White, Venetial Romance Designer Paper, Soft Suede
Accessories: Apothecary framelits, Circle framelits, 1 3/4" scallop circle punch, 1 1/2" circle punch, Small oval punch, Large pearls, Crumb Cake seam binding, dimensionals.