Showing posts with label Sympathy. Show all posts

Monday, February 27, 2023

Seaside Bay Sympathy - Try Stampin' on Tuesday #595

 In addition to  the sketch challenge, the challenge was to use stripes - big stripes, little stripes, any kind of stripes- in making the card.

I created diagonal stripes for a background, using a Stampin' Up stencil.  I don't use stencils nearly enough, and this year I vowed to myself that I would use them more.  This was a perfect opportunity to use a stencil.

The Seaside Bay bundle and DSP were used for my card.  In some instances the images were die cut directly from the DSP; in other instances the images were stamped and then die cut.


Products Used:

Stamps:  Seaside Bay, Many Messages

Inks  Basic Gray, Crumb Cake, Stampin' Blends (Pumpkin Pie, Smokey Slate), Mint Macaron

Papers:  Night of Navy, Crumb Cake, Basic White, Soft Succulent, Evening Evergreen, By the Bay Specialty DSP

Accessories:  Seaside Bay Dies, Dimensionals, Many Messages die, Diagonal stripe stencil, Flat adhesive backed Pearls, stripe embossing folder

Saturday, February 12, 2022

Soaring with Swallows - Thinking of You

 When I was about 7 my friends and I used to walk around a quarry that was no loger in use.  In the steep walls were holes, and flying in and out of these holes were swallows, flitting here and there intent on catching  mosquitoes.  I used to marvel at their beauty and their ease of motion.

Those memories came flooding back when I saw the "Soaring with Swallows" stamp set in the new mini catalogue.

My first card with this stamp set and coordinating die is a sympathy card, made in tones of gray and white.


The base and art piece panel are Smokey Slate and the rest of the card elements are white.  The ink used to stamp the sentiment is also Smokey Slate.

Before I started the card, I die cut all the different dies that came with the Swallows die and I must admit I was a bit baffled as to how to make the swallows. But I did figure it out and you see one of the birds in the card above.


The swallow is mounted on a doillie that is now retired but I decided to use it because it provided a perfect back drop for the swallow. The doillie and sentiment piece are added to a piece of Smokey Slate card stock die cut with a Nature's Thoughts Die.  This was adhered to a piece of Basic White cardstock die cut with a Scallop contour die.  All were added to a Smokey Slate card stock base.


To finish the card I added some metallic pearls.

Supplies Used:

Stamp:  Soaring Swallows

Ink:  Smokey Slate

Papers:  Smokey Slate, Basic White

Accessories:  Nature's Thought Dies, Scallop contour die, Swallow dies, Polka dot ribbon, Metallic pearls, dimensionals, pearlized doillie (retired)

Thursday, September 23, 2021

Dahlias or Mums?? A sympathy card

 Sale-a-bration is drawing to a close, and today I picked up the Delicate Dahlia stamp set and looked at it with different eyes.  I had just purchased a couple of Chrysanthemum plants for my front porch and was struck by the resemblance between the Dahlia flower and the Mum flowe.

So, why can't the Dahlia be a Mum flower? It's amazing how a flower looks differently when you give it a different name.  My Dahlia flowers were now  Mums. They were stamped  on a Slimline card.


The base of the card is Early Espresso layered with Cajun Craze/  The top piece of Basic White upon which the stamping will be done.

Instead of two step stamping, I decided not to use the detail stamp.  The dots stamps were done using Early Espresso ink and a stamp from the Merriest Moments stamp set.

The flowers were stamped around the outside edge of the art piece using the inks indicated below.  The dots were made using Early Espresso ink.


Near the bottom I add a strip of Cajun Craze matted with Early Espresso.  On top of that I add a piece of Bumblebee ribbon which I also made into a bow.
On a separate piece of Basic White card stock I stamp a small flower in Blackberry bliss and a leaf in Mossy Meadow. These images were fussy cut and added to the strip with a dimensional.
The sentiment is from the same stamp set.


I seem to be on a glitter craze these days so of course I added a lot of glitter to this project.

Dimensions:  

  • Early Espresso - card base - 9 by 7" scored at 3 1/2" on the short end.
  • Cajun Craze - 8 3/4 by 3 1/4"
  • Basic White - 8 1/4 by 3"  Art piece
  • Cajun Craze 1 1/4 by 3" - center strip
  • Early Espresso 1 by 3" - add to Cajun Craze for center strip
  • Basic White 1 by 2" for sentiment
  • 3/8" Bumblebee ribbon 15"
  • Extra piece of Basic White to stamp flower and leaf to fussy cut 
Stamp:  Delicate Dahlias, Merriest Moments

Inks:  Early Espresso, Bumblebee, Blackberry Bliss, Cajun Craze, Mossy Meadow

Accessories
  • 3/8" Bumblebee ribbon
  • glitter (Nuvo)
  • Dimensionals

Supplies Used:
Stamps:  Delicate Dahlia, Merriest Moments
Inks:  Early Espresso, Bumblebee, Blackberry Bliss, Cajun Craze
Papers:  Early Espresso, Cajun Craze, Basic White
Accessories:  3/8" Bumblebee ribbon, Dimensionals, glitter

Monday, May 11, 2020

Lilypad Lake Shaker Sympathy card

I often walk beside the canal near my home and occasionally I will surprise a blue heron feeding in the shallows.  Their size always amazes me.  I stand and watch them until something startles them and they take off.


The shaker window is die cut using the Stitched Nesting Label die on a 4 by 5 1/4" piece of Whisper White.  The sunset scene in the window was created on an identical size piece of Whisper White card stock.


A slightly larger piece of window sheet was adhered to the wrong side of the front, and after adding strips of adhesive foam around this as well as the card stock edges, the shaker was created.  The shaker elements are Tranquil Textures sprinkles.  This unit is adhered to a Balmy Blue card base.


A blue heron is stamped, coloured, die cut and adhered to the lower left of the shaker element using dimensionals.  A lily pad and lilies were also coloured, die cut and adhered to the lower right.


The sentiment is also from the stamp set, and is die cut using one of the coordinating dies of this set.

Supplies Used:
Stamps:  Lilypad Lake, Sailing Home (birds)
Inks:  Scene:  Sky: Daffodil delight, Calypso Coral, Pumpkin Pie, Water:  Pool Party, Balmy Blue and Pacific Point.  LIlypad:  Rococco Rose, Granny Apple Green.  Heron:  Smoky Slate, Basic Black, Balmy Blue
Papers:  Balmy Blue, Whisper White
Accessories:  Lakeside Dies, Stitched Nesting Label dies, Window Sheets, Tranquil Textures Sprinkles, Dimensionals.


Tuesday, August 6, 2019

All My Sympathy - Fab Friday #169

This sympathy card is being submitted to the sketch challenge at Fab Friday #169.'


The card base is a top fold Night of Navy card stock, layered with Whisper White, and then another layer of Whisper White which had been embossed with  Oh My Stars embossing folder brayered with Night of Navy ink.
A strip of Vellum card stock was adhered across the card front, just below the mid point.

On a separate piece of Whisper White card stock, I masked off a 2 1/4" circle.  Using daubers, So Saffron, Daffodil Delight, and Crushed Curry were added to create a moon. The bird image from "Sailing Home" was stamped over the moon.  A 2 1/4" circle punch was then used to punch out the moon and it was adhered to the card front with the top edge tucked under the moon.


Using the stamparatus, the image of  the fir tree from "Rooted in Nature" was stamped using Mossy Meadow ink, die cut using a Nature's Roots die, and adhered with the branches overlapping the moon and the trunk extending over the vellum.

The "sympathy" sentiment was die cut in Night of Navy, using one of the Well Written dies' the rest of  the sentiment (from Well Written) was stamped with Black Memento on Whisper White and adhered above the die cut word on the left.

Supplies Used:
Stamps:  Rooted in Nature, Well Written, Sailing Home
Inks:  So Saffron, Daffodil Delight, Crushed Curry, Black Memento, Mossy Meadow, Night of Navy
Papers:  Night of navy, Whisper White, Vellum
Accessories:  2 1/4" circle punch, Well written die, Rooted in Nature die, Oh My Stars Embossing folder, Adhesive sheets

Monday, April 22, 2019

Cards Made with Petal Prominade DSP

These 4 cards were made using the Petal Prominade DSP. This DSP which has some square and rectangular trimmable inserts is very versatile, and although the cards I made are for  birthdays,  a wedding , and  a sympathy card, it can be used for any occasion.

Birthday Cards:


Stamp:  Paper Pumpkin (April 2019)
Ink:  Gray Granite
Papers:  Fresh Fig, Whisper White, Petal Prominade DSP
Accessories:  1/4" Tranquil Tide velvet ribbon, Square stitched framelits, Gold faceted gems, retired embellishments


Stamp:  Stitched All Around
Ink:  Gray Granite
Papers:  Mossy Meadow, Whisper White, Petal Prominade DSP
Accessories:  3/8" mini ruffled Tranquil Tide ribbon, Stitched Label Framelit, Enamel embellishments (retired),  dimensionals.

Wedding:


Stamp:  Paper pumpkin (April, 2019)
Ink:  Gray Granite
Papers:  Blushing Bride, Whisper White, Gold Foil, Petal Prominade DSP, White corrugated label from Paper Pumpkin
Accessories:  Delicate Lace Edgelits, Leaf Punch, Classic Label punch, Gold faceted gems


Sympathy:


Stamp:  Beautiful Prominade
Ink:  Gray Granite
Papers:  Whisper White, Mossy Meadown, Petal Prominade DSP
Accessories:  Tiny pink paper flowers


Tuesday, March 26, 2019

Lasting Lily Sympathy Cards

During this last week of Sale-a-bration I selected one of my favourite stamp sets, "Lasting Lily" and its coordinating Framelits to make these two sympathy cards.

Pinterest is a great source of inspiration and one trend I was noticing was the use of dark card stock to show case the Lily.  The effect was quite stunning!

So, I decided to use Basic Black card stock to show case a bouquet of Lilies. In the first card the Basic Black was embossed with the Tin Tile embossing folder.

In the first card  the Lilies were stamped in Mango Melody with the edges sponged with Poppy Parade ink.  On the Basic Black card stock the lilies seem to take on a life of their own.
The stem and leaves were stamped in Granny Apple Green.  

For the second card the Lilies were stamped with Berry Burst ink and adhered to a Basic Black background embossed with the Layering Petals embossing folder.


Wednesday, January 2, 2019

Peaceful Place Sympathy - sponged embossed background

Only 1 more day and the new Occasions (and SAB) goes live!

Today I have 2 more cards for you made with the Peaceful Place stamp set from the new Occasions Catalogue.  It seems I can't get enough ways to use this stamp set.

The sponge and emboss background technique I have used before.  In some ways it is similar to Joseph's Coat.

My son saw this card and he tells me it reminds him of the sun coming up over the park near our home.

On a 3 3/4 by 5" piece of Whisper White card stock I started by sponging So Saffron in the center, followed by Cajun Craze around that, blending into some of the Saffron and then extending beyond it.  Early Espresso ink is sponged on last, sponging from the Cajun Craze layer to the outside of the card stock.

Then using the stamparatus, the image from "Peaceful Place" was stamped in Black Memento (although it could be stamped in Early Espresso).  I love the way the light seems to come from the far end of the card

After applying Versa Mark ink all over the sponged art piece, Clear embossing powder was added and set with a heating tool.

This piece was layered with a 4 by 5 1/4" Very Vanilla piece.  Using the Detailed Trio punch, I punched two holes in the upper left of the layered art piece and added some 1/8" Very Vanilla ribbon edged in copper and tied it into a bow.

This was added to an Early Espresso card front.

The sentiment is from "Flourishing Phrases"

Supplies Used:
Stamps:  Peaceful Place, Flourishing Phrases
Inks:  Black Memento, So Saffron, Cajun Craze, Early Espresso, Versa Mark
Paper:  Early Espresso, Very Vanilla, Whisper White
Accessories: Clear embossing powder, Detailed Trio punch, 1/8" Very Vanilla copper edged ribbon


Friday, November 2, 2018

Tent Grace Glass Vellum Sympathy card

This unique card fold would make a wonderful birthday or thank you card, but I chose to make it a sympathy card.  The card stands alone and because I am using the Grace Vellum paper,  a battery operated tea candle can be inserted in the card.

I used the tutorial from Splitcoaststampers  here for directions on how to make this card

The front of this 5 by 10 card was embossed with the Striped Scallop embossing folder (Pg. 223 Annual Catalogue) and then a rectangular aperture was die cut using the Layering Square framelits (Pg. 218).
The Grace Glass Vellum piece, after coloring with blends, was adhered in this aperture.  On both sides a strip of one of the delicate lace edgelits (Pg. 217) was added.


On the inside I added a 5 by 4" piece of Whisper White card stock scored at 1,2,3" on the 4" side (which is mountain and valley folded) adhering it to the front and back of the card.


On the left side 2 branches of Garden green sprigs punched using the "Sprig punch". Three Petal Pink flowers punched with the retired Petite flower punch were added randomly along these sprigs.  A rhinestone was placed in the center of each flower.

The sentiment is from the Painted Glass stamp set.

Supplies used:
Stamp:  Painted Glass
Inks:  Black Memento, Stampin Up Blends
Papers:  Whisper White, Grace Vellum, Petal Pink, Garden Green
Accessories:  Layering square framelits, Striped Scallop embossing folder, Delicate Lace Edgelits, Sprig punch, Petite Flower punch (retired), rhinestones


Tuesday, October 10, 2017

Comfort & Healing to You - Try Stampin' on Tuesday or Not #343

This week the optional theme with the sketch challenge is "leaves", and I made it into a sympathy card. The sketch is courtesy of Kaylin


I had earlier die cut some leaves from a background I created using the Baby Wipe technique.  These leaves came in handy for this card and became the art piece.

The card base is Cajun Craze card stock, layered with Whisper White card stock.

To the left are some retired DSP with leaf patterns on it.  The edges of these pieces were sponged with Cajun Craze ink and then mounted on Cajun Craze card stock.

The die cut leaves were arranged on the art piece, which is the reverse side of the retired DSP.  This was also matted with Cajun Craze card stock before adding it to the card front with dimensionals.
Attached to the right side of the art piece are 2 notched Gold Glimmer banners.

The sentiment. from "Flourishing Phrases" was stamped with Cajun Craze ink, punched with the 1 3/4" circle punch and matted with a Gold Glimmer scallop circle.

Supplies Used:
Stamp:  Flourishing Phrases
Inks:  Cajun Craze
Papers:  Cajun Craze, Whisper White, Autumn DSP (retired), Gold Glimmer, Whisper White
Accessories:  Seasonal Layers Framelits, Layering Circles Framelits, dimensionals.

Thursday, June 1, 2017

Circle Easel Sympathy Card

I seem to be in an easel making mood so after my class on Saturday, which ironically was on making Easel cards, I made this sympathy card -another scallop circle easel card.

Again, I used the retired Circle framelits only because the circles are larger in diameter.

 The Calla Lilies (from Remarkably Yours) were embossed with black embossing powder, colored,  cut out, and placed upon a Whisper White circle stamped with the Timeless Texture stamp set.
This circle was matted with a larger Garden Green circle, which was adhered to an again larger Whisper White circle sponged with Garden Green ink and then a Basic Black and finally a Garden Green circle.

Here's how the easel was made.

A large circle was die cut with one end of the circle was placed slightly over the edge of a folder Whisper White piece.  This results in two Whisper White circles joined in the middle.  One of the circles is folded in half towards the inside- this becomes the Easel.  The other half of the circle is adhered to the bottom large scallop circle.

The art piece is adhered to the folded circle half - and your card is done.

The flowers are punched using the Daisy Bunch Punch with Daffodil Delight candy dots placed in their centers.

The sentiment is from Floral Phrases.

Supplies Used: Remarkably You, Timeless Texture, Floral Phrases
Inks:  Versa Mark, Pear Pizzazz, Old Olive, Garden Green, Daffodil Delight
Papers:  Garden Green, Whisper White, Basic Black
Accessories:  Circle Framelits (retired), Daisy Bunch Punch, dimensionals, Garden Green thick Baker's twine

Wednesday, April 12, 2017

Comfort & Sympathy - SUO Challenges #172

"Thinking of You and Sympathy" are the topics of this week's classes, so the challenge at SUO is very timely. 
The challenge this week at SUO is to make a card for someone who is facing difficulties in life. I am making this card with a very special person in mind who is facing multiple medical difficulties.  As she has said many times, her calendar" looks like a medical convention".

She loves nature and flowers so that's what I put on the card.

I stamped the sentiment in the centre of a stitched die cut oval after which I adhered it to the Whisper White card front.

The cluster of small flowers were stamped over the edge of the oval and onto the card front. To color the flowers, the oval was removed and replaced later using dimensionals.

On a separate piece of Whisper White, I stamped a larger flower and two sets of leaves.  These were coloured with ink pads and a blender pen and fussy cut. The flower was added to the upper right of the oval, with the leaves added above and below the oval.

Some texture was added using second generation Tip Top Taupe ink.
Tiny pearls were added to the center of each small flower; a larger pearl to the center of the larger flower.

Supplies Used:
Stamps: Birthday Blossoms, Gorgeous Grunge
Inks: Black Memento, Daffodil Delight, Delightful Dijon, Wild Wasabi, Cucumber Crush, Tip Top Taupe
Papers: Delightful Dijon Whisper White
Accessories:  Stitched oval framelit, dimensional, pearls

Monday, February 27, 2017

An Embossed Sympathy Card

Yesterday I posted 2 cards made using the Floral Affection embossing folder. See the post here
Today, I embossed another image, for a sympathy card.

After coloring the embossed areas with a "revived" Wink of Stella glimmer brush and ink pads, the sentiment, from "Flourishing Phrases" was added.  The corners of the art piece were rounded, and the art piece was matted with Peek-a-boo Peach card stock which also had its corners rounded.

This art piece was added to the card front with dimensionals.

Supplies Used:
Stamp Flourishing Phrases
Inks: Black Memento, Peek-a-boo Peach, Pear Pizzazz
Papers: Peek-a-boo Peach, Whisper White, Fruit Stand DSP
Accessories: Clear Wink of Stella glimmer brush revived with alcohol, Floral Affection embossing folder, 3/8" ruffled Peek-a-boo Peach ribbon, dimensionals, corner rounder punch

Sunday, October 16, 2016

Totally Trees Sympathy Card - Pal Paper Arts #332

The sketch challenge with Pal Paper Arts 332 was a perfect opportunity to use the Totally Trees stamp set.  I needed a Sympathy card, so that's what the card became.


ppa322
The layering circle framelits was used to die cut the circle and coordinating scalloped circle.  This circle became the art piece.

The three bare trees were first stamped with Soft Suede and then stamped over (twice) with a different colour for each tree - Blushing Bride, Rich Razzellberry, and Flirty Flamingo. The stamp from Sheltering Trees was used to create the grassy ground underneath the trees. Sponged Marina Mist formed the sky.

This circle was adhered to the scalloped circle using dimensionals.

The basic card is Mint Macaron, layered with Whisper White embossed with the Woodlands embossing folder.Four strips of Blooms and Bliss DSP was attached horizontally, with a slight space between each strip.  The circle as adhered to the card front, slightly off center, over these strips.

The sentiment is from Flourishing Phrases.

Supplies Used:
Stamps: Totally Trees, Sheltering Tree, Flourishing Phrases
Inks: Soft Suede, Blushing Bride, Flirty Flamingo, Rich Razzelberry, Island Indigo
Accessories: Layering circles framelits, dimensionals.


Sunday, July 31, 2016

Cards made with Serene Scenic DSP stack

Yesterday I made a card that I had made using the DSP from the Scenic Scenery DSP stack with a promise that I would make some more todayl
Well, I made two, and it took me under 5 minutes to make both.
The first card is a sympathy card, and I used Old Olive as its base, layered with Whisper White.

The sentiment is from Flourishing Phrases, stamped  Whisper White, die cut using the layering ovals framelits and adhered to a punched out decorative label punchie.

The second card features the stamp set "Wherever You Go" and the image of the bridge was stamped directly onto the DSP.  Add some sunrise in Daffodil Delight, and some birds flying in the sky and wholla you have a card.
Here are both the cards along with the DSP stack.

Again, this DSP stack is on Page 174 of the Annual catalogue.


Sunday, June 12, 2016

With Sympathy - another Telescoping Technique

I knew there was a name for the technique that I called "layering" but could not remember it yesterday.  Today I remembered.  It's called Telescoping technique.
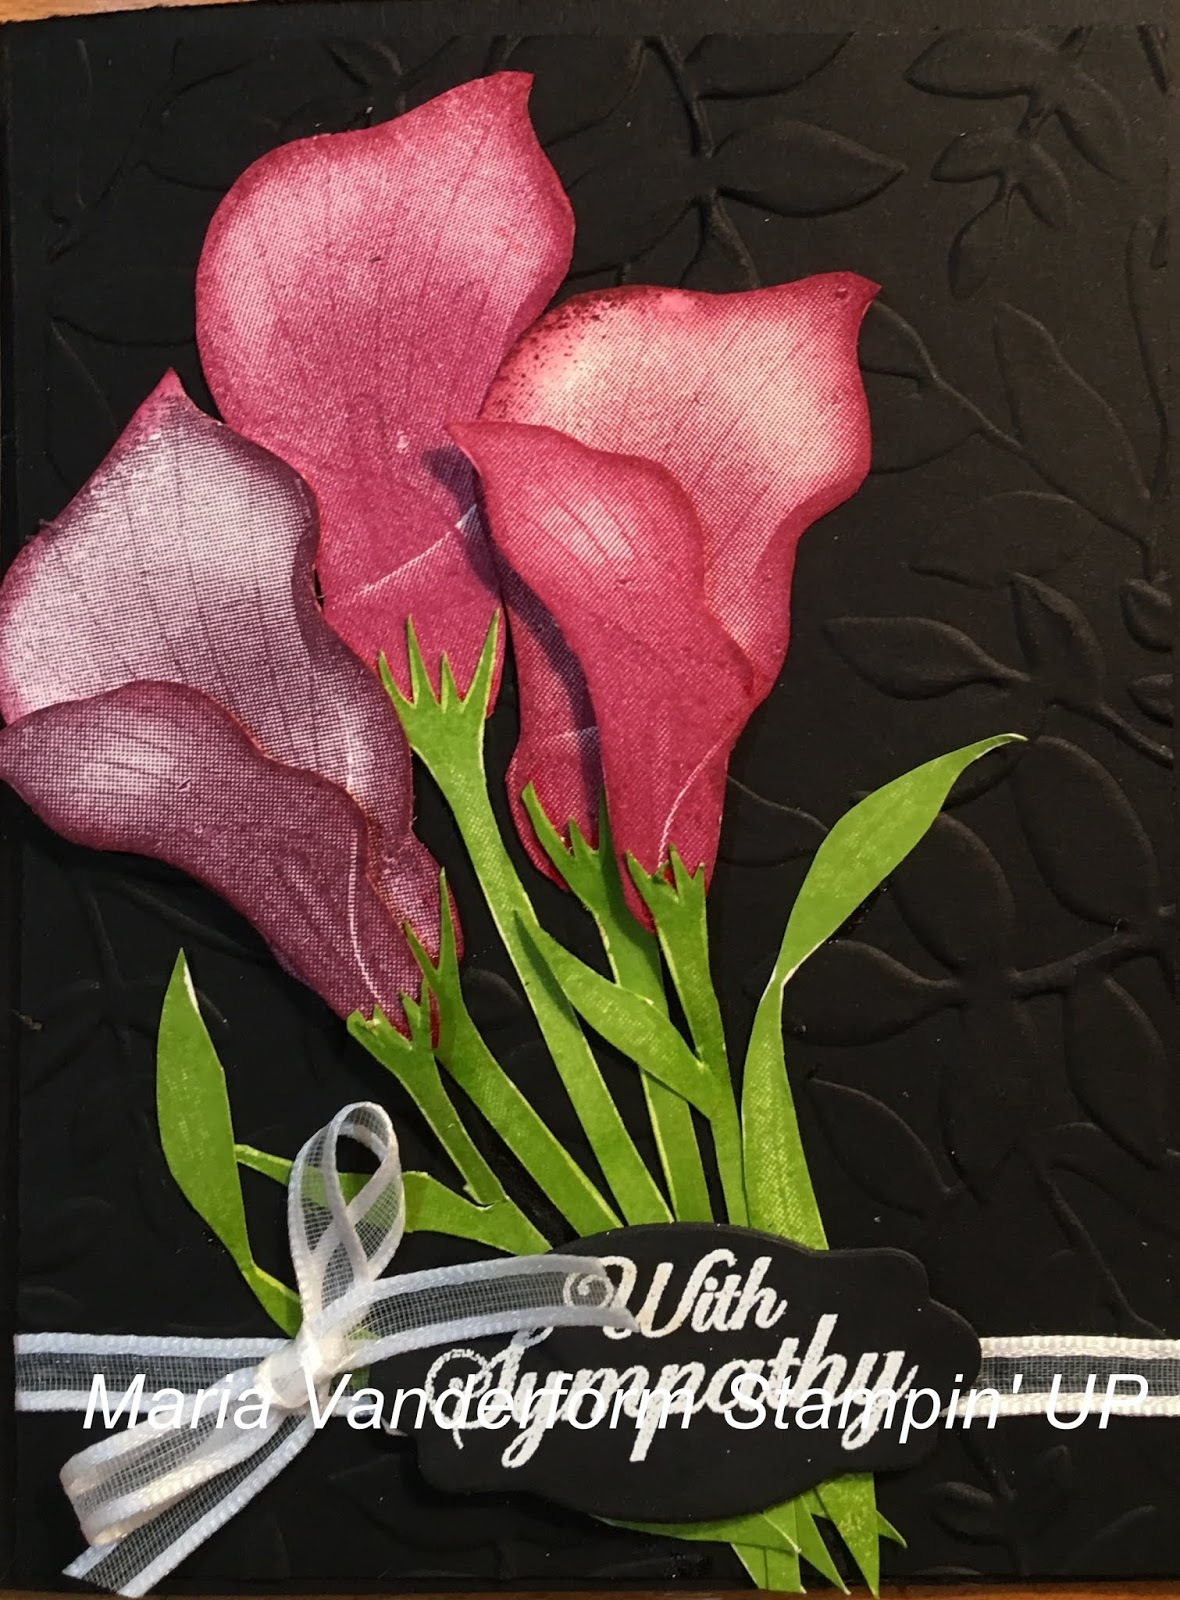
Today I made a sympathy card using the Calla Lily stamp from the Remarkably You stamp set, using that technique.
I don't know why I chose to make a sympathy card today, but I know why now.  I just finished watching a news broadcast about the mass shooting in a nightclub in Orlando, Florida - and the arrest of another terrorist who intended to do harm at a Gay Pride Parade in California.  I have friends in both Florida and California, and if any of you are reading this post, please contact me and let me know you are all right. 

This Sympathy card again features a stamp from the "Remarkably Yours" stamp set, and again I use the Telescoping technique.


The image is stamped on a 3 1/4 by 4 1/2" piece of Whisper White cardstock, and coloured with a blender pen and ink pads (Sweet Sugarplum and Old Olive).  Because I wanted to use the telescoping technique, I made 2 coloured images on the same size of cardstock - one to die cut and one to build the die cut pieces onto.

Selecting one of the pieces of cardstock, and using circle framelits, the image was die cut as shown in the picture below.

On the wrong side of the die cuts pieces, 1/2 pieces of dimensionals were attached, and one at a time these pieces were built on the remaining coloured images, carefully matching the images.


Here's a side view of the completed telescopic images.  You can't see it very well, but clear Wink of Stella glimmer was added to the sides and stems of the images.

This Whisper White image piece was matted with a 3 3/8" by 4 7/8" piece of Sweet Sugarplum cardstock.
This was adhered with dimensionals onto a Sweet Sugarplum cardstock base layered with Sweet surgarplum DSP
All layers were sponged with Sweet Sugarplum ink.

The sentiment and label is from the "Rose Wonder" stamp set.  They were stamped with Black Memento ink, and die cut.  Holes were punched at both ends of the label, and a 1/4" piece of white cotton ribbon was inserted in it, underneath it, out the other side, and then around the matted image piece and tied into a kot at the right front.


Supplies Used:
Stamps: Remarkedly Yours, Rose Wonder
Inks: Black Memento, Sweet Sugarplum, Old Olive, Hello Honey
Papers: Sweet Sugarplum, Whisper White, Sweet Sugarplum DSP
Accessories: Rose Garden thinlet dies, 1/4" white cotton ribbon, Circle framelits, blender pen, Wink of Stella clear glimmer brush, dimensionals.


Sunday, December 20, 2015

Heartfelt Sympathy

Yesterday I went to visit my former Sister-in-law who is dying of bowel cancer.  She has 1 week to a month left to live.  Needless to say I found the visit very difficult and cried a few tears when I left.
When I got home I made a sympathy card, that I knew I would need soon for her husband and/her family.  I used her favourite colour

  • The card is a 5 by 5" square card with a Pear Pizzazz base.
  • It is layered with Whisper White
  • On a separate 4 1/2" piece of Whisper White cardstock, I stamped 2 images from the stamp set "Heartfelt Sympathy" in Pear Pizzazz. - one at the upper right, and one at the lower left. The stamp-a-ma-jig was used to get the placement right. Tiny pearls were placed in each flower.
  •  
  •  In the middle of this, on a 1 5/8 by 2 /4" piece of Whisper White, I stamped the sentiment also in Pear Pizzazz.  It was layered with Pear Pizzazz cardstock before adhering it to the center of the front of the image panel.
  • The cardstock base was layered with Whisper White card stock.  The image panel was adhered to the middle of the Whisper White layer.
Supplies Used:
Stamp:  Heartfelt Sympathy
Ink: Pear Pizzazz
Papers: Pear Pizzazz, Whisper White
Accessories: Stamp-a-ma-jig, pearls