Showing posts with label Wedding. Show all posts

Wednesday, April 15, 2020

Jubilee Dies Wedding Card

This gold/white wedding card was made using the beautiful Jubilee Dies


  • In the center of a 4 by 5 1/4"" piece of Whisper White, a sentiment from "Last a Lifetime" was embossed with gold embossing powder
  • Adhere two pieces of Whisper White card stock embossed with the Jubilee Dies (with the notch out)- one at the top and one at the bottom - with the notches facing each other.

  • Adhere this 4 by 5 1/4" piece of Whisper White to the 4 1/4 by 5 1/2" Thick Whisper White card stock base
  • On a separate piece of Whisper White card stock emboss the bouquet of flowers (2) with gold embossing powder.  Die cut with Jubilee Dies, Adhere above and below arch of adhered die cut using dimensionals

  • Add Gilded Gems to the centers of all flowers
  • Add bow made with 1/4" Whisper White crumpled seam binding to left side.


  • Gold emboss sentiment on inside.

Wednesday, April 8, 2020

Ornate Wedding Card

The Ornate Border Dies are absolutely gorgeous in gold foil, so I paired the gold foil floral border die cut with the gold patterned Ornate Garden DSP.  The result - a wedding card.


Supplies:

Stamp:  Peaceful Moments - gold embossed sentiment punched with Everyday Label Punch

Inks:  Versa Mark

Papers:

  • Thick Whisper White card stock 4 1/4 by 5 1/2"- card base
  • Whisper White 4 by 5 1/4" - for inside
  • Whisper White 2 3/4 by 3" for sentiment

  • Ornate Garden DSP (white- with gold floral pattern)  5 1/8 by 3 1/8"
  • Ornate Garden DSP (same pattern) 5 by 1/4" - adhere along inner edge of inside Whisper White piece
  • Gold Foil 1/8" by 5" - adhere next to DSP on inside

  • Gold Foil 5 1/4 by 3 1/4" - mat for DSP
  • Gold Foil 1/2 by 4 1/4" - die cut with Ornate border die - floral

Accessories:
  •  Ornate border dies
  • 3/8" gold metallic edge ribbon  11"
  • gold embossing powder
  • gold rhinestones 7
  • Dimensionals - to adhere sentiment to card front

Tuesday, February 18, 2020

Last a Lifetime

This card is a partial case of the card in the new Mini Occasions catalogue.  My intent to case the entire card went by the wayside when I started creating.  My version ended up being simpler (I can hardly believe I said that). However, I did colour 6 flower clusters.


The sentiment is embossed with gold embossing powder and matted with gol foil.  Two of the flower clusters were coloured with Stampin' Blend markers and die cut with an Elegant Lasting Die.  I decided to add one cluster on the top and one on the bottom of the sentiment panel. A bow made using a 1/4" gold metallic edged ribbon.


All are added to a piece of Whisper White which I  embossed twice with the Subtle Texture embossing folder.  After embossing it the first time, I rotated the piece and embossed it second time. This gave it that wonderful canvas look.


Three gold glitter gems were added along the right side near the bottom.

So, what happened to the other 4 clusters?
One was added to the inside of the card, and another was used to make a note card.  I still have one remaining one that will be used in a future project.

Products Used:
Stamp:  Last a Lifetime
Inks:  Versa Mark, Black Memento, Flowers (Light and Dark Calypso Coral, Old Olive, Daffodil Delight)
Papers:  Thick Whisper White (base), Whisper White, Gold foil
Accessories:  1/4" gold metallic edged ribbon, gold embossing powder, Elegant Lasing Dies, Gold Glitter gems,, Subtle Texture embossing folder

Friday, August 2, 2019

My son is getting Married

Tomorrow, my son, my middle child, is getting married.   I don't have too many details as children like to do things on their own these days.  All I know is that I have to show up tomorrow at 3 pm for the ceremony, a ceremony I have had no part in planning.

This however, has not stopped me from doing the traditional thing and making them a hand made wedding card, and a hand made gift.

And here is the traditional wedding card:


Wednesday, April 24, 2019

A Wedding Card in Silver and White

I love to get maximum usage from my stamps and dies, particularly my dies.  For this card I used Valentine Day dies to make this silver and white wedding card.


Starting with a Smoky Slate card stock base layered with Whisper White, I added the art piece to this using dimensionals.

The art piece is a piece of Whisper White card stock embossed with the Lace embossing folder and matted with Smoky Slate card stock.

Two hearts die cut using the fancy hearts die and silver foil paper were added juxtapositioned on top and at an angle from each other on this embossed art piece.  Below the hearts is a die cut scalloped panel in Smoky Slate card stock.  A 3/8" silver edged white ribbon and bow is adhered to this panel.


The sentiment, from "Floral Phrases" is stamped using Gray Granite ink and  die cut using the Stitched dies and added over the ribbon using dimensionals.

Supplies Used:
Stamp:  Floral Phrases
Ink:  Gray Granite
Papers:  Smoky Slate, Whisper White, Silver Foil
Accessories:  3/8" silver edged white ribbon, Lace embossing folder, Be Mine dies, Stitched All Around dies, Dimensionals

Tuesday, April 23, 2019

Petal Promenade Wedding Card

This is another card made using the Petal Prominade DSP - specifically using one of the rectangular trimmable images which is on two of the sheets of this DSP.   A wonderful simple wedding card was created by combining this trimmable image with the "Special Moments" stamp set.

The image of the bride was stamped in the center of this rectangular trimmable panel and coloured with water colour pencils.  Glitter was added to the gown, and a sentiment, from Floral Phrases, was added.

The panel was matted with silver glimmer paper, then Whisper White card stock, which was adhered to a Blushing Bride card base.

To finish the card, some rhinestones were randomly added to the card front

Supplies Used:
Stamp:  Special Moments, Floral Phrases
Inks:  Black Memento, Watercolour pencils
Papers:  Blushing Bride, Whisper White, Silver Glimmer, Petal Prominade trimmable image.
Accessories:  Dazzling Diamonds, rhinestones


Monday, April 22, 2019

Cards Made with Petal Prominade DSP

These 4 cards were made using the Petal Prominade DSP. This DSP which has some square and rectangular trimmable inserts is very versatile, and although the cards I made are for  birthdays,  a wedding , and  a sympathy card, it can be used for any occasion.

Birthday Cards:


Stamp:  Paper Pumpkin (April 2019)
Ink:  Gray Granite
Papers:  Fresh Fig, Whisper White, Petal Prominade DSP
Accessories:  1/4" Tranquil Tide velvet ribbon, Square stitched framelits, Gold faceted gems, retired embellishments


Stamp:  Stitched All Around
Ink:  Gray Granite
Papers:  Mossy Meadow, Whisper White, Petal Prominade DSP
Accessories:  3/8" mini ruffled Tranquil Tide ribbon, Stitched Label Framelit, Enamel embellishments (retired),  dimensionals.

Wedding:


Stamp:  Paper pumpkin (April, 2019)
Ink:  Gray Granite
Papers:  Blushing Bride, Whisper White, Gold Foil, Petal Prominade DSP, White corrugated label from Paper Pumpkin
Accessories:  Delicate Lace Edgelits, Leaf Punch, Classic Label punch, Gold faceted gems


Sympathy:


Stamp:  Beautiful Prominade
Ink:  Gray Granite
Papers:  Whisper White, Mossy Meadown, Petal Prominade DSP
Accessories:  Tiny pink paper flowers


Country Rose Wedding

Happy Easter Monday everyone. I hope you had some quality time spent with family and friends.

I had a friend spend Easter dinner with us and before dinner we had some time to 'play' in the craft room.  One of  the things we 'played' with was the Country Rose  embossing folder.  I am embarrassed to admit that I had not even opened the package, so tonight was experimenting time as well.

After embossing this folder the usual way, I began to use some techniques I had used on the Woodlands Embossing Folder.  One of these was applying Versa Mark directly onto the Folder (one the side with the Stampin' Up logo), adding Whisper White card stock, running it through the Big Shot, then adding gold embossing powder to the embossed piece.

The result was stunning!  So made this wedding card.....


 Close Up of Embossed Folder

Anything shiny is hard to photograph, and this card was no exception.

1 1/2" was trimmed off the bottom of the gold embossed piece,  and  some gold foil embossed with the corrugated embossing folder was adhered to the bottom until the front measured 5 ". This was layered onto a Whisper White layer and a gold rimmed Very Vanilla ribbon was added around the seam. The sentiment, stamped in Granite Gray ink, is from "Floral Phrases" and was die cut using the Stitched Framelits . It was adhered over the ribbon using dimensionals. This layer was added to a Crumb Cake top fold card base.

Supplies Used:
Stamp:  Floral Phrases
Ink:  Granite Gray, Versa Mark
Papers:  Crumb Cake, Whisper White, Gold Foil
Accessories:  Country Rose embossing folder, Gold embossing powder, Big Shot, Corrugated Embossing Folder, Gold Edged 3/8" Very Vanilla ribbon, Stitched Framelits, Dimensionals


Thursday, November 22, 2018

A Graceful Vellum Wedding Card

I saw this idea on Pinterest - the blending of Graceful Vellum and Wonderful Moments.


The Graceful Glass Designer Vellum was colored with Stampin' Up Blends and then adhered to a Whisper White background before adhering to another Whisper White card stock layered embossed with the Texture Embossing Folder.  The seam created was overlaid with 3/8" white silver edged ribbon.  A bow made with the same ribbon was adhered with a glue dot.

The image of the bride, from "Wonderful Moments" was stamped and colored on a separate piece of Whisper White - then fussy cut.
A piece of glitter tulle was placed over her head and shaped around her body.  Some rhinestones added to the hair helps to keep the tulle in place.  I also added some larger rhinestones at the edge of the dress.
Using dimensionals, the bride was added in front of the stained glass window heading into the church to get married.

The sentiment, from "Floral Phrases" was embossed with Silver embossing powder on Whisper White , matted with Basic Black card stock and adhered to the card front with dimensionals.

The image layer was adhered to a Basic Black card base.

Supplies Used:
Stamps:  Wonderful Moments, Floral Phrases
Inks:  Stampin; Blends - Old Olive (dark), Daffodil Delight (light and dark), Calypso Coral (dark), Coastal Cabana (dark), Black Memento
Papers:  Basic Black, Whisper White, Graceful Glass Designer Vellum
Accessories:  Glitter Tulle (non SU), Dimensionals, rhinestones, 3/8" White silver edged ribbon, silver embossing powder, Texture embossing folder


Saturday, July 28, 2018

Wonderful Moments - a Wedding Card

This card was inspired by one I saw on Pinterest, but I added a few of my own design features.

I needed some wedding cards, plus I wanted to try the new Delicate Lace Edgelits I just received.


The image of the bride was stamped on a separate piece of Whisper White card stock and coloured her using watercolor pencils and a blender pen. She was then cut out. 

An extra bouquet of flowers was stamped, coloured, cut out and then placed on top of the bride's bouquet using a small dimensional.

As an addition to the bride's dress, I cut a strip of wedding tulle and tied it in a bow and added it to it's back.  If you look carefully you can see it.  


The bride was then added to the card front, which was a piece of Whisper White embossed with the Tufted Embossing folder with one end die cut with the new Delicate Lace Edgelit.  Some Whisper White polka dot tulle ribbon was added at the edge of the die cut. 


This embossed Whisper White card stock was backed with Basic Black card stock, and added to the Basic Card base of Basic Black also layered with Whisper White. Rhinestone embellishments were added to each of the tufted corners.

Supplies Used:
Stamp:  Wonderful Moments
Inks:  Black Memento, SU Markers (Powder Pink, Daffodil Delight, Granny Apple Green, Flirty Flamingo)
Papers:  Basic Black, Whisper White
Accessories:  5/8" Whisper white Polka Dot Tulle ribbon, Tufted embossing folder Delicate Lace Edgelits, rhinestones, Tulle (non SU), Blender pen, dimensionals.


.


Monday, June 18, 2018

Here Comes the Bride

Beautiful You is one of my favourite stamp sets, and this set, "Wonderful Moments" in  the new Annual catalogue is a continuation of that.

One image  I am particularly partial to is the bride.

The bride was black embossed on Whisper White card stock, then die cut with  a layering oval framelit.  This was backed with an off-set Bermuda Bay oval.  Some Bermuda Bay dots were scattered around the bride and the flowers colored with a Bermuda Bay marker.

The background for the bride is some colored Glorious Vellum to mimic a church window. This was placed on a Whisper White layer embossed with the Leaf embossing folder. White polka dot ribbon was adhered to both ends of the stained glass layer,


The vellum flowers around the ovals, were punched using the new Four Petal punch, and before shaping them I colored the edges with a Bermuda Bay blendability. Two were adhered together to form a cluster.  A vellum leaf was also colored, shaped and added underneath each flower cluster. Using the Bermuda Bay blendability I colored some pearls and placed them in the center of each flower.


A 1 " circle punch was used to punch out the sentiment, which was layered with a 1 1/4" Bermuda Bay circle.

Supplies Used:
Stamps:  Wonderful Moments, Timeless Texture
Inks:  Versa Mark, Bermuda Bay, Blendabilities (Bermuda Bay, Pear Pizzazz, Daffodil Delight)
Papers:  Whisper White, Glorious Vellum, Vellum card stock, Bermuda Bay
Accessories:  5/8" white polka dot ribbon, layering oval framelits, Four Petal Punch, Leaf Punch, 1" circle punch, 1 1/4" circle punch, Pearls, Black embossing powder

Wednesday, September 20, 2017

Detailed Gate Wedding Card

There are so many possibilities for creating cards/projects using the detailed Gate Thinlet die. Yesterday I posted a Christmas card; I have previously posted a Halloween card.  Today I am posting a wedding card made with this thinlet die.

This time the gate was die cut using gold foil paper.  The ends of the gate were also scored, burnished, and taped around the back of the  Whole Lot of Lovely DSP.  I also cut the gate down the middle so the gate could open.

Picking up the colours of the DSP, I built a wedding bouquet on  a 1 3/4" circle. Using the retired Petite Flower punch, flowers were punched in Powder Pink, Soft Sky, and Tangerine Tango. The leaves were die cut in Garden Green, using the Eclectic Layers Thinlet dies.  All edges were sponged with Basic Gray.
This bouquet was added to the gate using glue dots and to prevent it from sticking to the DSP
I punched an identical 1 3/4" circle punch which I adhered to the back of the circle on the other side of the gate.

On this picture is a close up of the wedding bouquet.
In the middle of each flower I added a gold foil punchie from the 1/8" hand held punch, and then a gold pearl on top of that.

I snipped between the petals of each flower and curled the edges up.  The edges of the leaves were also turned up.

The sentiment, from "Floral Phrases" is embossed in gold on Basic Black card stock, and adhered to the right gate edge.


Here the gate is opened.


Supplies Used:
Stamp:  Floral Phrases
Inks:  Versa Mark, Basic Gray
Papers:  Basic Black, Lots of Lovely DSP, Gold Foil, Powder Pink, Soft Sky, Tangerine Tango, Pear Pizzazz
Accessories:  Detailed Gate Thinlet Die, Eclectic Layers Thintlet dies, 1 3/4" circle punch, 1/8" hand held punch, Petite Flower Punch (retired), Pearls, Gold embossing powder


Below is a picture of some of the elements I was able to cut out of this gate:


Monday, January 9, 2017

Best Birds Wedding Card

The Best Birds stamp set has proven to be a very versatile stamp set.  I have made a birthday card, a Valentine's Day card, and now a wedding card.

On a silver card stock base a Whisper White piece of card stock partially embossed with the Falling Petals embossing folder is layered.
A silver metallic ribbon (SAB) is adhered where the embossing ends.

Below the ribbon are attached two birds die cut in silver cardstock using the Birds & Blossoms framelits.  Two silver glimmer  wedding bands are held between the two birds.

Three flowers were stamped and then die cut and added to the left side of the card.  They were coloured with the silver marking pen and dazzling details added.

The sentiment was punched using the classic label punch.

Supplies Used:
Stamps: Best Birds
Inks: Black Memento, Silver marker
Papers: Silver card stock, Whisper White, silver glimmer
Accessories: 3/8" silver metallic ribbon, birds & blooms framelits, petite circle punches, dazzling details, glue dots, dimensionals, Falling petals embossing folder.

Monday, August 8, 2016

Wedding Cake using Ombre ink pad

Okay, so I'm on a kick with the new Ombre ink pads.  I made a lovely watercolor back ground using these ink pads, so today I thought I'd do some stamping.

I used the stamp set "Summer Sorbet" - the wedding cake-it could be a birthday cake as well)

The Bermuda Bay Ombre ink pad was used to stamp this wedding cake.  Just a note:  the ink pad is firmer than what we're used to, so you have to stamp harder.  Also, I found to get the best gradation in color, stamp in a circular motion while stamping firmly. The image piece was matted with Bermuda Bay cardstock, and adhered to the Bermuda Bay DSP with dimensionals.

Two small Calypso Coral hearts were placed on top of the cake.  These were punched using the Owl Builder punch.

The sentiment was stamped with Bermuda Bay ink onto Whisper White card stock.  This piece was notched at both ends and attached to the bottom of the image piece.

Below that some thick Calypso Coral Baker's twine was wrapped around the DSP and tied into a bow.

The two doves were cut from the top of the wedding cake from the stamp set "Your Special Day"
 
You can probably see the gradation in color better in the close up of the cake below.


To add bling, some dazzling diamonds was added to the layers, some Wink of Stella to the swag marks, and some Bermuda Bay sequins randomly placed on the card.


Supplied Used:
Stamps: Summer Sorbet, Your Perfect Day
Inks: Bermuda Bay Ombre ink pad, Bermuda Bay, Black Memento
Papers: Bermuda Bay, Bermuda Bay DSP, Calypso Coral card stock, Whisper White
Accessories: Owl Builder punch, Dazzling Diamonds, Wink of Stella clear glitter brush, Bermuda Bay sequins, Thick Calypso Coral Baker's twine, dimensioals.

Wednesday, July 6, 2016

Your Perfect Day - Try Stampin on Tuesday # 278

Last Sunday at my craft show I sold almost all of my wedding cards, so my task this week was to make more for the show this Saturday.  The layout of the sketch challenge with Try Stampin' on Tuesday was perfect for a wedding card.


  •  The Whisper White card base is a top fold card that measures  4 1/4 by 11.  It is layered with retired DSP. On the bottom right I adhered a  3 12 by 3" piece of Irresistably Yours DSP that I sponged with Sahara Sand ink.  This DSP is also retired.  Just behind that I place a white doillie.
  • The image panel is 3 3/4 by 1 7/8" of Whisper White, matted with 4 by 2 1/8' Sahara Sand cardstock.
  • The cake, from the stamp set "Your Perfect Day" was stamped with Black Memento, and coloured with a blender pen and Sahara Sand ink.  Some Wink of Stella was applied to the birds on top of the cake as well as the scalloped icing.
  • Some Sahara Sand lace ribbon was applied to the card to become a base upon which the sentiment was placed.
Supplies Used: 
Stamp:  On Your Perfect Day
Inks: Sahara Sand, Black Memento
Papers: Whisper White, Retired DSP, Sahara Sand
Accessories: Sahara Sand scalloped ribbon (R), white doillie, Wink of Stella clear glimmer brush, dimensionals.

Pleated Fold Wedding Card

The Pleated Fold looks complex, but it's really very easy.  I was in need of some wedding cards, so I made one using the pleated fold.  The paper is  Affectionately Yours DSP.

  • The DSP was cut to 4 by 11 1/2" and scored at 3,4,6,7,9 and 10. Then I drew a faint line from the 3" score line diagonally across the DSP to the far end about 1" from the top at the opposite side. Start at the 3" score line, fan fold the DSP to form the pleated folds/
  • This fold unit was adhered to a 4 by 5 1/4" piece of Whisper White cardstock.
  • A 5/8" gold ribbon was placed at the top of the card.
  • A Rose was die cut with gold foil paper using the Rose Garden thinlet and adhered to the front of the pleated fold.
  • The sentiment was stamped using Black Memento ink.

Supplies Used: 
Stamp:
Ink: Black Memento
Papers: Night of Navy, Whisper White, Affectionately Yours DSP, Gold Foil
Accessories: 5/8" gold ribbon, Rose Garden Thinlet

Wednesday, June 1, 2016

A Wedding Card - SUO Challenges #149

Weddings are here, and June certainly is the month for weddings!
I made this wedding card for the SUO challenge here


The base card is Whisper White cardstock, layered with Blushing Bride glimmer paper and then a layer of White Shimmer Paper.
The Blooming Hearts Thinlet die was used to die cut the Blushing Bride glimmer heart.  The flowers were die cut using Dazzling diamonds glimmer paper, and a rhinestone was added to the top of each flower.
White organza ribbon was coloured with a Blushing Bride marker and the colour blended with an Aqua painter.
The sentiment was embossed with silver embossing powder and adhered to the card front using dimensionals.

Supplies Used:
Stamp: Bouquet Toss
Inks: Versa Mark,Blushing Bride marker
Papers: Whisper White cardstock, White shimmer cardstock, Blushing Bride glimmer paper, Dazzling diamonds glimmer paper
Accessories: Blooming Heart Thinlet die, Silver embossing powder, white organza ribbon, rhinestones, dimensionals.

Thursday, July 9, 2015

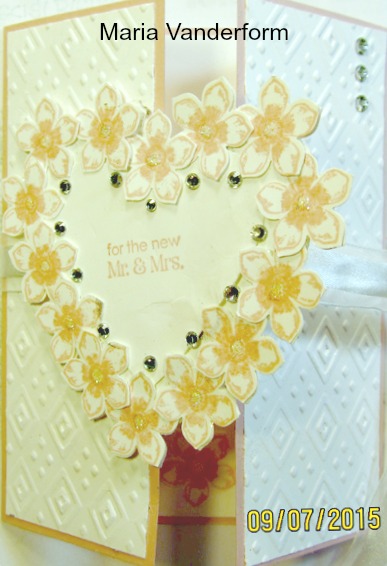
Gatefold Heart Wedding Card

I have another craft show this weekend and I was in need of some wedding cards.  This card was inspired by one I saw on Pinterest.
It's a gatefold card with a heart edged in flowers in the middle of the card.


  • After making the gate fold card using Blushing Bride cardstock, Whisper White cardstock embossed with Boho Chic embossing folder was adhered to the two front panels.
  • A piece of Whisper White cardstock was also adhered to the inside.
  • A heart was die cut using the Hearts collection framelit.
  • On a separate piece of Whisper White cardstock, 28 Petite Petal flowers were stamped using Blushing Bride ink, and punched out using the coordinating punch. Using a Blushing Bride marker, the center of each flower was highlighted, These flowers were adhered around the periphery  of  one side ofthe heart, and then the heart was turned over, and flowers were also placed on the backside.
  • A piece of Whisper White organza ribbon was adhered to the back of the card and brought along the front.  
  • Half of the heart was attached to the card front using dimensionals.
  • The organza ribbon, tied, closed the card.
Supplies Used:
Built for Free Using: My Stampin Blog

Sunday, May 24, 2015

A Pinwheel Card

Dawn O is doing a series of videos on different card folds.  Today the video was on how to make a pinwheel card and I was so intrigued by it that I had to try it.  You can find the video here 
Although it looks easy enough when Dawn does it the final folding can be a bit tricky. 


As you can see from the picture above I had to fold and refold it several times before I got it right.  My next one won't look so rumpled.

Supplies Used:

Built for Free Using: My Stampin Blog


Saturday, May 23, 2015

Wedding wine tag - Just Add Ink #263

The theme for the challenge with Just Add Ink  is weddings - anything to do with weddings. I thought about a lot of things that I could create, but I settled on a wine tag - a very special wine tag. I used the "Something Borrowed DSP" and the stamp set: " For the New Two" both of which are retiring very soon.
I must apologize for the colour in the pictures.  They were taken at night and the colour of the cardstock and DSP are not quite right.


Close up of tag

The basis of the tag is Sahara Sand cardstock, layered with DSP.  The tag was scored at 3" from the top and a 1 1/4" circle was punched in the middle of the top section for the neck of the bottle.  A scalloped circle in silver cardstock surrounds this aperture. 

The decorative element of this tag are two rosettes one on top of the other.  The larger one was made using a 1 1/4" strip of the same DSP but a different pattern.  The one on top was made using a 1" strip of DSP using a different pattern from the same DSP.  A 1 1/4" silver circle with a 1" Sahara sand circle was adhered to the top of the rosette cluster.  The top is finished with a Something Borrowed embellishment.

Below the rosettes, I adhered a piece of 7/8" Sahara Sand lace trim and bow.

The sentiment, from the stamp set "For the New Two" was embossed with silver embossing powder on Whisper White cardstock.  Both ends were notched, and it was then adhered to the top of the tag above the rosettes, using dimensionals.

Supplies Used:

Built for Free Using: My Stampin Blog