Showing posts with label Thanksgiving. Show all posts

Saturday, September 30, 2023

Slimline Pumpkin Thanksgiving Card - Hand Stamped Sentiments #423

 The challenge at Hand Stamped sentiments #423 is a theme challenge. I decided to make a slimline card featuring pumpkins.


I used the Pretty Pumpkins stamp set as well as Nature Prints.  Dies used include:  Detailed pumpkin dies, Vine slimline die, Stylish Shape Dies.  For papers I used Very Vanilla, Mossy Meadow, All About Autumn (wood grain for under pumpkins). Underneath the pumpkins I added leaves die cut using Autumn Leaves dies.  I used the copper oxidized paper.


Thursday, September 28, 2023

Fruitful Blessings: a Thanksgiving Card

 I love colouring, so the floral image associated with the Fruitful Blessings bundle set spoke to me. So, I stamped and coloured the image and made a Thanksgiving card.


The card base is Moody Mauve layered with Very Vanilla cardstock embossed with the 3D Fall Leaves Embossing Folder.
Across the middle I added a 1" Natural ribbon which I frayed at one end.
After colouring the image using Stampin' Blends, It was die cut using the matching die and added to the card front using dimensionals.
The sentiment, stamped in Moody Mauve ink, was die cut with a Stylish Shaped Die, and added at and angle with dimensionals.
The card was finished with the addition of 3 speckled dots.

Supplies Used:
Stamp:  Fruitful Blessings
Inks:  Black Memento, Moody Mauve, Stampin Blends
          Big Flower:  Daffodil Delight, Crushed Curry, Pumpkin Pie, Pecan Pie
          Medium Flower:  Rich Razzelberry, P|umpkin Pie, Copper Clay
          Small flowers:  Daffodil Delight, Copper clay
          Leaves:  Old Olive, Mossy Meadow
Papers:
          Moody Mauve:  5 1/2 by 8 1/2 scored at 4 1/4 to form an A2 card base (top fold)
          Very Vanilla 4 1/8 by 5  3/8"  2 pieces- one for the front and one for the inside. Emboss the one for the front using the 3D Fall Leaf Embossing Folder then add it to the Moody Mauve card base. Add the second piece to the inside.0
          Very Vanilla 3 1/2 by 2 1/2"  to stamp and colour image.  Die cut image after colouring it.
          Very Vanilla 3/4 by 3" for sentiment.  Die cut with Stylish Shape die.
Accessories:
    .Fruitful Blessings Die
    .Stylish Shape dies
    .1" Natural ribbon frayed at one end
    .Dimensionals
    .Adhesive backed speckled dots
    .Wink of Stella (centers of flowers)


Wednesday, September 14, 2022

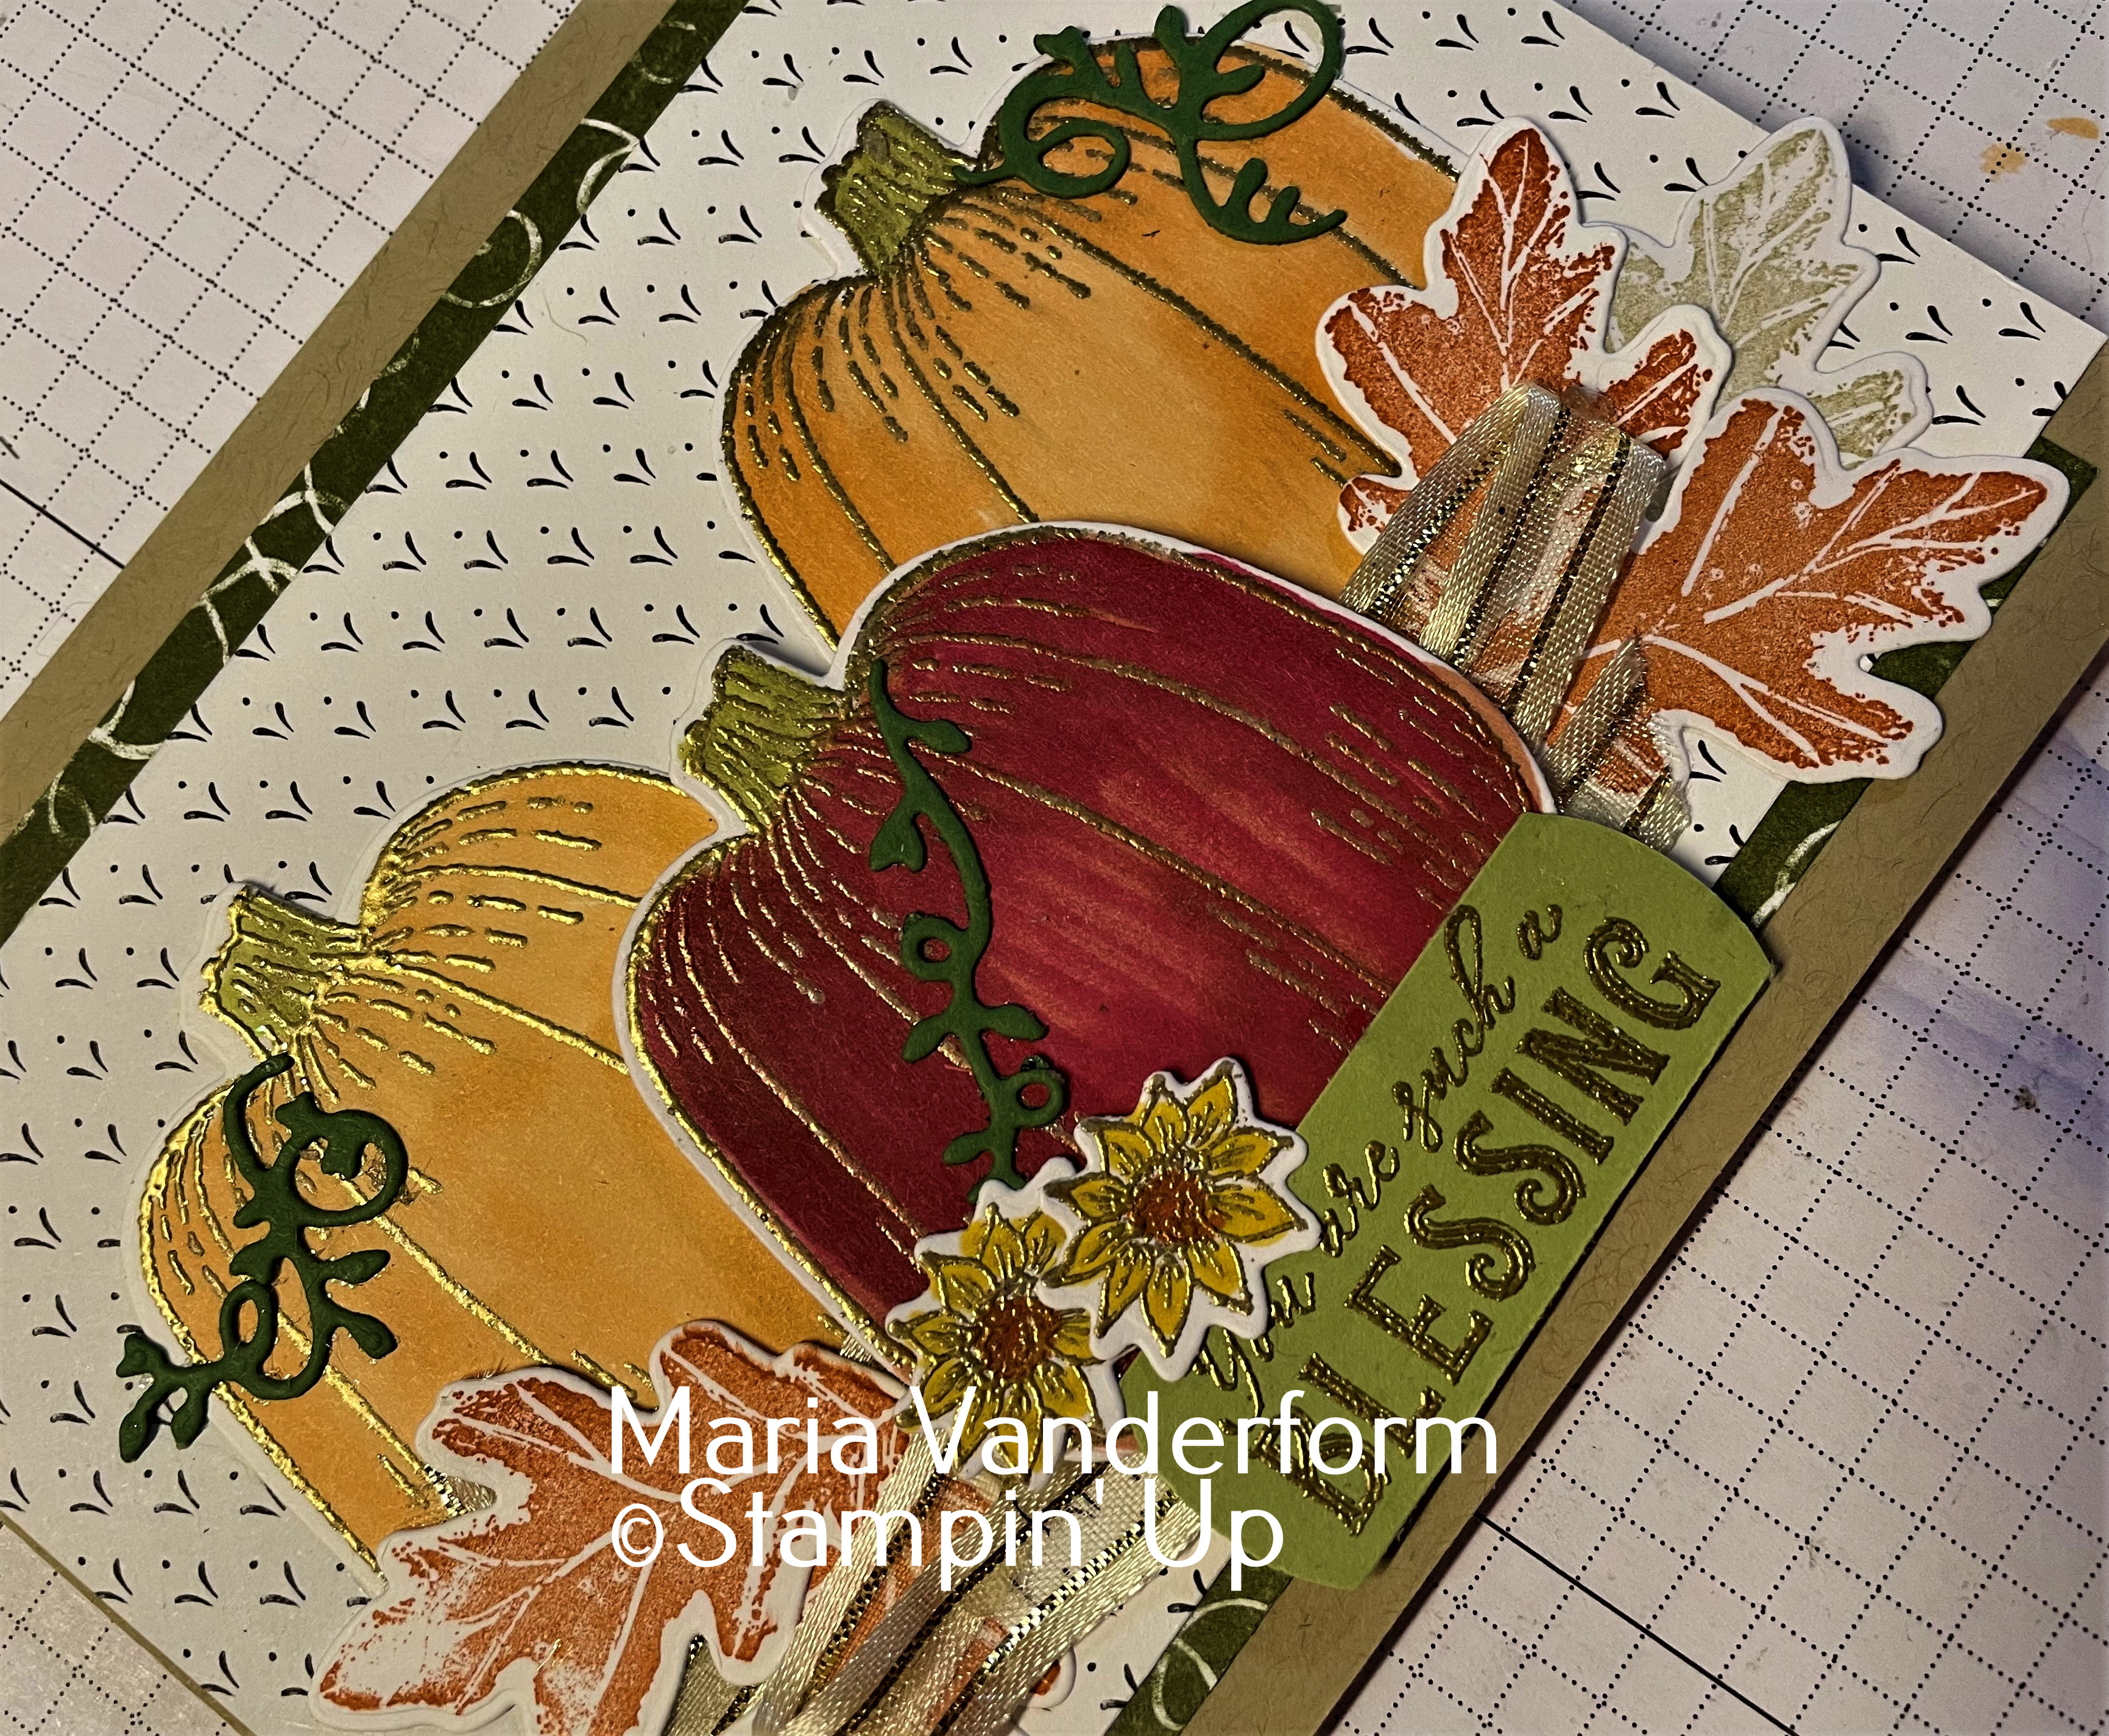
Hello Harvest - a catalogue case

Tonight I got started on my Thanksgiving cards.  I was stunned to realize that this holiday was a mere 4 weeks away - in Canada October 10. 2022.

This year I am using the new Rustic Harvest suite to make my cards.  For the first card I am casing one of the cards on pg. 50 from the Holiday catalogue.


The card base is Crumb Cake upon which is layered two different patterns of the Rustic Harvest DSP.

1. On a separate piece of Basic White card stock,  emboss 3 pumpkins with Gold Embossing powder.  Colour two with Pumpkin Pie stampin' Blend; the third with Cherry Cobbler .
2. Die cut the pumpkins using the coordinating Rustic Pumpkin Dies
3. Emboss two small sunflowers with gold embossing powder. Die cut
3. Stamp six leaves - 4 with Cajun Craze ink; two with Crumb Cake. Die cut.
4. Die cut three tendrils using Garden Green card stock. and adhere to the pumpkins using a glue dot.
5.  Adhere the two Pumpkin Pie coloured pumpkins to the DSP on the card base.


6.  Fold up a piece of Gold Satin Edged ribbon back and forth several times and adhere behind the red pumpkin.  Then adhere the leaves behind the pumpkin and adhere the pumpkin in from of and below the other two using dimensionals.
7.  Gold emboss the sentiment on some Old Olive card stock and punch with the Label Me Fancy punch.  Add  below red pumpkin with dimensionals.
7.  Add the two sunflowers using small dimensionals.

Supplies Used:
Stamp:  Hello Rustic
Inks:  Versa mark, Cajun Craze, Crumb Cake, Stampin' Blends (Pumpkin Pie, Cherry Cobbler,, Cajun Craze, Daffodil Delight)
Papers;  Crumb Cake, Basic White, Rustic Harvest DSP, Old Olive, Garden Green
Accessories:  Rustic Pumpkin Dies, Satin Edged gold ribbon, Glue dots, Dimensionals, gold embossing powder

Inside:

Add two strips of the same DSP as used on the front of the card to the bottom of the insert for the inside.

Fussy cut one of the 'gourds' or small pumpkins and a leaf from the DSP and adhere to the bottom right of the inside.


Sunday, October 3, 2021

Nature's Harvest Thank You for Thanksgiving- Card for 2 occasions

 Thanksgiving will soon be here.  In Canada the date is October 10th, 11th just barely over a week away.  It may be too soon to mail a card, but hand given cards are just as well received.

If you get invited for Thanksgiving dinner this card could also double as a Thank you card.


  • Cut and fold a 5 1/2 by 4 1/4" piece of Crumb Cake card sock to create a side folding A2 card.
  • Cut a 4 by 5 1/4" piece of Crumb Cake, emboss with the Timeworn Type 3D folder.  With a sponge dauber sponge the edges and very lightly the embossed surface using Crumb Cake ink.
  • Add a 2 by 5 1/4 " banner of Crumb Cake Harvest Meadow (branch pattern) with the edges sponged with Crumb Cake ink slightly off center on the top of the embossed piece.
  • On a separate piece of Basic White card stock, stamp the image with Basic Gray ink and colour with Stampin' blends using the following colour pairs (Daffodil Delight and Cajun Craze on the flowers; Soft Succulent on stem and leaves)

  • Die cut using Celebration Label die 
  • Mat with a larger Cork paper Celebration Die cut  
  • Add matted image piece to card front using dimensionals.
  •  Stamp sentiment on a 2 by 5/8" of Crumb Cake.  Sponge edges.  Add to side of image piece extending over edge of die cut.  Add a dimensional under edge extending over the die cut.
  • Tie a bow with 3/8 " Embroidered ribbon and add at bottom of matted unit using a glue dot.
  • Add 3 Brushed metallic dots randomly

Inside: 

  • Sponge the edges of 4 by 5 1/4" of Crumb Cake card stock.
  • Stamp part of the cone flower image across the bottom right hand corner using Basic Gray ink.
  • Adhere to inside of card. 
Supplies Used:
Stamp:  Harvest Nature
Inks:  Basic Gray, Crumb Cake, Stampin' Blends (Daffodil Delight, Soft Succulent)
Papers:  Crumb Cake, Basic White, Nature Meadow DSP, Cork paper
Accessories:  3/8" embroidered ribbon, Celebration Dies, Brushed Metallic self adhesive dots, dimensionals, glue dots.


Sunday, October 6, 2019

Season of Thanks - The Paper Players # 462

Thanksgiving - the Season of Thanks - a time to reflect on what we are thankful for.  And this week the theme challenge with The Paper Players is "Grateful, Thankful for You" .

In the note card below, I depict a lot of what I am grateful for - the blue sky, the changing colour of the leaves, pumpkins, and that wonderful turkey dinner shared by family and friends.


The turkey, from "Feathered Friends" was stamped on Whisper White and partially die cut using a square die. After rounding the corners of this die cut, and sponging the edges with Early Espresso ink, the sentiments from "Feathered Friends" and "Gather Together" were stamped in the white space.  Using Stampin' Blends, I coloured the turkey and these colours became the inspiration for the rest of the card.


Doesn't the turkey look like he's calling everyone to dinner?

The sky was brayered  with Balmy Blue ink, and the ground with Crumb Cake with a touch of Cajun Craze. The tree from "Snow Front" was stamped with Early Espresso ink and the colourful leaves were stamped in Crushed Curry and Cajun Craze.  I used the 'falling snow' stamp for the leaves on the trees.

The turkey 'tag' was added to the card front using dimensionals.  But before doing so, the sprig of wheat was stamped multiple times in Crushed Curry and Cajun Craze behind where the tag would be.

Pumpkins, from the stamp set "Gather Together" were stamped on Pumpkin Pie card stock, die cut and added to the card front using dimensionals.

Supplies Used:
Stamps:  Feathered Friends, Snow Front, Gather Togethetr
Inks;  Black Memento, Balmy Blue, Crumb Cake, Cajun Craze, Stampin' Blends
Papers:  Whisper White note card, Whisper White, Pumpkin Pie
Accessories:  Gather Together Dies, Layering square dies, Dimensionals, Brayer, Corner Rounder Punch


Friday, August 23, 2019

Season of Thanks - a sneak peak Autumn card

Yes, it still is summer, but the days are getting shorter and the nights cooler.  There is definitely a feel of autumn in the air.  So today I pulled out on"e of the new stamp sets in the holiday catalogue and made a few cards.  It did feel rather strange to be working with fall colours and thinking about Thanksgiving, but sometimes one has to work ahead.

This Z fold card is made using the "Gather Together" stamp set and coordinating "Come Together DSP".  It is similar to a card I saw on Pinterest.


The card base is a 5 1/2 by 11" piece of  Pretty Peacock card stock, scored at 5 1/2  and 8" and folded to form a Z fold card.

The 2 front panels are layered first with Whisper White card stock and then Come Together DSP.


On a separate piece of  Whisper White card stock, 4 large and  1 smaller pair of pumpkins were stamped using Pretty Peacock ink.  After die cutting them using the Gathering Leaves Dies, only half of each pumpkins was added along the front fold line. Another larger and the small pumpkin pair were stamped on the inside of the card.


The sentiment, stamped in Pretty Peacock ink, was die cut with a layering oval die, and matted with a slightly larger scallop oval die.  After adhering the two together it was adhered to the card front using dimensionals.  Two of the harvest grasses were stamped, fussy cut and adhered to the front below the sentiment and a bow made with the braided linen thread was adhered to the stem top.

A sentiment is stamped on the inside and to finish the card, three Pretty peacock rhinestones were added.

Supplies Used:
Stamp:  Gathering Together
Inks:  Pretty Peacock
Papers:  Pretty Peacock, Whisper White, Come Together DSP
Accessories:  Layering Oval Framelits, Gathering Leaves Dies, Braided Linen Thread, Pretty Peacock rhinestones, Dimensionals.

Sunday, August 19, 2018

Pleasant Pheasants

I seem to be waffling back and forth between Christmas and Thanksgiving.  Today it's Thanksgiving's turn.

The Pleasant Pheasant stamp set has some wonderful Thanksgiving/Fall images.  Today's card features the Pheasants.


The card base is Cajun Craze card stock, with a strip of Early Espresso matted with copper foil in the center.

The pair of pheasants, stamped on Whisper White, were coloured with watercolor pencils and a blender pen.  I stamped and colored a send female pheasant, fussy  cut her and placed her on top of the other one with dimensionals.


I used the Stitched Seasonal Framelit to die cut this pair, and added it to the card from using dimensionals.  The sentiment is from the same stamp set and was die cut using the Petals and More Framelits.

I also die cut some leaves in copper foil and added them above and below the image.

Supplies Used:
Stamp:  Pleasant Pheasants
Inks:  Black Memento, Watercolor Pencils
Papers:  Cajun Craze, Early Espresso, Copper Foil, Whisper White
Accessories: Blender Pen, Stitched Seasonal Framelits, Petals and More Framelits, Dimensionals

Tuesday, September 26, 2017

Thinking of You - Try Stampin' or Not on Tuesday #341

The optional theme with this week's sketch challenge with Try Stampin' or Not on Tuesday  is "Bold Words".


The Bold Sentiment, from "Count My Blessings" is stamped with Rich Razzelberry ink on a 1 1/2" piece of Whisper White cardstock which extends horizontally all the way across the top of the card.

The card base is Garden Green card stock, layered with Very Vanilla embossed with the Layered Leaves embossing folder.

On the left is a strip of Painted Autumn DSP with a strip of scalloped Rich Razzelberry card stock adhered to the inside edge.

Extending from the left bottom border of the sentiment strip is a notched piece of DSP, which is the reverse side of the DSP already used.

To finish the card, I placed 3 pieces of Glitter Enamel Dots on either side of the sentiment.

Supplies Used:
Stamp:  Count My Blessings
Inks:  Rich Razzelberry
Papers:  Garden Green, Very Vanilla, Rich Razzelberry, Painted Autumn DSP
Accessories:  Layered Leaves Embossing Folder, Tasteful Trim Die (retired), Glitter Enamel Dots

Tuesday, August 29, 2017

Count My Blessings - bleaching technique

I have been following the catastrophic events in Houston, Texas as they unfolded over the last couple of days. I can't believe the amount of rain that Hurricane  Harvey has dumped on this large city, and from all reports Harvey is about to strike again before heading inland. My heart goes out to all the victims of this flood.!  I hope you, my followers especially, are safe and not trapped on a roof somewhere!
In Southern Ontario, some impact of Harvey will be felt later in the week, with mild rainy, windy weather, certainly nothing compared to my neighbours to the south.
Stay safe my friends!

I was thinking of the victims of  Hurricane Harvey when I made this Thanksgiving card.  I used a technique I have not used in a long time - bleaching!


On a Chocolate chip piece of card stock, I black embossed these acorn images randomly over its surface.  Then, taking a fine tipped paint brush, I carefully applied bleach to the insides of each embossed image using my heat tool to dry.  This had an unusual effect of making parts of the images appear lighter in colour.

This art piece was adhered to a sponged Very Vanilla layer and before adhering it to the Cajun Craze card front, I wrapped linen thread 3-4 times around the left side and tied it into a knot at the front.

I used the Everyday Label Punch to punch out the sentiment, which I matted with Cajun Craze card stock before adhering it to the middle of the card.

It's not evident on the picture, but I did apply some clear Wink of Stella over the bleached images.

Supplies Used:
Stamp:  Count My Blessings
Inks:  Soft Suede, Versa Mark
Papers:  Cajun Craze, Very Vanilla, Chocolate Chip
Accessories:  Linen Thread, Everyday Label Punch, Bleach, Black embossing powder, Clear Wink of Stella

Monday, August 28, 2017

Painted Autumn Thanksgiving Card

Thanksgiving weekend is coming up fast.  Here in Canada it is the first weekend in October, and since I am doing a 3 day craft show on that weekend I needed to make some Thanksgiving/autumn cards.

The this sunflower on this card, I experimented with several color combinations:  Daffodil Delight, Crushed Curry and Daffodil Delight; Daffodil Delight, Pumpkin Pie and Daffodil Delight; and finally Daffodil Delight, Cajun Craze and Daffodil Delight.- and deciding on the Daffodil Delight and Pumpkin Pie option.

On Very Vanilla card stock, I stamped 3 sunflowers in a random pattern using the predetermined color pattern.  The center is stamped with Early Espresso ink; the leaves in Garden Green.

At the bottom is a strip of Painted Autumn Specialty DSP with some burlap ribbon on top.

The sentiment was punched with the Pretty Label punch and gold faceted gems added to the flower centers and below the sentiment.

Some Gold Wink of Stella was "splattered" across the card front and then I was done.

Supplies Used:
Stamp:  Painted Harvest
Inks: Early Espresso, Daffodil Delight, Pumpkin Pie, Garden Green
Papers:  Cajun Craze, Very Vanilla, Painted Autumn DSP
Accessories:  Burlap ribbon, Pretty Label Punch, Gold Faceted Gems, Gold Wink of Stella

Thursday, September 29, 2016

Pyramid Thanksgiving Centerpiece - SUO Challenges Challenge #158

The Pyramid Christmas card I made a couple of days ago inspired this Thanksgiving centerpiece.  My intent is to use it to decorate my craft table Thanksgiving Weekend.
Instead of using  4 by 4" pieces of cardstock, I used 8 by 8" pieces, and ended up with a centerpiece that was 8" tall.


Four pieces of 8 by 8" pieces of Kraft cardstock were  used to create the base of this pyramid centerpiece.  Irresistibly Yours DSP (retired) , sponged with Pumpkin Pie, Crushed Curry, Pear Pizzazz, and Soft Suede was adhered to the Kraft Cardstock.

The Pyramid centerpiece was kept closed with a large brad at the back.

Earlier in the day I had made fall leaves using the Leaf thinlets and a watercolored background. Some leaves were also die cut using the Pumpkin Pie glimmer paper. These leaves were used to decorate this centerpiece.

First I die cut a large Whisper White Label, matted with Pumpkin Pie glimmer paper .This was distressed using the Timeless Texture stamp set. A cluster of leaves and an acorn were adhered to the top left.


At the bottom I arranged some pumpkins, and more leaves.

The word "Thanks" was die cut from Hello You Thinlets in Crumb Cake and Early Espresso.  The two were adhered off setting each other.


Supplies Used: 
Stamps:Acorny Thank you, Gorgeous Grunge, Fall Fest (retired)
Inks: Pumpkin Pie, Crushed Curry, Pear Pizzazz, Soft Suede, Daffodil Delight, Early Espresso
Papers:Kraft Cardstock, Irresistibly Yours DSP (retired), Whisper White, Pumpkin Pie glimmer paper, Crumb Cake, Early Espresso
Accessories: Hello You thinlets, Leaf Thinlets, Fall Fest thinlets, dimensionals, glue dots, Acorn builder punch, Bow Builder Punch. Labels Thinlets


Wednesday, September 28, 2016

Thanks Card - a CASE

This card was made at our team meeting on Monday night .  This is one of the cards made at the Demonstrator Training event in Cambridge July 2016, which unfortunately I missed.  But my downline went and she provided me with the invaluable handouts.

Gail demonstrated how to make the background technique for this card, and then we all made the card.  What a  great technique - and so easy!!

The sponging is done from light to dark colours - starting with Peekaboo Peach in the center to Early Espresso around the outside border.

The colours in the background include:  Peekaboo Peach, followed by Crushed Curry, Pumpkin Pie, Cherry Cobbler, blending each colour and slightly overlapping each.  After all the colours are applied and the Early Espresso added, Peekaboo Peach was lightly sponged over the entire panel.

Now, here's where the background gets interesting.

First, an Oak Leaf  stamp (Vintage Leaves), lis ightly spritzed with water,  and stamped onto the background, letting it sit longer than when stamping which allows the moisture to penetrate the cardstock.  This process is repeated with the Maple Leaf, and then both areas are dried using the Heating Tool.  This really allows the images to "pop".  If you look closely at the card you can see these ghost like images in the upper corners of the background.

The sentiment "Thanks", from Hello You thinlets, is die cut in Crumb Cake and Early Espresso, and the two layers adhered together slightly off setting each other.

A Maple Leaf is embossed with Copper Embossing powder on vellum and die cut using the Leaflets Framelits.  Before adding it to the card front, some copper metallic thread is wrapped into loops and adhered to dimensionals on the back of the die cut leaf and then the leaf is added to the card front.

The sentiment from "Endless Thanks" is stamped with Early Espresso on Kraft cardstock, trimmed into a banner and adhered to the card f ront.

Here's  the close up.

Supplies Used:
Stamps: Vintage Leaves, Endless Thanks
Inks: Peekaboo Peach, Crushed Curry , Pumpkin Pie, Cherry Cobbler, Early Espresso, Versa Mark
Papers: Kraft Cardstock, Early Espresso cardstock, Whisper White, Very Vanilla, Vellum
Accessories: Copper Metallic Thread, Leaflet thinlets, Hello You Thinlets, Copper embossing powder, dimensionals


Monday, August 29, 2016

Gratitude Boxed Note cards

These are some thank you notes especially designed with Fall and Thanksgiving in mind.  There are 4 note cards and envelopes contained in a designer box.

Using the Wondrous Wreath stamp set, I stamped first with Daffodil Delight, and then Pumpkin Pie.  Lastly I stamped with Cherry Cobbler.
The wreaths were die cut using the Wondrous Wreath framelit dies and then adhered to the front of the note card. After the card was finished, cherry cobbler dazzling detail was applied to each of the berries.


The white note card is lined with Pumpkin Pie, and then Fancy Frost Specialty DSP which was sponged lightly with So Saffron ink.  A piece of 1/2" Pumpkin Pie ribbon (retired) was adhered to the lower half of the card. The same ribbon was used to make the bow on the wreath.

Pumpkin Pie cardstock was used to die cut the word "gratitude"

The box was made usng the envelope maker and Kraft cardstock.  Another wreath was made and a circular hole was die cut in the top of the box covered with a window sheet.  The wreath was adhered around the window.

To keep the box closed, a 1" Kraft card stock belly band was placed loosely around the box. and the pumpkin pie ribbon tied around it.

Supplied Used:
Stamp: Wondrous Wreath
Inks: Daffodil Delight, Pumpkin Pie, Cherry Cobbler, So Saffron
Papers: Whisper White note card, Fancy Frost Specialty DSP, Pumpkin Pie, Whisper White
Accessories: Wondrous Wreath framelits, Layering circles framelits, Envelope maker, 1/2" Pumpkin Pie ribbon (retired), window sheet

Saturday, August 27, 2016

Thankful - Try Stampin on Tuesday #285

When the CNE (Canadian National Exhibition) opens in Toronto, Ont. we know summer is coming to an end.  However, with the high temperatures we have been having, that's  a bit of a relief!  And of course with the ending of summer, school starts, and then Fall, and Thanksgiving.  So, today, with the sketch challenge with Try Stampin' on Tuesday, I thought I would do a fall card.  And because embossing was an additional option, I embossed the leaves with the new copper embossing powder.


Cajun Craze is a good fall colour, so that became the colour of the base card.  A layer of Whisper White, with some texture applied using a stamp from the "Timeless Texture" stamp set was adhered to this base.
In the middle a 2" piece of Cajun Craze cardstock was attached.  On top of that, horizontally, near the bottom was a 1 1/4" strip of Soft Suede cardstock with a 3/8 " burlap ribbon attached to it.
The base for the images was a 1 1/2 by 3 1/2" piece of Whisper White which was also texturized with the same stamp set using Soft Suede ink.

On a separate piece of Whisper White cardstock, 3 leaves and an acorn were stamped with Versa Mark and embossed with copper embossing powder.  The leaves were die cut using the "Leaflet Framelits"; the acorn was punched using the acorn builder punch.

Each of these were sponged with Real Red, Daffodil Delight, and Pumpkin Pie with the edges sponged with Soft Suede ink.

The leaves and acorn were clustered together and a piece of EarlyEspresso Baker's twine was wrapped around it and tied around into a bow.  A mini pinecone embellishment was suspended under the bow with a piece of  linen thread.  

Supplies Used:
Stamps: Vintage Leaves, Acorny Thank You, Timeless Texture
Inks: Real Red, Pumpkin Pie, Daffodil Delight, Soft Suede, Versa Mark
Papers: Cajun Craze, Whisper White, Soft Suede
Accessories: Copper embossing powder, Early Espresso Baker's Twine, Leaflets Framelits, Acorn builder punch, mini Pinecone embellishment, Linen Thread, dimensionals, 3/8" burlap ribbon, pearls
       

Sunday, September 13, 2015

Some more swap cards

This swap called for any theme as long as the card would fit into of a legal envelope.  Since I am currently in the Thanksgiving/Halloween mode, the card became a Thanksgiving card.  These are the cards I made.


  •  To make a legal sized card, I cut the cardstock at 9 by 8" scored at 4" to make a 9 by 4" horizontal card.
  • The basic cardstock is Cajun Craze, layered with a 8 3/4 by 3 3/4" piece of Daffodil Delight.
  • On the 8 1/2 by 3 1/2" piece of Whisper White, a strip of painter's tape was applied to 1" from the top and 1" from the bottom.
  • The area in between the tape was first sponged with Cajun Craze, Daffodil Delight and Old Olive,  The leaves from the "Vintage Leaves" stamp set were randomly stamped with Memento ink.
  • After the stamping was finished, the masking strips were removed, leaving an artistic strip in the middle of the card.
  • This piece of Whisper White was then adhered to the Daffodil Delight.
  • The sentiment is from "Peaceful Pines" is stamped with Memento on Whisper White, matted with Daffodil Delight and adhered to the front overlapping the sponged image slightly.
Supplies Used: 
 
Built for Free Using: My Stampin Blog

Friday, September 11, 2015

Image through Maple Leaf die cut

This card was inspired by a similar card I saw on Pinterest.  The top layer of the card is die cut with the vintage leaves framelit, and the scene is stamped on Whisper White which is underneath it.  I made 4 cards, but only 3 will be swapped.  The 4th I keep.


  • The base card is Tangelo Tango cardstock, layered with Very Vanilla cardstock
    The third layer is Crumb Cake embossed with the Woodlands embossing folder.  At the right end it is die cut using the Vintage leaves framelits.

    Using the die cut negative, small pencil marks were made to indicate the margins of the leaf.
    Removing the leaf, the image from Happy Scenes was then stamped on the Very Vanilla cardstock.  After stamping, the pencil marks were erased.

    Parts of the image were coloured using markers - Pumpkin Pie, Daffodil Delight, Real Red, Old Olive.

    The crumb cake layer was now adhered to the Very Vanilla layer.

    A piece of Burlap ribbon was adhered to the left side slightly overlapping the die cut. Underneath that are several loops of gold metallic thread. On the top of this ribbon is the sentiment and an acorn.

    Supplies Used:

    Built for Free Using: My Stampin Blog

Tuesday, September 8, 2015

Vintage Leaves Thankful


You'd never know by the weather that we are approaching fall.  The heat and humidity have been stifling and certainly does not put one in the mood to make Christmas cards let alone Thanksgiving or Halloween cards.  However, my craft shows are coming up so I'd better get cracking!!

 had some coloured leaves left over from another project so I  made this Thanksgiving card.  I used the Woodlands Embossing Folder as a background and included an acorn and a feather.


  • The base cardstock is Chocolate Chip, layered with Very Vanilla cardstock embossed with the Woodlands Embossing Folder.  To make the birch trees stamp out a little better, I lightly sponged the surface with some chocolate chip ink.
  • Using the colours of autumn - Old Olive, Cajun Craze, Daffodil Delight, Real red, some leaves were randomly stamped between the trees.  These are from the stamp set: "Among the Leaves".
    A barn owl and some black birds completed the scene.

    At the bottom of this layer, a piece of  Into the Woods Designer paper was adhered.  I did sponge this lightly with Crumb Cake as the background of this paper was Whisper White.  That made the DSP fit in better with the colour scheme of the card. At the top of the DSP I added some gold glitter ribbon.

    The leaves were built on a 1 3/8" chocolate chip circle using a hot glue gun. As I mentioned, these leaves and feathers were left over from another project.  The acorn was made using the Acorny Thank You stamp set with its coordinating punch.

    The sentiment was stamped in chocolate chip ink and die cut using the bitty banners framelit.

    Supplies Used:
    Built for Free Using: My Stampin Blog

Sunday, September 6, 2015

Give Thanks - Vintage Leafs - Pals Paper Arts #266

The challenge this weekwith Pals Paper Arts is a colour one - perfect Autumn colours - Delightful Dejan, Cajun Craze, and Old Olive.  So I pulled out my Vintage Leaves stamp set and the coordinating framelit set and got to work.


PPA266 

  • The leaves and the feather were stamped with Versa Mark on Whisper white cardstock, and embossed with gold embossing powder.  They were then die cut using the coordinating framelits.
  • Each leaf was coloured with  leaf with the 3 colours, spritzed them lightly with water and scrunched them up.  They were unfurled slowly, leaving most of the creases and folds, and allowed to dry.
  • While they were drying, I assembled the rest of the card.
  • The base cardstock is Cajun Craze, layered with Very Vanilla cardstock embossed with the Woodgrain embossing folder.  Some Cajun Craze ink was lightly grazed over the embossed surface using a sponge.
  • The sentiment is from "Thankful Forest Friends".  It was coloured with markers in the 3 challenge colours and stamped onto a piece of Very Vanilla.  The edges were sponged with Cajun Craze ink.  This piece was matted with two colours - Cajun Craze and Old Olive.  It was adhered near the top towards the right side.
  • The leaves were now dry, so I added them one by one with the stems facing the bottom of the card.  I used a hot glue gun to do this.
  • A gold metallic button threaded with linen thread was added to the base of the leaves with a glue dot.
Supplies Used: 


Built for Free Using: My Stampin Blog


Wednesday, August 26, 2015

Acorn Thanksgiving Card

I loved Sandy Hancock's Acorn card so much, I CASED it - well not totally, but pretty close. I changed the colour of the base cardstock, and the patterns on the tops of the acorn.  Thanks Sandy for a wonderful card.  This will be a class card as well.

  • This Crumb Cake cardstock card is a 4 by 11 top folded card.
  • The front of the card was embossed with the Woodland embossing folder.  The raised images were lightly sponged with Soft Suede ink
  • The acorn tops were stamped with Daffodil Delight (2), and Tangelo Twist (2) and punched with the Acorn Builder punch.
  • The rest of the acorn was punched using the Kraft Corrugated Paper, and the tops were glued to them.  The sides of the corrugated paper were sponged with Soft Suede ink.
  • A piece of "In the Woods" DSP was die cut using the larger Lots of Labels framelit.
  • A frame was then made using two of the framelits and Crumb Cake cardstock.  The edges of this frame was sponged with Soft Suede ink.
  • The DSP was adhered to the back of the frame, and the acorns adhered to the DSP at an angle, with one slightly over the other.
  • The sentiment was stamped in Soft Suede ink and die cut using the Bitty Banners framelit.  It was attached to the DSP with dimensionals.
The other two acorns were made the same way and used to decorate the inside.


Supplies Used:
Built for Free Using: My Stampin Blog


Friday, August 21, 2015

Thinking of You with a Grateful Heart

Today was an "off" day for me.  I have heard that the third day after surgery is the worst - and certainly that was the case for me.
I'm glad I don't have a craft show tomorrow.
So, instead, I tried doing some playing in the craft room today, and managed one card, the one I am about to post.
I was so happy to get the "Hearth & Home" framelit and the stamp set   "Happy Scenes" that coordinates with it.

  • I started with the scene out of the window, selecting the Halloween/Thanksgiving image.
  • The sky was coloured with s Marina Mist sponge and a cluster of scallop circles adhered together.  The rest of the image was coloured with markers from the Brights family - Pumpkin Pie, Real Red, Old Olive, Daffodil Delight.  The tree was touched up with a Chocolate chip marker
  • The image was trimmed to fit behind a Very Vanilla window, die cut using the Hearth and Home framelit.  I later sponged the edges of the window with Crumb Cake ink so the window would blend in with the rest of the card.
  •  On the left side of the window I attached a small piece of Happy Haunting DSP.
  • Then I built the rest of the card - an Old Olive base, layered with Very Vanilla, and then Crumb Cake cardstock embossed with the new Softly Falling Embossing Folder.  All of these edges were sponged with Crumb Cake ink.
  • Horizontally, in the middle, was attached a piece of Old Olive cardstock upon with was attached 1/2 of a frayed burlap ribbon.  I tied the frayed pieces in a knot in the middle and put it aside.
  • The window & DSP was attached to the rest of the card using dimensionals.
  • The knotted piece of frayed burlap was added to the lower window sill.
The sentiment was stamped with Chocolate Chip ink, the strip notched at both ends and attached below the window with dimensionals.

Supplies Used:
Built for Free Using: My Stampin Blog