Showing posts with label Thanks. Show all posts

Tuesday, April 9, 2024

Inspirational Sketches Thanks - TSOT #644

 I still feel awestricken after watching the total eclipse of the sun yesterday. I don't recall seeing the eclipse in 2017 but this one will stay etched in my memory.  I think what really got me was how eerie the light was as the eclipse was starting, how quiet everything was - there were no birds, no children playing, no music playing, no wind therefore no branches rustling, no squirrels. The darkness did not last very long, and before I knew it all the things that were absent were all of a sudden present. 

Tonight I decided to make a card using the sketch from TSOT.  For this sketch I decided to use one of the stamps from the Inspirational Sketches bundle - the mushrooms.

About a month ago I planted all my Canna and Calla lilies in pots and watched as one by one they sent up sprouts and formed stems and leaves.  I was very careful not to water them too much, yet still some of the soil in the pots grew some mushrooms. This inspired me to use the mushrooms as the main focus.


On a top folding Basic White card base, I added a layer of Wild Wheat card stock which I embossed with the "Bark" embossing folder. The edges were sponged with Wild Wheat ink.

Towards the left of this embossed piece , I added a piece of Rings of Love DSP, the edges of which were also sponged with the Wild Wheat ink.

On top of that and offset from the middle, I added a rectangular piece of Soft Suede cardstock which I embossed with the "Stripes" embossing folder.

The focal image was added to the bottom right corner of this embossed rectangle.


The colours of the Mushrooms, from the stamp set "Inspirational Sketches" were inspired by the DSP. Stampin' Blends (Poppy Parade, Wild Wheat, Soft Suede, Granny Apple Green) were used to colour them, after which they were die cut using the Inspirational Sketches die.

Before adding them to a die cut deckled circle, some "dots were added to the background using a dot stamp from the Irresistible Blooms stamp set.

The sentiment is from the same stamp set.

Supplies Used:

Stamps:  Inspirational Sketches, Irresistible Blooms

Inks:  Black Memento, Wild wheat, Soft Suede, Stampin' Blends (Poppy Parade, Granny Apple Green,, Wild Wheat, Soft Suede)

Papers:  Basic White, Wild Wheat, Rings of Love DSP , Soft Suede

Accessories:  Bark embossing folder, Stripes Embossing folder, Sparkle gems Dimensionals, Deckles circle dies, Inspirational Sketches dies,


Friday, January 19, 2024

A Thank You card - TSOT #639

 This card is for the sketch challenge at Try a Sketch on Tuesday #639

I use the retired Tea Boutique DSP.


On an A2 Gorgeous Grape card base I added a 4 by 5 1/4" piece of Basic White card stock, and on top of that a smaller piece of retired Tea Boutique DSP (light mauve pattern), The edges of these papers were sponged with Gorgeous Grape ink.

I cut three strips of a different pattern of the same DSP at  3 3/4 by 3/4"  and matted them with Gorgeous Grape cardstock.  After sponging all the edges with Gorgeous Grape ink these 3 strips were added to the left side of the card front.

A Basic White banner, notched at one end was added near the bottom.  The sentiment, a die cut word "thanks" was added to this banner.  At the unnotched end, a cluster of three punched flowers with leaves was added.  Some gold prills were added to the center of each flower.

To finish the card I added 3 pale pastel pearls.

Supplies Used:
Stamp:
Inks:  Gorgeous Grape
Papers:  Gorgeous Grape, Basic White, Tea Boutique DSP (retired), Garden Green
Accessories:  Pastel pearls, small floral punches, Prills, Well Said dies


Friday, November 17, 2023

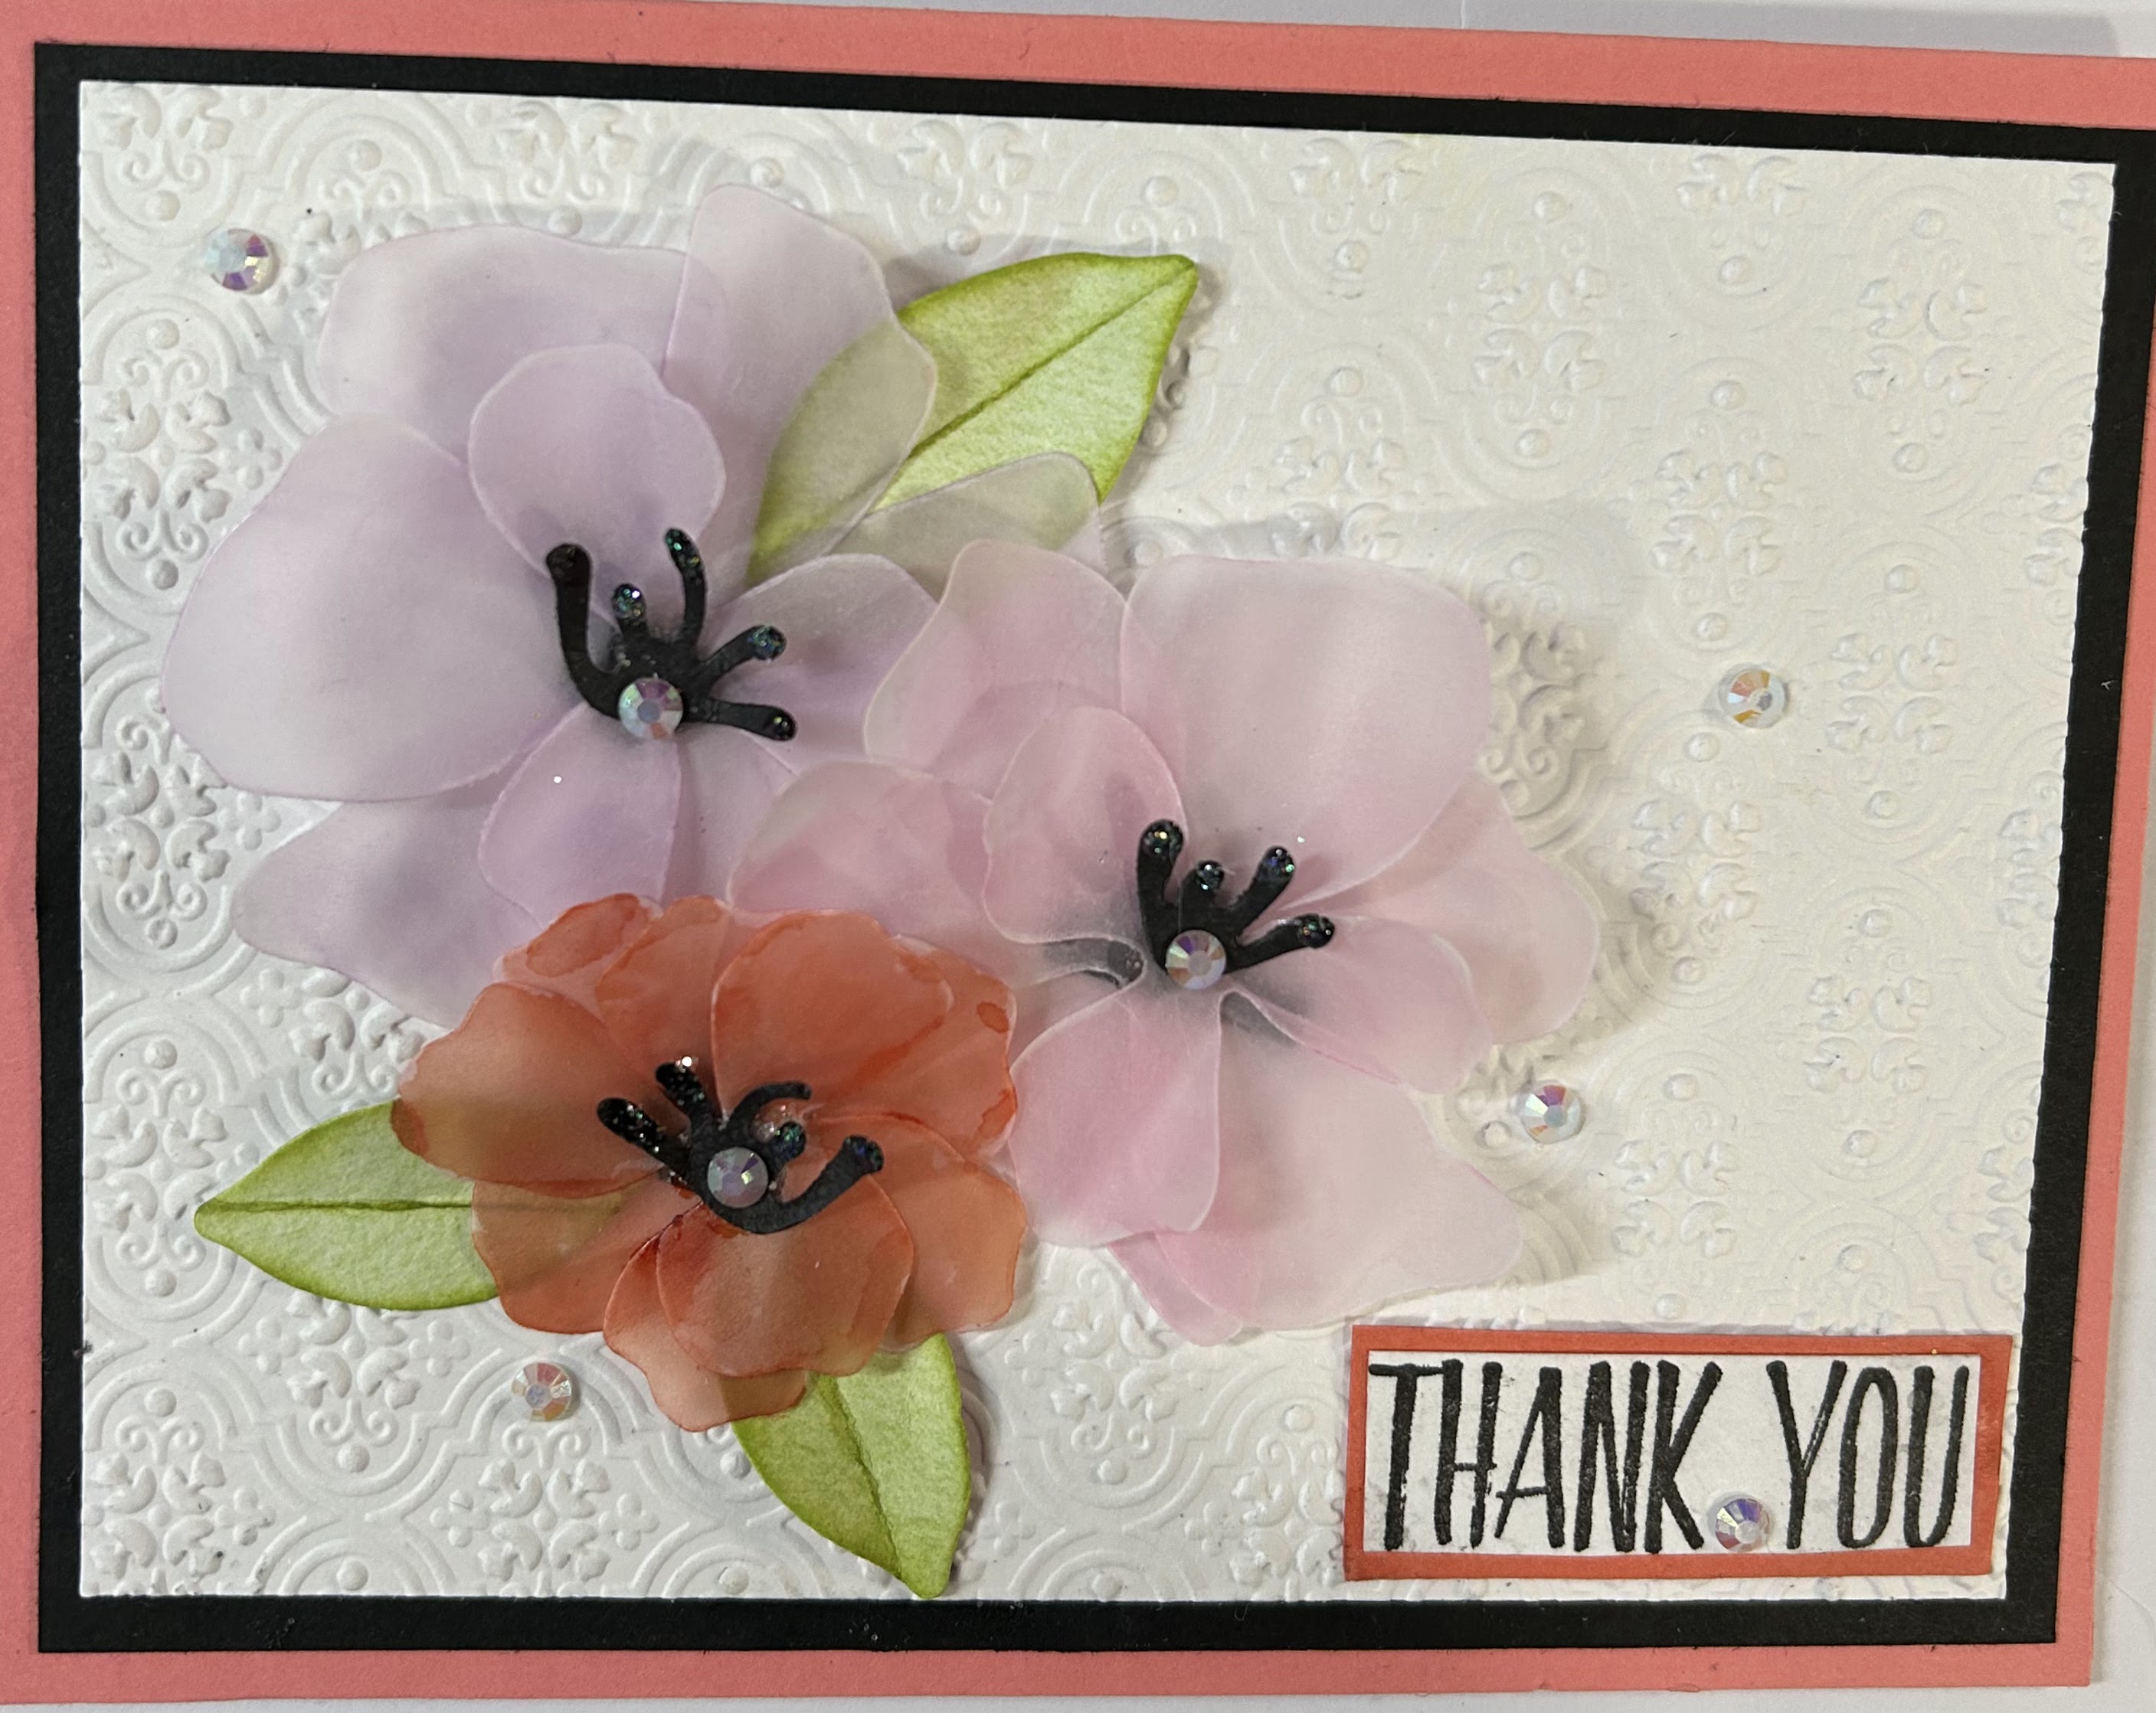
A Translucent Floral Thank You

 Not long ago, I received a phone call requesting assistance in pricing and then selling art supplies belonging to a family member who recently died. To compensate for my time I was informed that I could purchase anything I wanted at a substantially reduced price.  Later that was changed to "take what you want"

When I saw the craft room and the contents I gasped! So many supplies!  Stamps, inks, papers, embellishments, die cutters, dies, scan n cuts, paints, markers, embossing powders, embossing folders etc - many were still in the store packaging and had never been used. 

I did manage to take a fair bit home.

As a thank you, myself and another person are taking this generous person to lunch..  In addition I made a thank you card, using the Translucent Floral bundle.


To make the flowers I first coloured some Vellum card stock, on the wrong side and on different  sections. , using Claypso Coral, Bubble Bath and Flirty Flamingo stamp n blends. I then die cut three floral petals in each colour.  The centers were die cut in Basic Black card stock, and the leaves from the Delightful Floral DSP.

I shaped each of the floral petals before adhering them to form the flower.  I used glue dots to do so.  The centers were added using liquid glue. Each leaf was folded in half and sponged with Mossy Meadow ink before adhering them to the flowers.

On the card base of Calypso Coral was added a Basic Black layer, followed by Basic White embossed with the Quatrefoil Tile Embossing Folder.  The 3 flowers were added to the left front.

The sentiment was from "All Things Thanks", was stamped in Basic Black on Basic White and matted with Calypso Coral.  It was added to the lower right.

Several Iridescent Shaker circles were added randomly on the card front. An Opal Round was added to the center of each flower.

Supplies Used:

Stamps:  Translucent Floral, All Things Thanks

Inks:  Basic Black, Stampin' Markers (Calypso Coral, Flirty Flamingo, Bubble Bath), Mossy Meadow

Papers:  Calypso Coral, Basic White, Vellum cardstock, Basic Black, Delightful Floral DSP

Accessories:  Translucent Floral dies, Quantrefoil embossing folder, Iridescent Shaker Circles, Opal rounds.

Thursday, January 19, 2023

Lock & Pop Gate fold card

 I saw this fun fold card on Pinterest and traced the card back to Cheryl Algie an Australian demonstrator. It is a gate fold card that is folded in such a way as to stand up after the sentiment piece which holds the card closed, is released

I followed her directions on how to make this fun fold card.  I used the stamp set "Dainty Delight" from the Mini catalogue, and its coordinating free SAB DSP "Dainty Flowers"


The card base of Gorgeous Grape card stock of 9 by 5 3/4" was scored at 1/2, 2 1/4, 4, 5, 6 3/4 and 8 1/2".  It is then folded as shown below.


I used 2 different patterns of the DSP at the following dimensions:

. 7/8 by 5 5/8 (1 piece) Pattern 1 (tiny flowers)
. 3/8 by 5 5/8" (2 pieces) Pattern 1 
.1 5/8 by 5 5/8" (2 pieces) Pattern 1
1 5/8 by 5 5/8" (4 pieces) Pattern 2 Polka dots

Basic White 
1 5/8 by 5 5/8" (2 pieces)
7/8 by 5 5/8" (1 piece)


Scrap of Basic white and Gorgeous Grape for sentiment which was die cut using Something Fancy dies.

The 2 layers of the sentiment piece which is attached to the middle strip using dimensionals, hold the card closed.  The card ends fits under the ends of the sentiment holding the card closed.


The card stands up by itself when open.  I have added some Basic White at the back in order to write a message on.  It closes nicely and fits into a regular A2 envelope.

Supplies Used:
Stamp:  Dainty Delight
Ink:  Gorgeous Grape
Papers:  Dainty flower, Gorgeous Grape, Basic White
Accessories:  Something Fancy dies, dimensionals


Wednesday, December 29, 2021

A Windmill (Molen in Dutch) another catalogue sneak peak

 I was 6 when I emigrated from Holland, leaving everything behind - except what could be packed into a trunk. It must have been a hard decision for my parents not knowing what was ahead of them in Canada.

Windmills remind me of the land of my birth.  I returned to Holland after I graduated from University and was awestruck by the majesty of these structures.

One of the new bundles in the Mini catalogue launching in less than a week is the Tulip Fields and Flowering Tulips, both of which have dies.  The Designer Paper that coordinates with them is gorgeous, as are the metallic butterfly embellishments.

The card I made is larger than I normally make - a 5 by 7- as I did not want to crowd out the windmill.

I put a picture of an old windmill below my card.


Supplies:
Stamp:  Tulip Fields
Inks:  Gorgeous Grape
Papers: Thick basic white, Basic White, Soft Suede, Ombre specialty paper, Flowering Fields DSP
Accessories:  Tulip dies, Windmill Field Dies, Small brad, Crystal Effects, Brushed Brass Butterflies

Measurements and putting card together.

  • Thick Basic White 10 by 7 scored at 5 to form a 5 by 7 card (card base)
  • Flowering Fields DSP 4 3/4 by 6 3/4" - layer on card base
  • Soft Suede 4 by 11 to die cut the windmill and turbines. To make the wind wings or turbines sturdier,  I cut 2 of them and adhered them together.  (These are the parts that turn in the wind to make the windmill operational)
  • Add the wings to the body of the Windmill using a small brad
  • Adhere completed windmill to the card front.
  • Using the edge die from the Tulip dies,  cut 3 layers of tulips using the Ombre specialty paper, a different colour for each layer. 
Layer 1:  Gorgeous Grape 2 1/2 by 7" Ombre paper 
Layer 2:  Poppy Parade 2 1/2 by 7" Ombre Paper
Layer 3:  Daffodil Delight 2 1/2 by 7" Ombre Paper

  • Adhere the layers together using Tear and stick tape, alternating the flowers and shifting the heights.
  • Adhere to the card front below body of Windmill


  • Trim off excess at both sides.
  • Stamp sentiment using Gorgeous Grape ink on a 5/8 by 2 1/8" piece of Basic White.  Adhere to card front hear the top of the windmill.
  • Add 3 metallic butterflies
To finish the card, I did add some Glossy Accents to the wing edges and parts of the body but this is optional.


Sunday, November 28, 2021

Thanks - Stamp, Ink, Paper #206

I made this card for the challenge at Stamp, Ink, and Paper, but missed the Link up.  I decided to post the card regardless.


The colours of the leaves of the tree, from the stamp set "Beauty of Friendship" was inspired by the picture above, as was the colours of card stock for the card base and those used to die cut the sentiment.

The card base is Cajun Craze layered with Basic White embossed with the Bark embossing folder.  The focal image is built on this base.


Tree:  On a separate piece of Basic White, the tree was stamped and then die cut. The tree trunk was stamped with Merry Merlot brushed with Early Espresso.  The canopy was stamped first with Daffodil Delight, then Cajun Craze followed by Merry Merlot (2nd generation)  Both were die cut using the "Beautiful Tree" dies.


Kangaroo:
I selected the kangaroo from the collection of animals from the stamp set "Count on Me" because it was holding this beautiful flower that would be coloured to coordinate with the challenge. It was coloured with Stampin' Blends (Crumb Cake, Soft Suede, Flirty Flamingo - flower with Daffodil Delight, Cajun Craze and Merry Merlot).  I cut it with my new Scan n Cut machine.
Thanks:  This word was die cut twice - once in Merry Merlot and once in Cajun Craze.  The two were adhered together off set from one another.  The die is a single word die from Sue Wilson.

All the elements were organized and adhered together on a Basic White Hippo and Friends lightly brushed with Bashful blue ink using a blender brush. The tree trunk was adhered first using tombo glue followed by the canopy which was added over the trunk using dimensionals.
The kangaroo was also added with dimensionals to the right of the tree.
The sentiment was added on the tree canopy slightly at an angle - it seemed to look better that way. To finish the card, a bow made with linen thread was added at the bottom of the canopy and three butterfly embellishments were randomly  to the front.
The completed Hippo & Friends die cut was now added to the embossed card front using dimensionals.

Supplies Used:
Stamps:  Count on Me, Beauty of Friendship
Inks:  Black Memento, Daffodil Delight, Cajun Craze, Merry Merlot, Early Espresso, Balmy Blue, Stampin' Blends (Crumb Cake, Soft Suede, Daffodil Delight, Cajun Craze, Flirty Flamingo (ears)
Papers:  Cajun Craze, Basic White, Merry Merlot
Accessories:  Beautiful Tree dies, Hippo & Friends die, "Thanks" die by Sue Wilson, Scan n Cut, Butterfly embellishments, Dimensionals, Bark embossing folder, Linen thread

Sunday, October 3, 2021

Nature's Harvest Thank You for Thanksgiving- Card for 2 occasions

 Thanksgiving will soon be here.  In Canada the date is October 10th, 11th just barely over a week away.  It may be too soon to mail a card, but hand given cards are just as well received.

If you get invited for Thanksgiving dinner this card could also double as a Thank you card.


  • Cut and fold a 5 1/2 by 4 1/4" piece of Crumb Cake card sock to create a side folding A2 card.
  • Cut a 4 by 5 1/4" piece of Crumb Cake, emboss with the Timeworn Type 3D folder.  With a sponge dauber sponge the edges and very lightly the embossed surface using Crumb Cake ink.
  • Add a 2 by 5 1/4 " banner of Crumb Cake Harvest Meadow (branch pattern) with the edges sponged with Crumb Cake ink slightly off center on the top of the embossed piece.
  • On a separate piece of Basic White card stock, stamp the image with Basic Gray ink and colour with Stampin' blends using the following colour pairs (Daffodil Delight and Cajun Craze on the flowers; Soft Succulent on stem and leaves)

  • Die cut using Celebration Label die 
  • Mat with a larger Cork paper Celebration Die cut  
  • Add matted image piece to card front using dimensionals.
  •  Stamp sentiment on a 2 by 5/8" of Crumb Cake.  Sponge edges.  Add to side of image piece extending over edge of die cut.  Add a dimensional under edge extending over the die cut.
  • Tie a bow with 3/8 " Embroidered ribbon and add at bottom of matted unit using a glue dot.
  • Add 3 Brushed metallic dots randomly

Inside: 

  • Sponge the edges of 4 by 5 1/4" of Crumb Cake card stock.
  • Stamp part of the cone flower image across the bottom right hand corner using Basic Gray ink.
  • Adhere to inside of card. 
Supplies Used:
Stamp:  Harvest Nature
Inks:  Basic Gray, Crumb Cake, Stampin' Blends (Daffodil Delight, Soft Succulent)
Papers:  Crumb Cake, Basic White, Nature Meadow DSP, Cork paper
Accessories:  3/8" embroidered ribbon, Celebration Dies, Brushed Metallic self adhesive dots, dimensionals, glue dots.


Sunday, May 30, 2021

Artistically Inked Card #2 - Video

 This second card was cased from Pg. 96 of the Annual catalogue, although I put my personal touch on it. It is somewhat more complex than Card #1 (see previous post) in that I add a die cut to the card, which also has more layering. 


The above picture shows the card and beside it an envelop stamped on the flap to coordinate with the card.

The video I made can be viewed on this blog or on You Tube https://youtu.be/cMngDMeTci0


On a Thick Basic White card base is layered a 4 by 5" piece of Soft Succulent card stock.  On top of that is a 3 3/4" piece of Basic White added an angle.  This will be 
the art piece.
The images are stamped using 3 of the 4 new In-colours:  Polished Pink and Soft Succulent, and Pale Papaya.
A large white die cut flower , cut using a die from the Artistic die collection, is placed over the stamped images. To make it easier to work with, I used as adhesive sheet adhered to the Basic White cardstock and then die cut the flower.


The inside of the card is finished by stamping the 3 flower stamp with Polished Pink in the top left and lower right, including some Soft Succulent dots to tie in the inside with the card front.  This Basic White piece is 3 3/4 by 4" and adhered to a 4 by 5 1/4" piece of Soft Succulent card stock at an angle similar to the card front.

To finish the card, I added some 2021-2023 In Colour Jewels.

For this card I finished the envelope by stamping similar images as on the card front.


Supplies Used:
Stamp:  Artistically Inked
Inks:  Polished Pink, Pale Papaya, Soft Succulent
Papers:  Thick Basic White, Basic White, Soft Succulent, Basic White A2 envelope
Accessories:  Artistic dies, Adhesive sheets, 2021-2023 In Color Jewels


Artistically Inked Car #1 with video

 What gorgeous paper to work with! When I first saw the Expressions in Ink DSP I drooled!  When I started working with it I drooled again.

So I made my first card to highlight the DSP- and made a video as well.


The Thick Basic White card base is layered with a 4 by 5 1/4" piece of the Expressions in Ink DSP.

The sentiment, from the Artistically Inked stamp set, is stamped in Polished Pink on a 1/2 by 2 1/4" piece of Basic White.  This was matted with a slightly larger piece of Evening Evergreen card stock.

Before adding this sentiment, a shaped element as well as a leaf branch from the Expressions in Ink Ephemera pack was added to the card front.  The sentiment was added over the bottom half.


Watch the video below, or on You Tube here


Before adding the leaf branch, I used he smaller end of a scoring tool to make vein marks in the leaves. Gilded Gems were added to around the sentiment.


The accompanying envelope was stamped with the largest one of the stamps (see the first picture)

Supplies Used:

Stamp: Artistically Inked

Inks:  Polished Pink

Papers:  Thick Basic White 4 1/4 by 5 1/2  Card base

              Basic White 1/2 by 2 1/4 for sentiment

             Basic white 4 by 5 1/4" for inside

             Basic White envelope

             Evening Evergreen 2 1/2 by 1 1/4" - mat for sentiment

             Expressions in Ink DSP - 4 by 5 1/4" for card front

Accessories:

            Artistic Dies

            Gilded Gems

            Expressions in Ink Ephemera Pack


Monday, April 19, 2021

Hand-Penned Petals Thanks - a catalogue sneak peak

 This stamp set has some images that look delicate and rich and lends itself to a variety of techniques.

For this card, I used watercolor paper, ink pads and water brushes to create this art piece.  The colours I used were pulled from the DSP.


After embossing the image with Black embossing powder, it was coloured with the following colours:  Highland Heather with shading done with Gorgeous Grape; Daffodil Delight with shading done with Bumblebee; Just Jade.  The background wash is done with Pool Party.

The sentiment was stamped using Black Memento ink on the lower right.

The completed image was die cut with the new Scallop Contour Dies and added to the card front using dimensionals.


The card base is Gorgeous Grape layered with Basic White embossed with the Wrapped in Texture embossing folder.  A strip of Hand-Penned DSP was added to the left side.  Some Gorgeous Grape organza ribbon was added in the center of this DSP.


Supplies Used:
Stamp:  Hand-Penned Petals
Inks:  Black Memento, Versa Mark, Gorgeous Grape, Highland Heather, Daffodil Delight, Bumblebee, Just Jade, Basic Black, Pool Party
Papers:  Water color, Basic White, Hand-Penned DSP, Gorgeous Grape
Accessories:  Wrapped in Texture Embossing Folder, Black embossing powder. Water color brush, Stickles glitter (purple, black), Pastel Pearls, Scallop Contour dies, 1/4" Gorgeous Grape organza ribbon.


Tuesday, January 12, 2021

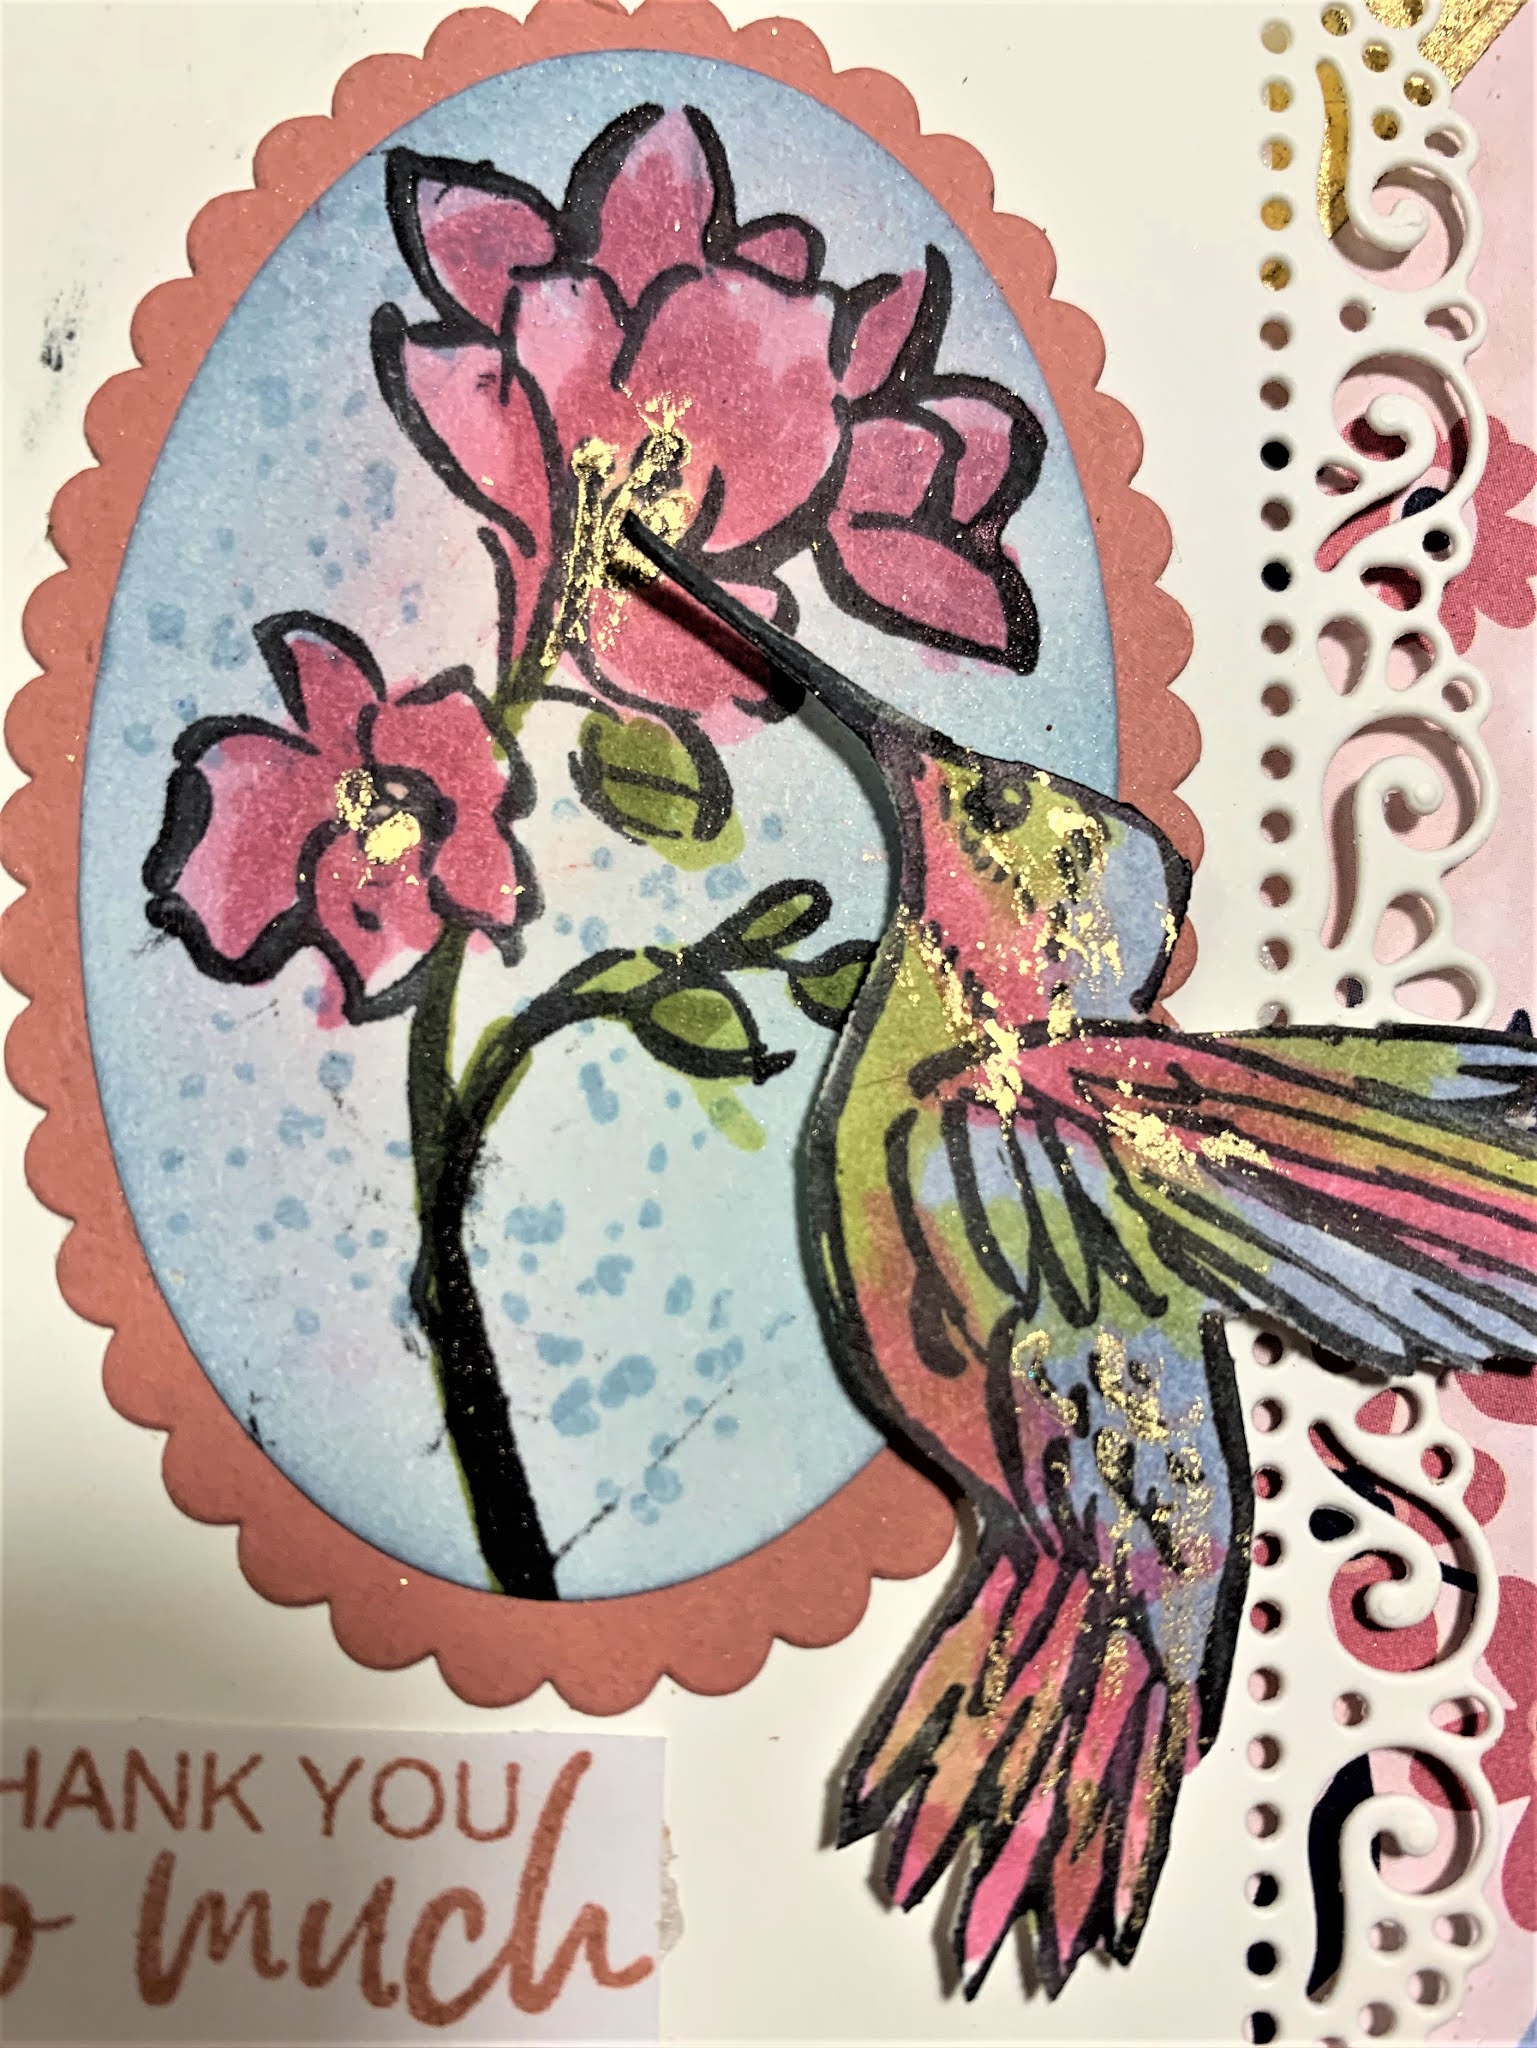
Thanks so Much with A Touch of Ink

 A Touch of Ink is a Sale-a-bration stamp set that is free with a $120 order. 

The lovely images of a humming bird, a butterfly and some flowers have both an outline stamp and a filler stamp.  These stamps can be stamped using 2 step stamping, or stamped only with the outline stamp and coloured.

For my card, I stamped the outline images and coloured using Stampin' Blends using colours picked up from another Sale-a-bration item, the Paper Blooms DSP


The thick Whisper White card stock base was layered with a half triangle of Paper Blooms DSP (SAB). Some Gilded Flakes was applied to the doubled sided tape which had been applied to the edge of the DSP.


For the main art piece, the Ornate Layer Die was used to die cut the rectangle upon which the card elements would be added.

On a piece of Whisper White card stock, the images of the Humming bird and the flowers were stamped using Black Memento ink. 


The flowers were coloured with Rococco Rose Stampin blends with Old Olive for the leaves. A Blender Brush was used to add some Balmy Blue ink around the flowers and the dot stamp was used to add some texture around the stems.


A fine tipped glue pen provided a tacky surface for some Gold Gilded flake embellishments in the center of the flower.

The image was then die cut with the Layering Oval die and matted with a scallop oval of Roccoco Rose. It was adhered to the top half of the ornate die cut, and a sentiment stamped below it.


The Humming bird was coloured with similar colours (Balmy blue, Roccoco Rose and Old Olive.  Some Gilded Flakes added some gold glitter to this bird.  

The bird was fussy cut and using dimensionals, it was adhered to the ornate die.  It was positioned so that the beak was in the flower center and the wings extended over the art piece edge.

Supplies Used:
Stamp:  Touch of Ink (SAB)
Inks:  Black Memento, Balmy Blue , Stampin Blends (Roccoco Rose, Old Olive) Roccoco Rose
Papers:  Thick Whisper White, Whisper White, Rococco Rose, Paper Blooms DSP
Accessories: Dimensionals, Layering Oval Dies, Ornate Layering Dies, Guilded Metallic Embellishment

Monday, May 25, 2020

Celebrate Sunflowers - a catalogue sneak peak

Nothing says summer like Sunflowers.  They are the faces of summer.

Today's card features not only the Sunflower, but  other sneak peak of new products from the upcoming catalogue


The card base is Mossy Meadow card stock layered with two-different sizes of Very Vanilla card stock die cut with the Ornate Layers Dies.  The bottom larger layer is also embossed-with the new Texturized Embossing folder.

On a separate piece of Whisper White card stock two images of Sunflowers were stamped and coloured with blends


After die cutting with the coordinating Sunflower Dies they were added to the smaller of the two ornate die cut layers using dimensionals. Two sprigs die cut in Crumb Cake are added under each flower.

The sentiment, from the stamp set, stamped with Mossy Meadow ink and  matted with Mossy Meadow card stock is added to the card front below the flowers.

Sitting on  top of the sentiment on the left side is a bow made using the white edged linen Magnolia ribbon .


Some metallic dots left over from another project are added in 3 places.

Supplies Used:
Stamp:  Celebrate Sunflowers
Inks:  Black Memento, Stampin' Blends (Daffodil Delight, Pumpkin Pie, Cajun Craze, Soft Suede for the flower; Old Olive for the leaves), Mossy Meadow
Papers:  Mossy Meadow, Whisper White, Very Vanilla, Crumb Cake
Accessories:  Layered Ornate dies, Sunflower Dies, White edged linen ribbon, Dimensionals, metallic dots, Tasteful Texturized Embossing Folder


The

Saturday, May 9, 2020

Inspiring Iris - two cards

The Iris is the genus of 260 -300 species of showy plants which takes it name from the Greek goddess who rode rainbows.
The most familiar one is the tall 'bearded' variety which is easy to grow and blooms in June. They attract butterflies and hummingbirds and make wonderful cut flowers.

Today I made 2 cards featuring this beautiful flower.  Both cards are fun folds - one a double triangle flip fold and the other a "W" or inside pop up fold.


The basic card is Blushing Bride where the top layer is cut into 2 triangles.  See video here
Well Dressed designer paper is adhered to one of the triangles; retired Vellum DSP on the other.

The image of the Iris is coloured with Stampin' Blends and then embossed using the Stitched So Sweetly Die and the embossing mats. The Whisper White art piece is then matted with a die cut Gorgeous Grape rectangle.


This is added to the bottom half of the card front.

The sentiment, highlighted from a complete sentiment from the same stamp set with a Basic Black marker, is added below the flower with dimensionals.

Here the frontlower triangle is opened.  A piece of Whisper White card stock is adhered to the inside of the art piece.


Then top triangular piece is opened to reveal the inside


Supplies Used:
Stamp:  Inspiring Iris
Ink:  Black Memento, Stampin Blends (Highland Heather, Gorgeous Grape, Old Olive, Seabreeze Spray
Papers:  Blushing Bride, Whisper White, Well Dressed DSP, Vellum Specialty DSP, Gorgeous Grape
Accessories:  Stitched So Sweetly dies, Dimensionals, Dimensionals.


My second card is a "W" fold or an inside panel pop out card


The Iris is coloured with Highland Heather stampin' blends, with  darker areas shaded with Gorgeous Graps.  The stems and leaves are coloured with Old Olive.   Around the flower, a  Seaside Breeze Stampin' Blend provided some colour and contrast.  Sparkle was added to the flower with Glitter Crystal Effects and Dazzling Diamonds.

Measurements:
Highland Heather 4 1/4 by 11" scored at 5 1/2" for form a side folding card
Whisper White  3 pieces 4 by 5 1/4" (one for the front, and 2 for inside)
Well Dressed DSP  3 3/4 by 5" (layer for card front) 3 by 3 3/4" die cut with largest of scallop rectangle die from Stitched So Sweetly set
Whisper White 3 by 4" - stamp and colour image, then die cut with stitched so sweetly die
Whisper White scrap to stamp sentiment and die cut with Ornate frame die.

Inside:
Highland Heather 2 by 11" scored at 2 3/4, 5 1/2, and 8 1/4".  Fold in half at 5 1/2" score, with outer edges folding outward to form the letter W.
Highland Heather - 4 pieces 2 1/4 by 2 3/4"  -mat for image pieces
Whisper White - 2 pieces 2 by 2 1/2"
Well Dressed DSP - 2  pieces 2 by 2 1/2"


Add both pieces of 4 by 5 1/4" of Whisper White pieces to inside of card.
Adhere both ends of "W" strip to outside edges of each side.
Stamp and colour images on each of the two 2 1/2 by 2" pieces of Whisper White and along with the two DSP of the same dimensions, mat with the larger pieces of Highland Heather.
Adhere these completed pieces to the scored "W" strip using tear and tape adhesive.


Stampin' Blends were used to colour the floral images in both of these frames.


Looking from the top you can see the W, which in this case is side ways.


Friday, May 8, 2020

Double Sided See Through Shaker Card - Try Stampin' on Tuesday #456

I made this shaker card for the sketch challenge at Try Stampin' on Tuesday  where I had the option to do the sketch challenge or make a shaker using the sketch - so I did both.

However, I did something I had not done before - I made a double sided see through shaker card.  Both the front and the back of the card have a see through window, with the back flap of the card becoming the actual shaker unit.


The Poppy Parade base card is a 4 1/4 by 5 1/2" side fold card, with rectangle apertures die cut and covered by window sheets, in  the middle of both the front and back. This allows you to see through the card from the front to the back - like open concept.


Back of card

Two extra pieces of  Poppy Parade card stock 1/8" smaller than usual i.e. 3 7/8 by 5 1/8" also have rectangles die cut in the center.  The rectangular opening in the front is used as a template for these two extra pieces to ensure the "open concept" is carried through exactly the same in all layers. 

After the window sheet is adhered to the wrong side of the card front, the second card stock piece is adhered over it to hide it.

A window sheet is also adhered to the second smaller piece of card stock, as well as the back of the card base.  The shaker unit,with Poppy shaker elements, is created on the back flap of the card base and the second smaller piece of Poppy Parade card stock is added over the back piece to complete this unit.


The Tropical Oasis DSP also has a rectangle die cut with the stitched rectangle die, with a larger die and adhered to the card front. The card front is decorated with 3 flowers from the Timeless Tropical stamp set.  Each of these are coloured with Grapefruit Grove, So Saffron, with Cherry Cobbler in the center. After shaping, they are adhered to a 1 1/4" circle punch and added to the lower right frame.  Another 1 1/4" punched circle is also added to the inside to hide the flowers showing through the window sheet. Three hand cut sponged leaves added to the flowers complete the floral decoration.  Early Espresso stamens and gold prills are added to the center of each bloom.


A die cut tag from Ornate frame dies, with the word 'thanks' stamped in it, is added to the flower.

Supplies Used:
Stamp:  Time Tropical
Inks:  Black Memento, Grapefruit Grove, So Saffron, Granny Apple Green
Papers:  Poppy Parade, Whisper White, Timeless Tropical DSP, Granny Apple Green
Accessories:  Window Sheets, Stitched Rectangle Dies, Tropical Oasis dies, Gold Prills (non SU), Poppy shaker elements, Ornate framed die, 1 1/4" circle punch.