Showing posts with label Blossoms and Blooms. Show all posts

Sunday, July 19, 2020

Outdoor Class Under the Lilac Tree

Yesterday, July 18, 2020 I held my first class since cancelling them in March due to the pandemic - but I held it outside and the number of students was capped at 2.

What an enjoyable class.  I think we were all glad to see actual people.  It was so hard not to hug everyone.  A virtual hug just doesn't do it!!

I decided to hold the class outside for precautionary reasons.  It was a lot of work as all surfaces and supplies that would be used had to be disinfected. Students were asked to bring masks in case they needed to enter the house for any reason, and each student was given a small bottle of hand sanitizer.  The students sat across from each other rather than side by side as research shows that this reduces the spread of any potential viruses.  There have been no cases of COVID here in Peterborough for at least a month, but one needs to stay alert.  To ensure the class was as contactless as possible, students were asked to bring their own supplies, from adhesives to trimmer to stamparatus.

It turned out to be a very hot and humid day, so the tent really helped.  Every once in a while a lovely breeze  blew the papers around a bit, but no one minded. A cardinal tweeted over head, and children could be heard playing in the next yard. Air conditioners turned on and off but we were so intent on creating we heard none of the latter.

What was the focus of the class?

A special request was made to create a card featuring a sunset over water, so that was part of the class.  However the main focus was the Blossoms and Blooms stamp set.  Below are the two cards that were made using the Blossoms and Blooms bundle.


And because it was so hot it was important to stay hydrated.


The 3rd card featured a sunset over water, and the By the Bay stamp set was used.  This was the first time these gals had ever used the sponge brayer, and they were surprised at how much fun it was.  I demonstrated how to made the sunset and then they created their own.  Instead of the boat, they chose to use the dock.
They found that this card was quite easy to make if they did not try to CASE my card, but free style their own, They were shown how to make white caps on the waves using texture paste.


 At the end of the class, each student was given a decorated copper tin with a thank you note in it, as well as a package of embellishments and 2 rolls of ribbon. You can see the packages on the edge of the table. Below is a close up:


There are requests for another outdoor class.

Sunday, July 12, 2020

Blossoms & Blooms Anniversary card - a tutorial

This bundle has got to be one of my favourite bundle of the Annual Catalogue.  It is so versatile!

Today I made an Anniversary card using tone on tone card stock with Platinum foil and gold ink.


Measurements:
  • Thick Very Vanilla card stock 4 1/4 by 11" scored at 5 1/2" to form a top fold card. - card base
  • Very Vanilla 3 3/4 by 5" - art piece 
  • Very Vanilla 4 1/4 by 5 1/2" - to die cut bottom blossom layer)
  • Platinum foil - 4 by 5 1/4" ( I die cut the center out to use on another project) - mat for art piece
  • Platinum foil - 4 1/4 by 5 1/2" to die cut top blossom layer
  • Scrap piece of Very Vanilla to die cut sentiment using Tasteful Labels dies
  • Scraps of Platinum foil to die cut small leaves - Forever Flourish Dies
Stamps:
  • Blossoms & Blooms
  • Many Mates
Inks:
  • Gold 
  • Versa Mark
Accessories:
  • Many Layered Blossoms dies
  • Tasteful Labels Dies
  • Forever Flourish Dies
  • 1/4" Very Vanilla gold edged ribbon
  • Dimensionals
  • Gold embossing powder
  • metallic faceted dots
Putting card together:
  • Die cut the center out of the 4 by 5 1/4" piece of Platinum foil  Do not add to card base yet
  • Using gold ink, stamp the image of the blossoms on the 3 3/4 by 5" piece of Very Vanilla
  • Die cut both pieces of Blossom dies. Note:  do not remove centers of flowers die cut pieces.
  • Adhere together using tombo glue and a sponge matching leaves and flowers
  • Adhere to art piece matching stamped image

  • Add ribbon to bottom half of card front wrapping edges around very Vanilla and platinum foil layers.
  • Add these layers to card base.
  • Emboss sentiment with gold embossing powder on scrap piece of Very Vanilla and die cut with the Tasteful Labels Die.

  • Die cut 3 small leaves from scrap Platinum foil
  • Adhere to bottom of die cut sentiment
  • Add sentiment to card front over ribbon towards the right using dimensionals.
  • Adhere ribbon to left of sentiment.

  • Finish card by adding metallic faceted dots where desired.
  • Finish inside as desired.


Sunday, July 5, 2020

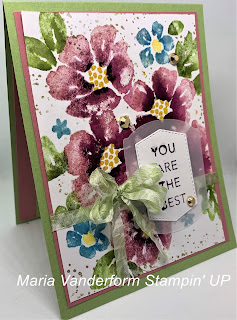
Watercolour Blossoms and Blooms

I can't seem to get enough of the Blossoms and Blooms stamp set.  There are so many ways to create beautiful cards.
Today I used my stamparatus and spritzer to create a watercolour look.


1. Start with a piece of Whisper White cardstock 3 3/4 by 5”
2. Place on Stamparatus
3. Position stamp on glass plate
4. Add Rocco Rose ink to stamp.  Spritz lightly with water
5. Stamp.
5. Clean stamp.
6.Using a sponge or finger dauber add Rich Razzelberry ink to the centers of the flowers only.
7. Spritz lightly and stamp.  Clean stamp.
8. Using a finger dauber add Blackberry Bliss to the flower centers taking care to stay in the centers.      Spritz and stamp.
    Stamp centers of flowers with Daffodil Delight
9. Repeat for leaves.  Stamp first with Pear Pizzaz followed by Old Olive
10.  Add 3 small flowers stamping and spritzing first with Balmy Blue and then Pacific Point
11. Fill in white spaces using Crumb Cake and splatter stamp from Forever Fern.

Stamp sentiment with Rich Razzelberry ink and die cut with the Tasteful Label Dies. Using another die, die a label with Vellum

Add sentiment label with Vellum label and adhere to card front over ribbon.


Mat with Rocco Rose card stock and before adhering to Pear Pizzazz card base add some ribbon near bottom.
Ribbon is Whisper White stamped with a leaf stamp and Pear Pizzazz ink.

Finish card by adding Guilded Gems.

Supplies Used
Stamps:  Blossoms and Blooms, Forever Fern
Inks: Rocco Rose, Rich Razzelberry, Blackberry Bliss, Daffodil Delight, Balmy Blue, Pacific, Point, pear Pizzazz, Old Olive, Crumb Cake
Papers: Whisper White, Rocco Rose,Vellum, Pear Pizzazz
Accessories: Stamparatus, Spritzer, Tasteful Label Dies,1/4” Whisper White ribbon,Guilded Gems