Every month ORSA (Ontario Rubber Stamping Artists) yahoo group has a challenge. The card is to be made and then uploaded into a folder.
The challenge in January was to create a blue and white glittery card - and the card I submitted (even though it has a bit of red on it) made the home page here
Here is the card and the original post: http://craftymariasstampingworld.blogspot.com/2011/10/snowflake-easel-card-friday-mashup.html
Thank you Theresa for putting my card on the group homepage.
Showing posts with label Snowflake die #2. Show all posts
Showing posts with label Snowflake die #2. Show all posts
Sunday, January 8, 2012
Card makes Homepage at ORSA
Labels:
Easel card,
Maria Vanderform,
Snowflake die #2,
Stampin Up
Wednesday, December 14, 2011
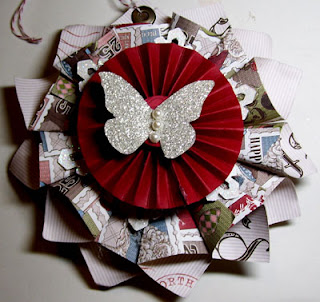
Medallion Christmas Ornament - Challenge 151
This ornament combines a medallion with a rosette, a snowflake and a butterfly. It's large and awesome!
1. Cut 13 pieces of Designer series paper (I used Letters to Santa) 2" by 2"
2. Fold each piece in half and unfold.
3. With a pencil or the handle of a paint brush, roll each piece diagonally. Unroll gently.
4. Fold into a cone shape. Do this for all 13 pieces.
5. Using a hot glue gun, attach each piece to a circle punched with a 1 1/4" circle punch.
See video:
6. Insert a jumbo eyelet in one of the medallions and attach a cherry cobbler and white Baker's twine through it.
7. Using the snowflake die, die cut a snow flake in Whisper White card stock and apply dazzling diamonds.
Attach it to the center of the medallion using stampin dimensionals.
8. Now make the rosette using 1 1/4" by 12" Cherry Cobbler card stock scored every 1/4" on the Simply Scored tool.
9. Attach a 1" circle in Cherry Cobbler punch with the 1" circle punch
10. On top of that attach a Cherry cobbler button.
11. On top of the button attach a butterfly die cut using the Beautiful wings die and silver glimmer paper.
12. Three pearls in the center of the butterfly complete the ornament.
Repeat steps 7 to 12 for the other side of the medallion.
Materials:
Papers: Letters to Santa designer paper, Cherry Cobbler card stock, Whisper White card stock, Silver Glimmer Paper
Accessories: Punches: 1 1/4", 1"; Dies: Snowflake, Beautiful wings. Other: Scoring tool, Cherry cobbler button, pearls, dimensionals, dazzling diamonds, hot glue gun, jumbo eyelt, cherry cobbler and white Baker's twine.
1. Cut 13 pieces of Designer series paper (I used Letters to Santa) 2" by 2"
2. Fold each piece in half and unfold.
3. With a pencil or the handle of a paint brush, roll each piece diagonally. Unroll gently.
4. Fold into a cone shape. Do this for all 13 pieces.
5. Using a hot glue gun, attach each piece to a circle punched with a 1 1/4" circle punch.
See video:
6. Insert a jumbo eyelet in one of the medallions and attach a cherry cobbler and white Baker's twine through it.
7. Using the snowflake die, die cut a snow flake in Whisper White card stock and apply dazzling diamonds.
Attach it to the center of the medallion using stampin dimensionals.
8. Now make the rosette using 1 1/4" by 12" Cherry Cobbler card stock scored every 1/4" on the Simply Scored tool.
9. Attach a 1" circle in Cherry Cobbler punch with the 1" circle punch
10. On top of that attach a Cherry cobbler button.
11. On top of the button attach a butterfly die cut using the Beautiful wings die and silver glimmer paper.
12. Three pearls in the center of the butterfly complete the ornament.
Repeat steps 7 to 12 for the other side of the medallion.
Side view
Close up of Rosette and Butterly
Papers: Letters to Santa designer paper, Cherry Cobbler card stock, Whisper White card stock, Silver Glimmer Paper
Accessories: Punches: 1 1/4", 1"; Dies: Snowflake, Beautiful wings. Other: Scoring tool, Cherry cobbler button, pearls, dimensionals, dazzling diamonds, hot glue gun, jumbo eyelt, cherry cobbler and white Baker's twine.
Labels:
3D ornaments,
Beautiful wings die,
Christmas,
Maria Vanderform,
medallion,
rosette,
Snowflake die #2
Tuesday, October 18, 2011
Snowflake Easel Card- The Friday Mashup
The challenge this week with the Friday Mashup is to make an easel card with snowflakes on it.

Stamp: Snow Swirled, other stamp non SU
Inks: Pacific Point, Whisper white, Versa Mark
Papers: Pacific Point, Whisper White, Silver Glimmer Paper, Red Glimmer Paper
Accessories: Snowflake die, Snowflake punch, Iridescent Ice Embossing powder, Pearls, 5/8" whisper white organza ribbon, Beautiful wings die, Beautiful wings emboslitt, Eyelet border punch
The above shows the easel card closed.
To make the background, I randomly stamped the various size snowflakes from the Snow Swirled stamp set using Whisper White ink onto Pacific Point card stock. When the ink was dry, I covered the entire surface with Versa Mark, covered it with Iridescent ice embossing powder and set with the embossing tool.
A butterfly was added because as the challenge said: " A Snowflake is Winter's Butterfly"
Labels:
Beautiful wings die,
Beautiful wings embosslit,
Christmas,
Easel card,
Maria Vanderform,
Snowflake die #2,
Stampin' Up
Subscribe to:
Posts (Atom)


