Showing posts with label Celebrate. Show all posts

Wednesday, April 12, 2023

Tulips in a Barrow - Inspiration Challenge Hand Stamped Sentiments #411

 I submitted this card for the Inspiration Challenge at Hand Stamped Sentiments #411.  It was the inclusion of the tulip images that inspired me.  Having been born in Holland, tulips are one of my favourite flowers.

For this card, I cut and pasted various images from different retired DSP's, the theme of which was tulips.  I also found an 'old' stamp (non SU) that I used a lot for applying flower soft to images. I cut a bunch of tulips from the DSP and placed them in the barrow.


Products Used:

Stamp:  Many Mates, Barrow (non SU), Tulip Fields (Retired)

Inks:  Black Memento, Watercolor pencils (color wheel barrow)

Papers:  Basic White (card base), Garden green (sentiment)Poppy Parade (die cut tulips), Tulip DSP (retired), adhesive backed sequins, 

Accessories:  Tulip dies, Dimensionals, Crystal Effects (on tulips in Barrow), Double punch

Thursday, June 25, 2020

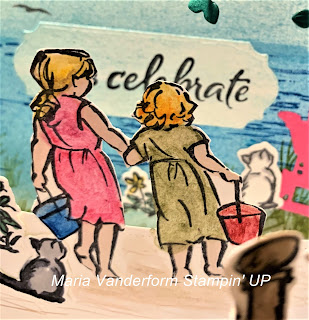
Celebrating Summer - a Diorama Card - SUO Challenges #252

When I think about celebrating summer I think about many things.

I think about my garden, with the cacaphony of colour as all the flowers are blooming

I think about the sounds of the birds as they call to each other and tend to their young.  There's a cardinal nest in my lilac tree right above my swing chair.

I think about warm sand and going to the beach and getting my nose sunburned - about children playing in the sand building sand castles.

As impossible as it might seem, all these thoughts were put into one card - a Diorama card.  For the challenge with SUO Challenges summer is celebrated with a different focus.


To celebrate summer, two little girls (Beautiful Moments) are visiting Grandma who happens to live by the beach and has this neat garden.  On this day, gathering pails in hand, they head through the garden gate down to the beach to spend the day building sand castles. Grandma (unseen) is watching) If they get tired they can take turns sitting in this lovely pink (Magenta Madness) beach chair.  Don't you wish you could join them?

The sentiment from "Celebrating Sunflowers" bobs on the ocean reminding us what this day is all about.


Several stamp sets are used to set the stage for this 3 layer Diorama card.  Grace's Garden stamps and die cuts are used to create Grandma's garden, from the front gate to all the colourful flowers to the curious kittens being teased by the local birds, to the blooming vines over head.  The girls pause briefly as they walk through the gate hardly noticing the colourful scene all around them, their eyes focused on the beach ahead.

The ocean setting with the water and beach are created using the High Tide stamp set, with a brayered Balmy Blue sky, Pacific Point ocean and crumb cake beach.  An Adirondack chair, die cut using a Seasonal Layer die, sits among the beach grass on the shore. The shrill call of the Sea birds echo overhead as the girls step onto the warm sand of the beach.  The soft ocean breeze ruffle their hair as they take in the view, looking first at the water, then at the beach looking for a good spot to build their castles.  Finding a spot, they sit down to play.  Grandma is still watching.

This 3 layer Diorama card is 4 1/4 by 5 1/2" and 2 1/4" deep.  It will fold flat for mailing but a special, custom envelope will have to be made.


Layer 3 (back) is Whisper White 4 1/4 by 7 1/2" scored 1" at each end and has the beach scene.


Layer 2 (middle) Whisper White 4 1/4 by 7 1/2" scored 1" at each end. It has an aperture die cut in the middle using a medium stitched Label die. This is the end point of the garden, with flowers on both sides and vines over head.


Layer 1 (front)  Seaside Spray 4 1/4 by 11 1/2"  scored 2 1/4" each end. It also has an aperture die cut with the larger stitched Label die.


This is the beginning of the garden.  A variety of Stampin' Blends are used to colour the flora and fauna as well as the gate. It reminds me of my garden.

To put the card together, fold up the ends of layer 3 and adhere to the outside of the ends of layer 2 which have been folded down.  Adhere layer 1 with the folded ends added to the outside of both of the other layers.

Supplies Used:
Stamps:  Grace's Garden, High Tide, Beautiful Moments,  Celebrate Sunflowers
Inks:  Black Memento, Watercolor pencils (girls), Balmy Blue, Pacific Point, Basic Gray, Crumb Cake, various Stampin' Blends for the garden flowers,
Papers:  Whisper White, Magenta Madness, Seaside Spray, Garden Green
Accessories:  Garden Gateway dies, Stitched Nesting Label Dies, Seasonal Layers dies, Ornate frame die (sentiment) Blender pen

A garden, birds overhead, warm sand on your feet, the sound of waves, and a soft ocean breeze - what more can you ask for to celebrate summer.

Wednesday, May 27, 2020

Sunflower in a shaker jar - another catalogue sneak peak

One more week to go - and the new catalogue goes live.  But in the meantime, here is a sneak peak of another new bundle - a flower in a shaker jar.  To make the card, I used the following new products:  Flower in a jar stamp set, Jar punch, Jar shaker domes, and Flowers for Every Season gems


Stamp the image of the Sunflower jar stopper , colour with Stampin' blends, and fussy cut.

The base of Thick Whisper White is layered with Whisper White that has a strip of Daffodil Delight Subtle DSP as well as a strip die cut with the Ornate edge die.  The Jar punch was inserted into the bottom of this Whisper White layer as far as it could, and punched a jar aperture.  Lay it on top of the card front and trace the outline of the jar very lightly using a pencil.

The jar shaker dome has adhesive on both sides. After removing the cover over the adhesive on the top of the dome, the dome was inserted through the jar aperture from the bottom (wrong side) to the top.  Apply tear and tape adhesive along the periphery.


On the card front, stamp the image of the flower stems within the pencil outline of the jar and colour with Stampin' Blends.  Add the gems to the center, remove all the adhesive covers and add the  cardstock/dome  to the card front making a shaker.

Add the Sunflower topper to the top of the jar using dimensionals as well as a bow make with the ruched Daffodil Delight ribbon.


Stamp and punch the sentiment with the Classic Label punch and adhere one end to the jar lid.


Supplies Used:
Stamp:  Jar of Flowers, Itty Bitty Greetings
Inks:  
Jar:  Pool Party
Sunflowers:  Mango Melody, Daffodil Delight, Cajun Craze, Soft Suede
Leaves:  Old Olive
Stems:  Pear Pizzazz
Sentiment:  Mossy Meadow
Papers:  Thick Whisper White, Whisper White, Subtle DSP, Early Espresso
Accessories:  Ornate Border Die, Jar Punch, Jar domes, Flower for Every Occasion gems, 1/4" Daffodil Delight ruched ribbon, Classic label punch, Dimensionals, Glitter gems, Glitter Crystal Effects

Monday, August 5, 2019

A Coneflower Celebration - Just Add Ink #468

Just Add Ink has an alphabet challenge and this week it's the letter "C".  The idea  is to include anything that starts with the letter "C" in whatever I create.

For my project, the focus of my card is a flower known as a "Coneflower" with "Celebrate" as my sentiment. The coneflower was coloured, and the finished focal piece was adhered to a piece of Whisper White embossed with the Corrugated embossing folder .  This was added to a Crumb Cake card base.


The Coneflower focal image is from Frog's Whiskers Ink in Campbellford, Ont. and is coloured with water colour pencils and a blender pen.  It is die cut with a stitched rectangle die and matted first with Melon Mambo card stock and then with Crumb Cake.


Before matting it with the two card stocks, some heat and stick powder is used to add dazzling diamonds over the entire image.


The finished image with its two mats, is adhered to a Whisper White card front layer which has been embossed with the Corrugated Embossing Folder.  The card base is Crumb Cake card stock.

The sentiment "Celebrate You" is from Suite Sayings (retired) after matting with Melon Mambo is added to the lower image and card front - over the image using tombo glue, and on the card front with 2 dimensionals, one on top of the other.


The "C's" used on this card:
1.  Coneflowers
2.  Coloured with watercolour pencils
3.  Crumb Cake card stock
4.  Corrugated embossing folder
5.  "Celebrate You" sentiment

Supplies Used:
Stamps:  Suite Sayings (R), Coneflowers (Frog's Whiskers)
Inks:  Black Memento, Watercolour pencils, Versa Mark
Papers:  Crumb Cake, Whisper White, Melon Mambo
Accessories:  Corrugated Embossing folder, Dimensionals, Heat and stick powder, Dazzling Diamonds, Glitter gems, Stitched Rectangle Dies

Saturday, May 4, 2019

Let's Celebrate You - SUO Challenges #222 - catalogue sneak peak

This could be an Anniversay card or a birthday card, or a card for any celebratory event. When I saw the new challenge for SUO Challenges -celebrations -  I immediately thought of this new "Stamp and Bloom" stamp set available in the new annual catalogue starting June 2


Because foil reflects  light, it  is notoriously difficult to photograph and this card with foil on it is no exception. Gold foil makes a card look  so elegant.

The card base is  5 by 5 Square Whisper White card , layered first with Gold Foil, and then Whisper White.

The floral images were stamped on a separate piece of Whisper White, and coloured with Stampin' Blends - the flowers in Petal Pink, and Flirty Flamingo; the leaves in Granny Apple Green.  Gold glitter was added to the round greenery and the flower centers. It was die cut with the coordinating Grow and Bloom dies.

The gold embossed sentiment  was die cut with the Nesting Label Die. The same size of Nesting Label die was used to die cut a gold foil.  The ends were trimmed off this gold foil die and matted to each end of the Whisper White label die. Foil was not added to the upper and lower edges as the flowers would be covering this up.

This label was then adhered to the  card front, with the two floral die cuts added above and below it using dimensionals.


The inside of the card is layered in a similar manner and the sentiment gold embossed.


Supplies Used:
Stamp:  Bloom and Grow
Inks:  Black Memento, Versa Mark, Stampin' Blends (Petal Pink, Flirty Flamingo, Granny Apple Green, Daffodil Delight)
Papers:  Whisper White, Gold Foil
Accessories: Budding Blooms Dies, Gold Dazzling Details (retired), Dimensionals, Gold embossing folder, Nesting Label Dies

Sunday, August 12, 2018

Fireworks???

Every Wednesday and Saturday evenings there are free concerts in the park by the lake within walking distance of where I live.  At the end of each concert there are fireworks, and if I stand on my front porch I can see them.

Frenchie on one of her Facebook Live presentations used the "Dandelion Wishes" stamp set to create a fireworks card. This card is a partial case of the card she made.

Versamark was applied to the larger Dandelion stamp and then Cherry Cobbler and Night of Navy was applied using a marker. After stamping, clear embossing powder was applied and heat set.  This process was repeated a second time. Then, using a finger dauber, some Daffodil Delight was added to the center of each bloom.
Finally, using a sponge, Night of Navy was added to the entire card, with some white areas left around the blooms.  The entire surface was then wiped with a paper towel.
The word "sentiment" was die cut from "Celebrate You Thinlets" in Cherry Cobbler card stock and added to the card front.

Supplies:
Stamp:  Dandelion Wishes
Inks:  Cherry Cobbler, Night of Navy markers, Daffodil Delight and Night of Navy ink, Versa mark
Papers:
.  Whisper White (art piece)  3 3/4 by 5"
.  Whisper White (mat) 4 by 5 1/4"
.  Whisper White 4 by 5 1/4" (inside)
.  Cherry Cobbler 4 1/2 by 5 1/2" - card base
.  Cherry Cobbler 1 1/2 by 4" for die cut sentiment
Accessories:  Clear Embossing Powder, Celebrate You Thinlet dies

Sunday, March 26, 2017

Celebrate Beautiful You

I was working with the Up & Away thinlets for another project when the hot air balloon die cut fell on one of the images from the stamp set "Beautiful You".  It looked just like a balloon skirt, so the idea for this card was born.

I die cut the hot air balloon using the Playful Palette DSP, turned it upside down, trimmed off the basket, and made a pleat (to fit the waist better) in the middle.  Because this die cut was very transparent, I lined it with filter paper cut to shape.
Watercolor pencils were used to colour in the bodice of the dress and hat, selecting the colours from the Playful Palette DSP.
The skirt was added using glue dots.
Two tiny holes were punched on either side of the waist and a piece of 1/4" very vanilla ribbon was inserted through them (from the back), and tied at the waist in the front.

The 2 3/4 by 3 3/4" art piece was matted with Basic Black cardstock before adding it to the card front.

The flower embellishments were made using the Botanical framelits.

Supplies Used:
Stamps: Beautiful You
Inks: Black Memento, Watercolor pencils
Papers: Peek-a-boo Peach, Whisper White, Playful Palette, Basic Black, Emerald Envy, filter paper
Accessories: Botanical  Builder Framelits, Up & Away Framelits, Corner Rounder punch, dimensionals, glue dots, rhinestones, Classic Label Punch.

Thursday, January 19, 2017

Beautiful You in a Mediterranean Moment - a partial case

I saw this idea on Pinterest and was intrigued enough to make this card.  Two stamp sets are involved, and a masking technique is used.

Stamps: Beautiful You, Mediterranean Moment
Inks: Black Memento, watercolor pencils
Papers:
  • Pacific Point 4 1/4 by 5 1/2"
  • Pacific Point 5 by 3 1/2"
  • Whisper White 4 1/4 by 5 1/4"
  • Whisper White (art piece) 3 1/4 by 4 1/2"
  • Animal Party DSP 3 3/4 by 5"
  • Pacific Point 3/4 by 2" for sentiment
Accessories: Gold thread, dimensionals, blender pen, Clear Wink of Stella


The image of the lady was stamped first, masked, and then the Mediterranean scene was stamped.  Both were coloured with watercolour pencils and blended with a blender pen.  Some Wink of Stella was applied to the lady.


Tuesday, March 22, 2016

Wild About Flowers - Celebrate Spring - The Paper Players #287

It may be spring on the calendar, but its not spring outside.  I was out earlier and it was already precipitating a combination of rain/snow - and the next few days are about to be quite miserable!!

The challenge with The Paper Players   this week is a clean and simple card celebrating spring.

Every day I go to the edge of the yard and peruse the flower bed for evidence of plant growth, but so far there is little.
So stamping a flower will just have to do.
I stamped a flower using the stamp set "Wild About Flowers" - the stem in Pear Pizzazz, and the flowers in Hello Honey with Blackberry Bliss in the center.

Supplies:
Stamps: Wild About Flowers, Suite Sayings, In the Meadow, Timeless Textures
Inks: Pear Pizzazz, Hello Honey, Blackberry Bliss marker, Black Memento ink, Hello Honey marker
Papers: Hello Honey, Whisper white, Pear Pizzazz
Accessories: Retired 1/8" green/white ribbon, Trio Corner punch, blender pen, 1/4" Pear Pizzazz ribbon, dimensionals.

Sunday, March 6, 2016

Celebrate - Freshly Made Sketches $226

The weather was so mild today one almost had the feeling spring was on the way.  And it is light so much later now - and that I really like.

The card is made for the sketch challenge with Freshly Made Sketches #226


  • Image was stamped with Black Memento ink and coloured with a blender pen and ink pads (Daffodil Delight, Crushed Curry, Delightful Dijon, Soft Suede, Pear Pizzaz, Old Olive, Mossy Meadow)
  • Some clear Wink of Stella glitter was applied to the flower petals and part of the leaves.
  • The base card is Delightful Dijon, layered with Whisper White and then Timeless Elequence DSP.
  • The image piece is matted with Delightful Dijon, and then adhered to the card front using dimensionals.
  • At the bottom of the image, a 1" strip of Botanical Garden Vellum.
  • One side of a separate piece of vellum was coloured with delightful Dijon marker, and then 2 butterflies were punched out - a larger one and a smaller one.  The Smaller one was punched using a piece of uncoloured vellum.  The two butterflies were adhered together with a glue dot ans some black liquid pearl was added to the butterfly.
  • The sentiment is from Greatest Greetings, and punched with a word window punch.
  •  
Supplies Used:
Stamps: You've Got This, Greatest Greetings
Inks: Black Memento, Daffodil Delight, Crushed Curry, Delightful Dijon, Soft Suede, Pear Pizzazz, Old Olive, Mossy Meadow
Papers:  Delightful Dijon, Whisper White, Timeless Elegance DSP, Botanical Gardens Vellum
Accessories:Word Window Punch, Large Butterfly Punch, Small butterfly punch, dimensionals, glue dot

Sunday, February 28, 2016

Indescribable Gift Bleaching Technique

The card technique for the Canadian Die Cut Exchange group is  the bleaching technique.  There are several ways to do this , but I chose to paint my image with bleach and a brush and then return the colour back into the image.
I did not follow a tutorial to do this technique as I have done it several times before.
The stamp set I used is a beautiful Easter card, now retired (sob!) Indescribable Gift.

 
 On a 3 by 4" piece of Island Indigo the image was embossed with black embossing powder.  Then using a brush and some ordinary household bleach the image was "painted" with bleach and then heat dried with a heating tool. 

To get the colour I  desired I painted the areas twice, heat drying again after the second application.Then using an aqua painter and ink pads the image was repainted, and some Wink of Stella applied

Some glitter was added by randomly gluing some "In Color" sequins.

The corners were punched with the curvy corner trio punch.

The image panel was matted with 3 1/8 by 4 1/8" piece of Whisper White cardstock and this was matted with a 3 1/4 by 4 1/4" piece of Calypso Coral cardstock.

The base cardstock is Island Indigo, the front of which was embossed with the Decorative Dots embossing folder.  On the left hand side the spellbinder die "Fanciful Lattice" was used to cut a 5 by 3"  die cut.  A piece of 1/4" Whisper White ribbon was wound through the lattice holes on the outer side and adhered with tape on the bottom.  This die cut piece was then added to the card front.

The image panel was attached to the card front , using dimensionals, with the left side close to the woven ribbon.  A bow was made of the white ribbon and added to the left bottom corner with a glue dot.

The sentiment, from "Good Greetings" was punched with a small oval punch, the edges sponged with Island Indigo ink and attached to the card front with dimensionals.

Supplies Used:
Stamps: Indescribable Gift, Good Greetings
Inks: Versa Mark, Calypso Coral, Tangelo Twist, Old Olive, Mossy Meadow, Soft Suede, Chocolate Chip, Island Indigo
Papers: Island Indigo, Whisper White, Calypso Coral
Accessories: Spellbinding Fanciful Lattice die, Decorative dots embossing folder, 1/4" Whisper White ribbon, Black embossing powder, Heat tool, Curvy Corner Trio Punch, Small oval punch, Wink of Stella clear glitter brush, In colour sequins, dimensionals, glue dot


Tuesday, May 20, 2014

It's a Celebration - Braided Card Technique

I have never done this particular technique before, but when I saw Brandy Cox demonstrate the braided technique on her video (here), I was hooked!  I just had to try it. Fortunately she put a template on her blog which can be downloaded which makes doing this technique so much easier.
 This card is the result:


Stamp: In it together
Inks: Black Memento ink, blendabilities (Coastal Cabana, Daffodil Delight), Pool Party
Papers: Pool Party, Whisper White
Accessories: Apothecary Accents framelets, Polka dot folder, 3/8" white taffeta ribbon

Friday, January 4, 2013

Celebrate - Feeling Sentimental

 So far this is my favourite of the SAB stamp sets.  When making the three cards, similar color schemes were used, with variations in accessories and design. All were distressed by tearing, and inking. The cards were based on similar cards seen on Pinterest.

Card 1


Card 2


Card 3

Stamps: Feeling Sentimental, Buttons, Buttons
Ink: Early Espresso
Papers: Crumb Cake, Very Vanilla, Early Espresso Core-dination card stock
Accessories: Crumb cake seam binding, Early espresso Baker's twine, Silver Soda Pop tops (flattened using the Big Shot)
Folders:  Card 1  Argyle
               Card 2  Fancy Fan
               Card 3  Honeycomb

Feeling Sentimental - Phone Booth

This is one of the SAB stamps, which you can get FREE with a $60.00 order.  The phone booth reminds me of the phone booths of earlier days, or the ones you might see in Britain (I think because I've never been there).  They're a dying breed - just try and find a phone booth when you need one.  And they certainly don't look like this one anymore. If you do find one chances are the phone isn't working.  They're a rarity because everyone (well almost) carries cell phones today so public phones aren't as necessary as they once were.

Stamps: En Francais, Feeling Sentimental
Inks: Cajun Craze, Black Stazon
Papers: Cajun Craze, Crumb Cake, Whisper White, Parker's Pattern DSP
Accessories: Ovals framelit, Cherry cobbler scalloped dotted ribbon, 1/8" basic black taffeta ribbon, dimensionals, glue dots