Showing posts with label Ornate border dies. Show all posts

Tuesday, July 7, 2020

More of You - Try Stampin' on Tuesday #464

This card was made using the sketch challenge at Try Stampin on Tuesday #464 here


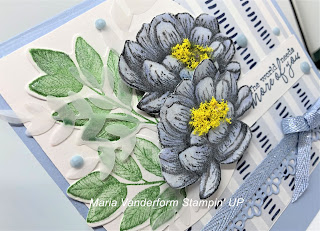
 This 5 by 5" square top folding card has a Seaside Spray card stock base.  Layered on that is Whisper White followed by Playing with Patterns DSP.  Both the Whisper White and DSP do not go all the way to the bottom of the card, but stop short about an inch from the bottom,
At the bottom edge is placed a die cut piece of Seaside Spray card stock; above that is a 1/4" 
shimmer Seaside Spray ribbon and bow.


In the upper left corner is an offset Whisper White die cut circle.  Placed in the circle are two flowers from Tasteful Touches colored with Seaside Spray Stampin Blends with Daffodil Delight in the center.  For added texture some Sunshine Flower Soft was added to the flower centers.  Both flowers were fussy cut and added to the circle using dimensionals.


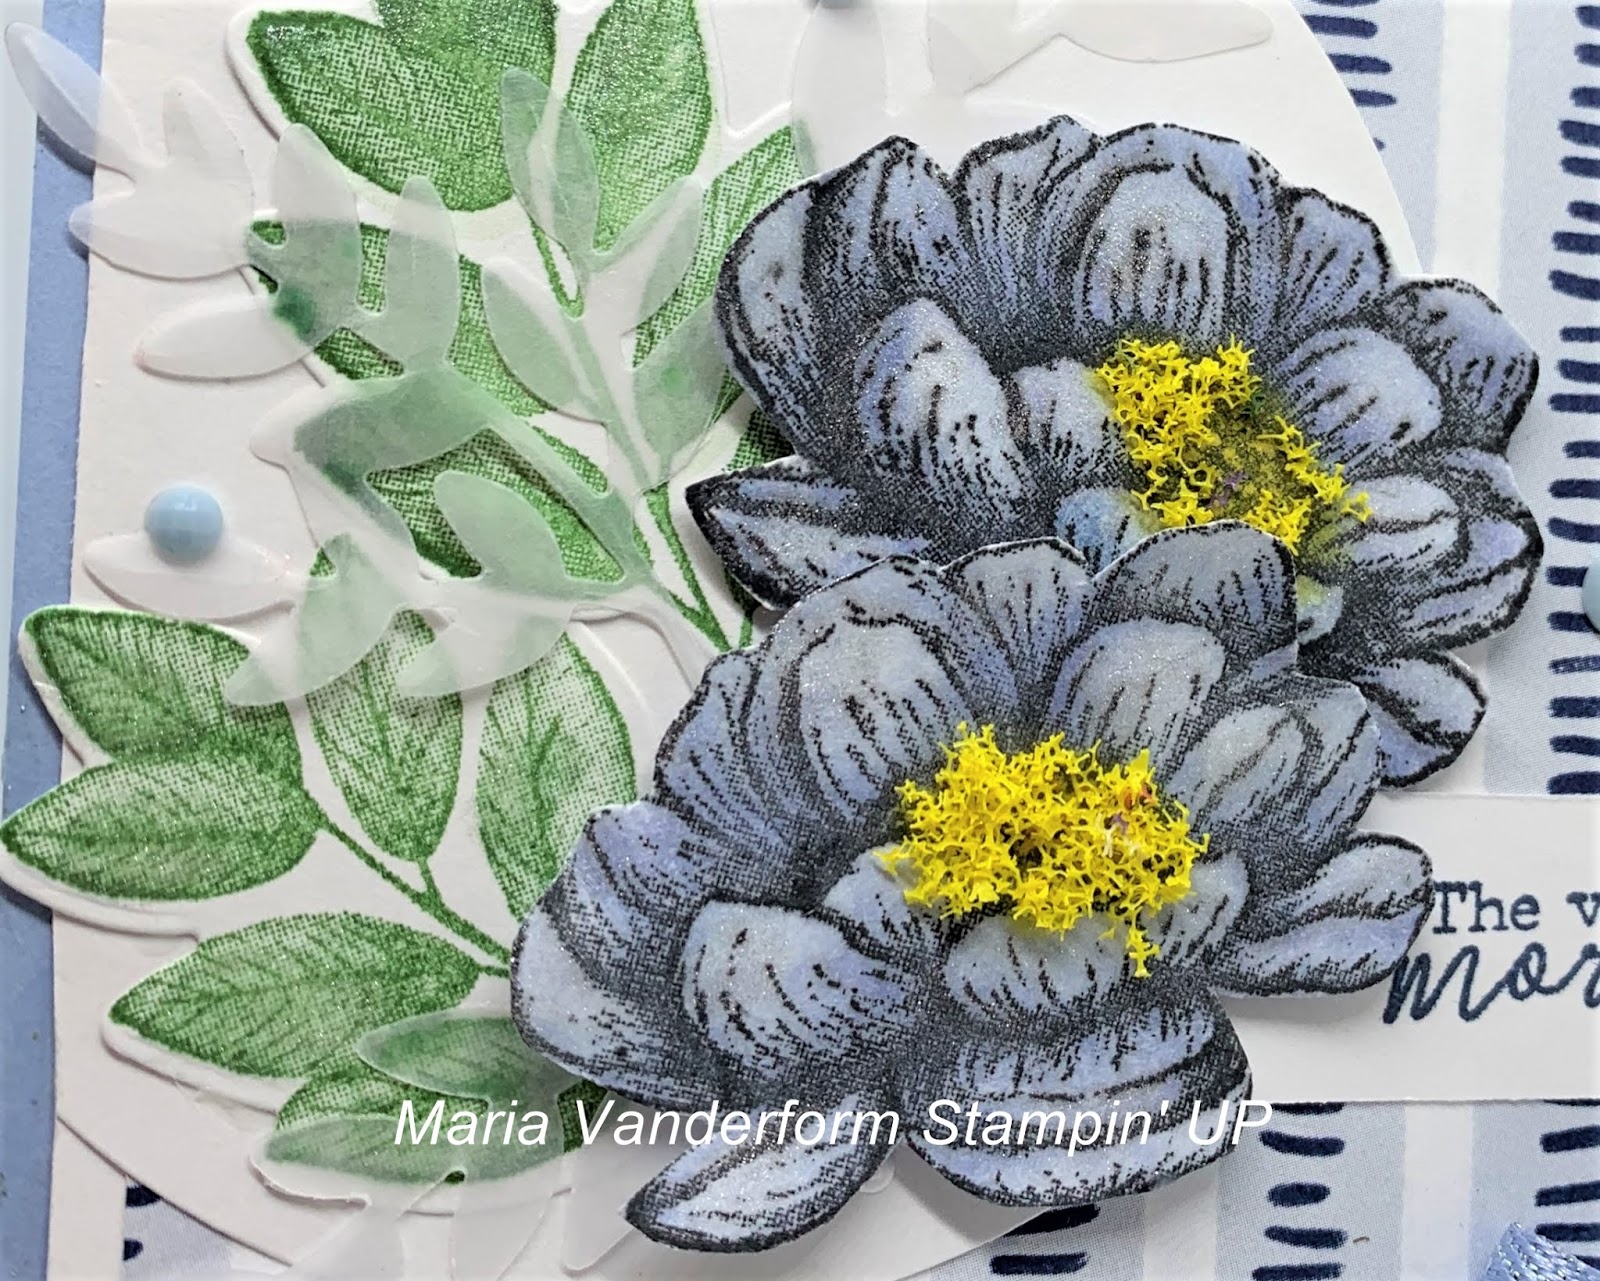
For the leaves Garden Green was used to stamp them, and they were die cut using the fern dies.  A vellum leaf was also die cut.  The leaves from "Forever Fern" were tucked under each flower.

The sentiment is from "Free as a Bird", stamped in Misty Moonlight, and added to the right of the circle.
To finish the card, some In Color 2019 - 2021 Faceted Dots were added randomly and clear Wink of Stella applies to the flower petals.


Supplies Used:
Stamps:  Tasteful Touches, Free as a Bird, Forever Ferns
Inks:  Black Memento, Stampin Blends (Seaside Spray, Daffodil Delight, Misty Moonlight), Garden Green
Papers:  Seaside Spray, Whisper White, Playing with Patterns DSP, Vellum
Accessories:  Ornate border die, 1/4" glimmer Seaside Spray ribbon, Layering Circle die, Sunshine Flower Soft (non SU), In Color 2019-2021 Faceted dots, Clear Wink of Stella, Dimesionals, Forever Flourish dies

Wednesday, May 27, 2020

Sunflower in a shaker jar - another catalogue sneak peak

One more week to go - and the new catalogue goes live.  But in the meantime, here is a sneak peak of another new bundle - a flower in a shaker jar.  To make the card, I used the following new products:  Flower in a jar stamp set, Jar punch, Jar shaker domes, and Flowers for Every Season gems


Stamp the image of the Sunflower jar stopper , colour with Stampin' blends, and fussy cut.

The base of Thick Whisper White is layered with Whisper White that has a strip of Daffodil Delight Subtle DSP as well as a strip die cut with the Ornate edge die.  The Jar punch was inserted into the bottom of this Whisper White layer as far as it could, and punched a jar aperture.  Lay it on top of the card front and trace the outline of the jar very lightly using a pencil.

The jar shaker dome has adhesive on both sides. After removing the cover over the adhesive on the top of the dome, the dome was inserted through the jar aperture from the bottom (wrong side) to the top.  Apply tear and tape adhesive along the periphery.


On the card front, stamp the image of the flower stems within the pencil outline of the jar and colour with Stampin' Blends.  Add the gems to the center, remove all the adhesive covers and add the  cardstock/dome  to the card front making a shaker.

Add the Sunflower topper to the top of the jar using dimensionals as well as a bow make with the ruched Daffodil Delight ribbon.


Stamp and punch the sentiment with the Classic Label punch and adhere one end to the jar lid.


Supplies Used:
Stamp:  Jar of Flowers, Itty Bitty Greetings
Inks:  
Jar:  Pool Party
Sunflowers:  Mango Melody, Daffodil Delight, Cajun Craze, Soft Suede
Leaves:  Old Olive
Stems:  Pear Pizzazz
Sentiment:  Mossy Meadow
Papers:  Thick Whisper White, Whisper White, Subtle DSP, Early Espresso
Accessories:  Ornate Border Die, Jar Punch, Jar domes, Flower for Every Occasion gems, 1/4" Daffodil Delight ruched ribbon, Classic label punch, Dimensionals, Glitter gems, Glitter Crystal Effects

Thursday, April 30, 2020

Thanks a Bunch- Try Stampin on Tuesday #454

One of my favourite creative activities is to make flowers or use 3D flowers on a card.  This goes along with the optional theme with sketch challenge #454 " favourite ".

In order to create my vision I turned the sketch upright.


I've had these Pixie flowers for as long as I have been crafting - about 12 years - and just waiting for the right opportunity to use them. So, they were used to create this vase of flowers for challenge 454 with Try Stampin on Tuesday

Making flowers, using flowers on cards, (even growing flowers) has always been a passion of mine. Normally I would make paper flowers myself, but a painful osteoarthritis of my hands make it difficult to use small punches right now.  So I used these Pixie flowers instead. But I did put my own touch on them.  

On a piece of Whisper White I first stamped a stem using the Beautiful Bouquet stamp set, and then made a vase using the striped pattern from the Well Dressed DSP and the Tailored Tag Punch.  The punchie was cut in half, the edges sponged with Basic Gray, shaped with a bone folder, and added over the stamped stems using dimensionals on the edges.

After the flowers were added, glitter crystal effects and dazzling diamonds was added to each one.


This image piece was matted with Pretty Peacock card stock.  On the left side is added a piece of Mint Macaron card stock die cut with the new Ornate border die.  A 3/8" strip of Purple Posy card stock is adhered on the end of that overlapping left side of the image piece as well.

The art  piece is adhered to the card front using dimensionals.

The base card is Pretty Peacock layered with Whisper white embossed with the Ornate flowery Embossing Folder.  A strip of  the same pattern of Well Dressed DSP edged with the negative piece of the die cut edging  the art piece is added to the left edge.


The sentiment, from Beautiful  Bouquet, stamped with Pretty Peacock, is die cut with the Ornate Frame die and matted with a coordinating die cut in Pretty Peacock.  It is added to the card front at the left side.

To finish the card, some Mint Macaron enamel shapes were added, and a bow made with white Baker's twine coloured with a Pretty Peacock Stampin' Blend , was adhered to the vase.

Supplies Used:
Stamp:  Beautiful Bouquet
Inks:  Pretty Peacock, Basic Gray
Papers:  Pretty Peacock, Whisper white, Best Dressed DSP, Mint Macaron, Pretty Posy
Accessories:  Ornate flowery Embossing Folder, Ornate border die, Tailored Tag Punch, Pixie flowers, Glitter Crystal Effects, Dazzling Diamonds, Ornate Frame Die, White Baker's Twine, Dimensionals, Mint Macaron enamel dots


Saturday, April 18, 2020

A double embossed elegant Mother's Day card - SUO #247

Gold foil combined with Whisper White or Very Vanilla create a very elegant card, perfect for Mother's Day or a card for that special someone in your life.

To make this card even more elegant, I double embossed the background using the 3D Ornate Floral embossing folder, which is available for order now even though it is a new item in the upcoming Annual catalogue, and gold embossing powder.

I will explain how this is done ,but first the card....


Here's how I double embossed the background.  You will need the Embossing Folder, a Big Shot or other embossing machine, a piece of Whisper White card stock 4 by 5 1/4", Versa Mark, and Gold Embossing Powder. Other colours of embossing powder can be used.


  • Open the Ornate Floral 3D embossing folder, and with your fingers, feel the surface of each of sides onthe inside.  Select the side where the surface feels smooth (usually it's the side that has the Stampin' Up logo on it but not always so it is good to feel for the smoothness of the surface)
  • Apply versa mark generously directly onto the embossing folder using the ink pad directly onto the folder
  • Add a 4 by 5 1/4" piece of Whisper White card stock to the inside of the folder, laying it against the uninked side.
  • Gently close the folder, and insert into the Big Shot and emboss as usual.
  • Gently remove the embossed Whisper White piece and add gold embossing powder over entire surface
  • Heat set with heat tool.
  • Your Whisper White piece is now double embossed.
  • Clean and dry embossing folder.
Below is a close up of the double embossed background of this card.


The 4 1/4 by 11" piece of  Thick Whisper White card stock is scored at 5 1/2" to form a top fold base.
After double embossing a  3 3/4 by 5" piece of Whisper White, it is trimmed to 3 by 4 3/8" and addedto a 3 3/4 by 5 1/8" gold foil stitched frame.  This frame was made by die cutting 2 sizes of Stitched Rectangle dies together.

A 3/4 by 3 3/4" strip of gold foil was die cut with one of the Ornate Layer dies and added to the center of the card. Some 3/8" gold metallic ribbon, bunched at the middle, was added to the top of this die cut and the ends adhered  around the back. A double bow was added at the left end.


This completed layer was then adhered to the card front using dimensionals.

The sentiment, from "Strong and Beautiful" was gold embossed, die cut with the Ornate Frame die and added to the card front with the lower end abut the die cut ribbon layer. Gold foil leaf stems (3), die cut using a Jubilee Beauty die, were added around the top of this piece.  Three hand made flowers were added above the bow.


Flowers:
Six flowers were punched in Whisper White using the small blossom punch, spritzed with alcohol, and bunched up.  After they were dry, they were shaped slightly, and two were adhered together to form one flower.  A small gold foil flower was added to each center.

Inside:
The outside of the die cut center was added to the inside, with a smaller whisper white center added on top of that.
A die cut similar to the one on the center of this card was added to bottom of the inside piece.


Supplies Used:
Stamps:  Strong & Beautiful
Inks:  Versa Mark
Papers:  Thick Whisper white, Whisper White, Gold Foil
Accessories:  Gold Embossing powder, 3D Ornate Flower embossing folder, Ornate frame die, Ornate Border die, Small Blossom Punch, 3/8" Gold metallic edge ribbon, dimensionals, Jubilee Beauty die

Wednesday, April 8, 2020

Ornate Wedding Card

The Ornate Border Dies are absolutely gorgeous in gold foil, so I paired the gold foil floral border die cut with the gold patterned Ornate Garden DSP.  The result - a wedding card.


Supplies:

Stamp:  Peaceful Moments - gold embossed sentiment punched with Everyday Label Punch

Inks:  Versa Mark

Papers:

  • Thick Whisper White card stock 4 1/4 by 5 1/2"- card base
  • Whisper White 4 by 5 1/4" - for inside
  • Whisper White 2 3/4 by 3" for sentiment

  • Ornate Garden DSP (white- with gold floral pattern)  5 1/8 by 3 1/8"
  • Ornate Garden DSP (same pattern) 5 by 1/4" - adhere along inner edge of inside Whisper White piece
  • Gold Foil 1/8" by 5" - adhere next to DSP on inside

  • Gold Foil 5 1/4 by 3 1/4" - mat for DSP
  • Gold Foil 1/2 by 4 1/4" - die cut with Ornate border die - floral

Accessories:
  •  Ornate border dies
  • 3/8" gold metallic edge ribbon  11"
  • gold embossing powder
  • gold rhinestones 7
  • Dimensionals - to adhere sentiment to card front

Thursday, March 26, 2020

A New Catalogue preview - Ornate garden bundle

With all the craziness everywhere,  it is important to do activities, like crafting, that prevent boredom and  promote mental health.

I have been staying home, not because I have the virus, but because I have a lot of risk factors that would make me very ill should I get it.

So, I am taking this opportunity to catch up on neglected tasks and to make samples of new products coming in the new Annual Catalogue in June. One of the new items is the Ornate Garden bundle, which will be available for customer order on April 1 (see link to flyer below).

Today I am sharing an envelope card, with a written tutorial, made using the products from this suite.


Card Base

  • Score  9 1/2 by 5 1/2" Thick White card stock at 3 and 7"
  • Fold down at  3" score line to form card flap; fold up at 7" score line to form a 2 1/2" pocket.
  • Burnish all folds.
  • Adhere pocket edges to card base using tear and tape adhesive.
Lid: 
  • Round the corners of the top  lid using the Detailed Trio Punch
  • Emboss a 5 1/4 by 2 1/4" of Pear Pizzazz card stock with the Ornate Floral 3D Embossing Folder, round the  tw front corners , and adhere to the lid.
  • Die cut a strip of gold foil with the Ornate border die and adhere to the edge of the lid.
  • Add a 5 1/4 by 2 1/2" piece of Ornate Garden DSP (Old Olive with gold metallic pattern) to the pocket. 
Floral Image:
  •  Stamp and colour the floral image from the Ornate Thanks stamp set on a separate piece of Whisper White card stock.  
  • Fussy cut and adhere  at an angle, to the lid, using dimensionals, overlapping the edge.  
  • Add crystal effects and dazzling diamonds to the flower edges and centers.

Ribbon
  • Make a bow with the 1/4" Old Olive ribbon and add to the floral stem.
Sentiment:
  •  Gold emboss the sentiment from the Ornate Thanks stamp set and die cut with the Ornate Frames die.  Adhere to lower pocket.
Embellishment
  • Add 3 designer elements to the left of the lid.
Card Insert:  
  • Cut a piece of Whisper White card stock 4 3/4 by 3 3/4" for the card insert.  
  • Round all corners.
  • Gold emboss the top corners with the corner stamp
  • Add a 1/2 by 4 1/2" piece of the same DSP as on the pocket to the bottom of this insert.  Add a 1/8" by 4 1/2" strip of gold foil above that.
  • Insert in card pocket.


Supplies Used:
Stamp:  Ornate Thanks
Inks:  Versa Mark, Black Memento, Watercolour pencils
Papers:  Thick White card stock, White card stock, Pear Pizzazz, Ornate Garden DSP, Gold Foil
Accessories:  Ornate Garden embossing folder, Ornate border die, Ornate Frames, Gold embossing powder, Designer Elements, Crystal Effects, Dazzling Diamonds, Dimensionals, 1/4" Old Olive ribbon, Detailed Trio Punch, Blender pen


If you haven't already done so, check out the flyer here

Friday, March 20, 2020

Ornate Garden thanks - a new catalogue sneak

The Ornate Garden Bundle is one of the new products from the new annual catalogue coming in June, 2020. It will be available for customer purchase on April 1.

The bundle contains a stamp set, a set of Ornate Dies, a set of Edgelet dies, DSP, two rolls of ribbon, an embossing folder, and some metallic embellishments (see picture below)


Below is a  card made by this bundle.


These dies are very Ornate. And I must admit to being somewhat overwhelmed by them.  So, I started with a single simple image which I stamped on one of the smaller of the ornate die cuts.
This was matted with a larger Old Olive ornate die cut.


The card base if Old Olive, layered first with Whisper White and then with Old Olive So Very Vellum DSP.  The art piece is added to the card front using dimensionals.

The sentiment is from the new stamp set  "Ornate Thanks".  The piece of Whisper White has the bottom edge die cut using an Ornate Border die and then added to the bottom of the art piece using dimensionals.

The bundle comes with 2 rolls of ribbon, one of which (old Olive) was tied into a bow and added to the flower stem.

To finish the card, some gilded gems were added randomly to the art piece ,with one being placed in the flower center.

Supplies Used:
Stamp:  Ornate Thanks
Inks:  Black Memento, Stampin Blends (Daffodil Delight, Mango Melody, Old Olive)
Papers:  Old Olive, Whisper white, Old Olive So Very Vellum DSP (SAB), 
Accessories:  Ornate dies, Ornate Border dies, Old Olive ribbon, Gilded Gems, Dimensionals