Showing posts with label Card Challenge. Show all posts

Tuesday, June 13, 2023

Eclectic Garden - Sending Best Wishes - TGIF Challenges #424

 This is my card for the challenge with TGIF Challenges #424


Supplies Used:

Stamp:  Eclectic Garden

Inks:  Black Memento, Stampin Blends various colours, Pool Party, Sweet Sorbet

Papers:  Basic White, Sweet Sorbet, Petal Park DSP

Accessories:  Fern 3D embossing folder, Stylish Shapes die, Triple punch, Dimensionals, Embellishments.


Tuesday, April 25, 2023

Birthday Roses in a Frame - Make My Monday Challenge #199

 I wanted to make a special birthday gift/card for a special lady who happens to love red roses. 

However, real roses are very expensive so I thought I would make my own.  I am submitting this project to the challenge at Make My Monday challenge #199 Flowers


I used a combination of a spiral flower die and a svg file - a die cutting machine and a Scan n cut machine to make the roses.  The frame I bought in my local Dollar Tree store for $1.50 (Cdn). 

The only alteration I had to make to the frame was to change the paper at the back. so I added a piece Texture of Chic DSP there. I chose this DSP because  it had the same blue colour and gold elements as were present in the frame.

Flirty Flamingo, Real Red, and Cherry Cobbler, were the colours I used to make the different size roses.  The leaves were made using  Granny Apple Green cardstock. 

Each rose was sprayed with a handmade shimmer spritz made using Champagne all purpose ink and 90% alcohol.

The sentiment is one half of a "Happy Birthday" sentiment which I chose because I liked the size and font of the word.  It was stamped and embossed with black embossing powder on Basic White card stock. For added stability, I added a same size piece of light weight chipboard to the back and adhered it to the frame using dimensionals.

Each rose was adhered to the frame using a hot glue gun. .I added leaves to some of the roses before they were added, but most were added without leaves.  .

Monday, February 20, 2023

A stripe challenge - Freshly Made Sketches #573

 This week's challenge reminds me of scraps. But creating a panel using scraps is not what I did for this card for the challenge with Freshly Made Sketches #573. I found some DSP with vertical stripes that I used instead.


The base of this A2 card is Garden Green, layered with Basic White card stock embossed with the Macramé Embossing Folder.
In the middle I added a 1 3/4 by 5" double layered vertical stripes DSP, which I matted with Garden Green cardstock.


On the left end of this panel, I added a turtle holding a flower which was mounted on a small doillie (using dimensionals). Some glitter crystal effects was placed on parts of the turtle.
A sentiment, stamped on a long narrow sentiment strip was added to the bottom of the panel with dimensionals.
The same DSP was added to the envelope flap.


Products Used:
Stamp:  Unknown
Inks:  Black Memento, Garden Green
Papers:  Garden Green, Basic White, Enjoy the Journey DSP (stripes), Rain or Shine DSP (turtle image)
Accessories:  Rain or shine dies,Small doillie, Macramé embossing folder, Shimmery Crystal Effects, Loose daisy embellishments, Dimensionals


Monday, August 8, 2022

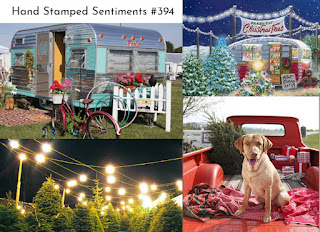
Vintage Trailer for the Inspiration Challenge at Hand Stamped Sentiments #394

 I have always wanted to go camping but it was never in a trailer, always in a tent. Making this card for the Inspiration Challenge at Hand Stamped Sentiments #394 brought back some of those memories.

Making a vintage trailer using the Sale a Bration (SAB) Tree lot dies was easier than I thought. For this card, which is a partial case from the card in the SAB catalogue, I used only 5 of the dies. The trees are from the Peaceful Deer stamp set.


The trailer, is placed against a back drop of White glimmer paper and a sky sponged with Starry Sky ink. The stars were made using white acrylic paint and the fine end of a paint brush.

The poles holding up the lights, were die cut from Soft Suede card stock; the light strings in Basic white.  The light strings were coloured with Shaded Spruce Stampin Blend, and the lights with various colours of blends.  Some clear Wink of Stella applied to the lights made them look like they were sparkling. 


The trailer was parked, using dimensionals, underneath the lights.


This vintage looking trailer is constructed of Real Red and gold foil card stock. There are white curtains in the window and a Garden Green wreath with a ribbon die cut from scraps of Mint Macaron handing on the door.  The wheel tire is coloured with a black marker; as is the hitch.
Some vellum card stock coloured with a So Saffron marker is added to the wrong side of the windows.

The sentiment, from Christmas Memories, is embossed with gold embossing powder .

Supplies Used:
Stamps:  Dancing Deer, Christmas Memories
Inks:  Various colours of Stampin' Blends for the lights, Starry Sky, So Saffron, Versa Mark., Basic Black marker
Papers:  Basic White, Real Red, Gold Foil, scraps of Garden Green, Mint Macaron, White Glitter paper, Soft Suede, Vellum card stock.
Accessories: Tree Lot dies (SAB), Gold Embossing powder, Clear Wink of Stella, White acrylic paint, dimensionals.

Thursday, June 2, 2022

Nature's Prints in a Tic- Tac-Toe Challenge -The Paper Players #593

 After the thunderstorms yesterday it is much cooler outside - perfect for touching up the garden.  There is still a lot of debris everywhere thanks to a powerful storm that moved through here about 10 days ago.

This card was made for the Tic-Tac-Toe challenge at The Paper Players#593, using the following 3 elements in the row across the top:  "birthday, embossing, ribbons". The Nature's Prints bundle was used for this challenge.


This A2 side fold card has a Night of Navy base, layered with Basic White.

The framed embossed floral is adhered to this card front using dimensionals.

The frame was die cut using the new "Fabulous Frame Dies", die cutting it twice - once in Night of Navy, and once in Basic White. The die cut frame has  both a stitched and an embossed edge. To create the layered frame look, the Night of Navy frame was fussy cut to the stitched line and the remaining embossed frame was adhered to the Basic White frame.

Behind the frames was added a piece of Night of Navy card stock embossed with the Tasteful Texture Embossing folder.


hree floral images from "Nature's Prints" were embossed with White embossing powder on Night of Navy card stock and die cut using the Nature's Prints die. They were added to the inside of the frame - the middle one directly to the embossed card stock and the other two with dimensionals.


A bow made with 3/8" Glittered Organdy Ribbon was added to the top of the floral stems using a glue dot.

The sentiment was stamped with Night of Navy ink and embossed with clear embossing powder before being separated into two words. After fussy cutting each word around the perimeter, they were added to the card front using dimensionals.

Supplies Used:

Stamp:  Nature's Print

Inks:  Versa mark, Night of Navy

Papers:  Night of Navy, Basic White

Accessories:  Nature's Print dies, Fabulous Frames die, White embossing powder, Clear embossing powder, Tasteful Texture embossing folder, dimensionals.

Monday, April 18, 2022

Inspiring Iris with Many Medallions background - Paper Craft Crew Challenges #466 Theme Challenge

This week the challenge with the Paper Craft Crew Challenge #466 is to create a card/project with a mosaic pattern on it.

To make a card for this challenge, I pulled out 2 retired items - a stamp set "Inspiring Iris" and a die "Many Medallions", and put them together.  Below is the result:


Iris' are one of my favourite spring flowers.  I must have had Iris' on my mind when I chose a stamp for this card .  I had just been to the store where I bought some Iris bulbs to plant in my garden as soon as it is safe to do so.  That may not be any time soon as I just looked out the window and would you believe it is snowing!!! (yuck).

Most of the Iris' in my garden are a dark purple (almost black) with the exception of a variegated one which is almost a florescent pale purple.  For this card I decided to stamp my Iris in Highland Heather ink, to coordinate with the Highland Heather card base with the leaves in Granny Apple Green.
The fine tip of three different colours of markers was used to add colour to the background. 
When finished, the stamped image was trimmed to a 2 1/2" square and matted with Highland Heather.


The background was created by die cutting a Medallion die in Basic White card stock and adding it to the Highland Heather card base.


After adhering the two layers together, I added a piece of 1/4" Gorgeous Grape mini striped ribbon towards the left front. The image was added to the front using dimensionals.

The sentiment is from " Happy Thoughts".  It is stamped in Highland Heather ink and die cut using a Stitched So Sweetly die.


To finish the card, I added some Iridescent Rhinestones to the card front.

On the inside I wove a piece of ribbon through one strip of the medallion die cut.


Supplies Used:

Stamps:  Inspiring Iris, Positive Thoughts

Inks:  Highland Heather Black Memento, Granny Apple Green

Papers:  Highland Heather, Basic White

Accessories:  Many Medallion dies, Stitched So Sweetly die, 1/4" Gorgeous Grape mini striped ribbon, Iridescent rhinestones, Stamparatus, Dimensionals.


Sunday, April 17, 2022

Home & Garden - a Masculine Floating Gatefold card - SUO Challenge #299

The challenge with SUO Challenge #299 is to " create with your favorite bundle or suite collection from any of our current publications."

It was really difficult to pick a favourite  bundle  so I chose a masculine one "Home & Garden" and used the Floating Gatefold card to showcase it.


The gatefold is formed by scoring a 5 1/2 by 8 1/2" piece of Very Vanilla cardstock at 2 1/8" and then bringing the other end over to meet at the folded end. In Good Taste DSP is added to each panel; die cuts of various garden/house tools is added to each panel - the birthday sentiment on the left side. All images are stamped with Black Memento ink and coloured with Stampn Blends before being die cut using the coordinating Garden dies.


The use of tabs  on the inside create the floating part of the card. Two tabs, each 2 by 5 1/2" scored at 1/2. One end of the tab is attached to the inside of the front panel; the other to the inside of the card.

Attached to each is an art piece, 2 by 2" of Very Vanilla card stock,  matted with a 2 1/8 by 2 1/8" piece of  Early Espresso and finally with a 2 1/4 by 2 1/4" piece of Very Vanilla.  All edges were sponged with Early Espresso ink. Below is a picture with the card closed.  See below for a picture of the card opened with the panels pulled out of the way.


Before adding the tabs, some DSP followed by Very Vanilla with sponged edges was added to the inside.  The sentiment, from " Happiest Birthdays" was stamped with Early Espresso on the Very Vanilla piece.

Some die cuts were added to each floating panel.


When the card opens, the panels float out of the way to reveal the sentiment .


Supplies Used:
Stamp: Home & Garden
Inks:  Black Memento, Early Espresso, Stampn Blends (Real Red, Smoky Slate, Crumb Cake)
Papers:  Very Vanilla, In Good Taste DSP
Accessories:  Garden dies


Thursday, June 17, 2021

A Little Note -- Paper Craft Crew Challenge #431

 This card was made for the sketch challenge with the Paper Craft Crew Horizontal challenge #431


For this sketch challenge, I started with a base of Thick Basic White card stock and layered it with a layer of retired Purple Posy card stock.  That colour goes so well with the Hand-Penned DSP that I will be using on the rest of the car. This card stock was embossed with the Tasteful Textile 3D embossing folder giving the card some much needed texture.


Towards the right side of the card base I added a 3 1/3 by 3 7/8" of Hand-Penned DSP the edges of which were sponged with Highland Heather ink.
On top of that but towards the left, I added a 2 1/4 by 3 1/2" piece of Basic White, the edges of which were also sponged with Highland Heather. This is the Art Piece.

On a separate piece of Basic White I stamped and coloured one of the floral clusters from the Hand-Penned Petals stamp set.  The image was coloured using the fill stamps after which it was die cut with the image specific Penned Flowers die. This die cut was added to the Art Piece. Below the image on the Art Piece, the sentiment (from Pansy Patch) was stamped using Gorgeous Grape ink.


Across the lower part of the card, I added a stitched scallop strip (in Purple Posy) which was die  cut using one of the Penned Flowers dies On the left side of this strip a bow made using the 3/8" Fresh Freesia organza ribbon was added.


Some Pastel Pearls added to the flower centers and at the end of the sentiment finishes the card with a bit of glam.

Supplies Used:
Stamps:  Hand-Penned Petals, Pansy Patch
Inks:  Black Memento, Highland Heather, Daffodil Delight, Soft Succulent, Gorgeous Grape
Papers: Thick Basic White, Basic White, retired Purple Posy, Hand-Penned DSP
Accessories:  Penned Flower dies, Pastel Pearls, 3/8" Fresh Freesia organza ribbon, Tasteful Texture 3D Embossing Folder


Monday, April 5, 2021

Butterfly Hello - Paper Craft Crew Challenge #420

 This card was made for the Vertical Challenge with the Paper Craft Crew Challenge #420 .

Since butterflies seem to be popular right now, I decided to resurrect the Botanical Butterfly DSP, a retired SAB item, and punch some of them using the retiring Butterfly duet punch.

And, I altered the sketch so that rather than square focal features I used layered circles.

So, here's my card"


The top folding Basic Black card base was layered with a Black and White polka dot pattern from the True Love DSP.

Five different butterflies were punched from the (retired SAB) Botanical Butterfly DSP using the soon to be retired Butterfly duet punch.  In addition, a small butterfly was punched from the body of another butterfly again using the butterfly duet punch (the small butterfly option). 


Six 1 1/4" Basic Black circles were punched as well as six smaller 1 3/8" Basic White ones.  The two were adhered together and added to the card front equidistant from one another. The larger butterflies were adhered to 5 of the circles.  On the remaining circle I added the sentiment (Forever Fern) which was stamped on a rectangle sentiment strip. Above that was added the smaller butterfly; below it a bow made with a 1/4" Calypso Coral ribbon (Ornate bundle).


And of course, no card is complete without bling. so a rhinestone was added to each butterfly making sure there was an odd number.


Supplies Used:
Stamp:  Forever Fern (sentiment)
Ink:  Basic Black (for sentiment)
Papers:  Basic Black, Basic White, True Love DSP, retired Botanical Butterfly DSP
Accessories:  Punches:  1 1/4" and  1 3/8" circle, Butterfly Duet, rhinestones, 1/4" Calypso Coral ribbon


Thursday, November 12, 2020

A Christmas Wreath for Try Stampin On Tuesday #482

 This card, featuring a Christmas wreath, was made for the sketch challenge with Try Stampin' on Tuesday #482.  This challenge provided me with opportunity to play with the new stamp "Arrange a Wreath"


The wreath on the stamp set is a bit larger than expected, so the card size was changed to 5 by 7" so as not to overwhelm the card.

The wreath was stamped with Garden Green on Whisper White and fussy cut.  

Four large flowers were stamped in Real Red and die cut with a Wreath Builder Die. Small Daffodil Delight circles punched with the 1/8" Hand Held Circle Punch were added to the centers of these flowers.  The edges were sponged with Gold Delicata ink.  Before adding them to the wreath, they were shaped by pressing them with the Tombo glue lid.

Six smaller flowers die cut in Real Red card stock , were also shaped and added around the wreath as shown.


s.

The berries made with the 1/8" circle hand held punch were added randomly around the wreath.

At the bottom of the wreath was added a double ribbon of organza Real Red ribbon.


A die cut circle with a sentiment stamped with Garden Green ink, was added to the center of the wreath and Holiday rhinestones added to the centers of each flower.

The base card is Garden Green, layered with Whisper White card stock embossed at the right side with the Greenery Embossing folder.

Adhered to this Whisper White layer, towards the left side is a  Heartwarming Hugs DSP notched banner.  The completed banner is added to the lower end of this banner using dimensionals.

To finish, Boughs die cut with the Beautiful Bough Die were added to the upper left and lower right sides.


Supplies Used:

Stamp:  Arrange a Wreath

Ink:  Garden Green, Real Red, Gold Delicate

Papers:  Garden Green, Real Red, Daffodil delight, Whisper White, Heartwarming Hugs DSP

Accessories:  Layering Circle dies, Wreath Builder Dies, Beautiful Boughs dies, Real Red Organza ribbon, Holiday rhinestones, Greenery embossing folder, 1/8" Hand Held punch

Monday, November 9, 2020

Poinsettia in Red Felt - Color Challenge at The Paper Players #516

 I was surprised today looking at the Calendar that Christmas is less than 2 months away.  The warm weather belies that fact.  Indeed it felt more like May than November as the last several days being around 20 degrees C.  Other years we have had snow on the ground.

One nice thing about the holiday season is making Christmas cards, and I LOOOOOVE making Christmas cards - especially Poinsettia Christmas cards.  And this year's Poinsettia Petals stamp set and coordinating die this year are absolutely gorgeous.

The colours of the challenge at The Paper Players - Real Red, Shaded Spruce, Whisper White and Gold, fit right into my love of Christmas and love of Poinsettias.


Real Red is a perfect colour for Poinsettias, and it is certainly more gorgeous when using Red Felt!

The Red Felt poinsettia flower with a gold foil center, gold foil leaves and gold foil sprigs is adhered to the top of a Whisper White Ornate layer die which has a piece of  Plush Poinsettia Specialty Paper  added to the center.


Two smaller flowers are added below the main flower.

This ornate die is added to the card front using dimensionals.


The card front is Real Red card stock, layered with Whisper White.  On top of the Whisper White layer are adhered 4 strips of "Tis the Season" DSP (plaid colours of Real Red, Whisper white and Shaded Spruce).  The focal image is added to the top of this layer.

The sentiment, stamped in Real Red is added to the bottom of the die cut.  Both ends of this are punched using the Banners Pick a Punch punch.

Supplies Used:

Stamp:  Poinsettia Petals

Inks:  Real Red

Papers:  Real Red, Whisper White, Gold Foil, Tis the Season DSP, Red Felt Paper, Plush Poinsettia Specialty Paper

Accessories:  Ornate Layer Dies, Poinsettia Petals Dies, Dimensionals, Banners Pick a Punch Punch, Elegant Faceted Dotsd