This is the second card I made yesterday using the double embossing technique - this time using 2 different embossing folders. Since I could not find a tutorial for this method I will provide a step by step explanation.
The two embossing folders I used were the Fancy Fan Folder and the Oval from the Designer Frames set of 2.
1. Cut 3 pieces of the cardboard ( from the DSP pack) - approximately 4.25 by 5.5 inches.
2. After deciding where I wanted the oval on my card, I used the Ovals framelits to cut an oval out of each piece of card board. To make sure the ovals are in the same spot on each piece of cardboard, I marked the oval on the 2nd and 3rd piece with a pencil before cutting out the ovals.
3. Adhere the 3 pieces together.
4. Attach this with a temporary adhesive to the top of the Fancy Fan embossing folder.
5. Place cardstock inside the embossing folder, and run through the Big Shot on the multipurpose platform- with all tabs closed and only one cutting plate. This results in an embossed piece of cardstock with an unembossed oval.
6. Attach the 3 die cut ovals together and attach to the back of the Oval designer embossing folder.
7. Place the oval embossing folder over the area that is blank
8. Place on top of the multipurpose platform and with all tabs closed run it through the Big Shot.
This gives you the second embossed area in the middle of the fancy fan embossed area.
Stamps: Backyard Basics, Itty Bitty Banners
Inks: Black Stazon, SU markers (Calypso Coral, Midnight Muse)
Papers: Vellum, Whisper White, Midnight Muse, cardboard from DSP
Accessories: Backyard Basics framelits, Itty Bitty Banner framelits, Fancy Fan embossing folder, Oval designer folder, gold Baker's twine.
The butterfly is made by stamping a butterfly from the Backyard Basics stamp set onto Vellum using Black Stazon ink, then colouring on the wrong side using markers. The image was then die cut using the coordinating framelit.
Showing posts with label Backyard Basics. Show all posts
Showing posts with label Backyard Basics. Show all posts
Sunday, May 11, 2014
Saturday, April 26, 2014
Mother's Day card in a box - Challenge 247 LNS
My card making classes are starting again this week.There was a brief hiatus because of my hand surgery. The class will be focusing on a project for Mother's Day.
I love making these cards in a box, and I used the stamp set Backyard Basics and coordinating framelits to do so. The tutorial I used was from Splitcoaststampers here
The box was made using Pear Pizzazz card stock, decorated with first Very Vanilla and then Afternoon Picnic DSP.
I coloured the images with SU ink pads and an aqua brush and die cut them using the coordinating backyard framelits. I attached the die cut images to the inserts using stampin' dimensionals.
Stamps: Backyard Basics, My Mother
Inks: Daffodil Delight, Summer Starfruit, Soft Suede, Chocolate Chip, Sky Blue, Tangerine Tango, Wisteria Wonder, Elegant Eggplant, Pool Party, Primrose Petals, Old Olive, Always Artichoke, Basic Black
Papers: Pear Pizzazz, Very Vanilla, Afternoon Picnic DSP, Whisper White, Wisteria Wonder
Accessories: Backyard Basics framelits, Window sheets, dimensionals, square framelits, Pearls
Friday, February 28, 2014
Just for You - Butterfly card - Pals Paper Arts #193
Today I made sure I got the posting for the challenge with Pals Paper Arts correct. Yesterday I did not.
I'm itching for Spring to arrive so that I can see butterflies in my garden again. But it's so cold today I'm despairing that the temperature will ever get above 0 degrees (C).
This card is for the sketch challenge with Pals Paper Arts here, featuring vellum butterflies.
 The card features a Pool Party base, layered with Whisper White cardstock and then with This and That Epic DSP. A strip of Pool Party was attached to the left side of the card upon which 1 1/4" embossed circles were mounted and then the butterflies.
I'm itching for Spring to arrive so that I can see butterflies in my garden again. But it's so cold today I'm despairing that the temperature will ever get above 0 degrees (C).
This card is for the sketch challenge with Pals Paper Arts here, featuring vellum butterflies.
I placed a Pool Party ruffled ribbon on one edge of this Pool Party strip.
The butterflies were stamped with Versa Mark on vellum and embossed with black embossing powder. They were then coloured on the wrong side using markers and the colours blended with an aqua painter. Using the Backyard Basics framelits, the butterflies were die cut, folded in half and attached to the circles using glue dots.
Stamps: Backyard Basics, Label Love
Inks: Versa Mark, Pool Party, Markers (Tangerine Tango, Daffodil Delight, Gumball Green)
Papers: Pool Party, Whisper White, This and That Epic DSP
Accessories: 3/8" ruffled Pool Party ribbon, Decorative dots embossing folder, black embossing powder, Aqua painter, Backyard Basics framelits, Artisan Label punch, pearls
Thursday, February 27, 2014
An Iris Happy Birthday
I made this card for the sketch challenge with Pals Paper Arts, but didn't keep track of the days very well. The linkz closed yesterday. I'm posting the card nevertheless.
 The image was coloured with ink pads and an aquapainter.
Stamp: Backyard Basics
Inks: Black Stazon, Wisteria Wonder, Elegant Eggplant, Summer Starfruit, Old Olive, Always Artichoke
Papers: Wisteria Wonder, Very Vanilla, Whisper White, Afternoon Picknic DSP
Accessories: Backyard Basics framelits, Artisan Label Punch, Dazzling details, Aqua painter.
Monday, December 9, 2013
Butterfly Thank You - Sketch Frenzy Friday
We had some snow and freezing rain today and its beginning to look a lot like Christmas. Since I've finished making my Christmas cards, I thought I would make some Thank You cards. I used the sketch challenge with Sketch Frenzy Friday here to design the card.


The base card is Tangerine Tango layered with Very Vanilla and then Venetian Romance designer paper and a white doily on the left border.
Three butterflies were stamped on Whisper White card stock and coloured with markers. Some orange stampin' glitter was adhered to the surface of each butterfly. They were arranged on the doily as indicated above.
The sentiment was stamped with Basic Black on Very Vanilla and matted with Basic Black card stock.
Stamps: Backyard Basics, Lots of Thanks
Inks: Black Stazon, Basic Black, SU markers (tangerine tango, Basic Black)
Papers: Tangerine Tango, Whisper White, Very Vanilla, Basic Black, Venetian Romance designer paper
Accessories: White doily, Orange stampin' glitter, Backyard Basics framelits
Saturday, December 7, 2013
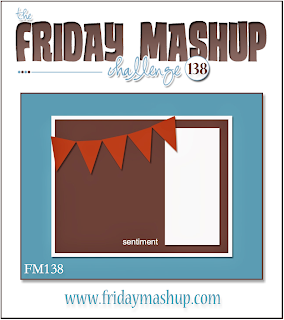
Tulip Birthday Window card - The Friday Mashup 138
The challenge with the Friday Mashup is to use their sketch to make a window card. I haven't used window sheets to make a window card in a long time so I had to put my thinking cap on as to how to do it.
This is what I came up with:

This is what I came up with:

The base card is Island Indigo layered with first Whisper White and then Gingham Garden designer paper.
To make the window I measured out the space for it than cut out the rectangle using my cutter. Since it was difficult to cut through all three layers at the same time, I cut out one layer at a time - using each layer as a template for the next. I attached the window sheet, which I cut larger than the window it would be covering, between the designer paper and the whisper white layer. To finish the window off, I attached a silver sticker decorative line around the edges.
The tulip was coloured using SU markers and an aqua painter. It was die cut using the Backyard Basics framelits and attached to a piece of Island Indigo card stock and adhered to the inside of the card so it would show through the window. The same edging was used around the edges of this piece of Island Indigo as I did the window.
The flags were made with hand cut triangles of melon mambo card stock.
Stamps: Backyard Basics, Bring On the Cake
Inks: Black Stazon, Melon Mambo, SU markers (Melon Mambo, Pear Pizzazz)
Papers: Island Indigo, Whisper White, Melon Mambo, Gingham Garden Designer Series Paper
Accessories: Window sheet, Backyard Basics framelit, silver decorative line stickers (non SU)
Labels:
Backyard Basics,
Birthday,
Bring on the Cake,
Window card
Backyard Basics Birthday - Technostamper 291
I'm finally finished with my Christmas cards, so now its time to start on some Birthday cards. I have some birthdays coming in the New Year so I might as well get ahead of myself.
I used the sketch challenge with Technostamper here to design my card.

I used the sketch challenge with Technostamper here to design my card.

The base card is Wisteria Wonder, layered with Whisper White card stock embossed with Stylish Stripes embossing folder. A strip of designer paper was adhered to the left side of the embossed layer and a piece of ruffled Wisteria Wonder ribbon attached over the seam.
The focal image is coloured with SU markers and die cut using the Backyard Basics Framelit. It was then attached to the embossed card stock using glue. The sentiment is stamped with Elegant Eggplant ink and punched with the Label Bracket punch and adhered below the focal image.
I put some dazzling details in the middle of the flowers and rhinestones on the top and bottom of the sentiment.
Stamps: Backyard Basics, Label Love
Inks: Black Stazon, Elegant Eggplant, SU markers (Wisteria Wonder, Elegant Eggplant, Always Artichoke, Old Olive, Daffodil Delight)
Papers: Wisteria Wonder, Whisper White, Afternoon Picnic designer paper.
Accessories: Wisteria Wonder ruffled ribbon, dazzling details, rhinestones, Label bracket punch, Stylish stripes embossing folder
Subscribe to:
Posts (Atom)


