Showing posts with label Card in a box. Show all posts

Wednesday, October 4, 2017

Christmas Card in a Box - Boxed

I have seen numerous cards in a box on Pinterest, and  finally, today I had a  chance to make some.  One of them was this Christmas card.  To help me make these cards I used the video tutorial by Rachel Tessman  here

Because of the 3D nature of this card it cannot be placed in an envelope, so I designed a box for this card.  Not only does this protect the card, but it allows it to be gifted easier.  The tutorial for this box will be on my blog tomorrow.

Below is a picture of the card, the box, and the decorated box for the card.


The card base is Cherry Cobbler card stock.

A strip of Be Merry DSP was adhered on the front, with Dazzling Diamond Glimmer Paper die cut Trees and deer decorating the front.

The sentiment, from "Merry Little Labels", white embossed on Cherry Cobbler card stock and punched with the Everyday Label punch. was adhered to the card front using dimensionals. A extra label was punched in Dazzling Diamond glimmer paper, cut in half and placed behind the punched sentiment.

The box is made using a different pattern of the Be Merry DSP, with a Cherry Cobbler lid.  Red Tinsel trim if tied around the box.

Above the box is inserted back into the card.

Tomorrow I will post the tutorial for making the box to put the card in.

Supplies Used:
Stamp:  Merry Little Labels
Inks:  Versa Mark
Papers:  Cherry Cobbler, Be Merry DSP, Dazzling Diamonds Glimmer Paper
Accessories:  Everyday Label punch, Card Front Builder Framelits, Red Tinsel, dimensionals, White embossing powder.


Friday, March 3, 2017

Tool Box (in a card)

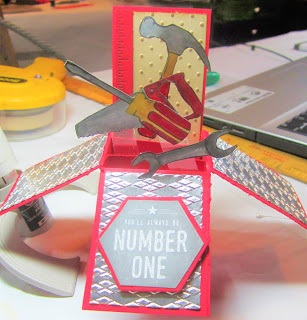
I was thinking of a different masculine card.  I wanted to feature the "Nailed It" stamp set and came up with the idea of a card in a box (aka tool box) - a simplified form.

Like a tool box, this box red, so I made this card in a box out of Real Red card stock. See a post here on making a card in a box.

This, however, is a simplified version of this 3D card.

After scoring the cardstock and making the cuts on the scored seams, the box was decorated before it was formed into the box you see in the picture above.

A piece of Crumb Cake cardstock, embossed with the dots embossing folder and rubbed lightly with a sponge and Crumb Cake ink was added to the back panel.  On the left side is a die cut Real Red ruler sponged lightly to bring out the markings.  On the back side of this panel is a similar sized piece of Whisper White cardstock meant for messages etc.

On the 3 top panels I adhered embossed adhesive silver foil pieces.  Then I adhered, using dimensionals, a hexagonal shaped matted sentiment to the middle panel.

I stamped and colored with markers the various tools, cut them out and adhered them with glue dots to strips of  Window Sheets and then to the box inserts.

Supplies Used:
Stamps: Urban District, Nailed It
Inks: Black Memento, Basic Gray, Crumb Cake, Markers (Smoky Slate, Daffodil Delight, Real Red, Pacific Point)
Papers: Real Red, Crumb Cake, Adhesive silver foil (non SU)
Accessories Dots embossing folder, Argyle embossing folder (retired), Build it Framelits, dimensionals, Window sheets, glue dots


Tuesday, February 14, 2017

Card in a Box with Succulents

When I was making the Succulent plants I had an epiphany (in other words a thought- a brilliant thought)!  Why not decorate a card in a box with the Succulent die cuts including some of the SAB glimmer paper. So, that is what I proceeded to do.
I am very happy with the way the decorated card in a box turned out.  When I showed it to my son he looked at it and said "Wow, that's bright!"

It's probably bright because of the glitter from the SAB glimmer paper.  I actually had a difficult time taking a picture because very picture I took was over exposed.  The exposure of the picture above is not the way I like it but it's the best I could do.

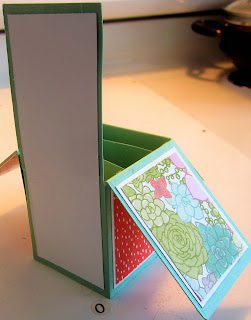
The basic box is made using Mint Macaron card stock, and the panels are decorated with the Succulents DSP matted with Whisper White cardstock

To provide a place to write a message and/or place a sentiment on this card in a box, I placed a Whisper White panel behind the tall decorated panel.

Now comes the fun part - decorating.
This was done using the stamp set "Oh So Succulent" with its coordinating Succulent framelit/die set as well as the small butterfly punch.

This is a close up of the box  front The die cuts were adhered to  1/2 by 4" pieces of Window Sheets which were adhered to the inserts using a hot glue gun.  I tried glue dots but they did not hold well.


This is a side view.  On some of the panels I die cut some Whisper White stitched shapes and adhered the die cuts on that. I liked that better because the DSP is quite busy and the die cuts were getting lost in its busyness.

All the back panel needs right now is a message.

The card in a box, although it looks bulky and 3D actually folds flat and fits into a standard A2 envelope


Supplies Used:
Stamps:  Oh So Succulent
Inks: Black Memento, Calypso Coral, Crumb Cake, Sweet Sugarplum, Rich Razzelberry, Old Olive, Garden Green, Tip Top Taupe
Papers: Mint Macaron, Whisper White, Succulent DSP, Calypso Coral, Glimmer Paper (Mint Macaron, Bermuda Bay, Sweet Sugarplum), Sweet Sugarplum, Tip Top Taupe
Accessories: Shaped Stitched Framelits, Succulent  Framelits/dies, Small butterfly punch, Window sheet, hot glue gun, glue dots, dimensionals, rhinestones

I have put together a tutorial, combining several tutorials that I have read, videos that I have seen on You Tube and pictures of cards in a box on Pinterest.  As mentioned at the beginning, this tutorial does not include decorating this card.

If you would like a copy of this tutorial FREE, make a comment on this post. Please indicate if you would like a copy and include your e-mail address.  I will send you a copy of this tutorial via an e-mail attachment.


Saturday, April 26, 2014

Mother's Day card in a box - Challenge 247 LNS

My card making classes are starting again this week.There was a brief hiatus because of my hand surgery. The class will be focusing on a project for Mother's Day.
I love making these cards in a box, and I used the stamp set Backyard Basics and coordinating framelits to do so. The tutorial I used was from Splitcoaststampers here


The box was made using Pear Pizzazz card stock, decorated with first Very Vanilla and then Afternoon Picnic DSP.
I coloured the images with SU ink pads and an aqua brush and die cut them using the coordinating backyard framelits.  I attached the die cut images to the inserts using stampin' dimensionals.

Stamps: Backyard Basics, My Mother
Inks: Daffodil Delight, Summer Starfruit, Soft Suede, Chocolate Chip, Sky Blue, Tangerine Tango, Wisteria Wonder, Elegant Eggplant, Pool Party, Primrose Petals, Old Olive, Always Artichoke, Basic Black
Papers: Pear Pizzazz, Very Vanilla, Afternoon Picnic DSP, Whisper White, Wisteria Wonder
Accessories: Backyard Basics framelits, Window sheets, dimensionals, square framelits, Pearls