Showing posts with label tutorial. Show all posts

Wednesday, October 6, 2021

Nature's Harvest Building Block Card

 I first saw this card, made by Debbie Mageed on Pinterest, and then used the tutorial on Splitcoaststampers to make my own calendar card. I used the lovely Blackberry Bliss DSP matted with Early Espresso card stock and some gold foil accents.


The card base is 5 `/2 by 10 1/2" Thick Basic white card stock, scored at 3 1/2 and 7"on the long side. These score lines are folded as a Mountain fold at the 3 1/2" score line and a Valley fold at the 7" score line.

To make the blocks the numbers are on some cut marks are made on the Valley Fold on the wrong side of the card. They are made up to 1 1/2" at the following intervals 3/8", 1 3/8" , 2 7/8, 3 7/8, 4 1/8, and 5 1/8".  Following that, score lines are made at the edges of the cut lines, at 5 1/2 and 8 1/2" so the 1" score lines can fold out as Mountain folds, and the 1/4" lines as Valley Folds.


All the score lines were burnished so they were crisp, after which the card was decorated.

Below are the dimensions:

Front panel: Early Espresso card stock 3 1/4 by 5 1/8"  DSP 3 1/8 by 5"


Small panels: Early Espresso 1 3/4 by 5 1/8" (2)  DSP 1 5/8 by 5" (2)


Blocks:  Gold Foil 1 3/8 by 7/8" (8)  Early Espresso 1 1.8 by 5/8" (8)   Numbers Sahara Sand card stock die cut with retired number dies.

Sentiment:  from Dragonfly Garden.  Stamped with Early Espresso ink and punched with  11/4" circle punch.

Calendar added at bottom of front panel 

Decorations behind calendar are gold foil die cuts from Nature Harvest dies.


Supplies Used:

Stamps:  Dragonfly Garden

Ink:  Early Espresso

Papers:  Thick basic white, Early Espresso, Nature Harvest DSP, Sahara Sand, Gold foil

Accessories:  Nature dies, Number dies (retired), 1 1/4" circle die.


Wednesday, June 16, 2021

What??? Colour DSP??? A Case plus a tutorial

 What do you get when you add colour to some already spectacular DSP?  Even more spectacular paper.

When I saw cards made with this altered DSP on Pinterest I tracked down Tina Wardell,  the demonstrator who made them. I will provide a link to her video tutorial at the bottom of this post.                                                                

So Tina thank you!  I love your cards so much I cased them exactly as you made them.  


Don't you just love what Tina has done to the DSP?

I provide a brief pictoral tutorial below the pictures.  


A tree die cut in Early Espresso card stock was added to the card front along the edge of the altered DSP.  The canopy was die cut from another pattern of this DSP and added to the tree top using dimensionals. Two birds die cut from some Basic White which had some Pacific Point and Cajun Craze added were added to the tree top. 

The second card depicts more of a fall scene:


The only difference between the two cards is the colour of the canopy and the colour of the birds.  I also changed the sentiment.

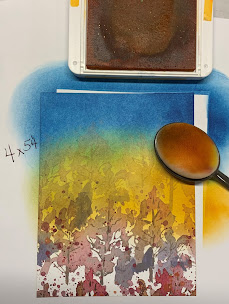
Below is a pictoral tutorial showing the process of colouring the DSP:

Supplies Needed:  
  • Pacific Point, Mango Melody, Cajun Craze inks
  • 3 blender brushes
  • Piece of DSP 4 by 5 1/4"


Start by adding Pacific Point ink to the top of the DSP.  Add darker at top edges and lighter towards center of DSP

Add Mando Melody ink below the Pacific Point colour, blending with Pacific Point ink above it.
Finally, add Cajun Craze ink at the bottom 1/3.
Cut the 4 by 5 1/4" into two equal pieces and make into cards.


Link to Tina's video https://youtu.be/EEqndfJ4wzw

Supplies Used:

Stamp:  Beauty of Friendship

Inks:  Pacific Point, Mango Melody, Cajun Craze, Early Espresso, Crumb Cake

Papers:  Thick Basic White, Beauty of the Earth DSP, Basic White, Early Espresso

Accessories:  Beautiful Tree dies, Dimensionals, Blender Brushes

Saturday, February 15, 2020

Timeless Tropical Tutorial

With minus 26 degrees Celsius outside, my thoughts wander to warmer climes.  Wouldn't it be nice to go to the tropics? Feel the sun on your face, the sand between your toes!!

My imagination would have to suffice. So I pulled out the Timeless Tropics bundle and made some this card which includes a tutorial.


This Z-fold card has a Terracotta Tile base layered with Very Vanilla card stock.  All the images are stamped and then embossed with clear embossing powder.

Stamp:  Timeless Tropical
Inks:  Terracotta Tile, Soft Suede, Stampin' Blends Light & dark Cajun Craze, So Saffron, Soft Suede, Old Olive blend
Papers:

  • Terracotta Tile 5 1/2 by 11 scored at 2 1/8 and 5 1/2".  Fold back on 2 1/8" score line to form a Z fold card
  • Terracotta Tile 3 1/2 by 3 1/2" - mat for art piece
  • Terracotta Tile - scrap to mat sentiment piece
  • Very Vanilla 4 by 5 1/4" - for inside - embossed with Coastal Weave Embossing Folder
  • Very Vanilla 3 1/4 by 3 1/4" - art piece - embossed with Coastal Weave Embossing Folder
  • Very Vanilla 2 by 5 1/4" - for card front
  • Very Vanilla 3 1/2 by 3 1/2" - for sentiment inside card
  • Soft Suede 3 5/8 by 3 5/8" - mat for inside sentiment piece
  • Tropical Oasis DSP 1 5/8 by 4 7/8" - for card front
  • Very Vanilla 4 by 4 - to stamp and colour 1 large, 2 medium flowers, and 3 leaves
  • Very Vanilla - scrap for sentiment
  • Gold foil - to die cut "aloha"
Accessories:  
  • Coastal Weave embossing folder
  • In the Tropics dies
  • 5/16" Braided Burlap trim
  • Champagne rhinestones (2)
  • Dazzling Diamonds
Putting Card Together:
  1. Form Z fold card base by folding back at 2 1/8" score line.  Burnish all folds
  2. Emboss both pieces of Very Vanilla - 3 1/4 by 3 1/4" art piece and 4 by 5 1/4" inside piece with the Coastal Weave embossing folder.
  3. Mat art piece with 3 1/2 by 3 1/2"  Terracotta tile and set aside
  4. Adhere embossed piece to inside of card.
  5. Adhere 3 1/2 by 3 1/2" piece of Very Vanilla to Soft Suede mat and add to inside layer
  6. Add Very Vanilla and DSP to card front
  7. Stamp and colour images on 4 by 4" piece of Very Vanilla.  Stamp flowers with Terra Cotta tile ink and embossing with clear embossing powder.  Stamp leaves with Soft Suede ink and emboss with clear embossing powder.
  8. Colour flowers with So Saffron Stampin' Blend.  Use Terracotta ink and the blender pen to darken the flower centers.


9.  Colour leaves with Old Olive Stampin blends. 
10. Die cut all images with In the Tropics dies and add to art piece as indicated in picture.


11.  Fold ribbon in half at an angle and insert under outside of large flower adhering with some tombo glue.
12.  Add rhinestones to flower centers and some Dazzling diamonds to the end of the stamen of the large flower.
13.  Adhere only left half of  finished art piece to card front making sure it completing covers the inside sentiment piece.
14.  Die cut "aloha" in gold foil and adhere to scrap of Very Vanilla.  Mat with Terra Cotta tile scrap and adhere left half to card front under the art piece.

Tuesday, February 4, 2020

Ladybug stamp floral Thank You - Tutorial

This thank you card was made using the  Little Ladybug stamp set, without the Ladybugs!  I used just the flowers which I coloured with Stampin Blends and die cut with the new Ladybug dies.


A Tutorial in PDF format can be downloaded using this link

Sunday, November 10, 2019

Winds of Change - a Free Tutorial

My birthplace is in the Netherlands, a land well known for its windmills.  I

 was a young girl of 6 when I came to Canada with my parents and 2 siblings, and have only been back to the country of my birth once. But I remember the windmills.

The stamp set "Winds of Change" in the annual catalogue, immediately caught my attention, but I waited until after my craft show before getting it. Here's the  first card I made.

The tutorial is free.


Stamp:  Winds of Change, Sailing Home
Inks:  Black Memento
          Sky:  Seabreeze Spray, Balmy Blue, Blueberry Bushel - apply with Brayer
          Windmill:  Crushed Curry, Soft Suede and Early Espresso watercolour pencils, blended with a             blender pen
          Tulips:  Lovely Lipstick watercolour pencil and Stampin' Blend, Old Olive, and Garden Green
Papers:

  • Lovely Lipstick 4 1/4 by 5 1/2" scored at 4 1/4" to make an A2 top folding card base
  • Lovely Lipstick 3 1/2 by 5" - mat for focal image
  • Whisper White 4 by 5 1/4" (2 Pieces) - one to layer on front card base  and other  inside
  • Whisper White 3 1/4 by 4 5/8"  - mat for focal image
  • Whisper White 3 by 4 3/8"  - focal image
  • Lovely Lipstick DSP 1 1/4 by 5 1/4" - to adhere across 4 by 5 1/4" Whisper White
  • Lovely Lipstick DSP 1/4 by 4" to adhere to inside piece of Whisper White
  • Lovely Lipstick card stock 1/8" by 4" to adhere next to DSP on inside Whisper White
Accessories:
  • Brayer
  • Blender Pen
  • Glitter Crystal Effects
  • Dimensionals
  • Post it note for masking
Putting the Card Together:
  1. Fold Lovely Lipstick card base and burnish fold with a bone folder.
  2. Mat with 4 by 5 1/4" piece of Whisper White which has 1 1/4 by 5" piece of Lovely lipstick DSP adhered horizontally across the middle.  Set aside this completed card front.
  3. Stamp image  using Black Memento onto 3 by 4 5/8" piece of Whisper White card stock. Stamp image  onto a post it note and  cut out  outline of windmill and silhouette of tulip tops. Adhere it to the stamped image on the Whisper White piece.
  4. With a brayer, apply these colours, Seabreeze spray, Balmy Blue, and Blueberry Bushel starting with the lightest colours near the horizon.
  5. Colour windmill and tulips
  6. Stamp birds from "Sailing Home" stamp set, and sentiment with Black memento ink - in the sky.
  7. Sponge edges of focal image with Blueberry Bushel ink
  8. Mat image piece with 3 1/4 by 4 5/8" of Whisper White
  9. Mat this with 3 1/2" by 5" piece of Lovely lipstick.
  10. Add this to the card front using dimensionals.
  11. Inside:  Adhere strips of DSP and DSP to one  end  of the 4 by 5 1/4" of Whisper White inside piece and adhere to the inside of the card.  Stamp sentiment of choice.
  12. Add Crystal Effects to tulip flowers only.


Thursday, July 11, 2019

An A2 Box Card featuring Sailing Home - a card plus a tutorial - Paper Craft Crew Challenges #343

I have made box cards many times before, but they have always been on the large size requiring a hand made envelope to be made.

Today I spent some time figuring how to make the box card fit into an A2 envelope. I did consult a few tutorials, but not any one of them addressed my particular desire.

I am submitting this project to the Designer's Choice Challenge at Paper Craft Crew #343 For this challenge  to make a project of my choice .


 Paper Craft Crew Designer's Choice Challenge PCC343

Here's how I made the box card:

1. Start with a 7 1/2 by 9" piece of Smoky Slate card stock


2. On the 9" side score at 2 1/8, 4 1/4, 6 3/8, and 8 1/2"


3.  Turn - cut 2" off the 7 1/2" side.  Your card stock is now 5 1/2 by 9"


4.  Score on the 5 1/2" side at 3".  Burnish all folds.


5.  Cut on each of the score lines of the bottom (the larger of the panels) - the 2 1/8, 4 1/4, and 6 3/8" - up to the 3" mark


6.  Cut off the top portion of the 1" tab at an angle.


7.  Adhere DSP to the top panels .  You will need 4 pieces which are 1 7/8 by 2 1/4" each.

8.  Turn over and adhere a second pattern of DSP on the bottom panels.  You will need  4 pieces of 
     1 7/8 by 2 3/4" each

9.  Apply tear and tape adhesive to remaining 1" tab and form a box.


10.  Score 1/2" at each end of two pieces of 1 by 3" card stock.  Burnish folds, apply tear and  stick tape to these folds, and adhere each to the inside of the card.


Decorate card as desired.  I used the Sailing Home stamp set with the coordinating Smooth Sailing Dies to decorate the upper panels.


The box folds up as shown above and fits into a regular A2 envelope.


Supplies Used:
Stamp:  Sailing Home
Inks:  Night of Navy, Granite Gray, Stampin' Blends (Lipstick Red, Night of Navy)
Papers:  Smoky Slate, Come Sail Away DSP, Whisper White, Silver Foil, Mossy Meadow
Accessories:  Sahara Sand/Night of Navy Baker's Twine, Sail Away trinkets,

Sunday, December 30, 2018

Double Pocket Card - a Tutorial

This is the card I promised you in my last post - a card using the squirrel from the Peaceful Place stamp set on.  My plan originally was to make a tag card, but along the way my card morphed into something totally different.

Instead of a tag card I made a double pocket card, a pocket for each of 2 tags .  I blame a conversation I had with my friend for this transformation.

 A tutorial to make  a double pocket card, is included in this post.

Below is the final card:

Note:
  • Start with an 8 1/2 by 11" piece of double sided DSP.  Place the side you want to be on the front of the card facing up.
  • Score each fold as you make it.

Here's how to make the double pocket card:

1,  Fold an 8 1/2 by 11 piece of double sided DSP (in this case "Share What You Love") in half vertically and open.  Then fold it horizontally and open.

2.  With scissors, cut on the left horizontal line to the center fold line.  I inserted the bone folder in the cut to visualize it better.


3.  Fold right bottom corner to the center.


4. Fold top left corner down approximately 2 3/4"


5. Fold top left quarter on the top of the top right quarter.


6.  Fold left bottom quarter underneath the bottom of the bottom right quarter.


7.  Fold bottom right corner up to meet middle horizontal fold.


8.  Fold bottom quarter onto the top quarter to finish the card.


Close all loose edges with tombo glue or double sided tape.

I punched three holes in the left upper side with the crop-o-dile, inserted a 1/4" Rich Razzelberry velvet ribbon through them and tied them in a knot.  Conversely eyelets or brads can be inserted through these holes.

Two tags were made to inset into the pockets and an embellishment was made for the front.


Embellishment:

The squirrel was stamped with Black Memento ink on Whisper White card stock and coloured with Watercolor pencils and a blender pen. I used Stampin Blends to touch up the colours.  The image was die cut with the layering circle framelits, adhering the image circle to the slightly larger Mossy Meadow scallop circle with dimensionals.  This in turn was adhered to the larger Berry Burst scallop circle and the unit was adhered to the card front.  Two leaves were punched with Berry Burst card stock and added above and below the image piece.

Tags:

Both tags start with 2 by 4" Whisper White card stock and the top punched with the scallop topper tag punch.  Chevron Old Olive ribbon is inserted through the tag aperture and tied with Old Olive linen thread (new in Occasions catalogue)

On the bottom I added a 2 by 1" piece of matching DSP with a 1/8" strip of Berry Burst card stock n the top edge.

Tag 1:


The entire front of the tag is stamped randomly with the Leaf stamp using Mossy Meadow ink.
On a separate piece of Whisper White card stock, using a Berry Burst marker,  I highlighted the sentiment "Thinking of You" from the larger sentiment. After trimming it so it would fit on the tag, I matted it the Berry Burst card stock and adhered it to the tag.

Tag 2:

This time I used a Mossy Meadow marker to highlight the images of the trees from the larger stamp  and stamping it onto the tag.  


I adhered a Mossy Meadow sprig punched with the Sprig Punch on the tag top.

Insert each tag into a pocket of the card.


Thursday, April 13, 2017

Wobble card & how to make your own wobbles

I have put together a tutorial on how to use wobbles on cards, and also how to make your own.

Check out the tutorial on my tutorial blog: here

Saturday, August 2, 2014

Card Using Napkin Technique with tutorial

I haven't used this technique in a long, long time, but I'm participating in another swap that requires us to adhere a dinner napking to a piece of cardstock and use this as a background for a card. There are some very interesting dinner napkins out there. I was very lucky to have this napkin as it was the last one I had that had a design on it.
I'll show you my card and then explain the technique.

Stamp: Word Play
Ink: Basic black, Bravo Burgundy
Papers: Bravo Burgundy (retired), Whisper white, Napkin adhered to Whisper White cardstock
Accessories: 5/8" Organza ribbon coloured with a Bravo Burgundy marker, dimensionals


Napkin Technique 

Supplies:
. Dinner napkin
.  White cardstock
.  Parchment paper
. Cling wrap (saran, etc)
. Iron 
. Waxed paper
. Scissors

A firm surface to work on.  I used my ironing board.

1.  Decide on the napkin you're going to use.
2.  Separate the top layer from the rest.  Be sure that you have only the top layer.
3.  You can cut out the area you wish to use, but make it a bit larger so that you can trim the edges evenly later.  Use scissors to do this as it's fragile and may rip if you use a paper trimmer.
4.  Cut a piece of white cardstock just a little larger than the napkin piece you're going to use.
5.  Place a piece of parchment paper on a firm surface.
6.  Place your cardstock on the parchment paper.
7.  Place a piece of shrink wrap (Saran, etc.) over the cardstock. (I've found that the cheaper the wrap the better it seems to work with this technique.
8.  Place your napkin piece on top of this.
9.  Place a piece of waxed paper over top of all these layers, and press the entire pile with an iron on medium heat.  Check every so often to make sure the edges of the carstock and napkin are sticking together.  If not, turn up the heat on the iron and carry on.
10.  Once finished, cut your piece to size and adhere to your card and add any embellishments you wish.

Wednesday, January 30, 2013

Square Scallop Treat Holder with a free tutorial - Hand Stamped Sentiments 152

What a day weather wise!  Yesterday we had snow which turned to freezing rain, and then rain.  Today the temperature is plus 8 degrees Celsius - tomorrow the temperature is expected to drop to minus 8 degrees.  It's no wonder people are getting sick.  I don't know what it's like where you are, but the flu season has seen the most cases, and severe cases, for a long time.  Many people did not get their flu shot (even though in Ontario the flu shot is free) because last winter saw almost no flu.  How complacent we get.  I got the flu shot and I'm thankful I did.  Over the Christmas holidays I experienced a very mild case of the flu over a period of 2 days.  Enough about flu ---and onto the challenge with Hand Stamped Sentiments which is "Love is in the Air" - an inspirational one here

Rather than made another Valentine card, I thought I would make a Valentine treat box


This treat box was inspired by Brandy on Pinterest.
 
Supplies:
  • Real Red Cardstock
  • Whisper White cardstock
  • Red Glimmer paper
  • Scallop square die
  • Small heart punch
  • 1" circle die
  • large silver soda pop top
  • Blossom builder punch
  • Hand held punch
  • Rhinestone
  • Small cello bag
  • White Baker's twine
  • Treats
Method: 
Box
  1. Using the Scallop square die, die cut 1 scallop square
  2. With the Simply Scored tool, score the scallop at 1 1/2 and 2 3/4".  Turn 90 degrees and score again at 1 and 3 1/4"
  3. Form a tab by cutting up 2 of the score lines on either side - up to the horizontal score line
  4. Using a bone folder, fold along all the score lines.
  5. Apply sticky strip or tombo glue to the tabs and attach them to one side to form the front half the box
  6. Apply sticky strip or tombo glue to the longer tabs of the remaining half and attach to the other half to form the sides and the back of the box
  7. With a hand held punch, punch a hole in the completed box on both of the ends.
  8. Punch holes also in the 8 by 1/2" Whisper White handle at each end
  9. Insert each end on the inside of the box, matching holes, and insert a red glimmer brad
Flower
  1. With the blossom petal punch, punch 3 flowers in Whisper White
  2. Using paper snips, cut each of the flower petals at the scallops and between the petals, but not all the way to the center
  3. Adhere the flowers together using tombo glue, alternating petals
  4. Attach a large silver soda pop top to the center of the flower with glue dots
  5. Punch a 1" circle of red glimmer paper and attach to center of pop top with a glue dot
  6. Punch a whisper white heart using the small heart punch
  7. Attach to the red glimmer paper with a bit of dimensional. Accent it with a rhinestone.
  8. Attach the flower to the box with tombo or glue dots.  Make sure the flower is attached high enough to allow the box to sit flat. 
Insert treats inside the box in a small cello bag and tie with white Baker's twine.

Monday, January 14, 2013

Creped Filter Flower - Tutorial

One of the new products in the spring catalogue is White Creped Filter Paper.  Today I decided to play with it and see if I could make a flower.
But first I wanted to color the paper, deciding to use reinkers in spritzers. To do this, add about 5 to 7 drops of reinker into a mini spritzer filled with tap water.
Here's the flower:

Coloring the Crepe Filter Paper:
Supplies: 
  • circle crepe paper
  • 2 spritzers each with a different color of reinker (Calypso Coral & Pretty in Pink)
  • 1 1/4" scallop circle punch
  • neutral brad
  • mat pack & paper piercer
 Make sure your table and clothes are protected.

Method: 
  1. Spritz the dry white crepe circle with the 2 colors completely covering the surface
     2.  Dry with an embossing tool.  Below you see it dried.


       3.  Fold circle in half, then in half again twice more until it looks like the filter below.

   Forming the Flower:

4.  Insert the folded colored filter into the 1 3/4" scallop circle punch

     5.  Punch, and then separate the layers.  There should be eight flowers. Notice the different shades of colors of each of the flower petals.


     6.  Stack the flowers putting the darkest colored flower on the top.  Pierce a hole in the middle with a paper piercer on  a mat pack and insert a brad. Then start forming the flower by bringing each layer up over the central brad.

     7.  Spritz formed flower with Vanilla smooch.  You're done.
You can try this with different colors of reinkers and different punches and dies.
Here's one I did using the Blossom Petals punch using Island Indigo and Daffodil Delight: