Showing posts with label Sailing Home. Show all posts

Monday, November 11, 2019

Snow Front - Hand Stamped Sentiment #327 - a tutorial

I don't usually take part in Colour Challenges, but when I saw the colour combinations of the challenge at Hand Stamped Sentiments I knew immediately how I could combine them to make a card. 

The colours in the challenge:  Coastal Cabana, Shaded Spruce, and Real Red.  I used the stamp set Snow Front and include a free tutorial


Stamps:  Snow Front, Sailing Home
Inks:  Coastal Cabana, Real Red, Shaded Spruce, Black Memento
Papers:
  • Thick Whisper White 4 1/4 by 11, scored at 5 1/2 to make a top fold card base
  • Real Red 4 by 5 1/4" - mat for card front
  • Whisper White 3 3/4 by 5 - image piece
  • Coastal Cabana 4 by 5 1/4" for inside
  • Whisper White 3 3/4 by 5" for inside - adhere on top of Coastal Cabana for message.
Accessories:
  • Brayer
  • Puff Paint
  • Stampin' Up Glitter
  • Shimmer Crystal Effects
Putting the Card together:
  1. Fold Thick Whisper White card base at score line and burnish with bone folder to form a top fold card.
  2. Add 4 by 5 1/4" Real Red card stock.
  3. Build scene on 3 3/4 by 5" piece of Whisper White.  First, brayer the sky with Coastal Cabana.  Tear a piece of copy paper to protect the lower part of the card while the sky is being brayered.  Apply a light coat of Coastal Cabana on the horizon, applying a darker layer towards the top.  At the very top, add a bit to Shaded Spruce to the Coastal Cabana for the darkest part of the sky. Stamp birds in the sky with Black Memento ink (Sailing Home stamp set)
  4. Stamp the mountain using Coastal Cabana ink
  5. Stamp cabin in Real Red and snowman in Coastal Cabana below cabin.
  6. Stamp numerous trees along mountain base, some in second and third generation stamping and at various levels using Shaded Spruce
  7. Stamp larger trees near bottom and near cabin.

       8.Add red cardinals on top of two trees and around snowman.
      9.Add puff paint and Stampin' Up glitter, and shimmer crystal effects on sheet of ice.
     10.Complete inside.


Friday, September 27, 2019

Calendar Easel card with single drawer

I spent the day working on  a 3D project for a Craft Show the end of next month. It took me all day to make one Calendar/Easel card on a single drawer for post it note and a pen (there has to be a better way to say this).

This 3D project is a masculine one and it features the Sailing Home bundle.  Once finished I designed a box for it. Hopefully this will make a wonderful gift at Christmas for some lucky gentleman.     

Using a combination of  Night of Navy, Crumb
cake card stock and Sailing Home DSP as well as the Sailing Home Stamp set and coordination dies helped to make this idea into a reality.

I started by making the drawer first, followed by a case-like structure which provides extra support for the drawer.

I will put dimensions and scoring information at the end of the post.

A strip of DSP was adhered to the front of the drawer - a large brad temporarily inserted through the middle.

The brad used for this handle is the retired circle one.  It is not inserted all the way through making it a better handle.


 To cover up the brad appendages, a strip of card stock was then adhered to the inside of that drawer edge.
After lining the bottom of the drawer, with some DSP,  I turned my attention to what I call the encasement. This is what holds the drawer. This  7 7/8 by 8 1/8" piece of Night of Navy card stock is scored at 1 and 6 3/4" on the 8 1/8" side then turned and scored at 3 1/2 and 4 5/8".  All the scored lines are burnished, the tabs cut and an open ended box is formed. The drawer is inserted in this.

In the drawer I place a decorated post it note and a pen.


A 6 by 4" piece of Night of Navy card stock is adhered to the top and bottom of the drawer unit.  On the top is added  a calendar Easel card.

The Easel card is made using an 8 by 6" of Crumb Cake card stock which is scored at 2 and 4".

Monday, August 12, 2019

Sailing Home Birthday on Watercolour background

A couple of weeks ago I taught a class on background techniques so I had a number of samples of various background techniques that I had stored in a box.  Tonight, when looking for something else, I came across the samples and decided to make them into cards.

The card below has a background made with watercolour and plastic wrap- using the following colours:  Rich Razzelberry, Daffodil Delight and Pear Pizzazz.


After trimming the watercolour background, the images from "Sailing Home" were embossed with black embossing powder as shown above.  The back ground was then matted with Basic Black card stock and some Baker's twine (Night of Navy/Sahara Sand)  wrapped 3 times around the bottom. Before tying it into a bow, a metal embellishment was added.  The whole unit was then added to a Vellum layer using dimensionals. This was added to a Basic Black card stock base.

Supplies Used:
Stamps:  Sailing Home, Itty Bitty Birthdays
Inks:  Versa Mark
Papers:

  • Watercolour backound 3 1/2 by 4
  • Basic Black mat 3 3/4 by 4 14
  • Vellum 4 by 5 1/4
  • Basic Black base 4 1/4 by 5 1/2
Accessories:  Black embossing powder, Baker's twine, Sailing home metal embellishment, dimensionals

Sunday, July 28, 2019

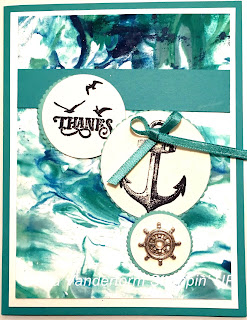
Shaving Cream Nautical Theme card - Try Stampin on Tuesday #418

The sketch challenge at Try Stampin' on Tuesday  #418 has a nautical theme, so I did something different. I made a background e that looks like waves on the ocean, using the shaving cream technique.


Shaving Cream Background:
1.  Put shaving cream (unscented) on a paper plate
2.  Add reinkers - Night of Navy, Balmy Blue, Pool Party, Bermuda Bay)
3.  Using a coffee stick stir all the colours together just enough to mix them
4.  Place card stock on top of this mixture.
5.  Scrape of  excess shaving cream and let card stock dry.
6.  Repeat


The shaving cream background was added to a piece of Whisper White, which was added to a Bermuda Bay card base.

Three different size circles were die cut using Shimmer White card stock, and layered with slightly larger scallop Bermuda Bay circles. Each circle had a different image stamped on it with Night of Navy ink.- all from "Sailing Home"
Large circle:  The anchor with a Bermuda Bay ribbon attached to the top
Medium circle: The sentiment "Thanks"  and birds over head
Small circle:  A Sailing Home steering wheel trinket.


The circles were adhered to the card front differently than in the sketch. A 1/2" strip of Bermuda Bay car stock was adhered to the upper background piece before the circles were added.

Supplies Used:
Stamp:  Sailing Home
Inks: Night of Navy, (Bermuda Bay, Coastal Cabana, Pool Party, Balmy Blue re inkers)
Papers:  Shimmer Whisper White, Bermuda Bay
Accessories:  Shaving Cream, Layering Circle dies, Sailing Home trinket, 1/8" Bermuda Bay ribbon


Saturday, July 20, 2019

Sailing Home Fun Fold card - Pop Up Panel Fold -a Case

I cased this card from Maria Taylor, who also provided a PDF with measurements and instructions here.  This is not a fold I have seen before and Maria indicated that she did not know the name of the fold. 

Because it reminds me of a type of window called a "pop out window" I'm going to call this fold the Pop Out Panel Fold.


22820 Canyon Way Colfax 95713 - Placer Living

Pop out window - a special architectural feature


The pop out consists of a Seaside Spray piece of card stock 5 3/4 by 8 1/4" scored at 1/2 and 3 1/2" at both ends.  Night of Navy panels were added between the score lines.and in the narrow center piece some Come Sail Away DSP was added.  On both side panels was added some Seaside Spray card stock embossed with the High Seas 3D embossing folder. Birds were stamped with Night of Navy ink and embellishments stamped, die cut and added.

Each embellishment was made using 4 die cuts - one stamped image was adhered to 3 unstamped die cuts

The one inch scored strip was adhered to the same size of Seaside Spray card stock - the other 1" was left unattached.

The inside of the card was a 5 1/4 by 71/4"piece of Seaside Spray card stock which was stamped with the compass image on each of the corners, adhered to a larger Night of Navy piece and then added to the Seaside Spray card stock base.

When the pop up panel was open, it is kept open by a  stop".  This stop was made by die cutting 2 pieces of Stitched Nested Label dies of different sizes. The smaller of the two, die cut in Seaside Spray, was adhered to the larger Night of Navy one and then adhered to the inside of the card using dimensionals.  The scored 1" strip slips under this stop to keep the pop up open.


The image of the anchor was stamped in the center of the Seaside Spray stitched label die, and an embellishment consisting of the stamped image and 3 unstamped die cuts was adhered over it at an angle.  Some Sahara Sand/ Night of Navy Baker's Twine was added  to the top of the anchor.


Supplies Used:
Stamp:  Sailing Home
Inks:  Night of Navy
Papers:  Seaside Spray, Night of Navy, Whisper White, Come Sail Away DSP
Accessories:  Stitched Nested Label Dies, High Seas 3D Embossing Folder, Smooth Sailing Dies, Dimensionals


Thursday, July 11, 2019

An A2 Box Card featuring Sailing Home - a card plus a tutorial - Paper Craft Crew Challenges #343

I have made box cards many times before, but they have always been on the large size requiring a hand made envelope to be made.

Today I spent some time figuring how to make the box card fit into an A2 envelope. I did consult a few tutorials, but not any one of them addressed my particular desire.

I am submitting this project to the Designer's Choice Challenge at Paper Craft Crew #343 For this challenge  to make a project of my choice .


 Paper Craft Crew Designer's Choice Challenge PCC343

Here's how I made the box card:

1. Start with a 7 1/2 by 9" piece of Smoky Slate card stock


2. On the 9" side score at 2 1/8, 4 1/4, 6 3/8, and 8 1/2"


3.  Turn - cut 2" off the 7 1/2" side.  Your card stock is now 5 1/2 by 9"


4.  Score on the 5 1/2" side at 3".  Burnish all folds.


5.  Cut on each of the score lines of the bottom (the larger of the panels) - the 2 1/8, 4 1/4, and 6 3/8" - up to the 3" mark


6.  Cut off the top portion of the 1" tab at an angle.


7.  Adhere DSP to the top panels .  You will need 4 pieces which are 1 7/8 by 2 1/4" each.

8.  Turn over and adhere a second pattern of DSP on the bottom panels.  You will need  4 pieces of 
     1 7/8 by 2 3/4" each

9.  Apply tear and tape adhesive to remaining 1" tab and form a box.


10.  Score 1/2" at each end of two pieces of 1 by 3" card stock.  Burnish folds, apply tear and  stick tape to these folds, and adhere each to the inside of the card.


Decorate card as desired.  I used the Sailing Home stamp set with the coordinating Smooth Sailing Dies to decorate the upper panels.


The box folds up as shown above and fits into a regular A2 envelope.


Supplies Used:
Stamp:  Sailing Home
Inks:  Night of Navy, Granite Gray, Stampin' Blends (Lipstick Red, Night of Navy)
Papers:  Smoky Slate, Come Sail Away DSP, Whisper White, Silver Foil, Mossy Meadow
Accessories:  Sahara Sand/Night of Navy Baker's Twine, Sail Away trinkets,

Friday, July 5, 2019

Smooth Sailing Thanks - Fab Friday #167

Today was a good day to stay indoors and craft.  With the temperatures hovering around 40 degrees C. it was too hot to be outdoors.  Because stepping outside felt like stepping into a blast furnace, I decided to stay indoors and 'play' with some of the new catalogue products.

One of the cards I made was for the sketch challenge at Fab Friday


The Night of Navy card stock base was layered with Smooth Sailing DSP  upon which the art piece was layered.

The Whisper White art piece was embossed with the High Seas 3D Embossing Folder, and lightly sponged to bring out the pattern. The birds were stamped in the upper right side.


On a separate piece of Whisper White, the image of the lighthouse, & both sail boats were stamped in Night of Navy ink and die cut.  The anchor was stamped in Granite Gray and also die cut. Night of Navy card stock was used to die cut the wheel.  All these elements were arranged together on the Whisper White art piece as shown in the picture below. Some Night of Navy/Sahara Sand Baker's twine was made into a bow and added to the top of the anchor.  The sentiment was stamped in Granite Gray, die cut and added to the bottom of the art piece.


On the left edge is placed a rope die cut in Granite Gray card stock 

This art piece is matted with a piece of Night of Navy card stock the right edge of which has has been die cut with a scallop die from the Budding Blooms dies.

The completed art piece is added to the card front using dimensionals.

The inside was finished as above.

Supplies Used:
Stamp:  Sailing Home
Inks:  Night of Navy, Granite Gray
Papers:  Night of Navy, Whisper White,  Come Sail Away  DSP
Accessories:  Smooth Sailing Dies, Budding Blooms dies, Sailing Away Trinket, Night of Navy/Sahara Sand Baker's twine, High Seas 3D Embossing Folder, Dimensionals.

Monday, July 1, 2019

Relaxing at the Beach - Try Stampin' on Tuesay #414


The hot lazy days of summer are finally here!  The Spring was rainy and cool, great for the garden, but not so great for enjoying the outdoors.  Hot, humid weather is forecast, but hopefully not as hot as what Europe is experiencing.  However, hot enough to enjoy the beach.

That's exactly what the gentleman in the card I designed for the challenge with Try Stampin' on Tuesday #414 (theme summer fun) is doing - relaxing at the beach.


.

The card base is Coastal Cabana card stock, layered with a piece of Whisper White card stock embossed with the Subtle Texture embossing folder inked with Coastal Cabana ink.  I love the tone on tone effect.


On this layer are added two different panels of DSP matted with Gray Granite card stock. One strip (the smaller) is from Follow Your Art DSP, and the larger one with the Sea Gulls from Bird Ballad DSP.  I sponged the edges of both DSP panels with Gray Granite ink to blend the two different designs for the purposes of this card.

The gentleman relaxing on a chair on the beach is from "A Good Man".  The ocean behind him is stamped using a Waterfront stamp ; the sky washed with a watercolor pencil and an aqua painter, and the beach sand created using glimmer embossing paste coloured with Sahara Sand reinker. 
I stamped some birds in the sky from "Sailing Home". 
Because the sentiment was too long for the art piece, I using a Basic Black marker to high light the words so that the sentiment could fit on the art piece. Dimensionals are used to add the sentiment to the art piece.

This art piece is added to the card front with dimensionals.


To finish the card, a bow made using the braided Sahara Sand trim is added to the bottom of the smaller DSP panel.

Supplies Used:
Stamps:  A Good Man,ncils, Free as a Bird, Waterfront, Sailing Home
Inks:  Coastal Cabana, Black Memento, Sahara Sand reinker, watercolor pencAils, Gray Granite
Papers:  Coastal Cabana, Whisper White, Gray Granite, Bird Ballad DSP, Follow Your Art DSP.
Accessories:  Subtle Texture 3D Embossing folder, 1/16 Sahara Sand braided twine, Dimensionals, Shimmer Embossing paste, Aqua painter


Friday, June 7, 2019

Sailing Home Double Corner Pop Up Card - SUO Challenges #224

Father's Day is coming up soon, but if you're anything like me, you don't have a father anymore.  That doesn't mean that I don't miss him.  I miss him terribly, especially when I work in the garden because I learned all my gardening skills from him.

Before we emigrated to Canada from Holland, my Dad was a fisherman in the North Sea, so the Sailing Home stamp set gives me 'warm fuzzies". 

This week the challenge with SUO Challenges #224 is "Masculine" so I will be submitting this fun fold card to this challenge.


This double corner pop up card features the Sailing Home stamp set with its coordinating dies and DSP.  For links to tutorials visit yesterday's blog post here

I kept the card monochromatic using Night of Navy, Balmy Blue,Very Vanilla and Sahara Sand.  Everything was stamped using Night of Navy ink.

In the center is a small easel upon which an arrangement of sea faring images from the stamp set is adhered.  The easel is made by die cutting a folded piece of cardstock using the stitched circles dies, moving the die so that a small part of the die edge is placed over the fold line.  This created 2 circles joined at the center.  One half of the circle is folded in half to form the easel.  Another circle of the same size is die cut and the images are adhered to this.  The bottom half of this circle is adhered to the bottom half of the folded easel.  The close up is below.


Sailing Home DSP cut into a triangle and matted with Balmy Blue are adhered to both outer corners. A stamped sentiment was placed on the right corner; a compass (with movable hands) on the left. The compass was punched with the 1 3/8" circle punch.

The inner corners were left uncovered, so images of the bird and the small sailboat were stamped on them.


The lower square upon which the Pop Up Easel was adhered, also had Balmy Blue card stock and DSP adhered to it as well as Whisper White.  Since there was little room to write a greeting on this piece, the square underneath was matted with Balmy Blue and Whisper White.


Because the closed card is an odd size (4 1/8 by 4 1/8") an envelope was made using the now retired envelope punch board using retired  Sahara Sand DSP .  The envelope I made is visible to the left of the card.

Supplies Used:
Stamp:  Sailing Home, Black Memento
Inks:  Night of Navy
Papers:  Heavy Very Vanilla card stock, Whisper White, Night of Navy, Balmy Blue, Sahara Sand, Come Sail Away DSP
Accessories:  Smooth Sailing DSP,  Sailing Home trinkets, Very Vanilla/Night of Navy Baker's twine, Dimensionals,Small black brad, Stitched Circle Dies, 1 3/8" circle punch.

Monday, May 27, 2019

Sailing Home - sneak peak

Today I 'played' with the new Sailing Home bundle, and this has become another one of my favourites.  This set makes wonderful masculine cards, graduation cards, thank you, sympathy, etc,

Measurements:
  • Balmy Blue 4 1/4 by 5 1/2" - card base
  • Whisper White 4 by 5 1/4" - first layer on card base
  • Sail Away DSP (Night of Navy with compasses)  3 3/4 by 5"
  • Whisper White 3 1/4 by 4 1/4" - art piece
  • Balmy Blue 3 1/2 by 4 1/2" - mat for art piece
  • Balmy Blue 2 by 2 1/2" for sentiment
  • Scrap of Soft Suede for the ship's wheel
The two ships were stamped using Night of Navy ink, and die cut using the Smooth Sailing Dies. After stamping the sea birds in the sky, the ship on the right was adhered to the art piece closer to the top; the second ship was adhered lower and to the left using dimensionals.

After sponging the edges of the art piece with Night of Navy ink, it was matted with Balmy Blue card stock.  Before adhering it to the card front with dimensionals, some Night of  Navy/Very Vanilla thick Baker's Twine was wrapped around the base twice.

The sentiment was stamped in Night of Navy on Balmy Blue card stock, die cut, and added to the card  front using dimensionals.  A Sail Away Trinket (anchor) was added to the die cut sentiment.  Behind the sentiment, a  Soft Suede Ship's wheel was added.

Supplies Used:
Stamp:  Sailing Home
Ink:  Night of Navy
Paper:  Balmy Blue, Whisper White, Soft Suede, Sail Away DSP
Accessories:  Smooth Sailing Dies, Dimensionals, Night of Navy/Very Vanilla thick Baker's Twine, Sail Away trinkets

Wednesday, April 24, 2019

My True North - SUO Challenge #221 ( A new catalogue sneak peek)

As I mentioned earlier, I was fortunate enough to be able to attend On Stage in Vancouver British Columbia.  One of the perks of attending On Stage is pre ordering products from the new Annual catalogue.
My pre-ordered products arrived yesterday (accompanied with a great deal of excitement and the strong and irrational impulse to play with all the products at once!  I understand from a friend's Facebook post that the dust from the craft room/supplies is the culprit responsible for my irrational actions!)  As the dust settled, so did my irrational impulses, which were replaced with a more level headed determination to use at lease one of the new catalogue items for the challenge with the SUO challenge.

I chose the "Sailing Home" stamp set mainly because of the sentiment, which is very Canadian, but also because the sailing boats worked well with the sketch challenge.


The sailboats were stamped with Night of Navy ink on Whisper White and die cut with the "Smooth Sailing Dies".  They were adhered to  a watercolor wash background  that had some  birds stamped on it.  The background was created by adding some Balmy Blue ink to watercolor paper using an aqua painter.

The watercolor panel was matted with Night of Navy card stock and then added to the card front.


The card base is Night of Navy card stock, layered with Come Sail Away DSP. The vertical stripes in Night of Night of Navy and Balmy Blue tie the various elements of the card together.

The sentiment, stamped in Night of Navy (such a Canadian sentiment) on Whisper White, is matted with Night of Navy and adhered to the card front below the art piece.  A bow tied with Night of Navy/Sahara Sand Baker's twine is added to the right bottom corner while a "Sail Away" trinket adorns the upper right corner.

Supplies Used:
Stamp:  Sailing Home
Inks:  Night of Navy, Balmy Blue
Papers:  Night of Navy, Whisper White, Come Sailing Away DSP, Water colour
Accessories:  Aqua painter, Night of Navy/Sahara Sand baker's twine, Sail Away trinket, Smooth Sailing Dies