Showing posts with label Remembering Your Birthday. Show all posts

Saturday, November 4, 2017

Nature Sings Birthday

Nature Sings is really a Christmas stamp set, but I think it's perfect for a masculine birthday card.

The background was made by stamping with a clear block - in this case the "E" block.  Sahara Sand and Crumb Cake ink were applied directly onto an E stamping block, spritzed generously with water, and then stamping the block directly onto Watercolor paper applying pressure. I left the block in place on the water color paper for a few minutes to allow for maximum absorption into the water colour paper.

I was impatient to get the card made so I used my heating tool to dry the art piece.  I trimmed the piece to make it the size I wanted  and  sponged the edges with Soft Suede ink.

The images were stamped using Early Espresso ink, and coloured using both the Light and Dark Stampin' Blendabilities.


The art piece was matted first with Early Espresso card stock, then Sahara Sand followed by Crumb Cake.  Some linen thread was wrapped 3 times around the left end and tied into a bow after which it was added to the card front using dimensionals.

The card base is Early Espresso card stock, layered with Crumb Cake which has a 2" piece of Wood DSP adhered to it.

The sentiment is from "Remembering Your Birthday" and is matted with Early Espresso cardstock before being added to the card.

Supplies Used:
Stamps:  Nature Sings, Remembering Your Birthday
Inks:  Sahara Sand, Crumb Cake ( back ground), Early Espresso, Stampin' Blendabilities (Light and Dark Crumb cake), Soft Suede (sponging edges)
Papers:  Early Espresso, Crumb Cake, Sahara Sand, Wood DSP, Watercolor Paper
Accessories:  Linen Thread, Dimensionals


Friday, December 16, 2016

High Tide Birthday - a Framed card

My son is always advising me to frame my cards and have a gallery of them on the wall down the stairs to my craft room.
Today I did frame a card, but not because he was urging me to do this.  I did it because the finished card just looked like it needed it.


The Light house was stamped with Smoky Slate and Basic Gray.  A blender pen was used to colour in the red portion and then with Basic Gray ink to touch up the sides and the architecture at the top. The sand around the light house was stamped in Sahara Sand, with Old Olive Sea Grass growing around the base. The beacon lights are Daffodil Delight. After the sea was stamped, the horizon was darkened with a blender pen.

The sky was first washed with an aqua painter finishing up with clouds sponged over a trio of scallop circles.

Basic Gray ink was used to stamp the Sea Gulls.

Next to the Light House on a patch of sand there are two Sand Pipers.

The sentiment is from "Remembering Your Birthday.

This art piece was adhered to some By the Shore DSP and placed in an old off white frame

On a separate piece of Whisper White the wheel and lantern from the set "From Land to Sea" were stamped, coloured and cut out, then mounted on the right lower frame.

The finish, some neutral rope was tied into a sailor's knot and placed on the left side of the frame.

Supplies Used:
Stamps: High Tide, From Land to Sea, Remembering Your Birthday
Papers: Whisper White, Marina Mist, By the Shore DSP
Inks: Smoky Slate, Basic Gray, Daffodil Delight, Marina Mist, Black Memento, Sahara Sand, Old Olive, SU Markers:  Real Red, Sahara Sand, Chocolate Chip, Early Espresso
Accessories Neutral SU rope (retired), frame , 1 3/4" scallop circle punch.


Tuesday, December 6, 2016

Center Fold Tool Box Card

Today I'm making another card featuring the "Nailed It" stamp set - new in the Occasions 2017 catalogue.  This time it's a center fold step card make to look like a tool box. 

It was hard for me to visualize a tool box but I drew on the memories of being in my father's work shop seeing him lovingly put away his "toys".  He loved his tools......

My dad is gone now ---this card is dedicated to him.

I used the tutorial with Split coast stampers here to make the center step card, and decorated it to make it look like a tool box.
Aluminum foil was embossed with the Argyle folder (retired) and adhered to the side and bottom panels.
To make the drawers, strips of 2 of 4" of Real Red cardstock were adhered with dimensionals on the outer edges.  The handles are made by cutting in half a small oval silver cardstock punchie/
The tools were stamped on a separate piece of whisper white cardstock and coloured with markers. After cutting them out, they were adhered to the card front as shown in the picture.
The nails the hammer and saw are hanging on were made using 2 sizes of basic black and whisper white  circles made by punching 2 sizes of the hand held punches.

Side view

The card folds closed for mailing.


Supplies Used:
Stamps: Nailed It, Remembering Your Birthday
Inks: Cherry Cobbler, Black Memento, Markers (Real Red, Pacific Point, Smoky Slate, Basic Gray)
Papers: Real Red, Whisper White, Aluminum Foil, Silver card stock
Accessories: Argyle folder, Small Oval punch, Hand held punch, dimensionals

Tuesday, November 29, 2016

Inside the Lines Happy Birthday - Fab Friday #101

Would you like to see another sneak peak from the catalogue containing FREE products when you purchase $60 worth of merchandise from SU?
Today it's one of the DSP - "Inside the Lines". This taps into the adult colouring book craze that is so popular now.
I used the sketch challenge from Fab Friday to make this card


 Art Piece:
On a section of the "Inside the Lines" DSP, the image was coloured with ink pads and a blender pen. leaving some areas untouched. It was die cut using a stitched framelit circle die, and matted with a Basic Black scallop circle.
The little bee was cut from anot
 Art Piece:
The little bee was cut from another section of the paper, coloured, and mounted on the flower with her section of the paper, coloured, and mounted on the flower with
dimensional. After the card was finished, some Dazzling details was added to the wings.
The art piece was mounted on the card front using dimensionals.
Card:
The basic card is Melon Mambo, layered with Whisper White, and then "Pop of Pink" DSP. the black dots on the top and the reverse side on the bottom.  A piece of crimped Melon Mambo cardstock was adhered over the seam.

Sentiment:
From the stamp set "Remembering Your Birthday", it was stamped on Whisper White cardstock with Black Memento ink. This piece is matted with Melon Mambo cardstock.

Supplies Used:
Stamp: Remembering Your Birthday
Inks: Black Memento, Rose Red, Cherry Cobbler, Soft Suede, Daffodil Delight, Crushed Curry, Wild Wasabi, Old Olive
Papers: Melon Mambo, Whisper White, Basic Black, Inside the Lines DSP (SAB), Pop of Pink DSP
Accessories: Layering Circles Framelits, Circle Stitched Framelit, Dazzling Details, Dimensionals, crimper (non SU)

Friday, January 8, 2016

A Wintery Happy Birthday - SUO Challenges #139

I wanted to make a birthday card for the challenge with SUO.  Many times my customers have asked for a birthday card for a child born in the winter months.
I used as my inspiration the sunrise I saw yesterday morning.  I had an appointment in Toronto, and rather than drive I took the Greyhound bus.  The bus left at 6 a.m. so it was still very dark, but later when the sun started to come up there was the most beautiful sunrise.  We were right near the Ganaraska forest so there were trees silhouetted in this brilliancy.
I used the beloved stamp set "Lovely as a Tree" and sponged the sky.

  • I started by tearing a piece of printer paper in an irregular pattern and used that as a mask to deliniate the ground the sky.  Covering up the sky area, I sponged the group first using Pool Party and some Marina Mist.  Later on I added dazzling diamonds to represent the snow.
  • Then covering up the ground, I sponged an area of dark green (Mossy Meadow) as there was a line of forest beyond these trees.
  •  So Saffron was sponged in the left corner (that was the sun coming up), and then sponged some Pink Pirouette over the rest of the horizon.  Above that Tangerine Tango was sponged, followed by Marina Mist and a fine layer of Night of Navy.
  • The trees were stamped using Mossy Meadow for the big one, and Early Espresso for the smaller trees.
  • Some dazzling diamonds were applied to the trees as we had experienced a heavy frost that night.
  • For some added bling some silver sequins were added.
  • The sentiment is from :Remembering Your Birthday"
  • The basic card is Whisper White, layered with Basic Black, and then with the image piece which was done on Whisper White.

Supplies Used: 
Stamps: Lovely as a Tree, Remembering Your birthday
Inks: Pool Party, Marina Mist, So Saffron, Pink Pirouette,Tangerine Tango, Night of Navy, Mossy Meadow, Early Espresso, Archival Black
Papers: Whisper White, Basic Black
Accessories: Silver sequins, two way glue pen, dazzling diamonds.dimensionals

I was mesmerized by the sunrise even that early in the morning,  I hope this card does justice to what I witnessed.

Sunday, July 12, 2015

A Birthday card for a special 65 year old

At one of my craft shows this week I was asked to make a birthday card for a special 65 year old.  This is the card I came up with.

  • The base card is Rose Red layered with Whisper White.
  • The next layer is Pink Pirouette cardstock embossed with the Filigree embossing folder.
  • The Ovals framelit was used to die cut an oval shape in the middle of the Pink Pirouette layer.
Flowers:
  • 3 flowers from the Flower Shop stamp set were stamped with Versa Mark on Vellum cardstock and  embossed with white embossing powder.  They were punched out using the Pansy punch and then coloured with a Pink Pirouette marker on the wrong side. 
  • 1 larger flower from Mixed Bunch was prepared the same way.  The Blossom petal punch was used to punch this flower. 
  • A dimensional was used to combine one of the smaller flower with the larger one.
  • The petals of all flowers were curled up using a bone folder, and a pearl was placed in the centers
  • The Bird Builder punch was used to punch the leaf sprigs.

Before the flowers were attached around one side of the oval, I die cut the numbers 6 and 5 in Old Olive cardstock,  using the Numbers thinlets and then attached them in the oval.

The flowers and leaf sprigs were attached as indicated on the card above.

The sentiment is from Rembembering Your Birthday.  It was stamped with Old Olive ink and the strip make into a banner.

Supplies Used:

Built for Free Using: My Stampin Blog


Monday, February 16, 2015

Bloom with Hope Happy Birthday - with Blendabilities background

This is another card made with a background I created using various colours of blendabilities.  The tutorial for this technique can be found here


These are the colours of the blendabilities that I used to create the background for this card:  Melon Mambo, Coastal Cabana, Daffodil Delight, and Wisteria Wonder

This is a 5 by 5" square card with an Early Espresso cardstock base.  The next layer, Melon Mambo, is the largest of the Square framelit dies and is scalloped on all sides.

Here is the side view.


The image was stamped with Black Stazon directly onto the coloured glossy cardstock. The flower and the stem is from "Bloom with Hope", but the leaves are from "Peaceful Petals".               

The image was trimmed to fit in a Bermuda Bay frame that was made by placing 2 sizes of the square framelits together and running it through the Big shot.  The image and frame were attached to the melon mambo square using dimensionals.

The sentiment, from "Remembering Your Birthday" was stamped with Basic Black ink on Whisper White cardstock and matted with a left over piece of the blendabilities background and  attached to the bottom of the frame.

To complete the card, 3 rhinestones were placed in the two upper corners.

Built for Free Using: My Stampin Blog


Also used was Glossy Cardstock but photo paper could be used.

Thursday, February 5, 2015

Happy Birthday - Celebrate Today - A Shaker Card - TSSC # 352

This birthday card was inspired by a video I saw on You Tube done by C.L. Budhal here.  I did make a number of changes as I was making this shaker card for the sketch challenge with Technostamper at this site

It was fun making a shaker card again, but I must admit it took a bit of trial and error.  The video helped a lot, but I still made a lot of mistakes - like forgetting to attach the window sheet before applying the foam tape. Ugh!  However, I got through it, and I'm quite pleased with the outcome.


Using a piece of DSP 3 5/16 by 4 12/16" a balloon was die cut near the top in the middle, using the Balloon framelits.
A Lost Lagoon mat 4 14/16 by 3 10/16" was placed under the DSP to determine the placement of the sentiment in the middle of the balloon die cut.  The sentiment was stamped in Versa Mark and embossed with silver embossing powder.  I also embossed some elements from the Perpetual Birthday stamp set.
Turning the DSP over, I first attached a 3 by 3" piece of clear window sheet, and then attached  a double layer of foam tape around the balloon and all the way to the bottom of the DSP.
I placed a little bit of In Color sequin assortment in a pile on the sentiment on the Lost Lagoon cardstock, and gently placed the taped DSP centered over the sentiment. P.S. Remove the protective layer of the tape first.

A piece of Hello Honey cardstock was embossed with the Fancy Fan folder and attached to the DSP below the balloon, and a piece of ribbon applied over the seam.
The sentiment is from "Remembering Your Birthday".

The basic card is Lost Lagoon, layered with Whisper White.  On this layers, near is the bottom is attached a Smokey Slate cardstock piece embossed with the Decorative Dots folder. 

Here are the products I used:

Built for Free Using: My Stampin Blog

Friday, January 16, 2015

Happy Birthday - Wood You Be Mine

I've been playing with this stamp set all day, and I made 3 Valentine Day cards using the "Wood You Be Mine" stamp set.  But I thought the stamp set would make a wonderful Masculine Birthday Card.  And I was right!  Here's what I came up with.

All the images were stamped with Black Memento ink, and coloured with Blendabilities.  They were then cut out.  The woodsman was attached to a Whisper White oval die cut, the edges sponged with Island Indigo.

The basic card  is Island Indigo, layered with Whisper White.  In the center is a strip of Adventure Bound DSP pack layered with Island Indigo.  The oval was added to the card front centered over the DSP.

The sentiment "Happy Birthday" was stamped on the saw using the stamp-a-ma-jig, and added to the top of the card.

The other cut out items were added at the bottom right and left.

Built for Free Using: My Stampin Blog


Friday, August 15, 2014

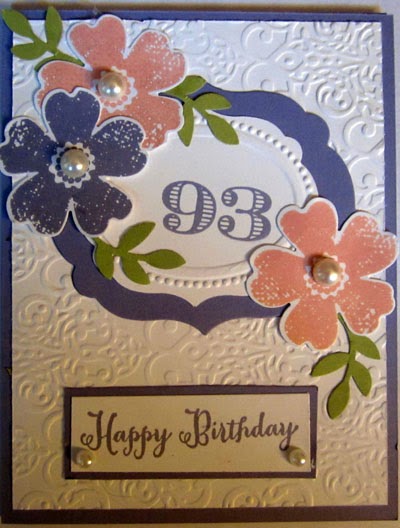
Happy 93rd Birthday

I haven't posted for a while as Craft fairs have kept me very busy.  I started marking decade specific birthday and anniversary cards and they have been very popular.  Here I am 2 weeks away from the end of one of my Craft fairs and I am almost out of Anniversary cards and age specific birthday cards.  I am even getting requests for special birthday cards.  The one I am posting today is for a lady who is turning 93 years young.


I started by die cutting a white labels die and then embossed the ovals embossing folder in the middle of that. Using the stamp-a-ma-jig and the Memorable Moments stamp set the age was stamped just slightly off center in the die cut.  A larger Wisteria Wonder Labels framelit die cut was made as a mat for the white framelit.
The flowers were stamped and then punched using the coordinating punch.  The leaves were from the Bird Builder punch.

Stamps: Mixed Bunch, Memorable Moments,Remembering Your  Birthday
Inks: Wisteria Wonder, Blushing Bride
Papers: Wisteria Wonder, Whisper White, Old Olive
Accessories: Brocade embossing folder, Labels framelit, Oval embossing folder, Mixed Bunch coordinating punch, Bird Builder punch, large pearls, medium pearl.