Showing posts with label Nailed it. Show all posts

Thursday, June 8, 2017

Nailed it - a repost

Since I am involved in a catalogue launch open house this weekend, I will probably not have any new posts until Sunday, so I thought I would pull up my all time most favourite post.

I made this pop and twist card in December, 2016. Little did I know how popular this card was to come.

See the original post here

Since December  3 , this card has been viewed 6,630 times!!!  This is the most any one of my cards has ever been viewed. If .I hadn't seen that number with my own eyes I would never have believed it.

What has made this card so popular I don't know.  I would appreciate some comments to let me know, as I would like to learn from this.


So, let me hear from you.  What has made this card so popular?

Thanks in advance.

Friday, March 3, 2017

Tool Box (in a card)

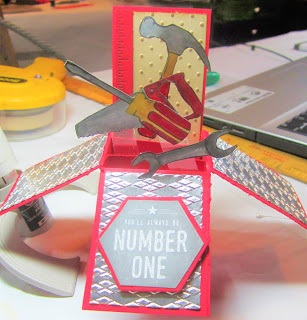
I was thinking of a different masculine card.  I wanted to feature the "Nailed It" stamp set and came up with the idea of a card in a box (aka tool box) - a simplified form.

Like a tool box, this box red, so I made this card in a box out of Real Red card stock. See a post here on making a card in a box.

This, however, is a simplified version of this 3D card.

After scoring the cardstock and making the cuts on the scored seams, the box was decorated before it was formed into the box you see in the picture above.

A piece of Crumb Cake cardstock, embossed with the dots embossing folder and rubbed lightly with a sponge and Crumb Cake ink was added to the back panel.  On the left side is a die cut Real Red ruler sponged lightly to bring out the markings.  On the back side of this panel is a similar sized piece of Whisper White cardstock meant for messages etc.

On the 3 top panels I adhered embossed adhesive silver foil pieces.  Then I adhered, using dimensionals, a hexagonal shaped matted sentiment to the middle panel.

I stamped and colored with markers the various tools, cut them out and adhered them with glue dots to strips of  Window Sheets and then to the box inserts.

Supplies Used:
Stamps: Urban District, Nailed It
Inks: Black Memento, Basic Gray, Crumb Cake, Markers (Smoky Slate, Daffodil Delight, Real Red, Pacific Point)
Papers: Real Red, Crumb Cake, Adhesive silver foil (non SU)
Accessories Dots embossing folder, Argyle embossing folder (retired), Build it Framelits, dimensionals, Window sheets, glue dots


Friday, January 27, 2017

Masculine Trifold Shutter Card

Making a trifold shutter card is a challenge on the Canada Die Cut Exchange group on Facebook. This was a great opportunity to showcase the Urban Design Specialty DSP, which is a wonderful masculine paper. The main colours in this paper:  Basic Gray, Basic Black, Delightful Dijon.  These colours were carried over into the card design.
To make this card I used the tutorial on Splitcoaststampers.

The base of this special fold card is Very Vanilla card stock, which was scored and cut using the directions in the video tutorial.
The DSP on each panel was matted with Basic Gray cardstock, and images from 2 different stamp sets were used to decorate the inside - Urban District and Nail It.

Supplies Used:
Stamps: Urban District, Nailed it
Inks: Black Memento, Basic Gray, SU Markers (Basic Gray, Smoky Slate, Delightful Dijon, Basic Black)
Papers: Very Vanilla, Basic Gray, Urban Design Specialty DSP
Accessories: Tools framelits, 1 1/4" circle punch, dimensionals, glue dots


Tuesday, December 6, 2016

Center Fold Tool Box Card

Today I'm making another card featuring the "Nailed It" stamp set - new in the Occasions 2017 catalogue.  This time it's a center fold step card make to look like a tool box. 

It was hard for me to visualize a tool box but I drew on the memories of being in my father's work shop seeing him lovingly put away his "toys".  He loved his tools......

My dad is gone now ---this card is dedicated to him.

I used the tutorial with Split coast stampers here to make the center step card, and decorated it to make it look like a tool box.
Aluminum foil was embossed with the Argyle folder (retired) and adhered to the side and bottom panels.
To make the drawers, strips of 2 of 4" of Real Red cardstock were adhered with dimensionals on the outer edges.  The handles are made by cutting in half a small oval silver cardstock punchie/
The tools were stamped on a separate piece of whisper white cardstock and coloured with markers. After cutting them out, they were adhered to the card front as shown in the picture.
The nails the hammer and saw are hanging on were made using 2 sizes of basic black and whisper white  circles made by punching 2 sizes of the hand held punches.

Side view

The card folds closed for mailing.


Supplies Used:
Stamps: Nailed It, Remembering Your Birthday
Inks: Cherry Cobbler, Black Memento, Markers (Real Red, Pacific Point, Smoky Slate, Basic Gray)
Papers: Real Red, Whisper White, Aluminum Foil, Silver card stock
Accessories: Argyle folder, Small Oval punch, Hand held punch, dimensionals

Saturday, December 3, 2016

Nailed It

The new Occasions catalogue will be here soon.  Today I made a Twist and Pop card which high lights the new Masculine stamp set "Nailed It"  It reminds me so much of an older stamp set which has a been a favourite of mine for years "Tool Time".  Remember that one?

I did incorporate some images from that retired stamp set into this card.


For the background of the art pieces the smaller images (nails, screws, etc) were stamped randomly using Basic Gray ink. The Timeless Texture stamp set was used as well.  I just love that set!! All edges were sponged with Basic Gray ink.

The images were coloured with markers and then cut out and placed where I wanted them on.
A belly band was used to keep the card closed.  A real screw and bolt  was used as an embellishment on this band.

Supplies Used: 
Stamp: Nailed It, Timeless Texture, Tool Time (retired)
Inks: Basic Gray, Black Memento, Markers (Real Red, Crushed Curry, Smoky Slate, Basic Gray, Crumb Cake, Soft Suede)
Papers:Whisper White, Basic Gray, Smoky Slate, Smoky Slate DSP
Accessories: Labels framelits, 1 3/4" scallop circle punch, 1 1/4" circle punch, 1" circle punch, dimensionals, Clear Wink of Stella glitter, a screw and a bolt.