Showing posts with label Lovely as a Tree. Show all posts

Tuesday, July 16, 2019

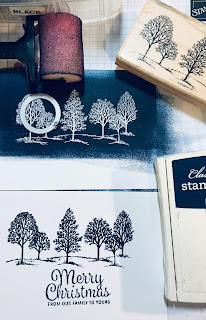
Emboss Resist Spotlight Technique with Lovely as a Tree

This is not my original idea as I stumbled upon a video made by fellow Canadian demonstrator Tina Zinek here and decided to give this technique a try.

I am familiar with the emboss resist technique, and I know the spotlighting technique, but this is a different take on both of these techniques.

And for one last time "Lovely as a Tree"  (well maybe)


  1. Start with 2 piece of Whisper White card stock cut at 3 3/4 by 5"
  2. Stamp the desired image using Night of Navy ink on one of the two card stock pieces.  Stamp desired sentiment
  3. On the second piece of Whisper White card stock, , stamp the same image in Versa Mark ink and emboss with white embossing powder.  
  4. With a brayer, apply Night of Navy ink over the entire image.  With a paper towel wipe off the ink over the embossed surface.

Using a circle die (or square), die cut 3 circles in different areas of the image.


Match these die cuts to the same areas on the original stamped image and adhere.


Use the piece of card stock which was brayered and has the die cut holes in it, to make another      card.  Trim all the part of the Whisper White card stock that has not been brayered and place it on another piece of Whisper White card stock matching the two images. Adhere this to a Night of Navy card stock base.
Add Dazzling diamonds


Friday, March 8, 2019

3D Best Catch - a Unique Fold and a CASE

I was fascinated when I saw this card  made by Amy Minson on Pinterest.  It was a fold I had never seen before but I couldn't figure out how to make it and I was curious.  Then when Frenchie made a   video featuring this card fold I was hooked.  I had to CASE this card.

The "Best Catch" stamp set is one, among many, of my favourite stamp sets in the Occasions catalogue. Earlier it was used  to make a diorama card here,  and like Amy and Frenchie, I used it to CASE their cards.


Frenchie's video explains how to make this card fold very well.

Here are the card dimensions:
  • Night of Navy 11 by 5 1/2"  scored at 1 3/4, 3 1/2, 7 1/2, and 9 1/4" (Card base)
  • Night of Navy 11 by 1 1/2" (2 pieces) one for the top and one for the bottom.
  • Whisper White 10 7/8 by 1 3/8" (2 pieces),  One at the top features the birds from High Tide: at the bottom water images from High Tide as well. Once stamped, the Whisper White is adhered to the Night of Navy strips and then scored at 1 3/4, 3 1/2, 5 1/4, and 7".  Fold each strip on scored lines and burnish well.  They will be adhered to the card base in opposite directions. 
  • Whisper White: 11 by 5 3/8"  Scenery piece. Once the scene is created, it is cut into pieces of these sizes: 1 5/8, 1 5/8, 3 7/8, 1 5/8". There will be 3/8" of a strip left over, and this will be adhered to a Whisper White piece at the back of the card.
Back

View from the top
Stamping:
Scenery:
Using the Lovely as a tree stamp set and Black Memento ink, stamp a row of trees all the way across the 11 by 5 3/8" piece of Whisper White. Stamp once full strength ink, then stamp a second time above and to the side of the first image without inking up.  Then using a brayer, apply Balmy Blue for the sky, making clouds using Pacific Point; across the trees with Pear Pizzazz and below the trees with Crumb Cake.
Cut into the following pieces: 1 5/8" 1 5/8", 3 7/8" and 1 5/8" and adhere to the scored Night of Navy card base.


Left side
Upper and Lower Strips:
Stamp birds from High Tide twice in the middle of one of the 10 7/8 by 1 3/8" pieces of Whisper White using Black Memento; the water image all the way across the second Whisper White piece of the same side.  
Adhere both pieces of Whisper White pieces to their corresponding Night of Navy strips.  Score the upper piece (birds) at  1 3/4, 3 1vc /2, 5 1/4, and 7" (on both sides) ; the bottom piece start scoring at the opposite end.
Adhere strip with water image to bottom of scenery ,  by adhering 3 smaller scored pieces to the bottom of the scenery piece
The other strip is applied in an opposite manner i.e. the 1 3/4" is at the left upper edge.  Apply adhesive to the first 3 scored areas and adhere to the upper left scenery piece matching score lines. 


Right Side

Images:
Using the stamparatus, stamp the images and colour them with Stampin' Blends.  Die cut them, as well as two of the smaller fish in Smokey Slate and some bull rushes in Whisper White.
Colour the Bullrush with Old Olive ink with the top with the Bronze stampin' blend

Adhere images as shown in the card.


The card folds flat for  mailing.  Start by folding the right side first, followed by the left. A bubble envelope is recommended.


Stamps:  Best Catch, Lovely as a Tree, High Tide
Inks:  Balmy Blue, Pacific Point, Pear Pizzazz, Old Olive, Bronze Stampin' Blend, Black Memento, other Stampin' Blends
Papers:Night of Navy, Whisper White, Smoky Slate
Accessories:  Best Catch framelits, Brayer

Monday, November 5, 2018

Bringing the Tree Home

For this card I brought out not one but two of my favourites - the Woodland Embossing Folder and Lovely as a Tree - and brought in a new friend -  Farmhouse Christmas


There are many tutorials on You Tube demonstrating stamping on the Woodlands Embossing Folder so I won't go into a lot of detail here.

 I applied Smoky Slate and Pool Party with a Brayer and then stamped the  tree from " Lovely as a Tree" with Mossy Meadow ink  directly onto the embossing folder. After running the embossing folder with  inserted cardstock through the Big Shot, Dazzling Diamonds were added to  the birch trees- making it look like a Winter Wonderland.

On a separate piece of Whisper white the image of the truck was stamped , colored with Stampin' Up Blends and then die cut using the coordinating  Farmhouse framelit.  Some snow, in the form of Liquid Applique,was applied to the tree and the top of the truck.


Dimensionals were used to adhere both the truck and the die cut sentiment to the embossed art piece.

Two rows of 1/8" Blueberry Bushel grosgrain ribbon adhered to the lower art piece, actually look like a road and  help to ground the truck.  Do you see the tiny wreath on the upper left corner of the sentiment?


The embossed art piece was adhered to a Blueberry Bushel card stock base.

Supplies Used:
Stamp:  Farmhouse Christmas, Lovely as a Tree
Inks:  Smoky Slate, Pool Party, Mossy Meadow, Black Memento, Stampin' Up Blends
Papers:  Whisper White, Blueberry Bushel
Accessories:  Woodland Embossing Folder, Brayer, Big Shot, Farmhouse Framelit Dies, 1/8" Blueberry Bushel ribbon, Liquid Applique (non SU), Dazzling Diamonds, 

Tuesday, May 22, 2018

Lovely as a Tree with Woodland Embossing Folder

Today I wanted to bring back my favourite stamp set and pair it with the Woodlands embossing folder

I haven't done stamping directly onto an embossing folder for a while and I was surprised to learn that my students have never done this technique before.  Guess what they're going to be doing in class!!??

My favourite stamp set?  Lovely as a Tree!

Using the sponge brayer directly onto the embossing folder (the side with the logo on it) Smoky Slate ink followed by Pool Party ink was applied,

Then using Mossy Meadow ink and the largest single tree, I stamped directly onto the embossing folder three times.

Then I inserted a piece of Whisper White card stock onto the uninked side, closed the folder carefully so as not to shift the paper, and ran the folder through the Big Shot.  Magic!!

After trimming the focal piece to a 4 by 5 1/4" piece, some 3/8" mini chevron Old Olive ribbon as added to the lower part and the focal piece then adhered to the card front.

The sentient, stamped from "Colorful Seasons" was punched with a  2" circle punch and added to the card front with dimensionals.


Two blue birds, from the "Swirly Bird" stamp set were provided a bit of color to the card.


Supplies Used:
Stamps:  Lovely as a Tree, Colorful Seasons, Swirly Bird
Inks:  Mossy Meadow, Basic Gray, Pacific Point
Papers:  Always Artichoke, Whisper White
Accessories:  Woodlands embossing folder, 3/8" mini chevron Old Olive ribbon, dimensionals, 2" circle punch


Thursday, November 30, 2017

Lovely as a Tree Merry & Bright - SUO Challenges #188 Winter Holidays

This is my second card today featuring the  Lovely as a Tree stamp set.  This time it is a card for the theme challenge with SUO Challenges - celebrating the Winter Holidays around December and January.

In this part of the world snow is a significant part of our landscape.  So activities revolving around snow are an important aspect of our lives.

The glittery snow scene in the card below was inspired by the work of Bibi Cameron.

Using masking, and the following colours- Night of Navy, Marina Mist, Pool Party, andElegant Eggplant -I created the wintery scene above - a winter wonderland in which to play, whether it is to snowshoe, toboggan, ski, or just view out of a cabin window.

The Art Piece was sponged onto watercolor paper, then matted with Basic Black card stock and added to an Elegant Eggplant card base.

The snow "effect" was created by using a liquid masking fluid, which when dry protected the white space (snow) over which the colouring is done.  This dried mask is rubbed off with clean fingers when the scene is complete leaving "snow".

The sentiment is from "Hearts Come Home" and is stamped in Elegant Eggplant on Whisper White, matted with Basic Black and added to the card front.

No winter card is complete without glitter, so I added some Dazzling Diamonds at both tree lines.

Supplies:
Stamps:  Lovely as a Tree, Hearts Come Home
Inks:  Black Memento, Night of Navy, Marina Mist, Pool Party, Elegant Eggplant
Papers:  Elegant Eggplant, Basic Black, Whisper White, Watercolor Paper
Accessories:  Dazzling Diamonds, Liquid Masking Fluid (non SU)


A Wintery Birthday Card featuring Lovely as a Tree

If you don't have the stamp set "Lovely as a Tree" get it.  This tried and true stamp set has been around for a long time and is so versatile that the images can be used for any occasion.

Today I used it to make a Birthday card for my neighbour who turned 85 yesterday. I have wonderful neighbours on both sides of me.  They would do anything for me and visa versa.

When I think of Bob I think of snow.  Why is that??  We have an agreement that Bob clears  my driveway after a snow fall using his snow blower, and in exchange I help with some minimal nursing care, like changing dressings, applying polysporin, or just checking up on he and his wife. I am a retired nurse so I'm glad to be helpful.  Both Bob and his wife are now in their mid 80's.

So, when I heard it was Bob's birthday, I just had to make a card.  Just a few days ago I made a card for their 62nd wedding anniversary.  What a couple!


The snowy scene in the card was inspired by the work of Bibi Cameron 

Using a combination of masking, and sponging and the following colours:  Marina Mist, Pool Party, Night of Navy, and Sweet Sugarplum, this winter scene was created.  The tree is a single stamp from "Lovely as a Tree".  The snow "effect" was created by splattering liquid masking fluid with a tooth brush onto the art piece prior to applying colour..  This liquid mask dries and protects white areas, and when removed with either clean fingers or an eraser after the scene is finished, the white areas give the illusion of snow.

The sentiment, from "Big on Birthdays" was black embossed on vellum,  I wanted a larger font for the sentiment, but I did not want to cover up the trees.  Vellum was the perfect choice.  Hint: the new Adhesive sheets are perfect for adhering vellum without leaving telltale adhesive marks.

Supplies:
Stamps:  Lovely as a Tree, Big on Birthdays
Inks:  Black Memento, Night of Navy, Marina Mist, Pool Party, Sweet Sugarplum
Papers:  Elegant Eggplant, Basic Black, Watercolor paper, Vellum
Accessories:  Black embossing powder, Liquid masking fluid (non SU), Adhesive sheets


Thursday, September 21, 2017

Detailed Gate meets Santa Paws

Hopefully this will not be my last card I make using the Detailed Gate thinlet die. I just love combining it with different stamp sets.  This time I used the Card Front Builder Thinlet dies, Lovely as a Tree stamp set as well as Santa Paws.
For this card I trimmed off the elaborate scroll work on the top of the gate, cut the gate in the middle so it would open, and wrapped the gate edges around the back of the art piece.


The sky elements were die cut with the Card Front Builder thinlet die on a piece of Whisper White card stock,  and to bring out the lights from the moon and stars I adhered a piece of gold foil behind the art piece.

Sponging is one of my favourite techniques, and I used it to bring out the colours of the sky and the landscape.  I first sponged around the moon with Daffodil Delight, bringing the colour down through the sky.  Then I used Night of Navy to sponge the rest of the sky, blending this with Basic Gray and Always Artichoke towards the bottom of the art piece.

Using Basic Gray, I stamped the Lovely as a Tree stamp at the horizon.

Below that I die cut an oval into the art piece.  Behind that oval I attached the images of Santa Paws of the 3 singing cats using dimensionals.


The sentiment was punched with the Word Label punch and attached to the outer gate; a red bow on the other gate.

Supplies Used:
Stamps:  Santa Paws, Lovely as a Tree
Inks:  Night of Navy, Daffodil Delight, Basic Gray, Always Artichoke, SU Markers, Black Memento
Papers:  Whisper White, Basic Gray, Gold Foil
Accessories:  Layering Oval Thinlets, Detailed Gate Thinlet, Word Label punch, 1/4" Real Red Ribbon (retired), dimensionals, Card Front Builder thinlets,

Sunday, September 10, 2017

Lovely as a Tree Birthday- The Eclipse Technique

The Eclipse technique is very "hot" right now, and today I made a card using that technique. I looked up a few tutorials and used the following:  Kim Wilson  here and Randi Collins here.

I love the versatility and the "wow" factor of this technique; the fact that it can be done with numbers, letters or images.

One of my all time favourite stamp sets is Lovely as a Tree, and tonight I used it in conjunction with the Happy Birthday framelit, to made a winter birthday card.


I started by using Marina Mist and the Watercolor Wash  background stamp to create a wintery sky.  Because I wanted he background to be more subtle, I stamped off once before stamping on the art piece.  Then I stamped the row of trees using Black Memento ink and added some Dazzling Diamonds at the tree bases.


Here's where the fun part comes in.  Using the "Happy Birthday"  die I die directly onto the stamped image. It's important to save all the bits and pieces of the die cut. Strips of foam dimensional tape are then applied to the back of the die cut sentiment. Before replacing the sentiment back in the space where it came from, I adhered the art piece to some Island Indigo card stock, and this to a Marina Mist card base.


Removing the protective covering on the foam tape, I replaced the sentiment back into the negative space.  The rest of the process is much like completing a puzzle. Adhesive was applied to each piece to fill in the remainder of the sentiment.

I wanted to make this a wintery birthday card, so I added some tombo glue, crumbled up some dried texture paste and Dazzling Diamonds and created a snow-like effect at the base of the trees.

Supplies Used:
Stamp:  Lovely as a Tree, Watercolor Wash
Inks:  Black Memento, Marina Mist
Papers:  Marina Mist, Whisper White, Island Indigo
Accessories:  Happy Birthday Thinlet Die, Dazzling Diamonds, Dry Texture Paste, Clear Faceted Gems

Tuesday, March 28, 2017

I'm Thinking of You

There are a number of people in my life now who I am "thinking about".  I put together two of my favourite stamp sets, Beautiful You and Lovely as a Tree, using the masking technique, to make this "thinking of you" card. I also used a couple of other stamps to create the scene below.

The first think I did was make a mask for the image of the umbrella covered woman.  Once she was protected I stamped the trees and grass, and the sky- the trees are from "Lovely as a Tree", the grass from "Sheltering Tree", the sky from "Celebration" and the birds in the sky from "Wherever You Go"

The basic card is Rich Razzelberry, layered with Crushed Curry, so I selected these colours for the clothes.  The blue in the outfit is from the sky. Because the sentiment (Sheltering Tree) was too long for the Art Piece, I cut it into 3 parts, each part matted with the same colours are the card.

Three Itty Bitty flowers were punched with Crushed Curry card stock, colored in the center with a Rich Razzelberry marker and then added to each of the sentiment words.  A silver metallic circle was placed in each flower.

Supplies Used:
Stamps: Lovely as a Tree, Beautiful You, Sheltering Tree, Wherever You Go, Happy Celebration
Inks: Black Memento, Watercolor Pencils, Rich Razzelberry marker, Basic Gray, Marina Mist, Old Olive
Papers:
  • Rich Razzelberry 5 1/2 by 4 1/4" (card base)
  • Crushed Curry 4 by 5 1/4" (mat for card base)
  • Whisper White 3 3/4 by 5" (Art Piece
  • Whisper White scraps (for sentiment)
  • Rich Razzelberry scraps (mat for sentiment)
  • Crushed Curry scraps (mat for sentiment and 3 flowers)
Accessories:
  • Silver metallic circles (flower centers)
  • Itty Bitty punch (for flowers)
  • Post-it Note (to make mask)
  • Glue dots

Friday, January 8, 2016

A Wintery Happy Birthday - SUO Challenges #139

I wanted to make a birthday card for the challenge with SUO.  Many times my customers have asked for a birthday card for a child born in the winter months.
I used as my inspiration the sunrise I saw yesterday morning.  I had an appointment in Toronto, and rather than drive I took the Greyhound bus.  The bus left at 6 a.m. so it was still very dark, but later when the sun started to come up there was the most beautiful sunrise.  We were right near the Ganaraska forest so there were trees silhouetted in this brilliancy.
I used the beloved stamp set "Lovely as a Tree" and sponged the sky.

  • I started by tearing a piece of printer paper in an irregular pattern and used that as a mask to deliniate the ground the sky.  Covering up the sky area, I sponged the group first using Pool Party and some Marina Mist.  Later on I added dazzling diamonds to represent the snow.
  • Then covering up the ground, I sponged an area of dark green (Mossy Meadow) as there was a line of forest beyond these trees.
  •  So Saffron was sponged in the left corner (that was the sun coming up), and then sponged some Pink Pirouette over the rest of the horizon.  Above that Tangerine Tango was sponged, followed by Marina Mist and a fine layer of Night of Navy.
  • The trees were stamped using Mossy Meadow for the big one, and Early Espresso for the smaller trees.
  • Some dazzling diamonds were applied to the trees as we had experienced a heavy frost that night.
  • For some added bling some silver sequins were added.
  • The sentiment is from :Remembering Your Birthday"
  • The basic card is Whisper White, layered with Basic Black, and then with the image piece which was done on Whisper White.

Supplies Used: 
Stamps: Lovely as a Tree, Remembering Your birthday
Inks: Pool Party, Marina Mist, So Saffron, Pink Pirouette,Tangerine Tango, Night of Navy, Mossy Meadow, Early Espresso, Archival Black
Papers: Whisper White, Basic Black
Accessories: Silver sequins, two way glue pen, dazzling diamonds.dimensionals

I was mesmerized by the sunrise even that early in the morning,  I hope this card does justice to what I witnessed.

Friday, August 14, 2015

Festival of Trees Merry Christmas - Fab Friday 70

It took me a while to figure out what to do with the sketch with Fab Friday.  I knew I wanted to made a Christmas card, but I don't have too many of the new ones yet.  Then I thought of the Festival of Trees stamp, and the rest is this card.


  • The base card is Old Olive, layered with Whisper white cardstock followed by Into the Woods DSP.
  • On to a smaller piece of Whisper White cardstock, the image of one of the trees from the Festival of Trees stamp set was stamped repeatedly to mimic a forest.  The trees in the back were stamped off before stamping to make them appear farther away .  As the trees became closer to the front, the darker the trees became.
  • Some dazzling diamonds was applied to the trees.
  • Two 1/4" strips of cardstock, one Always Artichoke, and one Old Olive, were applied to the card front 3/4 of the way down.
  • Instead of a button for an embellishment I stamped the image of the pine branch and cone from the stamp set "Lovely as a Tree" and punched it out with a 3/4" circle punch.  This was layered with a 1" circle of Always Artichoke.
  • The sentiment is from Teeny Tiny wishes.
  • The edges of all papers were sponged with Always Artichoke ink.
Supplies Used:
 
Built for Free Using: My Stampin Blog

Monday, July 6, 2015

The Eagle - The Paper Players #252

The theme of this week's challenge with The Paper Players is the Great Outdoors.  After all it is summer and what a better time to connect with nature.
I bought this Eagle stamp when I was in Vancouver a couple of weeks ago, and thought the image would be perfect for this challenge.

  • The base card is Basic Black cardstock, layered with Crumb Cake carstock embossed with the Boho Chic embossing folder.  Before embossing I stamped the image of the single tree from "Lovely as a Tree" multiple times near the bottom, using Old Olive ink.  The images didn't turn out as well as I hoped.  The idea was for the Eagle to appear to be flying over the forest.
  • On the left hand side I adhered a piece of Go Wild DSP pack, sponging the edges with Crumb Cake Ink.
  • Near the bottom, horizontally, I embossed a piece of Basic Gray cardstock with the Woodgrain folder and sponged the edges with Basic Gray ink.
  • The Eagle was coloured with ink pads and an Aquapainter, using multiple shades of browns and rusts.  The head was highlighted with a white gel pen.
  • The image panel was sponged with Crumb Cake ink and then matted with Basic black cardstock.  It was adhered to the card front using dimensionals.
  • The embellishment is an Eagle feather.  I stamped a feather "Four Feathers" stamp set, using Versa Mark  and Crumb Cake ink and embossed it with Clear embossing powder.  It was die cut using the Feathers framelits.  I attached it to the upper left corner using a glue dot and tying some linen thread in a bow around the top.  Another glue dot near the bottom kept it from sliding out of place. 
The sentiment on the inside says:  "Even a little bird can FLY like an Eagle"
Supplies Used:
Built for Free Using: My Stampin Blog


Tuesday, January 27, 2015

With Sympathy - Lovely as a Tree

Lovely as a Tree is such a versatile stamp set.  It's been around for a long time, and I hope it stays around for even longer.
Today I use the stamp set to make a sympathy card.  It is a very simple card, but very effective.

On a piece of Whisper White cardstock, the corners of which have been rounded, the tree was stamped with Old Olive ink, and then without re-inking , was stamped again just above and behind the first tree.
The sentiment, from "Bloom with Hope" was stamped with Basic Black on Whisper White.  This was matted with Basic Black and then Old Olive card stock and attached to the card using dimensionals.

The base card is Old Olive, layered with Basic Black, and then the image layer.

Built for Free Using: My Stampin Blog


Tuesday, December 24, 2013

Lovely as a Tree birthday - Try Stampin' on Tuesday #147

All the preparations for Christmas are done so I thought I'd relax and make a card.  This proved a bit of a challenge as I'm having some construction work done in my workspace and everything is tarped up.
This card is designed based on the sketch challenge on Try Stampin' on Tuesday here 
Since all my Christmas/winter cards are done I chose not to use a snowflake as an embellishment. Also, I placed the sketch upright.


I started by using the new background stamp Hardwood (available Jan. 2) to create the background.  Soft Suede ink was used on Very Vanilla background.  Then I placed a strip of Season of Style designer paper along the left side and adhered a natural ribbon to hide the seam. This was adhered to a Soft Suede card stock base card.

The image was stamped with Old Olive ink on Very Vanilla card stock.  This was matted with Soft Suede card stock, and adhered to the card slightly overlapping the ribbon and designer paper.

The embellishment was a sprig of pine tree with a cone attached - also from the Lovely as a Tree stamp set.  This was punched with a 1/2" circle punch and attached to an Old Olive 3/4" scallop  circle using dimensionals.  This was attached to a 1" circle of Soft Suede and attached to the upper left of the card.

This turned out to be a neat masculine birthday card.

Stamps: Hardwood, Lovely as a Tree, Petite Pairs
Inks: Soft Suede, Old Olive
Papers: Soft Suede, Very Vanilla, Season of Style designer paper
Accessories: 7/16 Natural trim, 1/2" circle punch, 3/4" scallop circle punch, 1" circle punch, small oval punch, dimensionals
 

Thursday, August 1, 2013

Lovely as a Tree - Swap cards

I belong to an Ontario group called ORSA - Ontario Rubber Stamping Artists - and every month I participate in a swap of 3 cards.
These are the 3 cards for this month's swap, the topic of  which is "Trees".


Stamp: Lovely as a Tree, A Word for You
Inks: Basic Black, SU Markers (Old Olive, Always Artichoke, Chocolate Brown)
Papers: Old Olive, Very Vanilla, Retired DSP
Accessories: Script folder, Circles framelits, Apothecary accents framelit, 3/8" stitched Primrose Petals ribbon, Clay Buttons

Saturday, January 5, 2013

Warm Winter Wishes - Challenge 204 LNS

The challenge this week is to make a winter card featuring snowflakes.  I had just put all my Christmas stamps etc away, so I was in a bit of a quandry as to how to meet this challenge. But, I put my thinking cap on and came up with a card.
I went on a cleaning spree on New Year's day, putting all the Christmas decorations away, doing laundry, baking bread etc.  Now I'm exhausted, but my house is starting the New Year clean!  I haven't been outside for a couple of days because we've had so much snow, so there should have been a lot of inspiration there to make a card featuring snowflakes.  Too bad snowflakes melt when you bring them in the house or else I could have just scooped some up, put them on a card and called it a day - LOL.
The amount of snow we've had gave me an idea of making snowbanks and having trees emerging from them.  Some areas of the province have really been clobbered with snow - for example Montreal got a dumping of 45 cm in one snowfall!  I imagine the countryside outside the city looks very similar to this.

The snowbank effects were created using a combination of masking and sponging.

Stamps:  Lovely as a Tree, Winter Memories, Itty Bitties
Inks: Baja Breeze, Island Indigo, Always Artichoke
Papers: Baja Breeze, Whisper White, Island Indigo
Accessories: Ruffled Island Indigo ribbon, Snowflake die

Starting this week, your creations will be featured in a new spot - a blog especially for the LNS group.  Upload your creations here


Thursday, December 6, 2012

Winter Shaker Card - a repost

Today I thought I would repost a shaker card I made last year when Mica flakes were popular - but are now retired as a SU product.  I did not use the shaker frames but make my own.
Here is the card. Brrr!!  I feel cold looking at it.
I used the tutorial from Splitcoast stamper here


Stamps:   Lovely as a tree, Occasions Alphabet
Inks:   Island Indigo, Marina Mist, Baja breeze,  Black Stazon
Papers: Island Indigo, Whisper White, Silver Glimmer paper, Island Indigo designer paper
Accessories: Frame Oval Scallop die and the Big shot, Snowburst embossing folder, Champagne shimmer paint, Mica Flakes, Medium Window Sheet, Double sided picture framing tape (non SU), 3/8" Lucky Limeade ruffled ribbon, Pearls. dimensionals

Here's a close up of the Shaker element.  The Mica flakes makes it look like the tree is in the middle of a blizzard.  Another option would be to use silver glass glitter or tiny white beads.

Have a wonderful weekend.

Tuesday, November 13, 2012

Frostwood Lodge at Dawn - Technostamper 245

I've been running around all day getting ready for my all day card making class this coming Sunday.  There will be 14 people there making 10 complete Christmas cards.  Needless to say it has required a fair bit of organization and planning on my part.
It's nice to sit down and make a card for the Technostamper challenge here
To accommodate the stamp I wanted to use, I turned to sketch on its side.


I started by sponging the sky, first with Island Indigo ink, then Marina Mist, and finally Pink Pirouette.  The sun is just rising and is casting a pink glow over everything.  The pink glow is picked up in the snow on the various areas covered by snow on the Lodge, which is stamped in Soft Suede.  It's not light enough to pick up colours yet.  The snow is actually dazzling diamonds.  I stamped a tree from Lovely as a Tree to the right side of the card - again in Soft Suede

Stamps: Frostwood Lodge, Lovely as a Tree, Petite Pairs
Inks: Soft Suede, Island Indigo, Marina Mist, Pink Pirouette
Papers: Early Espresso, Whisper White, Candlelight Christmas DSP
Accessories: Polka dot folder, Dazzling diamonds

Thursday, July 12, 2012

Lovely as a Tree Christmas - Sketch Frenzy Friday

What a week this has been! With Jazzfest on Saturday, and then off to see my grandchildren for 3 days I am exhausted.  Needless to say I did not go to market on Tuesday preferring instead to let my grandchildren get to know their grandmother a bit better. They live a 4 hour drive away.
Well, it's Friday again, and time for a mini blog hop with Sketch Frenzy Friday.
This week's sketch is by Kim Innes.

Believe it or not, I have started making Christmas cards.  It seems just like yesterday that I finished making them and now I'm at it again. Christmas in July????  I must be nuts!
Because I am awaiting an order for my Christmas stamps I have pulled out an oldie but goodie "Lovely as a Tree"


The designer paper just above the sentiment was made using the smallest of the stamp from the set.  The pine cone was colored with markers and randomly stamped to create the design.
Stamps:  Lovely as a Tree, Petite Pairs
Inks: Always Artichoke, SU Markers (Always Artichoke, Early Espresso)
Papers: Always Artichoke, Whisper White, Always Artichoke designer paper
Accessories: Dazzling diamonds, 1 1/4" circle punch, 1 3/8" circle punch, mat pack and paper piercer, 1/4" Early espresso grosgrain ribbon.

Now its your turn to create something using Kim's sketch.  When finished upload it to the Sketch Frenzy Friday homepage here.  Then take some time and visit the blogs of the other team members to see their sketch interpretations. And don't forget to leave comments.
Your next stop on the tour is Patrice's blog here

Hope you enjoyed the tour.
Stay well, and I'll see you next week.