Showing posts with label Meant to Be. Show all posts

Friday, January 17, 2020

Meerkat Valentine

What in the world are Meerkats?  When Stampin' Up first introduced the Meerkat stamp in the Sale-a-bration catalogue that was the first time I had ever seen this animal.  So, I did a little research and found the following:

Meerkats are a type of Mongoose who inhabit all parts of the Kalahar Desert in Botswana, in much of the Namid desert in Nambia, in southwestern Angolia, and South Africa.

They are carnivora a spend much of their day foraging for food and digging deep tunnels.

A group is called a gang or a clan and it is not uncommon for  30 or 40 Meerkats to be part of a gang. This the name of the stamp set "The Gang's All Meer"

Being with Stampin' Up sure gives you an education!

The Meerkat stamp set can be quite versatile using it for birthdays, and/or holiday events.  Today the gang is sending a Valentine message to everyone.


The Meerkats were coloured with Light and Dark Crumb cake Stampin' Blends; the sky behind them with a  Pool Party Stampin' Blend.

Using the Dog Builder punch (which has a tiny heart as well as the dog) a Real Red heart was punched for each of the Meerkats and attached to their hands.  Tiny stitch marks were made with a fine tipped black pen around the outside and a small red rhinestone placed in the center of each heart.


The completed scene was die cut with the So Sweetly Stitched Die and adhered to the card front with dimensonals.

The Real Red card base is layered with Whisper White card stock.  A strip of From My Heart DSP with a lace die cut adhered to the bottom and a 1/8" strip of Real Red to the top was added to the middle.

The sentiment, from "Meant to Be", stamped in Real Red ink and die cut with the Be Mine dies, was added to the left side above the strip.  The rest of the sentiment was stamped directly onto the card front below the strip.


Supplies Used:
Stamps:  The Gang's All Meer, Meant to Be
Inks:  Real Red, Black Memento, Stampin' Blends (Light and Dark Crumb Cake, Pool Party), Fine black marker
Papers:  Read Red, Whisper White, From My Heart DSP
Accessories:  Stitched So Sweetly Dies, Delicate Lace Edgelet die, Dog Builder Punch, Be Mine die, Dimensionals, Real Red Rhinestones


Friday, November 22, 2019

50th Wedding Anniversary Card using Meant to BE

One of my classmates is celebrating her 50th Wedding Anniversary, and I was asked to make a card for this occasion by another classmate.
I think 50th anniversay cards should be elaborate, special and of course made in tones of gold and vanilla.
This is the card I came up with.


Both she and her husband are very musical, so I incorporated some music in the design of the card, placing music sheets behind the die cut hearts.  The music sheets were made using the Sheet Music  background stamp on Very Vanilla paper .

The base card is Thick Very Vanilla (5 by 7"), layered first with Gold Foil, then with Very Vanilla, the edges of which were die cut using the Be Mine Stitched edge die.  I used the largest Stitched Rectangle to die cut the middle of the gold foil layer.  This was used on another project.   This piece was then embossed with the Lace Embossing folder.


The gold foil central oval was die cut with the Heritage Oval die and embossed with the complimentary Heritage embossing folder.  This was adhered to the card front using dimensionals.


Two overlapping gold foil die cut scallop hearts with music sheets behind them were added to this oval near the top, with the numbers "50" inserted in the middle.  Flowers were added along the bottom.  Tiny butterflies are added in several locations.


Gold glitter was added to the center of the flowers.

A very vanilla trim, striped with gold, was added just below the oval edge, and a ribbon was added on top of it on the right side

Here's the inside finished with gold embossing , gold foil die cuts as well as music notes.


Supplies Used:
Stamp: Sheet Music Background stamp, Meant to be
Inks:  Versa mark, Gray Granite
Papers:  Thick Very Vanilla, Very Vanilla, Gold Foil
Accessories:  Heirloom dies and embossing folders, Music Note dies, Lace embossing folder,  14" Natural trim with gold stripe, rhinestones, pearls, dimensionals, Window sheet, Shaker Elements, Junior Alplhabet dies (retired)

Wednesday, January 16, 2019

Hearts Pop Up

For some reason I'm in a 'pop up' kick, making cards that pop up , pop out or explode upon opening. Yesterday I posted a panel pop up featuring "Hey Love" here; and on Sunday an explosion card here.

Today's card is also a pop-up (or pop out), but the pop out's are hearts attached together.


Card Front

The card base is a Thick Whisper White top fold layered with Lovely Lipstick embossed with the Lace embossing folder.
    
On the upper portion I add 2 Whisper White stitched scallop hearts frames left over from another project.

The sentiment, from "Be Mine", was stamped in Lovely Lipstick, and punched using the Pretty Label punch.  To complete the front, two pearls are added on both sides of the sentiment.

Open the card, and out pops 4 hearts attached together.

Here's how to make the heart pop up insert: (The sample below is done using copy paper so as not to use up all my DSP)

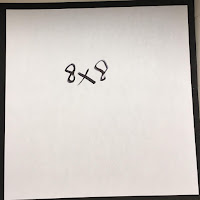
1.  Start with a piece of desired paper 8 by 8" (size may vary depending on the pop up)


2.  Fold in half, with the open ends facing down.


3.  Fold right corner down to bottom open ends followed by the left corner


4.  Place selected die to the upper folds, so that the cut edge is just barely over the fold.  You should see a very tiny open space.  Here I use the Sweet and Sassy heart framelit.


5.  Tape in place and run through Big Shot.


6.  Refold.  Place in inside of card  and position lower heart where you want it.  Adhere.  Add adhesive to the top heart, close card and your pop up is adhered in the card.

You can stamp a sentiment in the center of the inside if you wish.

Supplies Used:

Stamp: Meant to Be
Inks:  Lovely Lipstick
Papers:  Thick Whisper White, Whisper White, Love Me DSP, Lovely Lipstick
Accessories:  Lace Embossing folder, Delicate Lace Edgelit, Be Mine Stitched Framelits, Pretty Label punch, Pearls, Sweet & Sassy Framelits

Sunday, January 13, 2019

Meant to Be Explosion Valentine Card

This fun fold card is exploding with love.  The insert in the card is folded in such away that when the card is opened it literally explodes creating quite a sensation.

There are numerous tutorials available on Pinterest but I used the tutorial on Splitcoaststampers here


The card base is 5 by 10 piece of Flirty Flamingo cardstock scored at 5" to create a 5 by 5" square card.

The front is layered with Whisper White embossed with the Lace Dynamic embossing folder.  A 3 1/4" trip of Lovely Lipstick added down the center is embossed with the new Dot to Dot embossing folder.


To decorate the front, a strip of hearts is die cut in Crumb Cake.  The little hearts left over from the die cut are added on the right upper side of the card.  The Be Mine Stitched Framelits are used to die cut a heart in Flirty Flamingo, Whisper White, and a scalloped heart frame of Balmy Blue.  The little flower is die cut in Lovely Lipstick; a small half flower in Whisper White. The sentiment strip is added between the heart layers. All are layered as seen in the picture of the card.

To finish the card, a small bow is made using the 1/8" Flirty Flamingo ribbon

Open the card, and the surprise begins:

Open the card fully and …..

At the bottom I adhered a 'left over ' heart upon which was stamped "Happy Valentine Day"

Supplies Used:
Stamp:  Meant to be
Inks:  Lovely Lipstick
Papers:  Flirty Flamingo, Whisper White, Lovely Lipstick, Balmy Blue, Crumb Cake, All My Love DSP
Accessories:  1/8" Flirty Flamingo ribbon, Be Mine Stitched Framelits, Dot to Dot Embossing Folder (new), Lace Dynamics Embossing Folder (new)