Showing posts with label Colorful Season. Show all posts

Sunday, December 16, 2018

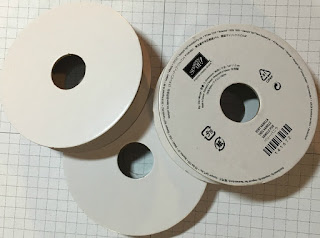
Recycling Ribbon Spools - a tutorial

Have you ever wondered what to do with all those empty ribbon spools?  Yes, they can go in the blue recycling boxes, but why not make something with them?  Some examples ... an ornament for the tree, or a magnet for the refrigerator.

In the tutorial today I will explain step by step how to transform an empty ribbon spool into the refrigerator magnet in the picture below.


Step 1:
Take the spool apart and keep only the 2 end pieces.  Remove any loose pieces of paper.


2. Apply tombo to wrong side of one of the spool ends.  I used only one end for my art piece, but if the spool ends are flimsy adhere the two pieces together.  Place spool onto selected DSP, and cut out with scissors. The DSP I used in the Botanical Bliss SAB (Sale-a-bration) paper .  I just love the butterflies.

3.  Then apply tombo to the other side and place on coordinating card stock and cut out with scissors.


4.  Use a dauber to apply Basic Gray ink to the edges. I also inked the outside edges of the art piece.  This finishes the piece off nicely.


5.  To decorate the magnet, I fussy cut a butterfly from the DSP, and sponged the edges with Basic Gray ink.  The butterfly was added to a 1" circle of Balmy Blue card stock.  I stamped a sentiment from "Colorful Seasons" and added it under the butterfly.  And of course, no project is complete without bling, so I added 3 rhinestones.


6.  Add magnets on the back and you're done.


This is just one idea.  Can you think of others?

Tuesday, May 22, 2018

Lovely as a Tree with Woodland Embossing Folder

Today I wanted to bring back my favourite stamp set and pair it with the Woodlands embossing folder

I haven't done stamping directly onto an embossing folder for a while and I was surprised to learn that my students have never done this technique before.  Guess what they're going to be doing in class!!??

My favourite stamp set?  Lovely as a Tree!

Using the sponge brayer directly onto the embossing folder (the side with the logo on it) Smoky Slate ink followed by Pool Party ink was applied,

Then using Mossy Meadow ink and the largest single tree, I stamped directly onto the embossing folder three times.

Then I inserted a piece of Whisper White card stock onto the uninked side, closed the folder carefully so as not to shift the paper, and ran the folder through the Big Shot.  Magic!!

After trimming the focal piece to a 4 by 5 1/4" piece, some 3/8" mini chevron Old Olive ribbon as added to the lower part and the focal piece then adhered to the card front.

The sentient, stamped from "Colorful Seasons" was punched with a  2" circle punch and added to the card front with dimensionals.


Two blue birds, from the "Swirly Bird" stamp set were provided a bit of color to the card.


Supplies Used:
Stamps:  Lovely as a Tree, Colorful Seasons, Swirly Bird
Inks:  Mossy Meadow, Basic Gray, Pacific Point
Papers:  Always Artichoke, Whisper White
Accessories:  Woodlands embossing folder, 3/8" mini chevron Old Olive ribbon, dimensionals, 2" circle punch


Thursday, June 15, 2017

Colorful Seasons - Fall - Baby Wipe Technique

For the second class card featuring the Colorful Seasons stamp set and its coordinating framelits, the baby wipe technique was used to create the lovely fall colors.  Two cards were made, the second one being a bonus card.

If you're not familiar with the Baby Wipe Technique, check out the tutorial hereThe author did the technique a bit different than the way I did it in class.  For example, I used a large stamping block to put the baby wipes on, and then used one baby wipe folded in 4 to create my "ink pad".
The re-inker colors I used were as follows:  Daffodil Delight, Cherry Cobbler, and Cajun Craze (about 3-4 drops of each color, applied close together).
I stamped 3 large leaves down the left side, and then added 3 small ones.  Some black "dots" were added using the "dot stamp" from "Timeless Texture"
After stamping the sentiment, the art piece was matted with Basic Black cardstock, and added to the Cajun Craze card front using dimensionals.
Before adding the art piece, some 1/4" copper trim was wrapped around the card front and tied at the right side.
This card was a top fold card, so the ribbon was easy to wrap around, but if it was a side fold card, a tiny slit would have to be made in the middle fold so the ribbon could be inserted though that.

Similar stamping was done on the inside, and the sentiment "Thinking of you" , from the same stamp set, was used.
Supplies Used:
Stamps: Colorful Seasons, Timeless Texture
Inks:  Black Memento, Reinkers (Cherry Cobbler, Cajun Craze, Daffodil Delight)
Papers:  Cajun Craze, Whisper White, Black Memento
Accessories:  1/4" copper trim, dimensionals, baby wipes

This is another version of the front of the card, where a different sentiment (from "Just Add Text" is stamped on a separate piece of Whisper White and punched with the new Pretty Label Punch".  The edges are sponged with Cajun Craze ink before adding to the art piece with dimensionals.


Which do you like better?

Colorful Seasons - Summer

I held a class this week focusing on the Colorful Seasons stamp set and its coordinating framelits "Layering Seasons Framelits".

The first card depicted "summer", and I brought in High Tide to help me along.

I just love those Muskoka (or Adirondack) chairs.   They are very popular in this area, and are made not too far from here using recycled materials.  Driving by they are lined up on the side of the road in a wide array of eye catching colors

I must admit though - as lovely as they are to look at they are uncomfortable to sit in. And once you sit in one it requires Herculean effort to extract yourself from its warm embrace.

Back to the card - the sand was stamped on a separate piece of card stock, torn into 2 pieces, sponged with Crumb Cake and then adhered to the art piece.  Some sea grass was added, and then the water was stamped also using a stamp from High Tide.

I love sunrises and sunsets, so sponging these colors was very enjoyable. The colors I used were Melon Mambo, Daffodil Delight and Marina Mist.  These colors were also reflected in the water.
The birds were stamped in Basic Gray, and then the sentiment was stamped.

Using the new multipurpose adhesive sheets to die cut the chairs was a god send.  No messy glue!!! and I was able to add the chairs on the send with just a little bit of a rub.

Supplies Used:
Stamps:  Colorful Season, High Tide
Inks:  Crumb Cake, Old Olive, Marina Mist, Daffodil Delight, Melon Mambo, Basic Gray, Black Memento, Marina Mist marker
Accessories:  Layering seasons framelits, multipurpose adhesive sheets


Saturday, May 20, 2017

Another Cottage Scene

Just because there are new products coming in the new Annual catalogue does not mean that we have to forget about the "oldies".

For instance, in this card, I brought back Swirly Bird and the Window Framelit, and together with some new catalogue products created this cottage scene.

Am I wishing for warm weather or what?


The Soft Suede card base is layered first with Crumb Cake and then Wood Texture DSP which has been embossed with the Brick Embossing Folder. The last two layers were added to the card front at a slight angle

The window was die cut with Crumb Cake card stock and the edges sponged with Crumb Cake ink. A piece of Window Sheet was adhered to the wrong side of the window.

On the other side of the window is a cottage scene depicting a sail boat on a lake, clouds in the sky, and a branch with flowers on it.

The branch and flowers were stamped with "Colorful Seasons"; the water with "High Tide": The boat with "Swirly Bird".  I created the clouds using 3 scallop circles adhered together, a sponge and Marina Mist ink.

On the window sill, I placed 6 stamped and die cut flowers, with leaves and 2 birds from the Swirly Bird set.  Below is a close up of the window.


Supplies Used
Stamps: Colorful Seasons, Swirly Bird, High Tide
Inks: Soft Suede, Marina Mist, Melon Mambo, Basic Black, Real Red, Daffodil Delight, Pacific Point,
Papers: Soft Suede, Crumb Cake, Whisper White, Wood Texture DSP stack, Old Olive
Accessories: Window Sheet, Hearth & Home Framelit, Brick Wall Embossing Folder, 3/8" Burlap ribbon, pearls, small oval punch, dimensionals.

Life is a Beautiful Thing

In less than 2 weeks the new catalogue officially launches.  Have you made a list  yet  from the sneak peak products revealed so far?

For this card I wanted to highlight the stamp set "Colorful Seasons" and its coordinating die set "Layering Seasons Framelits".  To do so I brought in an oldie but goodie "High Tide" to help me out.


I spent many a happy hour on an Adirondack chair watching sunsets/sunrises over Georgian Bay or Lake Simcoe, both favourite summer vacations spots of mine.

Against the background of the colorful sponged sky I placed 2 die cut Adirondack chairs - on sand banks created thanks to High Tide

Supplies Used
Stamps Colorful Seasons, High Tides
Inks: Basic Gray, Crumb Cake, Old Olive, Marina Mist, Melon Mambo, Daffodil Delight, Pacific Point
Papers: Whisper White, Crumb Cake,
Accessories: Seasonal Layers Thinlets


Friday, May 19, 2017

Watercolor Sunset - Fab Friday # 112 & SUO challenge #174

I have always loved the colors in sunsets  Nature has such a wonderful color palate!

For this card I combined 2 challenges - the colors of the Fab Friday challenge - Rich Razzelberry, Calypso Coral and Pacific Point with the watercoloring technique with  SUO Challenges. 

I used 2 different water coloring techniques - the first using a wash to create the sunset; the second a stamped image to create blended colors for the die cuts. Both use water color paper.


Creating the butterfly and flowers:

1.  On a piece of watercolor paper I used the large blotch stamp  from the "Happy Celebrations" to stamp the 3 colors, as shown below.


2. The stamped images were spritzed generously with water allowing the colors to run and blend together
3.  After drying with the heat tool. the butterfly image and 6 flowers (from Seasonal Layer thinlets) were die cut.


The Butterfly Thinlet was die cut in Pacific Point card stock and adhered to the die cut Butterfly framelit die cut (in the middle only).  Some pearls were placed on the body of the butterfly.


Watercolor Background: 

Water was applied to the surface of a piece of  White Shimmer paper.  Each color was then applied in a wash one color at a time.  An Aqua painter can be used, but I used a wide brush.


The watercolor background was cut to 3 3/4 by 5". embossed with the gently falling embossing folder,and then scored 1/2" all the way around. It was matted with Whisper White and then mounted on a Calypso Coral card base.

Completing the Card
 
After placing the butterfly on this piece I realized I needed something else on the card.  So, I die cut a tree branch with Rich Razzelberry card stock (Seasonal Layer Thinlets), adhered it to the card front and clustered the die cut flowers around it.

The sentiment is from Colorful Seasons.

Supplies Used:
Stamp:  Colorful Season, Happy Celebration
Inks:  Calypso Coral, Rich Razzelberry, Pacific Point
Papers: Calypso Coral, Shimmer White, Watercolor Paper, Pacific Point, Rich Razzelberry
Accessories:  Pearls, Gently Falling Embossing Folder, Seasonal Layer Thinlets, Bold Butterfly framelits, Butterfly thinlets, classic Label punch, dimensionals, Home made shimmer mist.