Showing posts with label Congratulations. Show all posts

Wednesday, July 7, 2021

Jar of Flowers for Hand Stamped Sentiments Inspiration Challenge#367

 I have spent a lot of time in my garden this year tending to my blooms, some of which, like the Inspiration Challenge are pink in colour.

Today is a rainy day, so I am tending to some different flowers, making them into a card and submitting it to the Inspiration challenge at Hand Stamped sentiment. In the Inspiration picture I see shades of pink, swirls of gold, and various shades of bright green - thus my colour scheme of  Flirty Flamingo. gold foil, Blushing Bride, and Granny Apple Green. I also used some Heat and Stick powder to add Gold Flakes to the embossed layer.


The card base is Basic White layered with Flirty Flamingo, and then Blushing Bride embossed with the Pretty in Flower Embossing Folder.

Along the left edge of this embossed layer was added a 1/8 by 5" strip of gold foil. Some Gilded Flakes was also added to this layer.

Adding Gilded Flakes:
To do this I swiped a Versa Mark ink pad randomly across the surface of the embossed piece, and added Heat and Stick powder. After activating this powder with the heat tool, the Gilded Flakes were added.  See below.


For the focal image I used the floral and jar image from the Jar of Flowers stamp set, as well as the Jar Punch.
Both the flower and jar  were stamped separately.  The flowers were stamped with Black Memento ink onto some Basic White card stock. The jar was stamped on Flirty Flamingo card stock with Versa Mark and embossed with Gold embossing powder. The jar was then painted with White shimmer paint. When the paint was dry it was punched with the Jar Punch.


The flowers were coloured with Stampin' Blends (Flirty Flaming, and Granny Apple Green.  Some Gilded Flakes were added to the flower centers, as well as the flower sprigs.
I also added some extra die cuts that I made using a Curvy Die.  These were die cut in Gold Foil and Granny Apple Green.


The flowers were added to the jar top and together the unit was added to a piece of Basic White card stock die cut with a Contour Scallop die using dimensionals. Some gold trim was wrapped around the jar top and a bow made with the same trim was added to the front

The Scallop Contour die was then added to the embossed card front using dimensionals.  Some gilded gems were added to the die cut.


The sentiment is from "Many Messages" and is added extending from the junction of the flower and the jar.

Supplies Used:
Stamps:  Jar of Flowers, Many Messages
Inks:  Black Memento,  Versa Mark, Stampin' Blends ( Flirty Flamingo, Granny Apple Green)
Papers:  Thick Basic White, Basic White, Flirty Flamingo, Granny Apple Green Gold Foil
Accessories:  Pretty in Flowers Embossing Folder, Heat & Stick powder, Gilded Flakes, Gold twine, Curvy Die, Jar Punch, Many Messages die, Gilded Gems, Scallop Contour due                                                                                                                                                                                                                                          


Monday, December 21, 2020

Stars - Try Stampin' on Tuesday #486

 For the sketch challenge at Try Stampin' on Tuesday #486 I used the Rainbow Glimmer paper as a background for some layered silver foil stars. And because there is a lot of glitter on this card it was really hard to get a quality picture.


I started out by die cutting 3 different sizes of stars using silver foil as I knew I wanted to use them on this card. Quite by accident one fell upon some Rainbow Glitter paper I was using for another project.   The rest is history! 

The Rainbow Glitter paper was matted with Whisper White card stock and then mounted on a Night of Navy card stock base.  Towards the bottom half is added a 1" strip of Night of Navy card stock embossed with the Dainty Diamond Embossing Folder. and matted with Dazzling Diamond glitter paper.

Eight stars in total were die cut - 2 for each star- a solid stitched star, and a more intricate patterned star. The two same size stars were adhered together and then added on the card front as shown. A rhinestone was added to the center of each star.


The sentiment, from Itty Bitty Greetings, stamped in Night of Navy ink, was punched with the Classic Label Punch and matted with Silver foil. It was added to the card front along the center strip.


Supplies Used:

Stamp:  Itty Bitty Greetings

Inks:  Night of Navy

Papers:  Night of Navy, Whisper White, Rainbow Glitter, Dazzling Diamond Glitter, Silver Foil

Accessories:  So Many Stars Dies, Dainty Diamond Embossing Folder, Rhinestones, Classic Label Punch,

Tuesday, May 12, 2020

Lilypad Lake Sail boats on a Choppy Lake

Anyone who owns a sail boat is itching to get on the water and go for a sail.  However, the month of May this year has been anything but cooperative, with record low temperatures, even snow flurries. Despite that some brave souls do venture out for a sail,


 The card front is in 3 layers. In order to create the matted frame look, the top 2 layers are die cut with the Stitched Rectangle dies, the Whisper White layer smaller than the Balmy Blue layer.

The scene is created on the 3rd layer, which has the same dimensions as the first two layers.

The sun was masked out while a brayer was used to colour the sky and water - the sky in Balmy Blue, the water in Pool Party with some Pacific Point ink.  After the mask was removed, the sun was coloured with Daffodil Delight ink, after which a wind cloud was created covering part of the sun and sky.


Some Pacific Point ink was applied to the lake water using the water stamp.  Then I made the water look choppy by adding glitter embossing paste randomly over the water

After colouring the sail boats with Stampin' Blends, they were die cut using the Lakeside die. They were arranged on the lake as shown.

Once the 3 layers of the front were completed, they were added to a Balmy Blue card base and the bottom corners were decorated with die cut grass.


Supplies Used:
Stamps:  Lilypad Lake, Sailing home
Inks:  Daffodil Delight, Balmy Blue, Basic Gray, Pool Party, Pacific Point, Stampin' Blends (Daffodil Delight, Real Red, Night of navy, Balmy Blue)
Papers:  Balmy Blue, Whisper White, Garden Green, Pear Pizzazz
Accessories:  Stitched Rectangle dies, Lakeside dies, Glitter embossing paste

Saturday, January 11, 2020

Congratulations - Freshly Made Sketches #417

It's is important that accomplishments be recognized and rewarded so I like to l have some ready made cards on hand to reflect that.

This card was made using the sketch challenge at Freshly Made Sketches #417


Whenever we are proud of someone we usually say we are as "proud as a peacock", so I turned to the Royal Peacock stamp set with its coordinating dies. This set, from the Annual Catalogue, has some wonderful brightly coloured foil and Specialty DSP as part of the suite.

The card base is Thick Whisper White card stock layered with Old Olive Foil Specialty DSP

Three feathers were die cut using the feather die and one each of the three foil colours - Blueberry Bushel, Old Olive, and Pretty Peacock.  They were clustered together and tied with a  3/8" Old Olive/Peacock Reverse ribbon before being adhered to a piece of Whisper White card stock with glue dots.  This was matted with some Proud Peacock foil before being added to the far right edge of the card front.


The sentiment, stamped with Pretty Peacock ink on Whisper White, is matted with Blueberry Bushel foil and adhered to the middle of the card straddling the art piece using dimensionals.

Nobel Peacock rhinestones, rhinestones that are in the same colours as the foil and DSP,  are added to the sentiment piece and to the upper and lower art piece.

Supplies Used:
Stamps:  Peaceful Moments, Noble Peacock
Inks:  Pretty Peacock
Papers:  Thick Whisper white, Noble Peacock Specialty DSP, Noble Peacock Foil, Whisper White
Accessories:  Noble Peacock Dies, 3/8" Old Olive/Peacock Reversible Ribbon, Noble Peacok rhinestones, glue dots, dimensionals


Sunday, November 25, 2018

Tropical Escape Congratulations - Paper Players #420

This week at the Paper Players Blog, the challenge is a sketch challenge.  There's nothing I love better than a sketch challenge.

I learned something new about importing pictures from my phone to my computer using an app and my Wi Fi connection.  Usually I struggle with cords or if I can't find the cord then I download the pictures into my e-mail and then download into a file etc etc.  It's quite a process.  Now, with this free app I scan the picture directly into my computer through my Wi Fi.  Marvelous!!  I feel quite proud of myself. And the time I have saved!

Back to my card.  Below is a picture of the card I made for the Paper Players sketch challenge #420


On a Granny Apple card stock card base I adhere a Whisper White layer embossed with the tufted embossing folder.

On this embossed layer I adhere two strips of Tropical Escape DSP both matted with Granny Apple card stock.  The first piece if 1 1/4" by 4", and the second 1 1/2 by 4".  In the center is a 1 1/2" square upon which is a Tropical leaf and flower embellishment.

The large tropical leaves were fussy cut from the DSP, as were the 3 pink flowers. After sponging the edges of the leaves with Mossy Meadow ink and the flowers with Petal Pink ink I shaped them and adhered them to the 1 1/2" square using a hot glue gun.  Some Clear Wink of Stella was applied to the leaves, and pink rhinestones were placed in the center of the flowers.


The sentiment, from "Hand Delivered" was punched with the Classic Label punch and adhered below the embellishment.

Supplies Used:
Stamp:  Hand Delivered
Inks:  Black Memento, Mossy Meadow, Petal Pink
Papers:  Granny Apple Green, Tropical Escape DSP
Accessories:  Pink rhinestones, hot glue gun, Clear Wink of Stella


Saturday, July 29, 2017

Fabulous Flamingo

The temperature this summer in Ontario has definitely not been tropical, but I was in the mood to use the new Flamingo stamp set. Because the only flamingos I have seen have been birthday lawn signs, I googled pictures of this wonderful bird.

The image of the Flamingo was stamped in a 3 step process using the following colours:  Flirty Flamingo, Powder Pink, and Flirty Flamingo. A Basic Black marker was used to highlight the eye and bottom of the beak.

The Flamingo is standing in water stamped with Marina Mist ink; the grass was stamped with Lemon Lime twist..The tropical sky was sponged lightly with Marina Mist, Daffodil Delight and Flirtatious Flamingo.  These colours were dragged into the water.

Three palm leaves were stamped using the rock and roll method - first in Lemon Lime Twist and then the edges rolled in Garden Green.  One of these leaves was stamped on a separate piece of Whisper White card stock and fussy cut. After sponging the edges I adhered it over the other two using dimensionals.

After matting the focal image with Gold Foil, it was adhered to the Garden Green card front.  Palm leaf images were stamped on the side of this card front with Garden Green before adhering this focal image.

Supplies Used:
Stamp:  Fabulous Flamingo
Inks:  Flirtatious Flamingo, Powder Pink, Garden Green, Basic Black marker, Marina Mist, Daffodil Delight, Lemon Lime Twist
Accessories:  Dimensionals.

Friday, February 3, 2017

Congratulations, I Knew You Could

This will be one of the cards to be made in class in a couple of weeks.  During SAB my plan is to include a card made with a SAB stamp with each class.  So far the "Hey, Chick", Avant-Garden and So Much" SAB stamps have been used.  With this class, coordinating the Designer Tee with the Custom Tee stamp makes perfect sense.

The card is like a flip chart. In other words there are 3 shirts on this card, and the cards flip up to reveal a different message.  Read the message on the first card, then flip the shirt up to read the message on the second shirt.  Finally, open the card to read the message on the third and last shirt.

The Pacific Point card base is layered with a Sparkle embossed Whisper White layer.  To the left is a 2" strip of Animal Party DSP, with a 1" strip of Garden Green cardstock adhered to this DSP to the left side.

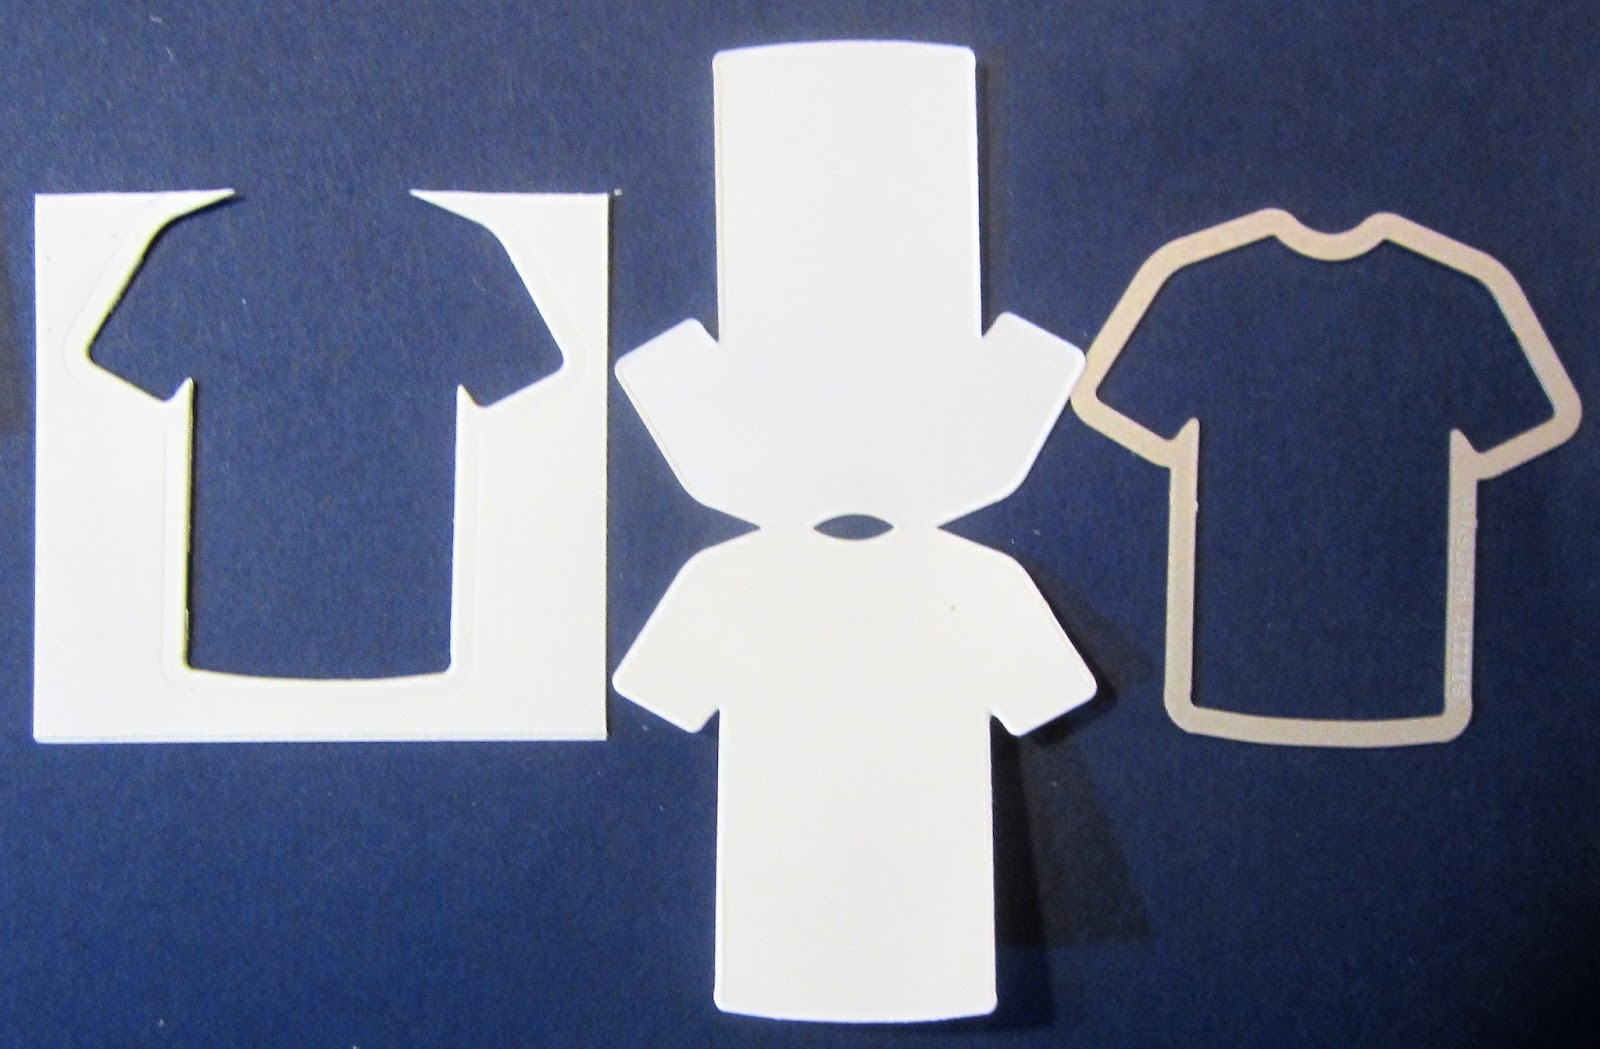
The shirt is two shirts attached at the shoulders.  It was made by folding a 3 3/4 by 5 1/4" piece of Whisper in half and placing the shirt framelit with the cutting edge slightly over the fold line.


After running that through the Big Shot, you have a Siamese shirt. See below.


The shirt on the front is decorated with stripes on the sleeves and the hem. This stamped decoration is common to all three shirts. The sentiment on the front "I think I can...." is stamped using the Garden Green and Real Red markers.

The first card is flipped up to reveal a second shirt which has another sentiment stamped in Pacific Point ink.  This shirt is adhered, at an angle, to a Whisper White square die cut with the square stitched die and stamped with the Touches of Texture stamp.  It is then matted with a Pacific Point die cut square.

This art piece is adhered to the card front using dimensionals.

On the inside the third die cut shirt has the final sentiment stamped on it.

Supplies Used:
Stamps: Designer Tee, Custom Tee (SAB), Touches of Texture
Inks: Black Memento, Pacific Point, Markers (Garden Green & Real Red), Tangelo Twist
Papers: Pacific Point, Whisper White, Party Animal DSP, Garden Green card stock
Accessories: Stitched Shape dies, Tee Builder framelits, Sparkle embossing folder, Classic Label Punch.


Thursday, March 24, 2016

Congratulations on a Beautiful Ride - Inkspirational Colour Challenge #104 and Fab Friday #83

This card combines 2 challenges - a sketch challenge with Fab Friday and the colour challenge with  Inspirational Challenges.
The colour challenge:  Use the colours pink and grey.

To make my card, I placed the sketch on its side.


The stamp set "Beautiful Ride" was used for this challenge.  The car was coloured pink using Pink Pirouette and Blushing Bride on the body of the car and the balloons, and Smoky Slate and Basic Gray for the wheels and luggage. An Aquapainter and a blender pen were both used.

To make the image piece a bit smaller, I used my trimmer to cut up to the balloons on both sides, and then with paper clips cut around the balloons.  They actually do seem to be blowing in the breeze.

To add a bit of bling to the card, the Wink of Stella clear glitter brush was used with the star template.


Supplies
Stamps: Beautiful Ride, And Many More
Inks: Black Memento, Pink Pirouette, Blushing Bride, Smoky Slate, Basic Gray
Papers: Basic Gray, Smoky Slate, Whisper White, Pink Pirouette DSP, Smoky Slate DSP
Accessories: Wink of Stella clear glitter brush, dimensionals, duo ticket punch, star decorative mask


Sunday, July 20, 2014

Congratulations using Blendabilities

Today I thought I would share a card I partially cased from Diane Dimich, whose card and video I saw on Pinterest.  It uses embossing with white embossing powder and 3 colours of blendabilities.


Diane explains the technique very well on  her video.  You can see the video on You Tube
here

Stamp: Bravo
Inks: Versa Mark, Blendabilities (Light Old Olive, Dark Rich Razzelberry, Dark Coastal Cabana)
Papers: Rich Razzelberry, Whisper White, Basic Black, Moonlight Series Designer Paper Pack
Accessories: White embossing powder, 3/8" Blackberry Bliss stitched satin ribbon

Thursday, June 5, 2014

Starfold Card

Today's a cool day, so back to the track pants and long sleeve shirts.  I've stayed indoors most of the day except to go out to deliver a catalogue to one of my customers.  The winter has really done a number on our roads, which are full of pot holes - and if it isn't the potholes its the construction.  On the way to my customer I passed a now empty hospital and was filled with memories of the days I taught nursing students on those wards.  If those walls could speak!  I sometimes picture the ghosts of patients and staff walking those halls and flying out the gaps of the once paned windows. Silly of me I know.  I wonder when a decision will be made what to do with those now ruins.

Because of the cool weather, I was once again indoors in the craft room.  That's no sacrifice believe me.  But first I received a phone call from a client who had ordered a hand made card from me before.  I also volunteered with her doing foot care so I know her well.  She wanted to place another very special order for a very special occasion.  I was happy to oblige, so when I went down to the craft room I made that card first.  I'll post the card later.

The card I want to post today is a Starfold card - one I made last night, but finished this morning.
I have made this card before for a design team I was on - and even did a tutorial, but do you think I could find it?  No!  So I went to the Internet and found  a You Tube video (no speaking but good demonstration and print over) that I followed.  You can find the video here Hope you find it helpful.


I used Island Indigo paper and retired DSP.  The rose was made using the Spiral Rose die.

The envelope was made using the envelope maker.

This shows the card opened.

Some people have commented that they found the linked video too difficult to follow because it is in metric.  Being Canadian I forget that not everyone is conversant in metric.  So I found another video on Splitcoast stampers for you.  Just follow the link to this tutorial which has a video on it.


Thursday, April 25, 2013

Congratulations - Mojo Monday #290

There are now flood warnings for my area!  The water that caused such havoc to the north and east are now heading this way, swelling waterways on its route.  I am feeling uneasy because I have gone through a flood before and I don't care to repeat the experience.

I've gotten a little behind this week, but today is my catch up day.

First order of the day is the card is for the Mojo Monday sketch challenge here.


This Gumball Green A2 card is layered with first Whisper White card stock, then Sunshine & Sprinkles DSP.

The image panel consists of 4 squares of 1 1/8 by 1 1/8" Whisper White card stock laid next to each other on a piece of Gumball Green card stock.
On each of these squares was adhered a flower from the Fabulous Florets stamp set.  Each flower was stamped with Black Stazon and coloured with markers and an Aqua painter, then cut out.  I also stamped and coloured 2 leaves which were placed by the first and third flower.  Some dazzling details was placed in the middle of each flower and along the edges.

Some stitched Gumball Green ribbon was placed along the bottom of this panel, and a bow at the right side.

Here's a summary of the stamps/materials used:

Stamps: Fabulous Florets, Curly Cute
Inks: Black Stazon, SU markers (Tangerine Tango, Summer Starfruit, Old Olive)
Papers: Gumball Green, Whisper White, Sunshine & Sprinkles DSP
Accessories: Stitched Gumball Green satin ribbon, Dazzling details, rhinestones

Thanks so much for stopping by.

Monday, January 7, 2013

Everything Eleanor Congratulations - Unscripted Sketches #192

I love doing triple stamping, but today's card is done using double stamping.  I don't know if that is the correct word for this technique or not, but that's what I'm calling it.  This technique was used for the sketch challenge with Unscripted Sketches here

SK 160 US 192 

Stamps:  Everything Eleanor, Delightful Dozen
Inks: Crumb Cake, Primrose Petals, Pool Party, Black Stazon
Papers: Primrose Petals, Whisper White, More Amore DSP
Accessories: Flattened bottle cap, 1/4" Primrose Petal stitched satin ribbon, glue dots

Sunday, December 30, 2012

Congratulations (On Your New Home)

There's nothing more exciting than moving to a new home.  A friend of mine recently moved from California to West Virginia and for the first time in her life experienced the changing colors of the leaves of our trees and last week - her very first snow fall!  Can you imagine having never seen snow?  We certainly got dumped on since Boxing Day and today I love it!  Next month I may not feel the same way.
Anyway, this card is for all of those who have moved to a new location.  From my house to yours!!!
I based the card on the sketch on Unscripted Sketches here


Stamp:  Layered Labels
Ink: Island Indigo
Papers: Island Indigo, Crumb Cake, Sycamore Street DSP (SAB), Whisper White, Tangerine Tango, Pool Party
Accessories: Apothecary Accents framelits, Square lattice folder, Small star punch, rhinestones, 1/4" Tangerine Tango satin ribbon (SAB)

Tuesday, May 15, 2012

Up in the Air Congratulations - Technostamper 221

This is a very versatile stamp set because when I decided to use it for the Technostamper Monday sketch challenge #221 here I started out thinking about a graduation card, but after I had the card made, I changed my mind and thought that it would make a cute new baby card. So, I am leaving the inside blank, except for some decoration.
This card features the retiring hostess set "Up in the Air" and retiring designer paper Paisley Prints designer paper. The ribbon is also retiring. All edges were sponged with Always Artichoke ink.

Here is the sketch:
 

Stamps: Up in the Air
Inks: Black Stazon, SU markers, Always Artichoke
Papers: Old Olive, Whisper White, Paisley Prints designer paper
Accessories: Labels framelits, 5/8" Old Olive satin ribbon, dimensionals.