Showing posts with label By the Tide. Show all posts

Wednesday, February 17, 2016

Picture Perfect meets By the Tide

I just loved this card when I saw it on Pinterest, and I unabashedly cased it.  It was originally made by a demonstrator in Germany, Carmen  Morris at "Caringforstamps.blogspot.nl"

  • The base card is Soft Suede, layered with crumb cake.
  • The images are stamped on  Very Vanilla cardstock, using only 2 colours of ink:  Crumb Cake and Soft Suede.  A piece of Burlap ribbon was adhered randomly near the bottom right.  Gorgeous grunge was used to mimic the air bubbles from the fish.
  • The top was torn, sponged, and Baker's twine was wrapped around it.
  • The star fish, from Picture Perfect, was stamped on a separate piece of paper and stamped first with crumb cake and then with Soft Suede.  It was cut out, the edges sponged, and mounted onto the card front using dimensionals over the burlap ribbon.
  • All edges were sponged with Soft Suede ink, and on the image piece part of the middle was sponged as well.

Stamps: Picture Perfect, By the Tide, Gorgeous Grunge
Inks: Soft Suede, Crumb Cake,
Papers: Soft Suede, Crumb Cake, Very Vanilla
Accessories: Baker's twine, dimensionals, Burlap ribbon

Monday, September 7, 2015

Time for Fishing - The Friday Mashup #224

The challenge this week with the Friday Mashup  is to make a card with a hunting or a fishing theme, using the following colours:  Early Espresso, Wild Wasabi, and Marina Mist.  I'm afraid I forgot about the colours required for the challenge, so I used some different colours.  I managed to get Marina Mist in, but that's all.  But my card does have a fishing theme.  So I'm going to share the card I made.

  • To make the image, I sponged the following colours on a piece of Whisper White paper:  Marina Mist, Pacific Point, Daffodil Delight, Tangelo Twist,
  • The stamps are from Stampscape.  They were stamped with Archival Ink (Black to create the scene).  The entire piece was embossed using clear embossing powder.
  • The fish on the right side are from "By the Tide" stamp set.  They were coloured with alcohol markers, cut out and embossed  using clear embossing powder.  A tiny hole was pierced near the tip of the mouth (I used a piercing tool) and a piece of linen thread was inserted through them to anchor the fish together.  The fish were mounted on a piece of blue cardstock using dimensionals.
  • The sentiment is from another fishing stamp set I have.  It is stamped in Archival ink on crumb cake cardstock and  punched with the word window punch and matted with a piece of  Modern Word label punch.
Supplies Used:
Built for Free Using: My Stampin Blog

Monday, April 22, 2013

Cards Made Using Bubble Wrap Backgrounds

In this week`s class we are going to have some fun with bubble wrap, creating some fun backgrounds!  I have a lot of bubble wrap lying around for use in my craft shows and this week I thought I would put it to another use.  Even Stampin`Up is using Bubble wrap in their shipping boxes rather than the `snake``

I`m going to show you 3 different cards with 3 very different backgrounds made using bubble wrap.  For all these backgrounds, I used glossy paper cut into 4 1/4 by 5 1/2

To begin, I used the F acrylic block and cut a piece of bubble wrap a little bigger than this block.  This was taped down to the back of the block.

When inking and using, don`t press too hard as you don`t want to pop the bubble wrap.  Yes, I know it makes that fun sound------

Do check the bubble wrap to make sure some of the bubbles have not been pre popped before using it on the back grounds.

Simply ink up the bubble wrap just like any other stamp and press down with even pressure onto the glossy card stock.

Card 1:  Fabulous Florets


For this background, I inked up the Bubble wrap with Primrose Petals ink and stamped onto the glossy card stock and let it dry.  Notice that each little bubble is a little different in shape and texture and makes a different impression.
I decided to make it into an Anniversary Card.

Stamps: Fabulous Florets, Teeny Tiny Wishes
Inks: Primrose Petals, Black Stazon, Versa mark
Papers: Primrose Petals, Whisper White, Glossy card stock, Wild Wasabi
Accessories: Wild Wasabi embossing powder, Clear embossing powder, Word Window punch, Modern Word Label punch, 3/8`` white taffeta ribbon, Large rhinestones, medium rhinestone, dimensionals, scallop trim border punch, Bubble wrap

Card 2:  Forever Young
A different way of creating the background was used on this card - referred to as the kissed bubble wrap background.
To do this, apply Primrose Petals ink to the entire piece of glosssy card stock, then spritz lightly with water - so the ink pools ever so slightly. The first piece I tried I spritzed too much and the resultant background, although interesting, did not demonstrate the bubble wrap pattern.  It can be used on another card.
Then apply a clean piece of bubble wrap over the paper, press down and wait a moment before peeling off.  Set aside to dry thoroughly.  I love the pattern this created.


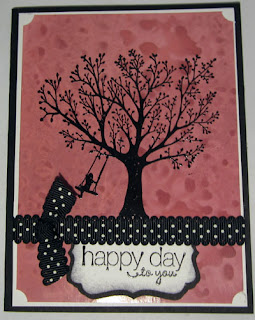
I decided to emboss an image directly over the background - using the tree from Forever Young and black embossing powder.
The base card is Basic Black, layered with Whisper White, and finally the background paper.  I notched out the corners of this layer.
A piece of black dotted scallop ribbon was attached just below the tree, and the sentiment punchie was attached just underneath the ribbon.

Stamps: Forever Young, Friendly Phrases
Inks: Versa Mark, Primrose Petals
Papers: Basic Black, Whisper White, Glossy white
Accessories: Black embossing powder, 1/4`Black scalloped dotted ribbon, Decorative Label punch, corner notching punch, bubble wrap

Card 3:  By the Tide:
This next version is simple as well as it is basically emboss resist.
Using a clean piece of bubble wrap, ink it up with Versa mark ink and press it against a piece of glossy card stock.
Cover the paper with clear embossing power, tap off excess, and heat set.
Using a second piece of bubble wrap, ink with desired color (I used Pacific Point), and press onto embossed background.  Dye based inks work best.
Take a clean cotton ball, gently rub in circles over the card stock.  This will rub off any ink that has adhered to the embossed bubbles and will give your background a softer look.


The bubbles reminded me of an aquarium, so I made a masculine fish card using By the Tide. 
First I die cut the background using the Apothecary accessories framelits. The edges were sponged with Midnight Muse ink.
Then using the sea weed stamp, I stamped that image twice on the die cut.  They stamped lightly, but that was what I wanted - they looked like they were under water.
Next I stamped 2 fish using Midnight Muse ink and cut them out.  They were placed on the die cut background using dimensionals.

The base card is Midnight Muse, layered with a chevron embossed Whisper White layer that had its edges inked.  A piece of stitched Midnight Muse satin ribbon was attached near the top of the card under the die cut, which was attached to the card using dimensionals.

Stamps: By the Tide, Teeny Tiny Wishes
Inks: Pacific Point, Midnight Muse
Papers: Midnight Muse, Whisper White, Glossy white card stock
Accessories: Clear embossing powder, Chevron folder, Word Window punch, Modern Word Label Punch, Apothecary accessories framelits, 3/8`` stitched Midnight Muse satin ribbon, dimensionals, bubble wrap.

Hope you enjoyed these quick and easy ways to use bubble wrap to create WOW backgrounds

Saturday, February 16, 2013

Nantucket Oceanside Inn Perch - Try Stampin' on Tuesday #105

The sketch challenge with Try Stampin' on Tuesday here enticed me and I just had to make a card.


The background for the Perch is a watercolor wash - using watercolor crayons on watercolor paper- blending the colors with an Aqua Painter.  I couldn't think of a sentiment, but the card could be used for any masculine occasion.

Stamp  By the Tide
Inks: Watercolor crayons, Not Quite Navy ink
Papers: Island Indigo, River Rock, Baja Breeze, Watercolor paper, Patterned Paper Pack DSP
Accessories: Chevron folder, Square Lattice folder, 2 1/2" circle punch, 3/4" circle punch, 1" circle punch, dimensionals, Aquapainter

Friday, February 1, 2013

Embossed Sea Horses - Chellenge 208 LNS

This week the challenge is to use heat embossing on a card or project.  Heat embossing is one of the techniques I like to do best as it always has that wow factor.  I don't think I ever get tired of watching the embossing powder change to a metallic sheen, in waves, right in front of my eyes.

In this another masculine card, I used heat embossing in various ways: on the image itself, for the scalloped border, in the center of a brad, as edging around the sentiment, and the sentiment itself. The image is from the By the Tide stamp set.  I now have 4 different masculine cards made using this set.

1. Image:  It was embossed with pewter embossing powder onto Whisper White card stock, punched out with the 1 3/4 by 7/8" oval punch and matted with a chocolate chip scallop oval punchie. This was attached to the Marina Mist panel with dimensionals.
2.  Scallop border: The Versa mark pad was used to put Versa mark on a large area of Whisper White card stock.  Pewter embossing powder was applied and heated with the embossing tool.  When cooled the edge was punched with the scallop border punch.
3.  Build your own brad: There was enough embossed paper left over after #2 that I punched a 1/2" circle and placed it inside the build a brad.
4.  Sentiment: The sentiment was stamped with Versa Mark onto Whisper White and embossed with Pewter embossing powder.  The decorative label punch was used to punch the sentiment.  A versa mark pen was used to apply Versa mark to the edges of the punchie and embossed.

The background of the card was made by lightly stamping the image of the seaweed in Always Artichoke ink and the fish in basic gray ink. The Square lattice embossing folder was used to emboss the background layer. Then I   The I  lightly sponged the edges and entire surface with Marina Mist ink.
Stamp: By the Tide, Wacky Wishes
Ink: Versa Mark, Basic Gray, Always Artichoke, Marina Mist
Papers: Chocolate Chip, Whisper White, Marina Mist
Accessories: Scallop border punch, Decorative label punch, Scallop oval punch, 1 3/4 by 7/8" oval punch, 1/8" Marina Mist taffeta ribbon, Build a Brad, Square lattice folder, dimensionals, Hand held hold punch.

Wednesday, January 30, 2013

Shelling out Wishes - Paper Craft Crew Challenges 27

I was born near the ocean and crossed the Atlantic to come to Canada when I was six.  The sea has always had a special place in my heart.  That's why I love By the Tide stamp set so much.  Plus, the images make excellent masculine cards.
This is the card I made for the Paper Craft Crew Challenges here

PCCCS027-Sketch 

The card is almost monochromatic.  If it wasn't for that touch of pink it would be.
I started out with a base of Crumb Cake, layered with Whisper White, and then a layer of Parker's Design Specialty Paper.
The image of the Conch Shell was colored using SU markers and an Aqua painter.  After it was dry, I cut it out and mounted it on an Apothecary accents framelit but not before I  stamped the script image on the die cut with River Rock ink.

All edges were sponged with Soft Suede ink.

Stamps: By the Tide, Vintage Verses (SAB)
Inks: Black Stazon, River Rock, Soft Suede, SU Markers
Papers: Crumb Cake, Whisper White, Parker's Design Specialty paper
Accessories: Apothecary Accents framelits, 3/4" circle punch, 1" circle punch, Pearls, dimensionals, Natural Trim Ribbon

Monday, January 28, 2013

By the Tide - birthday Technostamper challenge 248

We got a lot of snow today, but I have a wonderful neighbour and son.  My neighbour brought his snowblower over, and because it kept snowing, my son had to shovel an hour later.  Tomorrow the forecast is for freezing rain.  Yuck!!  I'd love to be some place warm right now and go scuba diving just to see some fish.  That was the inspiration for the card I made for the TSS Lunchtime challenge here 
So glad you`re back!


I put the sketch on its side to make this card.
The base of the card is Not Quite Navy card stock, layered with Whisper White, and then layered with another layer of Whisper White.  This third layer was stamped randomly with the stamps from the By the Tide stamp set using Not Quite Navy ink.

The 4th layer was a smaller Whisper White panel embossed with the Chevron folder and matted with Not Quite Navy.  The DSP layer along the bottom is from the color pack and it's also matted with Not Quite Navy.

All edges are sponged with Not Quite Navy ink.

The image was stamped using Black Stazon ink onto a Whisper white oval, die cut using the Ovals framelits.  The perch was colored using SU markers and an Aqua painter.  The edges were sponged using Not Quite Navy ink and then pierced using the mat pack &; paper piercer.  I also pierced the Not Quite Navy Oval mat.  The sentiment was stamped directly underneath the Perch.

This Oval unit was attached to the rest of the card using dimensionals.

To bring in a little color from the Perch, I attached a piece of Daffodil Delight rick rack which was 
die cut using the Tasteful Trim die.

Stamps: By the Tide, Petite Pairs
Inks: Not Quite Navy, SU Markers
Papers: Not Quite Navy, Whisper White, Not Quite Navy Designer Paper, Daffodil Delight
Accessories: Ovals framelits, Tasteful trim die, Mat pack & Paper piercer, Aqua painter, dimensionals, Chevron folder

Wednesday, January 23, 2013

There's Only One You - The Paper Players #129

The challenge this week with the Paper Players is a clean and simple sketch.  These are notoriously difficult for me so I hope I accomplished the task.

Here is the card:


I started by inking up the stamp of the seaweed in Always Artichoke and stamping off before stamping it onto a piece of Whisper White card stock.  The image of the Lobster was then stamped over top of the sea week using Black Stazon.  The Lobster was colored with Bravo Burgundy and Basic Gray markers using an aqua painter, then covered with Crystal Effects.  I hope I colored the Lobster correctly as I have never seen a lobster before and had to look up a picture of it on the internet.

Stamps: By the Tide, Vintage Verses (SAB)
Inks: Always Artichoke, Bravo Burgundy, SU markers (Bravo Burgundy, Basic Gray, Always Artichoke)
Papers: Bravo Burgundy, Whisper White
Accessories: Fancy Fan folder, Crystal Effects

All edges were sponged with Bravo Burgundy ink.