In this week`s class we are going to have some fun with bubble wrap, creating some fun backgrounds! I have a lot of bubble wrap lying around for use in my craft shows and this week I thought I would put it to another use. Even Stampin`Up is using Bubble wrap in their shipping boxes rather than the `snake``
I`m going to show you 3 different cards with 3 very different backgrounds made using bubble wrap. For all these backgrounds, I used glossy paper cut into 4 1/4 by 5 1/2
To begin, I used the F acrylic block and cut a piece of bubble wrap a little bigger than this block. This was taped down to the back of the block.
When inking and using, don`t press too hard as you don`t want to pop the bubble wrap. Yes, I know it makes that fun sound------
Do check the bubble wrap to make sure some of the bubbles have not been pre popped before using it on the back grounds.
Simply ink up the bubble wrap just like any other stamp and press down with even pressure onto the glossy card stock.
Card 1: Fabulous Florets
For this background, I inked up the Bubble wrap with Primrose Petals ink and stamped onto the glossy card stock and let it dry. Notice that each little bubble is a little different in shape and texture and makes a different impression.
I decided to make it into an Anniversary Card.
Stamps: Fabulous Florets, Teeny Tiny Wishes
Inks: Primrose Petals, Black Stazon, Versa mark
Papers: Primrose Petals, Whisper White, Glossy card stock, Wild Wasabi
Accessories: Wild Wasabi embossing powder, Clear embossing powder, Word Window punch, Modern Word Label punch, 3/8`` white taffeta ribbon, Large rhinestones, medium rhinestone, dimensionals, scallop trim border punch, Bubble wrap
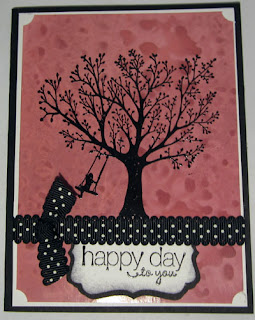
Card 2: Forever Young
A different way of creating the background was used on this card - referred to as the kissed bubble wrap background.
To do this, apply Primrose Petals ink to the entire piece of glosssy card stock, then spritz lightly with water - so the ink pools ever so slightly. The first piece I tried I spritzed too much and the resultant background, although interesting, did not demonstrate the bubble wrap pattern. It can be used on another card.
Then apply a clean piece of bubble wrap over the paper, press down and wait a moment before peeling off. Set aside to dry thoroughly. I love the pattern this created.
I decided to emboss an image directly over the background - using the tree from Forever Young and black embossing powder.
The base card is Basic Black, layered with Whisper White, and finally the background paper. I notched out the corners of this layer.
A piece of black dotted scallop ribbon was attached just below the tree, and the sentiment punchie was attached just underneath the ribbon.
Stamps: Forever Young, Friendly Phrases
Inks: Versa Mark, Primrose Petals
Papers: Basic Black, Whisper White, Glossy white
Accessories: Black embossing powder, 1/4`Black scalloped dotted ribbon, Decorative Label punch, corner notching punch, bubble wrap
Card 3: By the Tide:
This next version is simple as well as it is basically emboss resist.
Using a clean piece of bubble wrap, ink it up with Versa mark ink and press it against a piece of glossy card stock.
Cover the paper with clear embossing power, tap off excess, and heat set.
Using a second piece of bubble wrap, ink with desired color (I used Pacific Point), and press onto embossed background. Dye based inks work best.
Take a clean cotton ball, gently rub in circles over the card stock. This will rub off any ink that has adhered to the embossed bubbles and will give your background a softer look.
The bubbles reminded me of an aquarium, so I made a masculine fish card using By the Tide.
First I die cut the background using the Apothecary accessories framelits. The edges were sponged with Midnight Muse ink.
Then using the sea weed stamp, I stamped that image twice on the die cut. They stamped lightly, but that was what I wanted - they looked like they were under water.
Next I stamped 2 fish using Midnight Muse ink and cut them out. They were placed on the die cut background using dimensionals.
The base card is Midnight Muse, layered with a chevron embossed Whisper White layer that had its edges inked. A piece of stitched Midnight Muse satin ribbon was attached near the top of the card under the die cut, which was attached to the card using dimensionals.
Stamps: By the Tide, Teeny Tiny Wishes
Inks: Pacific Point, Midnight Muse
Papers: Midnight Muse, Whisper White, Glossy white card stock
Accessories: Clear embossing powder, Chevron folder, Word Window punch, Modern Word Label Punch, Apothecary accessories framelits, 3/8`` stitched Midnight Muse satin ribbon, dimensionals, bubble wrap.
Hope you enjoyed these quick and easy ways to use bubble wrap to create WOW backgrounds


2 comments:
Beautiful cards Maria!! I had forgotten about this technique and how awesome it turns out (especially yours). Thank you so much for the detailed instructions on the different ways you used this technique.
Maria, the three versions of this technique that you have showcased here are very effective, and beautiful. Thanks for the details instructions.
Post a Comment