Showing posts with label Banner Framelits. Show all posts

Saturday, May 2, 2020

Ahoy There - Try Stampin' on Tuesday #455

I was reorganizing my stamps today getting ready an On-Line stamp sale,  when I rediscovered an old  favourite  - "Seaside Shore".  Since the optional theme with the sketch challenge at Try Stampin' on Tuesday # 455 was a nautical one this was the stamp I chose to use.


A die cut banner became a window into an underwater world, with sea weed waving and fish swimming.  The banner was die cut in a piece of Come Sail Away DSP - a pattern with Night of Navy stripes - and the opening was used to trace an outline on a larger piece of Whisper White identifying where the underwater scene would be made.

Balmy Blue ink was applied with a finger dauber to create the water and sea weed was stamped near the bottom. Some extra sea weed was stamped on a scrap piece of Whisper White, coloured with dark Old Olive stampn blend, and fussy cut.  Two fish were also stamped, coloured on a scrap piece of Whisper White and fussy cut.

After the scene was built a shaker unit was made using window sheet and thick adhesive strips.  The shaker elements are a mixture of blues and crumb cake coloured sequins with the occasional clam shell thrown in.  If you look carefully you can see this tiny clam shell though the shaker window.


Two sizes of the banner dies were used to create the whisper White trim around the shaker.  A bow of Night of Navy/Sahara Sand Baker's twine was added at the top right, as well as a Sail Home Trinket.

The stamparatus was used to stamp a rope image which was coloured and then cut into strips and added to the card front horizontally and vertically from the shaker.

a
Stamp:  Seaside Shore
Inks:  Shaker unit:  Balmy Blue, Smoky Slate, Poppy Parade, Old Olive, Night of Navy, Pacific Point, Black Memento
Papers:  Night of Navy, Whisper White, Come Sail Away DSP
Accessories:  Banner Dies, Window Sheet, Shaker elements, Stamparatus, Night of Navy/Sahara Sand Baker's Twine, Sail Home Trinket, Adhesive Strips


Tuesday, August 29, 2017

Happy Retirement - Try Stampin' on Tuesday or Not #337

This week the theme associated with the sketch is "special celebration"  Having retired myself, the best celebration I can think of next to birthdays, and anniversaries, is retirement.

This week I discovered how to press flowers and leaves using the Big Shot.  I incorporated one of these background pieces into this card.


I used the Banner's framelit to die cut the pressed flower background and built the rest of the card around it.

Below is what the background looked like before I removed the pressed Geranium florets.  When the florets were removed, you could see where the "juice" from each flower was pressed right into the watercolor paper.


A small square of Sweet Sugarplum card stock with its corners rounded was placed on the right half of this banner.  The sentiment was layered on this and then  a medium Blushing Bride glimmer star was added to the lower left, and a smaller star at the lower right edge.

A Whisper White card stock layering the card front was embossed with the Starburst embossing folder prior to adhering it to the Berry Burst card base.


Before adhering this to a Berry Burst rectangle at the top of the card front, I adhered some Blushing Bride glimmer ribbon at an angle across this Berry Burst piece. The banner art piece was adhered over the ribbon with dimensionals.  A ribbon bow at the left side completed the art piece.

To complete the card I  added glimmer.  I placed three glimmer enamel dots above the sentiment, and one to the center of each of the two stars.

Supplies Used:
Stamp:  Teeny Tiny Wishes
Inks:  Black Memento
Papers:  Berry Burst, Whisper White, Water color Paper, Sweet Sugarplum, Blushing Bride Glimmer paper
Accessories:  Star burst embossing folder, 3/8" Blushing Bride glimmer ribbon, Glitter enamel dots, Medium star punch, Itty Bitty star punch, Corner rounder punch, Word Label Punch, Modern Word Label Punch, Banners Framelits


Wednesday, March 8, 2017

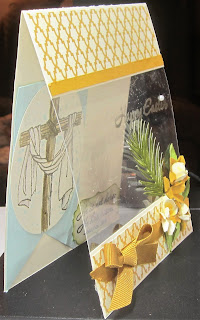
Easter Window Sheet Card

This special fold card has a 3/4 window sheet panel on the front of the card.  The image is embossed and mounted on the inside of the card.

An 81/2 by 4 1/4" piece of Very Vanilla card stock was scored at 5 1/2" and cut at 7.  After embossing a 4 1/4 by 3" piece of Window sheet with the Easter sentiment, it was adhered to the top and the bottom 1 1/2" cut off  piece of card stock.

Some DSP was adhered to the top and bottom panels.

The top panel was decorated with a 1/4" strip of Delightful Dijon cardstock; the bottom with the same colour of ribbon and a cluster of flowers and a palm leaf.

Through the window you can see an embossed Easter image coloured with a blender pen.  Die cut with layering oval framelits, it is mounted on a soft sky banner.

The inside sentiment cannot be seen as it is hidden by the lower panel.

Supplies Used:
Stamps: Easter Message
Inks: Versa Mark, Markers (Crumb Cake, Soft Suede, Soft Sky, Smoky Slate), Delightful Dijon, Old Olive
Papers: Very Vanilla, Mosaic DSP, Delightful Dijon, Soft Sky, Old Olive
Accessories: Window Sheet, 1/4" grosgrain Delightful Dijon ribbon, Petite Petal Punch, rhinestones, Pewter Embossing Powder, Layering Oval Framelits, Banner Framelits, glue dots

Thursday, February 19, 2015

Birthday Confetti Card - a CASE

This card I CASEd from Cindy Wilkinson here  I saw it on her blog this morning and I just loved it.

Some people, including Cindy, call this a faux shaker card, and I guess in some ways it is.  I call it a confetti card, because the window sheet pouch is filled with confetti (made by punching the Star border punch)

To make the card I started with a Tangerine Tango base layered with Birthday Bash DSP.

The confetti pouch is quite easy to make.  Take 2 pieces of  3 1/2 by 4 3/4" of window sheet and apply Washi tape on 3 sides of it.  To this pouch add confetti made by punching  pieces of Tangerine Tango, and Bermuda bay cardstock and punching them with the Star border punch.  For some bling I unstrung some gold sequins and added it to the mix (save 4 or 5 of them to decorate the outside of the card).  After the confetti has been added, seal the top with a piece of Washi tape.

Before attaching it to the card, I wrapped a piece of Calypso coral ribbon from the Best Year Ever Accessory pack (SAB) and tied it into a bow near the top.  The sentiment, stamped in Tangerine Tango and die cut with the banner framelit was added to the top with one edge slightly under the ribbon.  Dimensionals were used for this.

The sentiment was stamped using Bermuda Bay ink, and punched with the 2 1/2" circle punch, then layered with a piece of Bermuda Bay cardstock which had been die cut with the Starburst framelit. The two were adhered together with dimensionals, and added to the card with dimensionals as well.
The sentiment was stamped a second time with Tangerine Tango, and the banner "sentiment" was cut out and attached to the punched out one with two small pieces of dimensionals.

The confetti pouch was attached to the card with Vellum tape.  If you don't have any of that you can use glue dots.  Snail adhesive will show through the window sheet.

Here's a side view that shows the confetti in the pouch and the sentiment attached to the card.

The last thing I did was take those extra sequins and add them several places on the front of the card.

Here's a list of supplies I used:

 
Built for Free Using: My Stampin Blog


Wednesday, February 18, 2015

Thank You - Another Confetti Card

Here's another confetti card, although this time I used vellum to contain the confetti I made.

I used the stamp set "Painted Petals" and the DSP by the same name.

In the side view you can see the confetti below the vellum.

Here are the supplies used:

Built for Free Using: My Stampin Blog


Saturday, January 24, 2015

Thanks

I've been invited out to dinner tonight at a friend's house.  My mother always told me never to arrive empty handed, so I made a Thank You card using her favourite colours, and the new "Hello You" thinlet dies.  I am also planning on covering an Internet password and E-mail book I picked up.  My friend has this information all over the place and in about 5 books.  Hopefully this will make her life a litte more organized.


I started out by using photopaper and alcohol inks to create a background in mauves/purples and silver.
Using  the "Hello You" framelit I die cut the work "Thanks" from this background, and punched 6 flowers using the Petite Petals punch.
The word was run through the Xyron runner and attached to a piece of Whisper White cardstock matted with Wild Wasabi cardstock.

The basic card is Wild Wasabi, layered with Whisper White embossed with the Decorative Dots embossing folder.
On the top at the left hand side, 3 banners are attached,  The larger one is die cut using the Painted Blooms DSP, the second one (in the middle) is smaller and embossed with the Fancy Fan folder; the smallest is also die cut from the Painted Blooms DSP but the flip side of the first.

The sentiment panel is attached to the bottom of the card using dimensionals.

A small snip is made between the petals of each flower, and with the handle of a small paint brush, the ends are curled up.  A rhinestone is placed in the middle of each.  Hot glue is used to attache these to the card - 3 on the front, and 3 on the inside.

Built for Free Using: My Stampin Blog


I also used the Banner framelits.

I liked the card so much I made one for myself.

Saturday, January 17, 2015

I Do Love You - a Valentine card

This was such a quick and easy card to make and when you're making tons of cards that is very important.  It uses the "Big on You" stamp set.


I started with a Real Red cardstock base, layered with Whisper White and then a layer of DSP from the Stacked with Love DSP pack.

The sentiment main sentiment is stamped with Real Red ink on Whisper White and then die cut using the Banner framelits.  This was matted with Red Glimmer paper die cut using a larger banner framelit.
The small red glimmer hearts are punchies from the Hearts border punch.

The small sentiment is from "You Plus Me" and is stamped in Basic Black and matted with Red Glimmer paper.

Built for Free Using: My Stampin Blog

Tuesday, January 13, 2015

Happy Birthday with Tulip Flowers

This stamp is originally an Easter stamp, but I cut off the sentiment so that the stamp is more versatile.
This stamp would make a wonderful Birthday card, so that's what I did.

The tulips were stamped with Black Memento ink and coloured with blendabilities (Melon Mambo and Old Olive).  I then cut the tulips out. 

A small oval was die cut using Whisper White cardstock, and the edges pierced with the Occasions Paper Piercing Pack and a Paper Piercer.  This was adhered to a Melon Mambo label framlet die cut using dimensionals.

The tulips were adhered to the white oval and dazzling details added to the edges of the blooms.

The basic card is Melon Mambo, layered with Whisper White cardstock embossed with the Polka dot embossing folder.  Two sizes of banners were die cut using the Banners Framelits - the larger one using Sweet Taffy DSP; the smaller one in Old Olive which had been embossed with the Tiny Triangles Embossing folder.  The two banners were adhered together and then added to right side of the Whisper White cardstoc.

The focal image was adhered to the upper left.  Below this image, a Melon Mambo bow, made with the Bow Builder punch, was added.

The sentiment, stamped in Old Olive, is from "Big Day" (SAB)


Built for Free Using: My Stampin Blog

Saturday, September 6, 2014

Halloween Wine Tags

One thing I always make for my craft table is wine tags and they sell quite well. The wine tag I want to show you today is the one for Halloween.  The colour scheme is orange and black.


I made the tags using the Banner framelit, using the second largest one.  To make the tag longer than the actual framelit, I extended the cardstock over the top of the top edge rather than below it, and then when I put it through the Big Shot the top edge was not cut.
Each tag was scored 3" from the top and a 1 1/4" circle punch was used to punch the opening for the wine bottle.

The bottom part of the tag was embossed with the arrow embossing folder, and then I adhered a piece of black card stock near the middle of the tag.  The rosette was made using retired Halloween paper, and the sentiment and other stamping were from a retired Halloween stamp.  The bats were also punched using the retired bat punch. I made the eyes on the bats using a white gel pen. The rosette was completed by attaching a bow made of 1/8" black taffeta ribbon.

Stamp:
Ink: Basic Black
Papers: Pumpkin  Pie, Basic Black, Retired Halloween DSP, Whisper White
Accessories: Banner framelits, Arrow Embossing Folder, Bat punch (retired), White gel pen, 1/8" black taffeta ribbon, glue gun, 1 1/4" circle punch

Thursday, September 4, 2014

Designer Shoes with candy in cello packs for Halloween


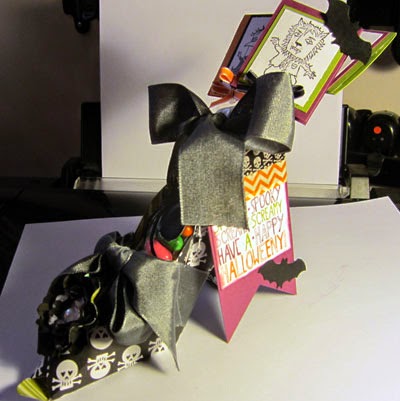
I have a lot of craft shows coming up and I wanted to  include some Halloween goodies in an attractive package.  Shoes were my answer!  I had made paper shoes before but this time I thought I would go way out and decorate it to the T's. I think I succeeded so well that you can hardly see the shoe in the picture. Each shoe was made using retired Halloween DSP.


Inside the shoe I place 3 cello packs filled with candy.  The tops of each of the cello packs were decorated using retired Halloween stamps and a few embellishments.  On the cello packs themselves I adhered a large black bug. You can see the bug better in the picture below. I had the stamp for this bug for some time, but had not used it before until now.  After stamping it I covered it with Crystal Effects and cut it out.  It's rather creepy looking. I really don't like bugs, especially big ones.

The top front of the shoe was decorated with a grungy looking flowers and then I tied a large black bow above it.

To keep the cello packs stable and prevent the shoe from falling over I tied a second ribbon around them near the top.

No package is complete without a tag, so I used the stamp set "Mingle All the Way" and die cut it with a Banners framelits.  Above the sentiment I adhered some Washi tape, then a bat using the retired bat punch.  This tag was attached to the top ribbon.

 As I'm not sure how well they will sell, I made 2 for Halloween and 2 for Thanksgiving - as a test run for future sales. 

I used the template for the witches shoe designed by Ellen Hudson, which a number of years ago I was able to download for free.  Now there's a fee.  However, I did find a comparable template here
The shoe is very easy to assemble.  What takes the time is decorating it.

The pictures aren't the best, but I hope you can see enough of the project.  I think they would be perfect as a gift for an office mate, a hostess gift, as a table decoration - well the possiblities are endless.


Tuesday, May 27, 2014

Love & Laughter

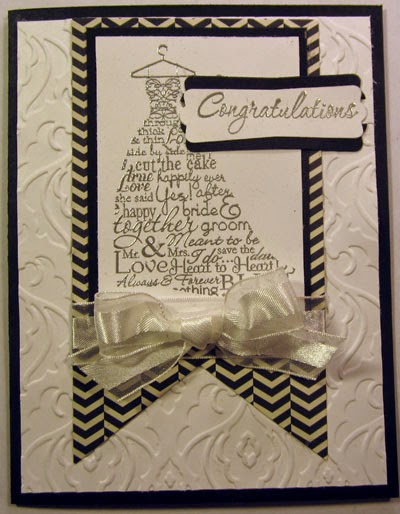
This is a card I made for the swap with ORSA (Ontario Rubber Stamping Artists).  The theme this month is "wedding". The swap involves making 3 of the same cards, and in return I get 3 different cards back.
Here is my card:


Stamp: Love & Laughter
Ink: Versa Mark
Papers: Basic Black, Whisper White, Modern Medley DSP
Accessories: Beautifully Baroque Folder, Banner framelits, Word Label Punch, Modern Word Label Punch, Silver embossing powder, 5/8" Whisper White Organza ribbon, glue dot.

Monday, February 10, 2014

Life Doesn't Have to be Perfect - Sketch Frenzy Friday

Are you tired of winter yet?  Are you waiting for spring to arrive?  Yes to both questions.  Spring is about 5 weeks away, but that 5 weeks seems like 5 years!  So to speed things along a little bit the card I made for the SFF challenge here is very spring like.  I just love the soft new colors!

 
The base card is Crisp Cantalope layered with first Whisper White, and then Sweet Sorbet DSP (SAB).
The banner I made using the banner framelits; the sentiment is from the Perfect Pennants stamp set.  I then stamped 4 different colors of Petite Petals and punched them out using the coordinating Petite Petals punch.

Stamps: Perfect Pennants, Petite Petals
Inks: Basic Black, Summer Starfruit, Gumball Green, Pool Party
Papers: Crisp Cantalope, Whisper White, Sweet Sorbet DSP
Accessories: Banner framelits, Petite Petals punch, Pearls, 3/8" ruffled Crisp Cantalope ribboon