Showing posts with label retirement. Show all posts

Friday, February 4, 2022

Senior Years - Retirement swap cards

 These are swap cards I made for a group I belong to.  The theme for this month was "retirement".  I thought the Senior Years would be a perfect stamp set to use.


I visualized my couple to retire to a tropical country, with beautiful sunsets, palm trees, and large foliage with exotic flowers.


Stamps : Senior Years, Timeless Tropical
Inks:  Black Memento, Soft Suede, Stampin' Blends, Marker for the trees (Old Olive, Early Espresso)
Papers:  Basic White, Old Olive, Tropical Escape retired paper, retired other DSP for the sky.
Accessories:  In the Tropics dies, 1/4" Braided Burlap trim, Wink of Stella, Dimensionals

Friday, April 10, 2020

Enjoy Your Retirement - Freshly Made Sketches # 430 and Fab Friday #187 An Eclipse Technique

This masculine retirement card, using the Eclipse Technique, was made for the sketch challenge at Freshly Made Sketches #430 and Fab Friday #187


On a 4 4/5 by 5" piece of Very Vanilla card stock, the image of the dock was stamped off  twice to create a faded background on the art piece.

The center of  this art piece was then die cut with  a Stitched Nesting Die.  The art piece, without the die cut was adhered to a Soft Suede card base.  The die cut was reinserted into the die cut space, and adhered with dimensionals.

.


On a separate piece of Whisper White, the images of the boat, 2 oars and a little frog were stamped, coloured with Stampin' Blends and then die cut with the Dockside Dies.

The boat was added on the die cut, next to the dock using dimensionals. The oars were added on top of the boat.


A sentiment, from Itty Bitty Greetings, was  punched with the Classic Label Punch and matted with a larger Soft Suede punch.  The little die cut frog is perched on top of the sentiment.


Supplies Used:
Stamps:  By the Dock, Itty Bitty Greetings
Inks:  Black Memento, Soft Suede, Stampin Blends (Crumb Cake, Early Espresso. Real Red, Garden Green, Balmy Blue)
Papers:  Soft Suede, Very Vanilla, Whisper White
Accessories:  Dockside Dies, Nesting Label Die, Classic Label Punch, Dimensionals

Tuesday, August 29, 2017

Happy Retirement - Try Stampin' on Tuesday or Not #337

This week the theme associated with the sketch is "special celebration"  Having retired myself, the best celebration I can think of next to birthdays, and anniversaries, is retirement.

This week I discovered how to press flowers and leaves using the Big Shot.  I incorporated one of these background pieces into this card.


I used the Banner's framelit to die cut the pressed flower background and built the rest of the card around it.

Below is what the background looked like before I removed the pressed Geranium florets.  When the florets were removed, you could see where the "juice" from each flower was pressed right into the watercolor paper.


A small square of Sweet Sugarplum card stock with its corners rounded was placed on the right half of this banner.  The sentiment was layered on this and then  a medium Blushing Bride glimmer star was added to the lower left, and a smaller star at the lower right edge.

A Whisper White card stock layering the card front was embossed with the Starburst embossing folder prior to adhering it to the Berry Burst card base.


Before adhering this to a Berry Burst rectangle at the top of the card front, I adhered some Blushing Bride glimmer ribbon at an angle across this Berry Burst piece. The banner art piece was adhered over the ribbon with dimensionals.  A ribbon bow at the left side completed the art piece.

To complete the card I  added glimmer.  I placed three glimmer enamel dots above the sentiment, and one to the center of each of the two stars.

Supplies Used:
Stamp:  Teeny Tiny Wishes
Inks:  Black Memento
Papers:  Berry Burst, Whisper White, Water color Paper, Sweet Sugarplum, Blushing Bride Glimmer paper
Accessories:  Star burst embossing folder, 3/8" Blushing Bride glimmer ribbon, Glitter enamel dots, Medium star punch, Itty Bitty star punch, Corner rounder punch, Word Label Punch, Modern Word Label Punch, Banners Framelits


Thursday, June 27, 2013

The Secret of Life ... Paper Players #151

I retired from my day job 13 years ago, and have not regretted one moment of it.  James Taylor had it right when he said "The secret of life is enjoying the passing of time".  So for all of you who are retired, or thinking of retiring, this card is for you.  I used the sketch challenge with the Paper Players here to create this card.


I started by creating the flowers and leaves  using the two stamp method of stamping and the stamp-a-ma-jig.  The two colours I used for the flowers:  Pool Party and Island Indigo - for the leaves: Pear Pizzazz and Old Olive.  These were then cut out and put aside while I assembled the rest of the card.

The sentiment was stamped with Basic Black ink onto Whisper White and die cut using the Labels framelit.  The top portion was cut off.

The base card is Pool Party, layered with Whisper White and then a blue patterned retired SU DSP.
The sentiment die was attached to the card and a piece of 3/8" white taffeta ribbon adhered to the top of the die cut sentiment. A piece of ribbon tied in a knot was attached near the flowers.
The flowers and leaves were then attached as shown in the card above - the flowers with dimensionals, and the leaves with glue.  Tiny pearls were inset into the large flower center; one tiny pearl in the center of the small flower with dazzling diamonds around it.

Materials used:
Stamps:  From my Heart, Stippled Blossoms
Inks: Basic Black, Island Indigo, Pool Party, Pear Pizzazz, Old Olive
Papers: Pool Party, Whisper White, Retired DSP
Accessories: Labels Framelits, 3/8" white taffeta ribbon, Pearls, Dazzling diamonds, dimensionals

Monday, April 22, 2013

Cards Made Using Bubble Wrap Backgrounds

In this week`s class we are going to have some fun with bubble wrap, creating some fun backgrounds!  I have a lot of bubble wrap lying around for use in my craft shows and this week I thought I would put it to another use.  Even Stampin`Up is using Bubble wrap in their shipping boxes rather than the `snake``

I`m going to show you 3 different cards with 3 very different backgrounds made using bubble wrap.  For all these backgrounds, I used glossy paper cut into 4 1/4 by 5 1/2

To begin, I used the F acrylic block and cut a piece of bubble wrap a little bigger than this block.  This was taped down to the back of the block.

When inking and using, don`t press too hard as you don`t want to pop the bubble wrap.  Yes, I know it makes that fun sound------

Do check the bubble wrap to make sure some of the bubbles have not been pre popped before using it on the back grounds.

Simply ink up the bubble wrap just like any other stamp and press down with even pressure onto the glossy card stock.

Card 1:  Fabulous Florets


For this background, I inked up the Bubble wrap with Primrose Petals ink and stamped onto the glossy card stock and let it dry.  Notice that each little bubble is a little different in shape and texture and makes a different impression.
I decided to make it into an Anniversary Card.

Stamps: Fabulous Florets, Teeny Tiny Wishes
Inks: Primrose Petals, Black Stazon, Versa mark
Papers: Primrose Petals, Whisper White, Glossy card stock, Wild Wasabi
Accessories: Wild Wasabi embossing powder, Clear embossing powder, Word Window punch, Modern Word Label punch, 3/8`` white taffeta ribbon, Large rhinestones, medium rhinestone, dimensionals, scallop trim border punch, Bubble wrap

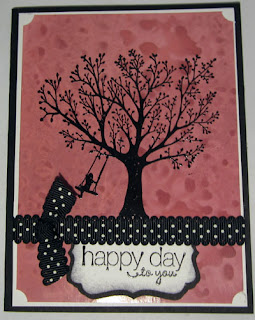
Card 2:  Forever Young
A different way of creating the background was used on this card - referred to as the kissed bubble wrap background.
To do this, apply Primrose Petals ink to the entire piece of glosssy card stock, then spritz lightly with water - so the ink pools ever so slightly. The first piece I tried I spritzed too much and the resultant background, although interesting, did not demonstrate the bubble wrap pattern.  It can be used on another card.
Then apply a clean piece of bubble wrap over the paper, press down and wait a moment before peeling off.  Set aside to dry thoroughly.  I love the pattern this created.


I decided to emboss an image directly over the background - using the tree from Forever Young and black embossing powder.
The base card is Basic Black, layered with Whisper White, and finally the background paper.  I notched out the corners of this layer.
A piece of black dotted scallop ribbon was attached just below the tree, and the sentiment punchie was attached just underneath the ribbon.

Stamps: Forever Young, Friendly Phrases
Inks: Versa Mark, Primrose Petals
Papers: Basic Black, Whisper White, Glossy white
Accessories: Black embossing powder, 1/4`Black scalloped dotted ribbon, Decorative Label punch, corner notching punch, bubble wrap

Card 3:  By the Tide:
This next version is simple as well as it is basically emboss resist.
Using a clean piece of bubble wrap, ink it up with Versa mark ink and press it against a piece of glossy card stock.
Cover the paper with clear embossing power, tap off excess, and heat set.
Using a second piece of bubble wrap, ink with desired color (I used Pacific Point), and press onto embossed background.  Dye based inks work best.
Take a clean cotton ball, gently rub in circles over the card stock.  This will rub off any ink that has adhered to the embossed bubbles and will give your background a softer look.


The bubbles reminded me of an aquarium, so I made a masculine fish card using By the Tide. 
First I die cut the background using the Apothecary accessories framelits. The edges were sponged with Midnight Muse ink.
Then using the sea weed stamp, I stamped that image twice on the die cut.  They stamped lightly, but that was what I wanted - they looked like they were under water.
Next I stamped 2 fish using Midnight Muse ink and cut them out.  They were placed on the die cut background using dimensionals.

The base card is Midnight Muse, layered with a chevron embossed Whisper White layer that had its edges inked.  A piece of stitched Midnight Muse satin ribbon was attached near the top of the card under the die cut, which was attached to the card using dimensionals.

Stamps: By the Tide, Teeny Tiny Wishes
Inks: Pacific Point, Midnight Muse
Papers: Midnight Muse, Whisper White, Glossy white card stock
Accessories: Clear embossing powder, Chevron folder, Word Window punch, Modern Word Label Punch, Apothecary accessories framelits, 3/8`` stitched Midnight Muse satin ribbon, dimensionals, bubble wrap.

Hope you enjoyed these quick and easy ways to use bubble wrap to create WOW backgrounds

Saturday, May 26, 2012

Card wins at Unscripted Sketches

The card I made for the piggyback sketch challenge with Unscripted Sketches , was one of the top 3 picks of the week.
Here is the picture and a link to the original post: http://craftymariasstampingworld.blogspot.ca/2012/05/open-sea-retirement-unscripted-sketches.html

Thanks to the  designers at Unscripted Sketches for all the wonderful comments.

Wednesday, May 23, 2012

The Open Sea Retirement - Unscripted Sketches #159

I love doing the challenges with Unscripted Sketches, especially when there is an additional Piggyback challenge to the sketch. The additional challenge this week is to add ink, which could be a stamped image, distressing, or anything creative.
Here is my card.  I decided to make it a retirement card because a lot of us feel like sailing off into the sunset when our full time jobs are finally behind us.  Wouldn't it be lovely just to sail the open seas without a care in the world?


I added ink in several ways.  First of all the background which was created by dropping reinkers onto wet watercolor paper and letting the colors run.  Before the ink dried I added a bit of coarse sea salt creating the design in the background that almost looks like fireworks going off.
The second way was stamping the image using Black Stazon ink and embossing with clear embossing powder.  The focal image was then distressed by inking the edges with Early Espresso ink.  Actually all the edges of the various card elements were distressed with Early Espresso ink.


 Here is a close up of the focal image showing the reinker created background.

Stamps: The Open Sea, Teeny Tiny Wishes
Inks: Reinkers (Real Red, Daffodil Delight, Early Espresso, Pacific Point), Black Stazon, Early Espresso
Papers: Soft Suede, Crumb Cake, Retired SU designer paper, Watercolor paper
Accessories: Clear embossing powder, Hodgepodge hardware (vanilla), 1" circle punch, Word Window Punch, Oval Punch, 1/8" Early Espresso taffeta ribbon, dimensionals

Now here is the sketch:

Monday, May 21, 2012

Tool Time Retirement - Technostamper #223

Hope everyone in Canada is having a wonderful holiday weekend.  The weather has been absolutely gorgeous and so hot I've even had to put the air conditioning on.  I think this is the earliest I have ever had to do that.
Like some of you I have been a bit distracted of late trying to get my gardening done and getting ready for market which starts tomorrow. As a result I haven't been blogging as much as I usually do, but hopefully that will change as I adjust to my new schedule.

Today's card is for the Monday Lunchtime Technostamper Sketch challenge here
I wanted to make a masculine card because that is the theme for the challenge with the LNS group and I am on their design team (although I don't post until Saturday).  Most of my cards this week will have a masculine flavour as they are very popular at market.

The stamp set "Tool Time" is retiring, as is the designer paper "Well Worn", so again, I am making this a retirement card.

Each tool was stamped using Black Stazon ink and colored with markers.  The metallic portions of the tools was painted with Platinum all purpose ink.  The tools were then cut out and mounted on a piece of crumb cake card stock embossed with the polka dot embossing folder - to mimic a peg board.

Here's the sketch:
 

Stamps:  Tool Time, Teeny Tiny wishes
Inks: Black Stazon, markers, Bravo Burgundy
Papers: Bravo Burgundy, Crumb Cake, Well Worn designer paper, Whisper White,
Accessories: Platinum all purpose ink, 1 3/8" circle punch, 1 1/2" circle punch, dimensionals

Monday, May 14, 2012

Happy Retirement Upsy Daisy - Ink 4U Duo Challenge

Did you have a wonderful Mother's Day?  I spent part of the day in the garden, and part of the day in a garden center just looking at all the colors, smelling the flowers and generally just enjoying myself.  My poor son who went with me started sneezing as he is allergic to flowers so we had to leave.
My other son had me over for a BBQ and of course I ate too much.

This card is for the Ink 4U Duo Challenge, which is to use the following 2 colors plus a neutral on a card or project:  Melon Mambo and Daffodil Delight.


Because a new catalogue is coming out in June, it seemed appropriate that I use a stamp and 2 designer papers that are retiring.  Since I was short of retirement cards for my markets I thought I would make this a retirement card - a pun???

The focal image (Upsy Daisy) is a watercolor image made by applying the Wonder watercolor crayons (Melon Mambo on the flower and Basic Gray on the stems) directly onto the st amp.  Then I spritzed lightly with Vanilla smooch spritz instead of water.  The picture doesn't show the glitter on the image.

Here's the inside of the card.

Recipe:
Stamps: Upsy Daisy, Teeny Tiny wishes
Inks: Basic Black, Wonder watercolor crayons (Melon Mambo, Basic Gray)
Papers: Melon Mambo, Whisper White, Basic Gray, Beyond the Garden designer Series Paper, Flirtatious Specialty designer paper
Accessories: Finial Press embossing folder, 5/8" Daffodil Delight satin ribbon, dimensionals, Eyelet border punch.

Sunday, February 5, 2012

Monday, January 30, 2012

Timeless Treasures - Happy Retirement - Create with Connie & Mary # 136

Another one of my friends is retiring - but not from work - and she went out with a happy note having fulfilled her dream of playing an instrument in a band (at the ripe age of 75 years).  Thus this card features an old music box - it seemed somewhat symbolic.  I used the sketch challenge with Create with Connie & Mary here to create the card.

Here is the sketch


My card:
My friend loved music all her life, playing various instruments with her family when she was a child.  However, life happened, and she had to obtain employment - than came marriage, and children, followed by a painful divorce - and music was the last thing on her mind.  Well into her official retirement years she joined a band and learned how to play the French Horn and is as happy as a clam.  But now she feels it is time to hang up her "horn" as a medical conditiion has made it difficult to breathe.  Happy retirement my friend, and may music be a part of the rest of your life.

Stamps: Timeless Treasures, Teeny Tiny wishes
Inks: Black Stazon, SU markers, Soft Suede
Papers: Soft suede, Very Vanilla, Whisper White, Attic Boutique designer paper, Rose Red
Accessories: Antique Wallpaper embossing folder, Corner rounder punch, Label framelit, Oval textured embossing designer frame, 1 7/8 by 3/4" oval punch, Modern Label Punch, pearls, dimensionals, 1/2" Rose Red seam binding.

Sunday, January 29, 2012

Countryside Retirement - Techno Stamper Monday Lunchtime Sketch Challenge # 205

I had to let the sketch sit with me for a while as nothing immediately came to mind when I saw the sketch challenge for the Techno Stamper Monday Lunchtime Challenge here 
But a friend is retiring soon, so I needed a retirement card.  This friend used to farm, and now likes to tinker in his garage refinishing furniture and doing general repairs. Hope he likes the card.

Here is the sketch:


My card:

Since I have been having difficulty getting my cards to sit straight during a photographic session (very much like most of us), I  decided to photograph the card at an angle since it was going to end up that way anyway.

Here's the way I normally photograph a card.  Which view do you like better?


Look carefully and see if you can see the Robin sitting on the barrow handle.  A sure sign that spring is coming soon.

Stamps: Countryside, Teeny Tiny wishes, Every Little Bit
Inks: SU markers, Early Espresso
Papers:  Early Espresso, Crumb Cake, Well Worn Designer paper, Whisper White
Accessories: Houndstooth embossing folder, Decorative Label Punch, 1" circle punch, 1 1/4" circle punch, 1/4" Early Espresso grosgrain ribbon,