Showing posts with label 1 1/4" circle punch. Show all posts

Sunday, August 16, 2020

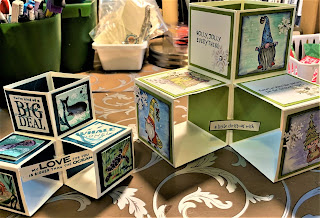
Mini Pop Up Cube Card featuring Whale of a Time

Today I made a mini version of the pop up cube card I made on July 31 here  This card is smaller and will fit into a regular A2 envelope.  I used as reference a video made by Dawn here

Some stamping is done using the Whale of a Time stamp set, but a lot of the cube fronts are images die cut or fussy cut from the DSP, or is the DSP.


As I mentioned, this card when collapsed will fit into a standard A2 envelope, where as the larger one needs a 6 by 6" envelope made.  Below, see the two cube boxes side by side.


Sunday, December 29, 2019

Parisian Beauty - a Mini Catalogue sneak peak


Only 4 more days before the new Mini Catalogue goes live.

In the meantime, I've made some cards using the new Parisian Beauty stamp set and its coordinating Parisian dies.  The 4 cards progress from simple stamping to more complex cards, although I have saved two of the most complex ones for a later post.

I have created a PDF for these cards, which you can download free  by clicking on Parisian Beauty
This document contains all the information you need to create these cards.

Card #1:  Simple Stampin:

Using the stamparatus, the image stamp is notch stamped on a Whisper White front.  The image is than stamped on top of this and coloured with a Pool Party Stampin' Blend.


Card #2  Simple stampin' cont'd

Designer is now added with the stamping done directly on it.
A sentiment is also added.


Card #3  Merci

Change the size and shape of the base card, add some layers, emboss the images on the DSP and add a die cut sentiment, and you have card #3


Card #4  Collage stamping

In addition to the added layers, now add an art piece that is uniquely designed using collage stamping as well as some ribbon.


Tomorrow I will post other cards made with this bundle .

Thursday, May 24, 2018

A Bear in a Window - SUO Challenges #200


This week the challenge with SUO challenges here is to create a card with a critter or animal  on it.

There were so many possibilities to choose from, but I elected to use the stamp set "A Little Wild" and because these images have a "front" and "back" they are perfect for mounting onto see through tulle windows.


After adhering some Coffee Break DSP to an Early Espresso layer which  was then adhered  to a top fold Shimmer White card stock base, I die cut  a square aperture using the stitched square framelit die.  This square opening was covered by a piece of tulle using tear and tape adhesive applied close to the aperture edges on the card front.


The DSP layer was then added to the card front, after which I made Whisper White frames to add around both the inside and outside window.


The images were stamped on Whisper White, colored with watercolor pencils and a blender pen, and then die cut using the "Little Loves Framelits".  The little bees were fussy cut by hand.

Tear and tape adhesive was used to adhere the front of the bear on the tulle of the card front as well as the bee hive and the flower.  The extra bees were located near the hive, and one landed on the bear himself.  An extra bee was placed on the inside of the card.


Open the card, and the back of the bear was adhered over the front.  I colored and die cut a second flower to adhere over the front one, but for the beehive I just die cut an outline of one in Basic black card stock.


The sentiment, stamped in Garden Green ink, was punched with a 1" circle punch, matted with a 1 1/4" Early Espresso circle and adhered to a piece of 5/8" burlap ribbon below tulle window.

Supplies Used:
Stamp:  A Little Wild
Inks:  Black Memento, Garden Green, Watercolor pencils,
Papers:  Shimmer White, Whisper White, Early Espresso, Coffee Break DSP
Accessories:  Tulle(non SU), Stitched Square Framelits, 1" circle punch, 1 1/4" circle punch, 5/8" burlap ribbon, linen thread, dimensionals. Clear Wink of Stella, Dimensionals. Little Loves Framelit dies, Blender pen.


Tuesday, May 15, 2018

A Shaker Balloon Card - another catalogue sneak peak

This shaker card is more of a traditional one in that it uses window sheets.

It is non traditional in that the entire image, from the hostess stamp set "Hand Delivered" is fussy cut and the shaker element is part of a bunch of balloons.


The image was stamped on a 2 1/2 by 5" piece of Whisper White card stock. Before coloring the balloons with watercolor pencils and an aqua painter, I punched a  1 1/4" circle in the lower middle balloon. This I covered on the inside with  some window sheet.

This stamp set has various options for different skirts, so I chose the stripes and used a Rich Razzelberry water color pencil to fill in just the stripes.


The entire image was fussy cut and adhered with foam tape to a 4 by 2 1/4" piece of Whisper White card stock matted with Rich Razzelberry card stock.  I used the retired "Sprinkle Embellishments" for the shaker elements.

The base card is Rich Razzelberry card stock layered with Whisper White followed by a 2 by 5 1/4" striped piece of Perfect Picture Party DSP.  Over the seam I adhered some 3/8" mini chevron Bermuda Bay ribbon.

The focal image was added to the card front slightly off center.  On the right side some Bermuda Bay enamel dots were added.

I die cut the sentiment using the retired "Bitty Banners Framelits"  and added it just handing under the balloons.

As a final touch some 3D enamel lacquer was added to the balloons to give them that shiny appearance.

Supplies Used:
Stamp:  Hand Delivered
Inks:  Black Memento, Watercolor pencils
Papers:  Rich Razzelberry, Whisper White, Perfect Picture Party DSP
Accessories:  ! 1/4" circle punch, Window Sheet, Sprinkles embellishments, foam tape, Bitty Banners Framelits, 3D lacquer, Bermuda Bay enamel dots, 3/8" mini chevron Bermuda Bay ribbon, blender pen


Thursday, May 3, 2018

Sneak Peak Annual Catalogue- The Impossible Card

I'm intrigued by unusual cards, and the Impossible Card is just that.

I've seen numerous samples of this card type on Pinterest posted by numerous Demonstrators, but I used the measurements by Dawn ( and the template she suggests) to make this card, using some of the new products from the upcoming Annual catalogue.


The card is not that impossible to make, but it can be a bit tricky.

The card base is Marine Macaron ( a color brought out of retirement) and layered with Whisper white and Share What You Love DSP.

The flip up panel is comprised of Whisper White matted with Always Artichoke card stock.  On the Whisper White, I stamped some "dot" stamps from the Timeless Texture Stamp set and some leaves using the Mossy Meadow marker.  The flowers were cut from remnants of the DSP and adhered in both corners. (Looking at the card now I see the possibilities for a calendar card)


A double white organza ribbon was adhered in the upper left.


To stabilize the card a 1/2 by 5 1/4" strip of Mint Macaron was added near the bottom of the card. On that strip I added a 1 3/8" Mint Macaron circle, layered with a  1 1/4" Whisper White circle.  On that circle I added another flower I cut from the DSP.


Supplies Used:
Stamps:  Love What You Do, Timeless Texture
Inks:  Mint Macaron, Mossy Meadow Marker
Papers:  Mint Macaron, Whisper White, Love What You Do DSP
Accessories:  1 3/8" circle punch, 1 1/4" circle punch, 1/4" white organza ribbon, score tool.