Showing posts with label classic label punch. Show all posts

Friday, April 10, 2020

Enjoy Your Retirement - Freshly Made Sketches # 430 and Fab Friday #187 An Eclipse Technique

This masculine retirement card, using the Eclipse Technique, was made for the sketch challenge at Freshly Made Sketches #430 and Fab Friday #187


On a 4 4/5 by 5" piece of Very Vanilla card stock, the image of the dock was stamped off  twice to create a faded background on the art piece.

The center of  this art piece was then die cut with  a Stitched Nesting Die.  The art piece, without the die cut was adhered to a Soft Suede card base.  The die cut was reinserted into the die cut space, and adhered with dimensionals.

.


On a separate piece of Whisper White, the images of the boat, 2 oars and a little frog were stamped, coloured with Stampin' Blends and then die cut with the Dockside Dies.

The boat was added on the die cut, next to the dock using dimensionals. The oars were added on top of the boat.


A sentiment, from Itty Bitty Greetings, was  punched with the Classic Label Punch and matted with a larger Soft Suede punch.  The little die cut frog is perched on top of the sentiment.


Supplies Used:
Stamps:  By the Dock, Itty Bitty Greetings
Inks:  Black Memento, Soft Suede, Stampin Blends (Crumb Cake, Early Espresso. Real Red, Garden Green, Balmy Blue)
Papers:  Soft Suede, Very Vanilla, Whisper White
Accessories:  Dockside Dies, Nesting Label Die, Classic Label Punch, Dimensionals

Sunday, April 5, 2020

Ornate Garden Buckle Card

It's getting harder to self isolate during is Covid-19 pandemic so I'm continuing to challenge myself to create at least one project per day.
Today's project is a card fold I have seen often on Pinterest and You Tube - a Buckle Card - using the Ornate Garden DSP, which is part of an Ornate Garden bundle available for order as of April 1


Card Base and Strap


  • Mint Macaron is one of the colours in the Ornate Garden DSP so I chose that for the card base and the buckle strap.
  • Cut a 4 1/4 by 8 1//2" piece of Mint Macaron card stock and score at 3".  Fold at the score line to form the card fold. Burnish.
  • Cut a 2 by 4 1/4" piece of Mint Macaron and score at 1".  This is the strap. Fold at score line and burnish fold.
  • Add adhesive to the inside of the 1" fold line of the strap and add to the middle of the wrong side of the 2 by 4 1/4" piece of DSP. (gold pattern on a Mint Macaron background) 
  • Adhere to inside of card.
  • Stamp a sentiment on a 2 1/4 by 4" piece of Whisper White and adhere to the inside next to the DSP.


Card Front:

  • Add a 2 3/4 by 4" piece of DSP (Daisy pattern) to front flap.
  • Using the Classic Label Punch, punch an opening for the card strap 1/2" from edge of card front. Insert the strap in the opening.
Embellishment:
  • Using a scrap piece of  Whisper White card stock,  punch 4 flowers using the Small Daisy Punch.  Apply Daffodil Delight ink to the flower petals and Soft Suede to the centers.  Shape flowers and add 2 together alternating petals (2 flowers).  Add a Perrential Essence Floral center to each flower center.
  • Punch 4 leaves in Old Olive using the Leaf Punch. Shape and add 2 leaves to each flower.
  • To cover the buckle opening, die cut a Stitched So Sweetly Die.  Stamp a sentiment near the bottom. Add to the card front with dimensionals.
  • Add one flower/leaf to this die cut.
  • Add the other flower/leaf on the strap, on another Whisper White  Stitched So Sweetly Die.

Supplies Used:
Stamp:  Another Thank You
Inks:  Mint Macaron
Papers:  Mint Macaron, Whisper White, Ornate Garden DSP
Accessories:  Small Daisy Punch, Leaf Punch, Classic Label Punch, Stitched So Sweetly Dies, Perennial Essence Floral Centers, Dimensionals

Saturday, January 25, 2020

A Spring Flower for SUO Challenges #241

This week the theme at SUO Challenges is "Flowers".  I love flowers, any flower, paper, or real.  I love them all.

And I particularly like the flower for this card, the crocus. This bulb flower sticks its head above the ground while the snow is still on the ground. This is a welcome sight after a long Canadian winter.

Although the sentiment on this card is an Easter one, it could be a birthday, anniversary or even a sympathy card.


This one layer card in Whisper White card stock, is made elegant by the stitched embossed rectangular frame in the center.  This frame was made using the Stitched Rectangle Die using the Stampin' Up embossing mat and the Big Shot.


The flower was stamped inside this frame and coloured with light and dark Mango Melody Stampin' Blends.  The leaves and stems were coloured with a Granny Apple Green marker.   A blue wash  around the flowers made them stand out a bit more.


Then another embossed frame, centered in the rectangle frame, was made around the flower using the new Stitched So Sweetly Die and the Embossing mats.

The sentiment from Teeny Tiny Wishes is punched with the Classic Label punch, matted with Daffodil Delight ,and added at an angle just below the flowers.

A bow, made with some 3/8" Whisper White crumpled seam binding coloured with a Mango Melody Stampin' Blend was added to the stems just below the flowers

Supplies Used:
Stamps:  Easter Blessings, Teeny Tiny Wishes
Inks:  Black Memento, Mango Melody (Light and Dark) Stampin' Blends, Granny Apply Green Blend, Balmy Blue ink
Papers:  Whisper White
Accessories:  3/8" Whisper White crumpled seam binding, Stitched Rectangle Dies, Stitched So Sweetly Die, Embossing Mats, Big Shot, Classic Label Punch.

Monday, January 20, 2020

Leftover to Marvelous

My mother was the guru of making wonderful meals from left overs. I have never been able to emulate her with meals.  I am much better with paper crafting.

Today I thought I would make a wonderful card from 'leftovers' from yesterday's Lily birthday card here

Th

The Lily, lily pads and leaves were left over from yesterday's card  I adhered them to a die cut Whisper White rectangle which was  placed inside another die cut piece that has a rectangular frame embossed in it. Inside that was another embossed frame. All were embossed with the Sweetly Stitched Dies and the embossing mats. 
I coloured the white 3/8" Seam Binding with the Gorgeous Grape Stampin' Blend, and when it was dry, it was made into a bow and added to bottom edge of the lily.
The punched sentiment is added emerging between the leaves of the flowers.


The Gorgeous Grape card base is layered with Whisper White. The framed Highland Heather  layer is added to the card front at an angle, as is the die cut art piece.

Noble Peacock rhinestones finish the card.


Supplies Used:
Stamps:  Lovely Lily, Teeny Tiny Wishes
Inks:  Versa Mark, Highland Heather, Granny Apple Green, Daffodil Delight, Gorgeous Grape Stampin' Blend (colour ribbon)
Papers:  Gorgeous Grape, Whisper White, Watercolour paper
Accessories: 3/8" Whisper White crinkled seam binding (coloured), Noble Peacock rhinestones, Stitched So Sweetly dies, Embossing mats, Lovely Lily dies, Dimensionals, White embossing powder, Classic Label punch

Friday, November 1, 2019

Snow Front Christmas Wishes - Try Stampin' on Tuesday #431

One of my favourite stamp sets of the Holiday catalogue is the Snow Front stamp set.  The versatility in creating winter scenes is absolutely amazing and used it exclusively to make swap cards for On Stage November 19, 2019
So, for the sketch challenge with Try Stampin' on Tuesday #431 (with the optional theme of stripes) I used this stamp set again


The focal image is a winter scene created on a 4 by 2" Whisper White tag made using the Angled tag punch.
I started by using a sponge brayer to apply Balmy Blue and Blueberry Bushel ink to create the sky.  The trees were then stamped with Shaded Spruce ink in first and second generation stamping.  After adding the two deer some puff paint and glitter was added to mimic snow.

A tooth pick and white acrylic paint was used to create the stars in the sky and whisper white polka dot ribbon inserted through the tag top.


The tag was matted with Blueberry Bushel card stock and a sentiment, from Itty Bitty Christmas punched with the Classic Label punch was added at the top right.


This tag was added to the right side of the Blueberry striped card front.  This background was made using the Diagonal Stripe Background stamp.  The striped layer was adhered to a Whisper White layer and then to a Blueberry Bushel card base.

On the inside, I stamped the image of the deer standing beside a tree.

Supplies Used:
Stamps:  Snow Front, Itty Bitty Christmas, Diagonal Stripe Background
Inks:  Blueberry Bushel, Balmy Blue, Early Espresso, Dark Seaside Spray Stampin' Blend, Shaded Spruce
Papers:  Blueberry Bushel, Whisper White
Accessories: 5/8" White Polka Dot Tulle ribbon, Angle topper tag punch, Classic Label Punch, Dimensionals, Puff Paint, SU Glitter

Friday, April 13, 2018

Pop Up Butterfly Birthday

I was inspired by a card I saw on Pinterest made by Rachel Tessman.  She used the Dragonfly for her card.  I changed my card up a bit, but I used the same DSP (Petal Garden - which is retiring)

I used Thick Whisper White as my card base folding it in a horizontal fold. On the inside I adhered a 4 by 5 1/4" of Petal Garden DSP

A 2 3/4" strip of the same pattern of Petal Garden DSP was added about 3/4" from the left edge of the card front.  The Classic Label punch was used to punch an aperture in this DSP through which the butterfly would would pop through.

I die cut the butterfly using Basic Black card stock, and the Butterfly Thinlet -  the Framelit was used to die cut the same size butterfly but in Vellum..

The two butterfly layers were adhered together using glue dots.


Glue dots were added to the butterfly unit, the wings folded up and the butterfly inserted through the punched aperture and adhered to the DSP on the inside of the card.  When the card is opened, the butterfly slips through the opening in the front.  On closing the card, the wings are pinched together and inserted back through the aperture and pop back up through the front.


Supplies Used:
Stamp:  Better Together
Inks:  Black Memento, Rich Razzelberry Bendability
Papers:  Thick Whisper White, Petal Garden DSP, Basic Black, Vellum
Accessories:  Butterfly Thinlets and Framelits, Classic label Punch, Pearls

Wednesday, October 11, 2017

Merry Patterns - Copper Deer

The Merry Patterns stamp set arrived on Tuesday and today was the earliest I had time to play with it.  The  Year of Cheers DSP also arrived, and all that copper and silver inspired me to make this card. It was really hard to take a picture with good exposure because of the metallic nature of the paper.

The image of the deer was embossed with copper embossing powder on Basic Black card stock and then die cut using the layering circles framelits.
This I adhered to the card front - the beautiful metallic Year of Cheers DSP - with dimensionals. This DSP was layered onto a 5 by 5" Basic Black card base.
Before adhering the DSP to the card front some 1/4" Basic Black Shimmer ribbon was adhered to the center and a bow added to he right side.

The sentiment was embossed with copper embossing powder, punched with the Classic Label punch and adhered to the card front at the bottom left circle.

Supplies Used:
Stamp:  Merry Patterns
Inks:  Versa Mark
Papers:  Basic Black, Whisper White, Year of Cheer DSP
Accessories:  Copper Embossing Powder, Classic Label Punch, Layering Circles Framelits, Dimensionals, 1/4" Basic Black Shimmer Ribbon

Friday, February 3, 2017

Congratulations, I Knew You Could

This will be one of the cards to be made in class in a couple of weeks.  During SAB my plan is to include a card made with a SAB stamp with each class.  So far the "Hey, Chick", Avant-Garden and So Much" SAB stamps have been used.  With this class, coordinating the Designer Tee with the Custom Tee stamp makes perfect sense.

The card is like a flip chart. In other words there are 3 shirts on this card, and the cards flip up to reveal a different message.  Read the message on the first card, then flip the shirt up to read the message on the second shirt.  Finally, open the card to read the message on the third and last shirt.

The Pacific Point card base is layered with a Sparkle embossed Whisper White layer.  To the left is a 2" strip of Animal Party DSP, with a 1" strip of Garden Green cardstock adhered to this DSP to the left side.

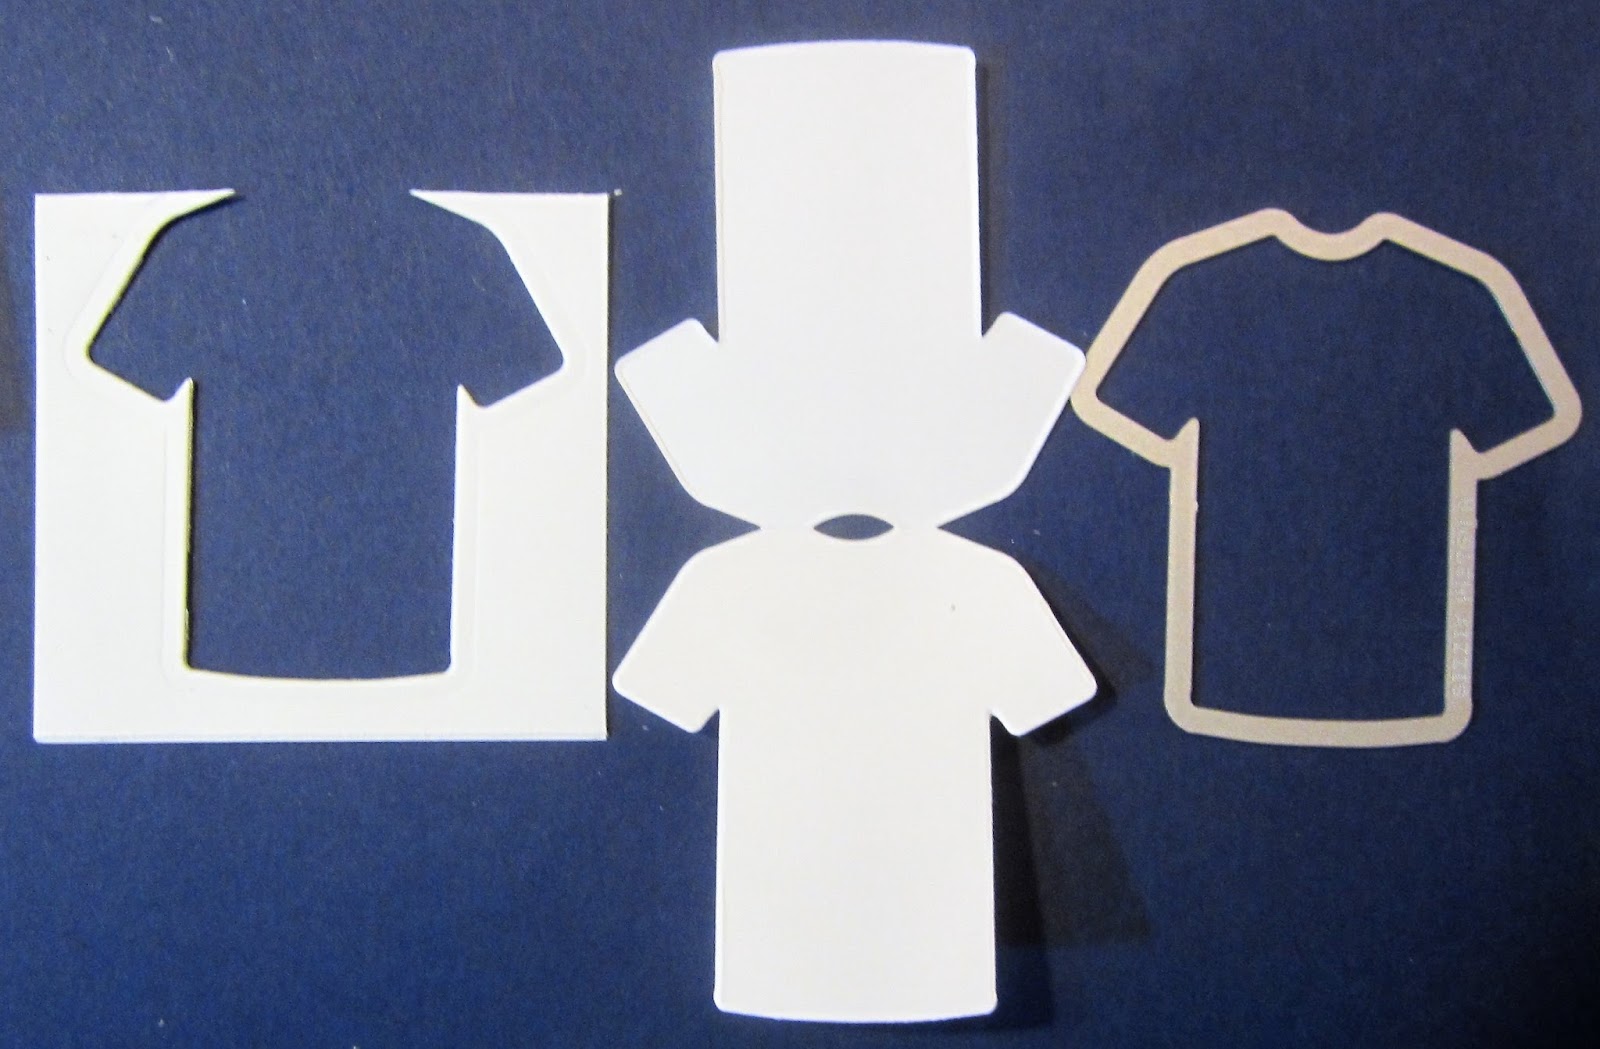
The shirt is two shirts attached at the shoulders.  It was made by folding a 3 3/4 by 5 1/4" piece of Whisper in half and placing the shirt framelit with the cutting edge slightly over the fold line.


After running that through the Big Shot, you have a Siamese shirt. See below.


The shirt on the front is decorated with stripes on the sleeves and the hem. This stamped decoration is common to all three shirts. The sentiment on the front "I think I can...." is stamped using the Garden Green and Real Red markers.

The first card is flipped up to reveal a second shirt which has another sentiment stamped in Pacific Point ink.  This shirt is adhered, at an angle, to a Whisper White square die cut with the square stitched die and stamped with the Touches of Texture stamp.  It is then matted with a Pacific Point die cut square.

This art piece is adhered to the card front using dimensionals.

On the inside the third die cut shirt has the final sentiment stamped on it.

Supplies Used:
Stamps: Designer Tee, Custom Tee (SAB), Touches of Texture
Inks: Black Memento, Pacific Point, Markers (Garden Green & Real Red), Tangelo Twist
Papers: Pacific Point, Whisper White, Party Animal DSP, Garden Green card stock
Accessories: Stitched Shape dies, Tee Builder framelits, Sparkle embossing folder, Classic Label Punch.


A Thankful Swan - Fab Friday #105

Swan Lake arrived on my door step yesterday, and I wanted to play with it immediately! The sketch challenge with Fab Friday provided me with the opportunity to do so. Seeing the swan in the water, with the little ones by her side immediately brought back memories of seeing the real birds on Lake Ontario when I was staying with friends. It was a cool day, and the wind was strong, but the swan and her goslings' swam bravely on.  Memories --funny things aren't they?


Card:
Marina Mist card stock, layered with Whisper White and then Scenic Scenery DSP formed the basis of this A2 card.
The Serene Scenery layer was embossed with the Sea side embossing folder making it look like waves on a lake.

Art Piece:
The images were stamped with Black Memento onto a Whisper White circle die cut using the largest of the Circle Stitched die. Part of the right side of the die was trimmed as per the sketch above. Masking was used to place the images where I wanted them and then they were coloured with ink pads and a blender pen.  The water lily was stamped on a separate scrap piece of Whisper White, coloured, cut out and adhered to the bottom of the circle.
The sky was sponged while the clouds were stamped using the cloud stamp from the "Lift Me Up" stamp set. Each cloud was accented with Smoky Slate ink.


The art piece was adhered to the card front using dimensionals.

Sentiment and Embellishment:
The "thank you" was stamped with Marina Mist ink on a piece of Pool Party card stock, punched with the Classic Label punch, and adhered to a strip of Whisper White.
Before attaching this sentiment label to the card front, a small piece of gold metallic ribbon (SAB) was fan folded and adhered to the wrong side near the right end.
Dimensionals were used to adhere this to the card front and the art piece.
A bow made of 1/8" Stitched Smoky Slate ribbon was added with a glue dot.


What's a card without glitter?  So some Clear Wink of Stella was added in some places.

Supplies Used:
Stamps: Swan Lake, Lift Me Up
Inks: Black Memento, Smoky Slate, Tangelo Twist, Daffodil Delight, Crushed Curry, Flirty Flamingo, Marina Mist, Pacific Point
Papers: Marina Mist, Whisper White, Serene Scenery DSP, Stitched Shape Dies, Classic Label punch, 3/8" silver metallic ribbon, 1/8" stitched smoky slate ribbon, Clear Wink of Stella, dimensionals, glue dots, blender pen, Sea side embossing folder.

Saturday, October 15, 2016

A Musical Birthday - a CASE

This card was inspired by one I saw on Pinterest, and I cased it from Tami White. It is a stunning birthday card for someone who's interest is music.


Supplies Used:
Stamps:
Inks: Versa Mark
Papers: Basic Black, Whisper White, Gold Foil
Accessories: Gold embossing powder, satin Real Red ribbon, classic label punch, dimensionals