Showing posts with label Hello. Show all posts

Thursday, June 17, 2021

A Little Note -- Paper Craft Crew Challenge #431

 This card was made for the sketch challenge with the Paper Craft Crew Horizontal challenge #431


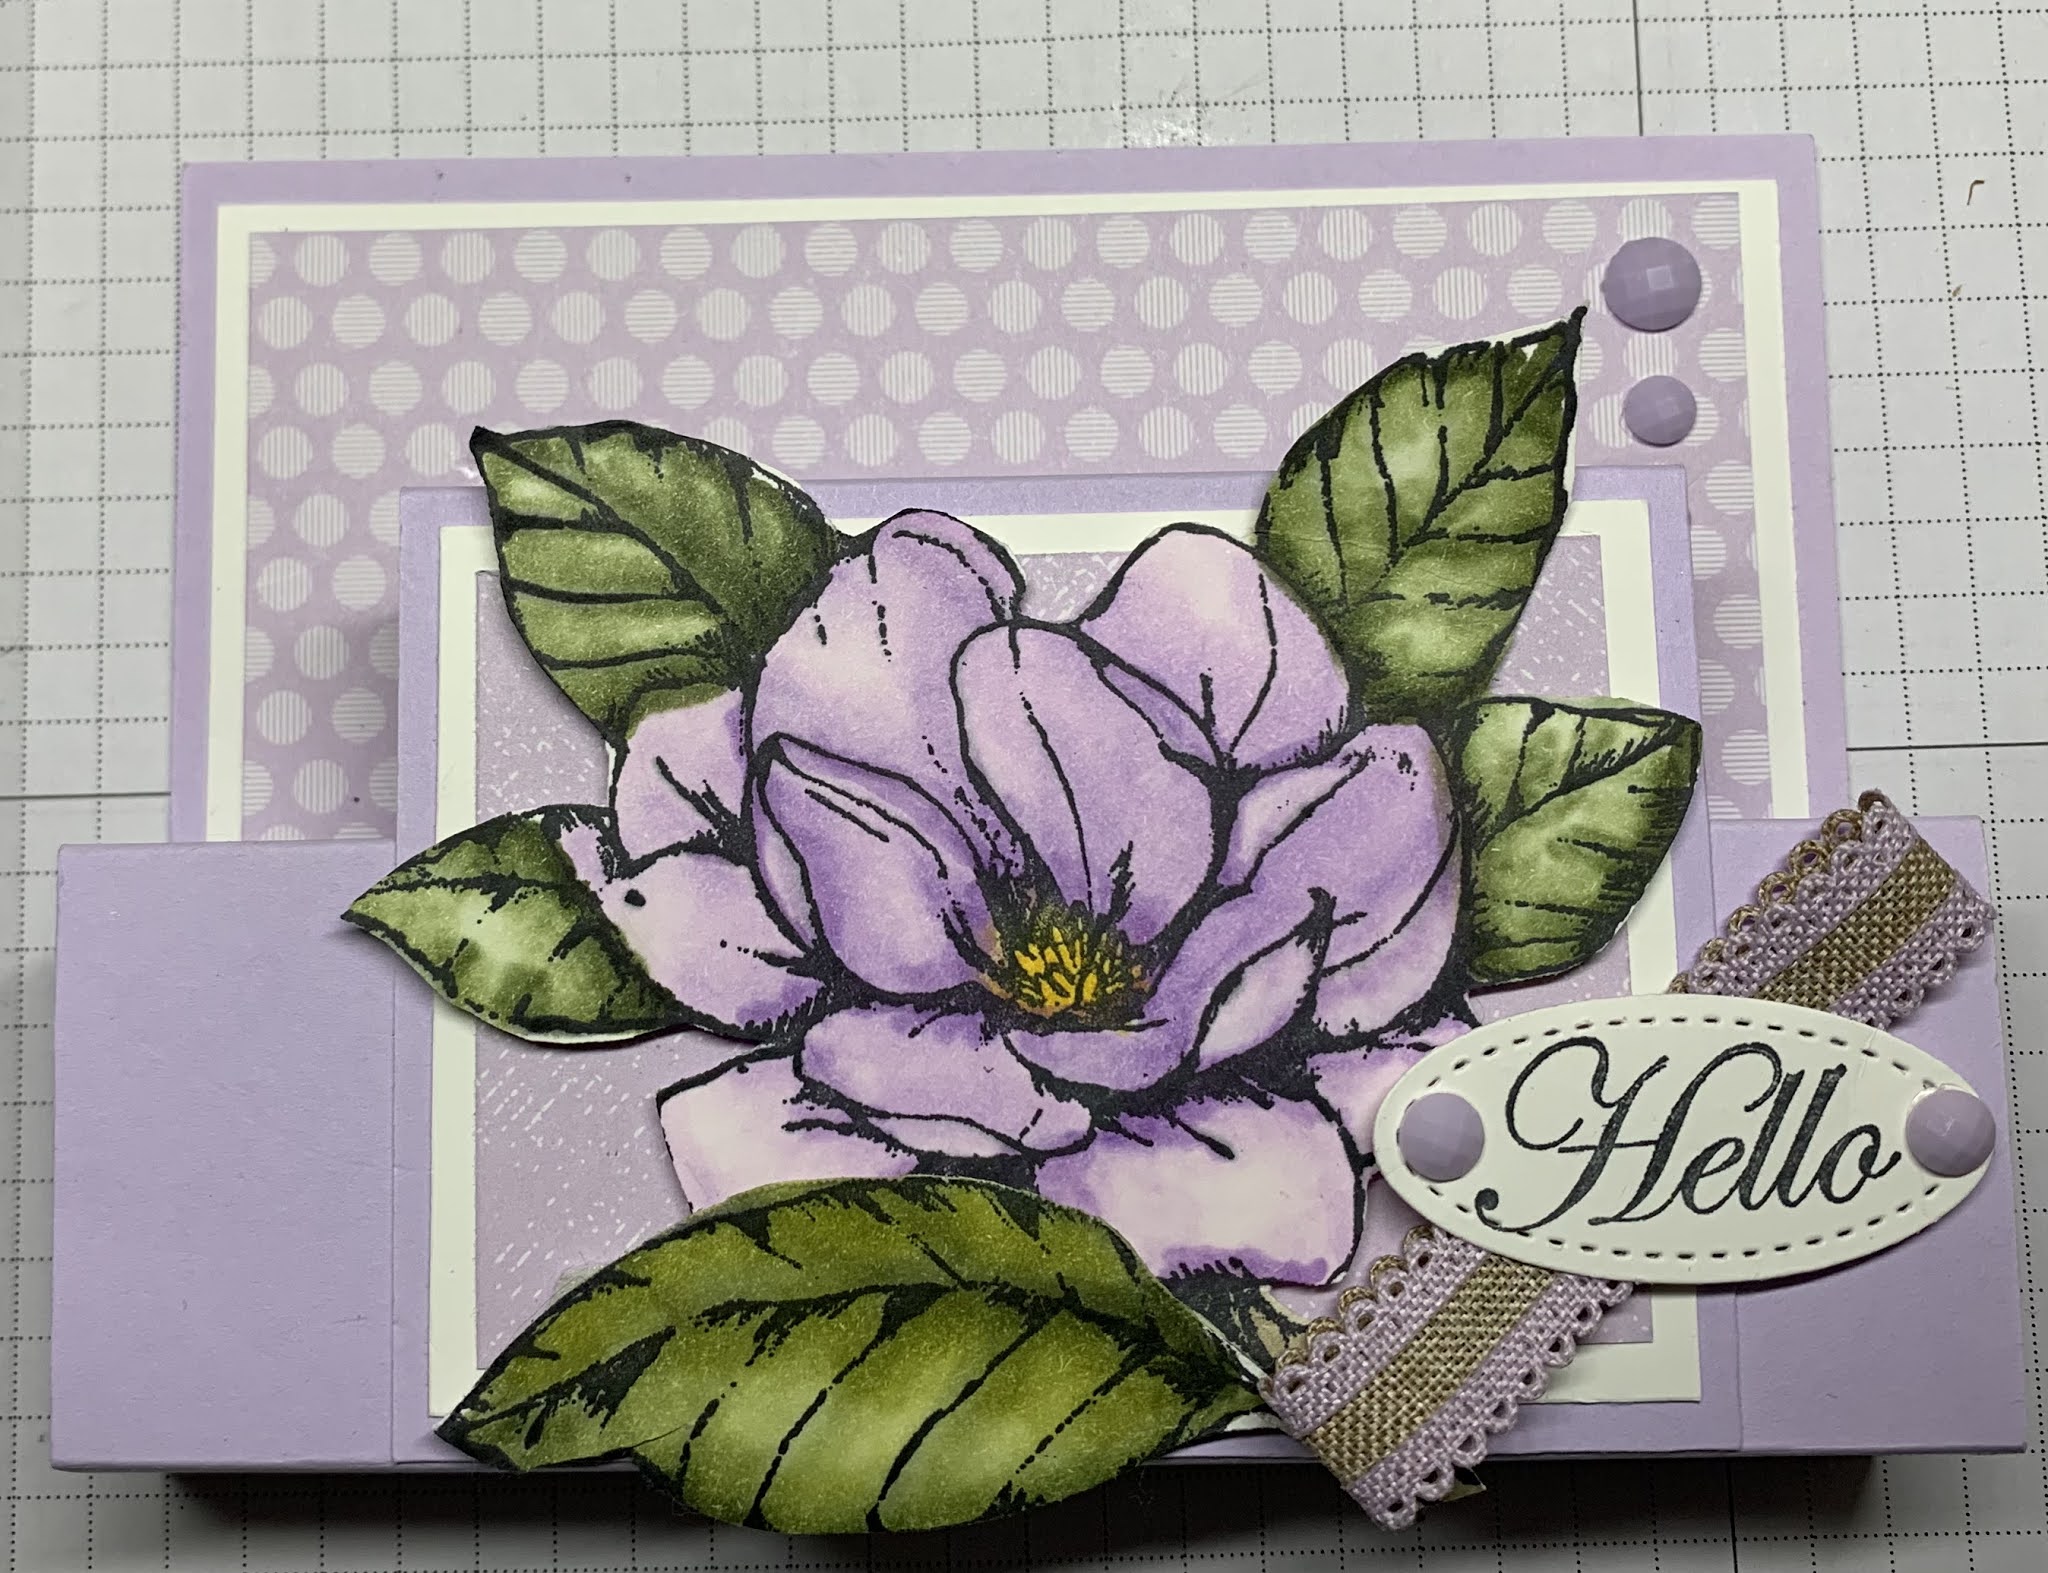
For this sketch challenge, I started with a base of Thick Basic White card stock and layered it with a layer of retired Purple Posy card stock.  That colour goes so well with the Hand-Penned DSP that I will be using on the rest of the car. This card stock was embossed with the Tasteful Textile 3D embossing folder giving the card some much needed texture.


Towards the right side of the card base I added a 3 1/3 by 3 7/8" of Hand-Penned DSP the edges of which were sponged with Highland Heather ink.
On top of that but towards the left, I added a 2 1/4 by 3 1/2" piece of Basic White, the edges of which were also sponged with Highland Heather. This is the Art Piece.

On a separate piece of Basic White I stamped and coloured one of the floral clusters from the Hand-Penned Petals stamp set.  The image was coloured using the fill stamps after which it was die cut with the image specific Penned Flowers die. This die cut was added to the Art Piece. Below the image on the Art Piece, the sentiment (from Pansy Patch) was stamped using Gorgeous Grape ink.


Across the lower part of the card, I added a stitched scallop strip (in Purple Posy) which was die  cut using one of the Penned Flowers dies On the left side of this strip a bow made using the 3/8" Fresh Freesia organza ribbon was added.


Some Pastel Pearls added to the flower centers and at the end of the sentiment finishes the card with a bit of glam.

Supplies Used:
Stamps:  Hand-Penned Petals, Pansy Patch
Inks:  Black Memento, Highland Heather, Daffodil Delight, Soft Succulent, Gorgeous Grape
Papers: Thick Basic White, Basic White, retired Purple Posy, Hand-Penned DSP
Accessories:  Penned Flower dies, Pastel Pearls, 3/8" Fresh Freesia organza ribbon, Tasteful Texture 3D Embossing Folder


Saturday, April 10, 2021

Pansy Patch- Casing the New Catalogue

 My pre-order arrived yesterday and as you can see I wasted no time playing with one of the new stamp sets, making a card using the new In Colors.

This catalogue goes live May 5 and contains some gorgeous stamp sets, dies, coordinating DSP and so much more.  Pansy Petals with its coordinating Pansy dies are one of them.  

This stamp set has coordinating DSP, the images in which can be die cut using the Pansy dies.  This is what I did to create this card.


I used many of the new In Colors (which will be with us until 2023) making this card which I cased from the new catalogue. The colors I used were Soft Succulents for the base, Evening Evergreen for some of the leaves, Fresh Freesia in the DSP and Pale Papaya in the flower centers.

The new Pansies are arranged on a Vellum doillie which is carried over from the about to retire catalogue. This doillie is adhered to a Soft Succulent card base.  These pansies are die cut with the Pansy dies directly from the Pansy Petals DSP, as are the leaves around the flowers. The flowers are adhered to the doillie with dimensionals.


These flowers are at the left edge of two of the patterns of DSP, cut in 1/2" strips adjacent to each other.  The sentiment, stamped with Gorgeous grape ink on a 1/2" piece of Basic White card stock has the edge punched with the Doubled Labels Pick a Punch.  And finally, a tiny gold bumble bee is hovering on the pale pink Pansy.  This tiny bee is part of the Pansy Petals suite

No card is complete without bling, so Clear Wink of Stella is applied to both flowers.


Supplies Used:

Stamp:  Pansy Patch

Inks:  Gorgeous Grape

Papers:  Soft Succulents, Petal Petals DSP, , Vellum doillie, Basic White

Accessories:  Pansy dies, Bumble Bee  trinket, Doubled Labels Pick a Punch, Dimensionals, Clear Wink of Stella.

Wednesday, March 31, 2021

Good morning Magnolia on a Step Panel card

 Along with the 5 in-colours mentioned in yesterday’s post, the Good Morning Magnolia stamp set and dies are also retiring.

Using one of the retiring colours, Purple Posy, I made a Pop-up card featuring this beautiful flower. Last year I visited my sister in Vancouver and visited a secluded garden with many Magnolia trees. The flowers on each tree were different colours and oh they were so beautiful!


I’m not good enough to emulate Nature but I tried  my best.


Using both the light and dare shades of Purple Posy I coloured the flower.  Daffodil Delight was used for the middle of the flower and both shades of Mossy Meadow for the leaves. I also added a touch of Daffodil Delight the leaves. When finished, the flower was die cut and set aside while I made the pop up base


To make the the Front Step Panel card I used the tutorial by Jan B here

Below are the dimensions of the papers I used:


Card stock:

Purple Posy:
.start with 2 pieces of card stock , a 5 1/2 by 8 1/2" (back pop up) and a 3 3/4 by 4 1/4" piece (front pop up).
. On the 8 1/2" side of the 5 1/2 by 8 1/2" piece, score at 4 1/4, 5 1/4, 7 & 8"
. On the  3 3/4" side of the 3 3/4 by 4 1/4" piece, score at 2 3/4 & 3 3/4"
.Fold and burnish all folds


Basic White: 
5 1/4 by 4" 1 piece for the back pop up
3 1/2 by 2 1/2" 1 piece for the front pop up
4 by 5 1/4" for the back of the card
4 1/4 by 4 1/4" for image and sentiment


DSP (Purple Posy DSP)
5 by 3 3/4" for back pop up
3 1/4 by 2 1/4" for front pop up (reverse pattern)

Supplies Used:
Stamp:  Good Morning Magnolia
Inks:  Black Memento, Stampin' Blends (Purple Posy, Daffodil Delight Mossy Meadow
Papers:  Purple Posy, Basic White, Purple Posy DSP
Accessories:  Stitched Oval Die, Magnolia die, Purple Posy Faceted Dots, 1/2" scallop linen Purple Posy ribbon, Dimensionals


Saturday, June 27, 2020

Forever Fern and clear block stamping -Paper Craft Crew Color Challenge #382

Clear block stamping is a technique I had almost forgotten about but I was playing with it last week and thought it would be perfect to try for the colour challenge with the Paper Craft Crew Challenge .
The colours:  yellow, blue, pink and green reminded me of the new 2020-2022 In Colours (Misty Moonight, Magenta Madness, Just Jade, and Bumblebee),  so they were used for this challenge.


Color challenge using Yellow, Blue, Bright Pink, Bright Green.

Misty Moonlight,  Bumblebee, and Magenta Madness ink was directly applied to a H clear block, spritzed with water, and then stamped onto a piece of Whisper White card stock.  Once dry, the dot stamp from Forever Fern was used to add some Misty Moonlight ink randomly over the colour panel.

After cutting out the panel with the SU trimmer, it was matted with some Just Jade card stock, and adhered to a 3 3/4 by 5" piece of Whisper White card stock embossed with the Delicate Diamond embossing folder, near the left side.


A large leaf  was die cut from Just Jade card stock using a Forever Flourishing die and adhered at an angle across the colourful panel with a 1/4" gingham Bumblebee bow  adhered to the stem. 

A sentiment,  matted with Bumblebee card stock, is added near the card bottom.

To finish the card, some Misty Moonlight embellishments were added.


Supplies Used:
Stamp:  Forever Fern
Inks:  Misty Moonight, Bumblebee, Magenta Madness, Just Jade, Black Memento
Papers:  Misty Moonlight, Magenta Madness, Whisper White, Just Jade
Accessories:  H Block, Spritzer, Delicate Diamond embossing folder, In Color embellishments, Forever Flourishing Die, 1/4" Bumblebee gingham ribbon


Thursday, May 28, 2020

Forever Fern - Another Catalogue Sneak Peak

These sneak peaks can be a real tease can't they?  Well, it's only 5 more days and you'll be able to order your own new products, whether it's Forever Fern or another stamp set.

For today's card, I am using the following new products:  Forever Fern and Forever Flourishing Dies in a pop up container card.


Usually I make a card by starting on the outside, but in this case I started on the inside of the Whisper White card base, even before scoring at the 4 1/4" mark.
Using the fern stamp and Pretty Peacock ink, I stamped this image twice, once on each side of the potential mid point.  These images would look like they were part of the pop up.  After stamping, the card base was scored at 4 1/4" and the fold burnished well.

The pop up flower pot was made by scoring a 2 by 8" piece of Crumb Cake embossed with the Pinewood Plank Embossing Folder at 2, 4, and 6 ".  These score lines were burnished well.  A 1/2 by 4" piece of Crumb cake scored at 1" each end and burnished well, with the folds going in the opposite directions.  This piece will be added to the inside like a pop up box card and the other die cuts added to this.


This folded crumb cake pop up is added to the inside at the bottom as shown in the picture.

Other leaf images were stamped in Old Olive, Pretty Peacock, or Shaded Spruce on a separate piece of Whisper White, and die cut.  Two of the pieces were adhered handing over the side of the container, and the others were added with glue dots to the inner strip.

The sentiment, is stamped on the inside beside the pop up using Shaded Spruce ink.


For the card front, I first emboss a 3 3/4 by 5" piece of Whisper White with the Heritage Embossing Folder.  In the center of that I adhere a die cut Fern Leaf and add a bow made with Whisper White polka dot organza ribbon. This is matted with Shaded Spruce card stock and added to the card front.


Supplies Used:
Stamp:  Forever Fern
Inks:  Proud Peacock, Shaded Spruce, Old Olive
Papers:  Thick Whisper White, Crumb Cake, Shaded Spruce
Accessories:  Heritage Embossing folder, 5/8" White Polka dot Organza ribbon, Pinewood Plank embossing folder, Forever Flourishing Dies

Sunday, March 29, 2020

The Last of SAB looking to the future - a CASE

I cased these 3 cards from Pinterest.
The Specialty Vellum DSP is partnered with the Metallic Flower DSP, both SAB products, and then with the Ornate Garden die, a product of the future.


Each of the cards is colour coordinated starting with the Specialty Vellum DSP, which comes in Pool Party, Soft Sea Foam, and Purple Posy. The background of the Metallic Floral DSP is sponged with an ink colour to coordinate with the card stock.

Dimensions of Papers:

  • 5 1/2 by 8 1/2" Thick Whisper White card stock - card base
  • Specialty Vellum DSP 4 by 5 1/4"
  • Card stock of desired colour die cut with the Ornate Garden die
  • Metallic Floral DSP 2 1/4 by 3 1/2" with background sponged with coordinating ink colour and added to Ornate die cut
  • Scrap of Whisper White for sentiment and die cut with Sweetly Stitched Die

Purple Posy


Soft Sea Foam


Pool Party

Saturday, February 6, 2016

Hello My Friend - Try Stampin' on Tuesday #256

For this card, made for the challenge with  Try Stampin on Tuesday I used as many SAB products as possible - DSP, and 2 stamp sets. To make this card, I put the sketch on its side.


The card base is Melon Mambo, layered with Whisper White, and then Perfectly Artistic DSP which I stamped all over with a small flower from "Hello" and Melon Mambo ink. 

Using the circles framelit, a large circle was die cut using the "Color Me Irrestibably" DSP with the pattern of the rain drops in it.  A sponge was used to apply a bit of Pink Pirouette, and a bit of Melon Mambo in a random pattern on this circle.


On a small Whisper White rectangle, the word "Hello" was stamped using Black Memento ink.  A flower was stamped using Melon Mambo ink just above the word on the right. Melon Mambe was used to sponge the edges.  This was adhered to the circle using dimensionals.  Then below the circle the rest of the sentiment "My Friend" was stamped .

On a separate piece of Whisper White cardstock, two flowers and two leaf stems were stamped - the flowers using 3 step stamping.  The colours, in order of usage, Pink Pirouette, Blushing Bride, and Melon Mambo.  The middle of each flower was stamped with Melon Mambo.  Old Olive was used to stamp the leaf stems.  The flowers and leaves were cut out by hand.

One flower was adhered directly to the card front at the edge of the circle at the lower right.  A green leaf was attached to the flower before it was glued down.  The second flower was added using dimensionals, and the accompanying leaf attached to the card front.

Wink of Stella (clear) was applied to the flower centers.

Supplies Used:
Stamps: What I Love, Hello
Inks: Black Memento, Pink Pirouette, Blushing Bride, Melon Mambo, Old Olive
Papers: Melon Mambo, Whisper White, Perfectly Artistic DSP, Color Me Irrestiably DSP
Accessories: Circles framelits, dimensionals, Wink of Stella glitter brush (clear)

Friday, March 8, 2013

Bleaching Technique - Card 2 - Feeling Sentimental

I've been continuing to experiment with bleach stamping and have learned a few things.  First of all, don't be generous with the bleach.  After applying bleach to the stamp, stamp off a few times and then stamp the final image.  You'll get more detail that way. Secondly, use the stamp-a-ma-jig to overstamp the bleached image.
Here's the second card for class:

This time I bleach stamped the image onto Cajun Craze cardstock and over stamped with Black Stazon ink.  I then die cut the image with the Oval framelit and mounted it onto a black windows framelit.  The designer paper is from the spring catalogue - Parker's DSP, and the sentiment is from a retired stamp set "Happy Greetings"

Stamps: Feeling Sentimental, Happy Greetings (retired), Itty Bitties
Inks: Black Stazon, Cajun Craze
Papers: Basic Black, Whisper White, Parker's DSP, Cajun Craze
Accessories: Chevron folder, Bleach, Black dotted scalloped ribbon, silver soda pop tops, Windows framelit, Oval framelit, large pearls, dimensionals