Showing posts with label Window framelits. Show all posts

Sunday, April 29, 2018

Thanks a Bunch (of Spring Flowers) Hand Stamped Sentiments #288

I had a walk around my garden this morning just to see what I could see.  And I was amazed to see growth emerging from under ground.  Even though the spring has been very cold the perennials have decided that it is time for them to start growing.  I can hardly wait for them to bloom and bring some colour to my back yard.

Which brings me to the Inspiration Challenge at Hand Stamped Sentiments .......and yes, a bright spring-like card.


There's more than one way to make a Wood grain background!  One can stamp using a background stamp, emboss with a wood grain embossing folder followed by sponging or brayering,  or one can just use Wood grain DSP. Finally, the method I chose,  one can add ink directly to a woodgrain embossing folder, insert a piece of card stock in it and put it through the Big Shot.

A window opening was die cut using the Window framelit placed sideways on this "barn" front.  I added an identical size of Crumb Cake cardstock behind this die cut layer so that I could reattach the die cut window frame (using foam tape) which now has some window sheet attached to its back. This has almost an "eclipse" effect.

Because the window was die cut sideways, the window sill was too small for the bottom of the window, so I die cut 2 of them and adhered them together to make one longer one and this formed the base for the spring floral bouquet.

Various flowers (and leaves)  were stamped and die cut using the Beautiful Bouquet, Tranquil Tulip and Petal Palette stamp sets and arranged on this extended window sill selecting the colors from the Inspiration picture above.  The flower -covered  sill was adhered to the bottom of the window with some foam tape - and a sentiment tucked into the flowers at the side.


To complete the picture, I added a  bird from the Petal Palette stamp set placing it on top of the yellow flower.


This card layer was added to a Pool Party card front.

I feel more spring-like already.

Supplied Used:
Stamps:  Beautiful Bouquet, Tranquil Tulip, Petal Palette
Inks:  Soft Suede, Daffodil Delight, Rich Razzelberry, Old Olive, Berry Burst
Papers:  Pool Party, Crumb Cake, Whisper White, Garden Green, Blushing Bride, Berry Burst
Accessories:  Wood grain embossing folder, Windows framelit, Eloquent Bunch framelits, Petals and more thinlet dies, Window sheet, foam tape, dimensionals. liquid pearls (for center of flowers)

Tuesday, February 17, 2015

Happy Birthday Moon Lake

I again use the blendabilities background to stamp an image from Moon Lake.  I just love doing this technique, but alas there is another technque that I want to try - but not for this card.

Colours used for this background:  Old Olive, Daffodil Delight, Coastal Cabana, Crumb Cake

The image, from "Moon Lake" was stamped with Black Stazon ink directly onto the background paper, and then the image was die cut using the Windows collection framelit die.  This was adhered to a piece of Crumb Cake that had been die cut using the Apothecary accents framelit.  This in turn was added to a Bermuda Bay die cut using the other shape of the Apothecary accents framelit.  Both Apothecary Accent dies were paper pierced using the paper piercing pack and paper piercer.  Also, all edges were sponged with Early Espresso ink.  The sentiment, from "Petite Pairs", was punched with the small oval punch and adhered just below the image.

The base card is Bermuda Bay cardstock, layered with Very Vanilla cardstock embossed with the Decorative Dots embossing folder.  The edges of these were sponged with the Early Espresso ink as well.


Horizontally, in the middle, is a piece of Crumb Cake cardstock matted with Bermuda Bay.  I trimmed the long end of a piece of 1 1/4" striped Bermuda bay ribbon and frayed it, and then attached it to the horizontal band.

The image piece was attached to the middle of the card over this band.


Built for Free Using: My Stampin Blog

Wednesday, January 28, 2015

You Brighten My Day

Sale-a-bration is in full swing, and the stamp set and DSP I used are free with an order of $60.00 or more.
"You Brighten my Day" - isn't that what friends are all about?

The image was stamped with Memento ink onto White cardstock.  Then coloured with blendabilites - Daffodil Delight.  It was punched with the 1 3/4" circle punch, and layered with a Daffodil Delight die from the Circles framelit using dimensionals. It was then attached to a Coastal Cabana  window die cut using the Windows framelit.

The base card is Coastal Cabana, layered with Whisper White, and then You Brighten My Day DSP (SAB).  A smaller piece of the same DSP was matted with Soft Suede cardstock, and attached to the card, with a strip of Soft Suede laying across it.  The Soft Suede piece was embossed with the Decorative Dots Embossing folder and a piece of Coastal Cabana ribbon (part of the Best Year Ever  accessory pack  SAB) spanned across it.  I also made a ribbon from it and attached it to the right side of the card.
The buttons are also from the SAB accessory pack.

Built for Free Using: My Stampin Blog


Friday, January 9, 2015

Altering a Composition Book

In class this week, students will be altering a notebook which is smaller than this composition book. I picked several of these up in the Dollarama store.

Today, I altered one of the Composition Books.  My new video camera came today and I'll try and do a video tutorial in the next week or so.  I think learning the operation of this camera will be a steep learning curve.


This is what the book looked like before alteration:


I covered the outside of the book in 3 stages.  Measurements were very carefully made.
I measured from the front inner edge to the edge of the black binding, and added 1".
Then I measured from the top edge to the bottom edge and added 2" (an inch for the top and an inch for the bottom.
Here are the materials used:


Built for Free Using: My Stampin Blog


I also used a paper crimper.

Friday, March 8, 2013

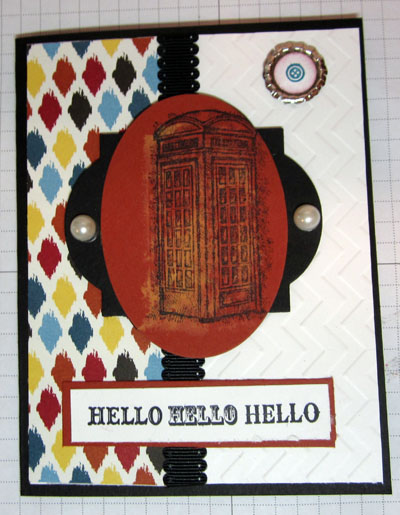
Bleaching Technique - Card 2 - Feeling Sentimental

I've been continuing to experiment with bleach stamping and have learned a few things.  First of all, don't be generous with the bleach.  After applying bleach to the stamp, stamp off a few times and then stamp the final image.  You'll get more detail that way. Secondly, use the stamp-a-ma-jig to overstamp the bleached image.
Here's the second card for class:

This time I bleach stamped the image onto Cajun Craze cardstock and over stamped with Black Stazon ink.  I then die cut the image with the Oval framelit and mounted it onto a black windows framelit.  The designer paper is from the spring catalogue - Parker's DSP, and the sentiment is from a retired stamp set "Happy Greetings"

Stamps: Feeling Sentimental, Happy Greetings (retired), Itty Bitties
Inks: Black Stazon, Cajun Craze
Papers: Basic Black, Whisper White, Parker's DSP, Cajun Craze
Accessories: Chevron folder, Bleach, Black dotted scalloped ribbon, silver soda pop tops, Windows framelit, Oval framelit, large pearls, dimensionals