Showing posts with label Seaside Shore. Show all posts

Saturday, May 2, 2020

Ahoy There - Try Stampin' on Tuesday #455

I was reorganizing my stamps today getting ready an On-Line stamp sale,  when I rediscovered an old  favourite  - "Seaside Shore".  Since the optional theme with the sketch challenge at Try Stampin' on Tuesday # 455 was a nautical one this was the stamp I chose to use.


A die cut banner became a window into an underwater world, with sea weed waving and fish swimming.  The banner was die cut in a piece of Come Sail Away DSP - a pattern with Night of Navy stripes - and the opening was used to trace an outline on a larger piece of Whisper White identifying where the underwater scene would be made.

Balmy Blue ink was applied with a finger dauber to create the water and sea weed was stamped near the bottom. Some extra sea weed was stamped on a scrap piece of Whisper White, coloured with dark Old Olive stampn blend, and fussy cut.  Two fish were also stamped, coloured on a scrap piece of Whisper White and fussy cut.

After the scene was built a shaker unit was made using window sheet and thick adhesive strips.  The shaker elements are a mixture of blues and crumb cake coloured sequins with the occasional clam shell thrown in.  If you look carefully you can see this tiny clam shell though the shaker window.


Two sizes of the banner dies were used to create the whisper White trim around the shaker.  A bow of Night of Navy/Sahara Sand Baker's twine was added at the top right, as well as a Sail Home Trinket.

The stamparatus was used to stamp a rope image which was coloured and then cut into strips and added to the card front horizontally and vertically from the shaker.

a
Stamp:  Seaside Shore
Inks:  Shaker unit:  Balmy Blue, Smoky Slate, Poppy Parade, Old Olive, Night of Navy, Pacific Point, Black Memento
Papers:  Night of Navy, Whisper White, Come Sail Away DSP
Accessories:  Banner Dies, Window Sheet, Shaker elements, Stamparatus, Night of Navy/Sahara Sand Baker's Twine, Sail Home Trinket, Adhesive Strips


Thursday, April 12, 2018

Seaside Shores

Another favourite about to retire the end of May. I loved this one.  Coming from a nautical country this stamp set hit close to home.
Here's a picture of a card I made a while ago


And another......


There is time to order this set.  It is available until May 31 while supplies last

Tuesday, July 25, 2017

Have a Swimmingly Good Day - Try Stampin on Tuesday or Not #332 , Hand Stamped Sentiments #269

Under the sea! Under the sea!  With the heat we have been experiencing, under the sea sounds like a nice place to be.

This week I combined 2 challenges: Try Stampin on Tuesday # 332  here and Hand Stamped Sketches #269 here

The challenge with Try Stampin on Tuesday or Not this week is not only a sketch one (sketch by Donna) but also an optional theme one associated with it - seaside/ocean.

At Hand Stamped Sentiments, the Inspirational Challenge also had a seaside theme.


The base card is Night of Navy, layered with Soft Sky embossed with the Seaside Embossing Folder.

For the sand at the bottom of the sea I first tore a piece of Sahara Sand card stock and then stamped sand on it using the "sand" stamp from High Tide. The top torn edge was then sponged with Sahara Sand ink

On the right lower corner I clustered 3 different sea shells. All were fussy cut.
The large shell was stamped first with second generation Crumb Cake and then with full strength of the same color.  After cutting out the edges were sponged with Basic Gray, and the edges curled to make it look 3D
The round shell was first stamped with second generation Wisteria Wonder, than regular strength.  Edges were also sponged with Basic Gray.
The last shell was also sponged with a bit of Calypso Coral.
Some sea grass from the stamp "Seaside Shore" was stamped and coloured with Always Artichoke, then fussy cut and arranged around the sea bed.
A couple of fish were playing around the shells.

On the bed at the left lies an anchor tied to a chain.

After I had the card all put together, I applied a liquid lacquer to the shells and the anchor.

Supplies Used:
Stamps:  Lots of Shells, Seaside Shore, High Tide
Inks:  Black Memento, Pacific Point, Always Artichoke, Calypso Coral, Sahara Sand, Crumb Cake, Wisteria Wonder, Basic Gray
Papers:  Night of Navy, Soft Sky, Sahara Sand, Whisper White
Accessories:  Seaside Embossing Folder, Liquid Lacquer (non SU), dimensionals.

Now its your turn to create something using Donna's sketch, with or without the theme, and you have 2 weeks in which to do so.  When done, upload your project to either the Try Stampin on Tuesday or Not blog here or to their facebook page here

Monday, June 19, 2017

An Awesome 'fishy' Pop Up

I have been on the hunt for pop up cards, and saw this one on Pinterest, made by several different authors in different ways.  So I made my own version.
I just love this card because of the surprise factor.  Open the card, and a fish's mouth pops open with a message inside.

The card front shows images from "Seaside Shores".  The Pacific Point side fold card is layered first with Whisper White, then Calypso Coral DSP, and finally by the art piece.  Before adhering the stamped and cut out images on the art piece it was embossed with the Seaside embossing folder.

Prepare to be surprised when the you open the card.

In the center a big fish opens it's mouth! Once you get over the surprise, you will see that there is a "Happy Birthday" message inside the open mouth.

How did I do that?

A piece of Soft Sky card stock was cut 1/4" smaller that the base card. i.e. 4 by 8 1/4" and folded in half.  The pop up is created on the fold.

Make a faint pencil line 1" from top on this fold.  Measure 1 3/4" down from that and make a horizontal slit 1"  on the fold.  Score from the ends of the slit diagonally to the 1" pencil mark.  Pop out the scored area, close card, and burnish the area well.

For the bottom of the mouth, repeat the above, first measuring 1 3/4" down from horizontal slit.

Calypso Coral DSP was used to decorate the top and bottom of the mouth.  Two 3 by 2" piece of DSP were cut into a triangle by trimming them from a 1" mark (on the 2" side) to both lower corners.  Fold in half and adhere one to the top make another to the bottom. I used the retired Owl Builder punch to make the eyes.

The tail was die cut using the Sweet & Sassy framelit; the fins punched with a flower punch and cut in half.  A scallop circle punch could also be used. A solid, coordinating color was used.

How did I get the sentiment inside the mouth?  I piece of Whisper White card stock was placed behind the mouth and a small pencil mark was used to mark the center.  The sentiment was stamped centered on that.  This piece of Whisper White folded in half and adhered to both sides of the mouth.

The lower edge of this inner piece was stamped with sea weed.  A few clams and an anchor were also added.

Supplies Used:
Stamps: Seaside Shores, Special Celebration
Inks:  Black Memento, Pacific Point, Calypso Coral, Old Olive, Sahara Sand, Crumb Cake
Papers:  Pacific Point, Whisper White, Soft Sky, Calypso Coral, Calypso Coral DSP
Accessories:  Seaside embossing folder, Sweet & Sassy framelits, Flower punch (retired)


Friday, June 2, 2017

An Under Sea Birthday - Fab Friday #113

This is my card for the sketch challenge with Fab Friday #113

The topic for this card was made at the request of a client who wishes to make a card of a similar nature for a male friend.

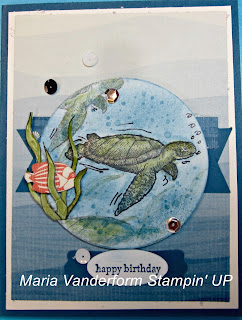
This  masculine birthday card featuring an under sea turtle was made using two stamp sets:  From Land to Sea, and Seaside Shores.  I also used some retired DSP.


For my card I flipped the sketch onto its side.  I did this because the DSP I used (and I had only a small piece left) had the waves going from left to right and would only fit on the card if I flipped the sketch.

The image was stamped onto Whisper White card stock with two other turtles stamped very lightly above and below it.  It was colored with a blender pen and the following colors:  Daffodil Delight, Crumb Cake, Old Olive, and Always Artichoke. The background was sponged with Marina Mist and Dapper Denim, and stamped with the Timeless Texture stamp.  Some air bubbles emerging from the turtle were hand drawn using a black marker.


The image was die cut using the layering circle framelit and adhered to the card front using dimensionals.

The basic card is Dapper Denim, layered with Very Vanilla and then Seaside DSP (retired). A 3/4" strip of Dapper Denim notched at both ends was adhered to the middle, and on the top edge of that was attached a 1/4" of DSP.  The art piece was adhered to this.

On the left side of the circle, I adhered some sea grass that was cut out with a fish that I cut out of the Seaside DSP weaving in and out of this.

To finish the card I added some black, white and silver sequins.

Supplies Used:
Stamps:  From Land to Sea, Seaside Shore, Timeless Texture
Inks: Black Memento, Daffodil Delight, Old Olive, Always Artichoke, Crumb Cake, Marina Mist, Dapper Denim
Papers:  Dapper Denim, Very Vanilla, Whisper White, Seaside DSP (Retired)
Accessories:  Layering circle framelit, small oval punch (retired), Modern word label punch, sequins, Wink of Stella, dimensionals.


Thursday, September 1, 2016

Shaker Post it Note Holders

What a wonderful day!  The temperature is below seasonal (yes, for the first time in I don't know how long) it is below seasonal at 23 degrees C.  I think I can actually do some work outside today.

But before I do, I wanted to post a couple of Post-it notes in holders which I made especially for the guys.  Both have a pen tucked along the side. Please note that they are packaged and almost ready to go in my craft fair bin.

One is the regular 3 by 3" post-it notes; the second the 4 by 6" yellow lined notes.

1.  The 4 by 6" Post it Note: 
Start with a piece of Dapper Denim cardstock that is 9 1/2 by 6 1/4", and score at 4, 4 1/2, and 5"
Fold in half at the middle score line and made two small slits to the other score lines (this will hold the pen).  I cut 2 extra 2 by 6 1/4" pieces and notched them with the badge punch to create the illusion of waves.  These were adhered to the front and bottom edges.
Decorate the top as you would a regular shaker card.
The pen that is added to the side of the note pad is an R.S.V.P pen

2.  3 by 3 Post it Note:
Start with a 8 1/8 by 3 1/2" piece of card stock, and score at 3 1/3, 3 3/8, and 4 1/4.
The pen used here is a gel mini pen.

Supplies Used for Both:
Stamp: Seaside Shore
Inks: Dapper Denim, Calypso Coral, Marina Mist, Mint Macaron
Papers: Dapper Denim, Very Vanilla, Calypso Coral, Byond the Sea DSP
Accessories: Layering Oval framelits, Window sheet, shades of blue shaker elements (non SU)

Friday, July 29, 2016

Seaside Shore Shaker Birthday - Paper Craft Crew Challenge # 204

After supper I went into the garden to do some more pruning and deadheading, and decided to cut back my coreopsis which had grown really tall.  With this plant in full bloom, the weight of the flowers  were  causing the plant to bend over some of the other perennials blocking their light.  So, I trimmed it back, using the flower stems to make an arrangement for  my patio table.

Later in this post you will see a picture of this card in the flowers.


After making the double fold card featured in the previous post, I had some stamped and cut fish left over, so, for the sketch challenge with Paper Craft Crew Challenge I made a shaker card using these left over fish.  I never like to throw anything away.


PCC204


  • I first created the front of the card, using Very Vanilla, and the Seaside Shore DSP (two patterns separated by a 1/4" strip of Calypso Coral cardstock).   Through this layer, an oval was die cut using the Layering Ovals Framelits.  This was used to create the ovals  shaker  element                                    
    This is the close up of the shaker.
                                                      
Supplies Used:
Stamps: Seaside Shore, Thoughtful Banners
Inks: Calypso Coral, Denim Dan, Marina Mist, Mint Marone)
Papers: Denim Dan, Very Vanilla, Seaside Shore DSP, Calypso Coral
Accessories: Window Sheet, adhesive strips, shades of blue sequins (non SU) layering ovals framelits

As promised, a picture of the card among the flowers.

Seaside Shore - a double fold display card

The heat remains unrelenting, with no rain in sight, at least in our area.  However, my garden continues to remain a place of solice for  me and I water every night even though the price of watering has gone up.

Again I remained inside today and spent a considerable amount of time making this card.

I started out making the Large display card the Dawn showed in her video but something happened along the way and I ended up making my own different card fold.  The finished size is 6 by 4".  The stamp set "Seaside Shore" is used.

This is the card closed

This shows the card opened

Supplies Used:
Stamp: Seaside shore
Inks:Dapper Denim, Calypso Coral, Mint Macaron, Basic Gray
Papers: Dapper Denim, Very Vanilla, By the Seaside DSP
Accessories: Layering Circles framelits, dimensionals