Showing posts with label Forever Flourish Die. Show all posts

Sunday, July 12, 2020

Blossoms & Blooms Anniversary card - a tutorial

This bundle has got to be one of my favourite bundle of the Annual Catalogue.  It is so versatile!

Today I made an Anniversary card using tone on tone card stock with Platinum foil and gold ink.


Measurements:
  • Thick Very Vanilla card stock 4 1/4 by 11" scored at 5 1/2" to form a top fold card. - card base
  • Very Vanilla 3 3/4 by 5" - art piece 
  • Very Vanilla 4 1/4 by 5 1/2" - to die cut bottom blossom layer)
  • Platinum foil - 4 by 5 1/4" ( I die cut the center out to use on another project) - mat for art piece
  • Platinum foil - 4 1/4 by 5 1/2" to die cut top blossom layer
  • Scrap piece of Very Vanilla to die cut sentiment using Tasteful Labels dies
  • Scraps of Platinum foil to die cut small leaves - Forever Flourish Dies
Stamps:
  • Blossoms & Blooms
  • Many Mates
Inks:
  • Gold 
  • Versa Mark
Accessories:
  • Many Layered Blossoms dies
  • Tasteful Labels Dies
  • Forever Flourish Dies
  • 1/4" Very Vanilla gold edged ribbon
  • Dimensionals
  • Gold embossing powder
  • metallic faceted dots
Putting card together:
  • Die cut the center out of the 4 by 5 1/4" piece of Platinum foil  Do not add to card base yet
  • Using gold ink, stamp the image of the blossoms on the 3 3/4 by 5" piece of Very Vanilla
  • Die cut both pieces of Blossom dies. Note:  do not remove centers of flowers die cut pieces.
  • Adhere together using tombo glue and a sponge matching leaves and flowers
  • Adhere to art piece matching stamped image

  • Add ribbon to bottom half of card front wrapping edges around very Vanilla and platinum foil layers.
  • Add these layers to card base.
  • Emboss sentiment with gold embossing powder on scrap piece of Very Vanilla and die cut with the Tasteful Labels Die.

  • Die cut 3 small leaves from scrap Platinum foil
  • Adhere to bottom of die cut sentiment
  • Add sentiment to card front over ribbon towards the right using dimensionals.
  • Adhere ribbon to left of sentiment.

  • Finish card by adding metallic faceted dots where desired.
  • Finish inside as desired.


Tuesday, July 7, 2020

More of You - Try Stampin' on Tuesday #464

This card was made using the sketch challenge at Try Stampin on Tuesday #464 here


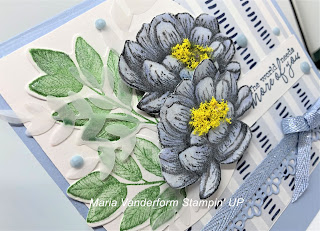
 This 5 by 5" square top folding card has a Seaside Spray card stock base.  Layered on that is Whisper White followed by Playing with Patterns DSP.  Both the Whisper White and DSP do not go all the way to the bottom of the card, but stop short about an inch from the bottom,
At the bottom edge is placed a die cut piece of Seaside Spray card stock; above that is a 1/4" 
shimmer Seaside Spray ribbon and bow.


In the upper left corner is an offset Whisper White die cut circle.  Placed in the circle are two flowers from Tasteful Touches colored with Seaside Spray Stampin Blends with Daffodil Delight in the center.  For added texture some Sunshine Flower Soft was added to the flower centers.  Both flowers were fussy cut and added to the circle using dimensionals.


For the leaves Garden Green was used to stamp them, and they were die cut using the fern dies.  A vellum leaf was also die cut.  The leaves from "Forever Fern" were tucked under each flower.

The sentiment is from "Free as a Bird", stamped in Misty Moonlight, and added to the right of the circle.
To finish the card, some In Color 2019 - 2021 Faceted Dots were added randomly and clear Wink of Stella applies to the flower petals.


Supplies Used:
Stamps:  Tasteful Touches, Free as a Bird, Forever Ferns
Inks:  Black Memento, Stampin Blends (Seaside Spray, Daffodil Delight, Misty Moonlight), Garden Green
Papers:  Seaside Spray, Whisper White, Playing with Patterns DSP, Vellum
Accessories:  Ornate border die, 1/4" glimmer Seaside Spray ribbon, Layering Circle die, Sunshine Flower Soft (non SU), In Color 2019-2021 Faceted dots, Clear Wink of Stella, Dimesionals, Forever Flourish dies

Saturday, June 27, 2020

Forever Fern and clear block stamping -Paper Craft Crew Color Challenge #382

Clear block stamping is a technique I had almost forgotten about but I was playing with it last week and thought it would be perfect to try for the colour challenge with the Paper Craft Crew Challenge .
The colours:  yellow, blue, pink and green reminded me of the new 2020-2022 In Colours (Misty Moonight, Magenta Madness, Just Jade, and Bumblebee),  so they were used for this challenge.


Color challenge using Yellow, Blue, Bright Pink, Bright Green.

Misty Moonlight,  Bumblebee, and Magenta Madness ink was directly applied to a H clear block, spritzed with water, and then stamped onto a piece of Whisper White card stock.  Once dry, the dot stamp from Forever Fern was used to add some Misty Moonlight ink randomly over the colour panel.

After cutting out the panel with the SU trimmer, it was matted with some Just Jade card stock, and adhered to a 3 3/4 by 5" piece of Whisper White card stock embossed with the Delicate Diamond embossing folder, near the left side.


A large leaf  was die cut from Just Jade card stock using a Forever Flourishing die and adhered at an angle across the colourful panel with a 1/4" gingham Bumblebee bow  adhered to the stem. 

A sentiment,  matted with Bumblebee card stock, is added near the card bottom.

To finish the card, some Misty Moonlight embellishments were added.


Supplies Used:
Stamp:  Forever Fern
Inks:  Misty Moonight, Bumblebee, Magenta Madness, Just Jade, Black Memento
Papers:  Misty Moonlight, Magenta Madness, Whisper White, Just Jade
Accessories:  H Block, Spritzer, Delicate Diamond embossing folder, In Color embellishments, Forever Flourishing Die, 1/4" Bumblebee gingham ribbon


Thursday, May 28, 2020

Forever Fern - Another Catalogue Sneak Peak

These sneak peaks can be a real tease can't they?  Well, it's only 5 more days and you'll be able to order your own new products, whether it's Forever Fern or another stamp set.

For today's card, I am using the following new products:  Forever Fern and Forever Flourishing Dies in a pop up container card.


Usually I make a card by starting on the outside, but in this case I started on the inside of the Whisper White card base, even before scoring at the 4 1/4" mark.
Using the fern stamp and Pretty Peacock ink, I stamped this image twice, once on each side of the potential mid point.  These images would look like they were part of the pop up.  After stamping, the card base was scored at 4 1/4" and the fold burnished well.

The pop up flower pot was made by scoring a 2 by 8" piece of Crumb Cake embossed with the Pinewood Plank Embossing Folder at 2, 4, and 6 ".  These score lines were burnished well.  A 1/2 by 4" piece of Crumb cake scored at 1" each end and burnished well, with the folds going in the opposite directions.  This piece will be added to the inside like a pop up box card and the other die cuts added to this.


This folded crumb cake pop up is added to the inside at the bottom as shown in the picture.

Other leaf images were stamped in Old Olive, Pretty Peacock, or Shaded Spruce on a separate piece of Whisper White, and die cut.  Two of the pieces were adhered handing over the side of the container, and the others were added with glue dots to the inner strip.

The sentiment, is stamped on the inside beside the pop up using Shaded Spruce ink.


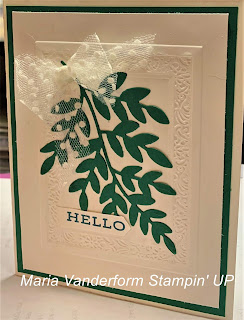
For the card front, I first emboss a 3 3/4 by 5" piece of Whisper White with the Heritage Embossing Folder.  In the center of that I adhere a die cut Fern Leaf and add a bow made with Whisper White polka dot organza ribbon. This is matted with Shaded Spruce card stock and added to the card front.


Supplies Used:
Stamp:  Forever Fern
Inks:  Proud Peacock, Shaded Spruce, Old Olive
Papers:  Thick Whisper White, Crumb Cake, Shaded Spruce
Accessories:  Heritage Embossing folder, 5/8" White Polka dot Organza ribbon, Pinewood Plank embossing folder, Forever Flourishing Dies

Saturday, May 23, 2020

Something Old and Something New - a catalogue sneak peak - Try Stampin' on Tuesday #458

The new Annual Catalogue goes live on June 3, 2020 -  about 10 days from now. So, today's card will provide you with a sneak peak of some of the upcoming new products.

For this sketch challenge with Try Stampin on Tuesday #458, I combined something old - some DSP that is about to retire - with something new - a stamp set "Forever Fern".  For the optional theme of texture, I used the new "Tasteful Texture 3D Embossing Folder".


The focal image is a Whisper White tag punched with the Angle Topper Punch and then embossed with the new Tasteful Texture 3D Embossing Folder. Mossy Meadow ink was used to sponge the edges of this tag.


On a separate piece of Whisper White, the image of the Fern Leaf was stamped  with Mossy Meadow ink and then die cut with the coordinating "Forever Flourish Die".  Dimensionals adhered this die cut leaf to the tag which was  then added to the card front also using dimensionals. At the bottom of the tag was added a sentiment stamped on a strip of Whisper White notched at both ends.  At the top I added a triple bow made with the 1/4" Whisper White crumpled Seam Binding.


Some retired faceted dots are added to the bottom of the tag.

The card base is Soft Sea Foam card stock layered with Mossy Meadow card stock, and then Garden Lane DSP.  At the top and bottom of this card front I added some 1/8" Whisper White ribbon coloured with a Mossy Meadow marker.


Supplies Used:
Stamp:  Forever Fern
Inks:  Mossy Meadow, Mossy Meadow marker
Papers:  Soft Sea Foam, Whisper White, Mossy Meadow, Garden Lane DSP
Accessories:  Angle Topper Punch, Forever Flourish Die, Tasteful Texture Embossing Folder, 1/4" Whisper White crumpled Seam Binding, 1/8" Stitched Whisper White ribbon, Dimensionals, Faceted dots, bow maker