Showing posts with label Star framelits. Show all posts

Tuesday, April 4, 2017

Enjoy an Egg-cellent Easter - Try Stampin' on Tuesday or Not #316

For this week's sketch by Donna, with Try Stampin' on Tuesday or Not, I thought I would make an Easter card. After all, Easter is only a matter of week's away. The optional theme?  A burst of color.

I made the central focus of the card a shaker element and placed colorful embellishments around it.


I made the shaker the usual way, using layering circle framelits, and the Sprinkle Embellishments as the "shaker" elements. These elements are from the Occasions Catalogue and come in wonderful Easter colors.

Three different embellishments, all symbols of Easter, surround one side of the shaker.

The first one has an Old Olive pansy flower base with a Daffodil flower adhered to it. This flower was made using the Basket Bunch stamp set, but I chose to fussy cut it rather than using the coordinating framelits.  It was coloured using the new watercolor pencils and a blender pen. I made 3 flowers, and the other two were used to decorate the inside.

On a scallop garden green circle, 5 tiny colorful Easter eggs are added. These are die cut using the Basket Builder framelits because all 5 eggs can be die cut at the same time.

The lower-most embellishment is a Daffodil Delight star on which there  is an Easter bunny holding a basket.

Don't you just love the Easter colors?

Close up of focal point,


Supplies Used:
Stamps: Basket Bunch, Retired SU Easter stamp set (? name)
Inks: Black Memento, Old Olive, Tip Top Taupe, Watercolor Pencils
Papers:Sweet Sugarplum, Whisper White, So Succulent DSP, Daffodil Delight, Old Olive, Garden Green
Accessories: Layering circle framelits, Star framelits, Basket Builder Framelits, Pansy Punch, Sprinkle Embellishments


Tuesday, December 22, 2015

Happy New Year 2016 - The Friday Mashup #237

Merry Christmas Everyone, and may the New Year bring you health, happiness, joy and time spent with family and friends.

To make a New Year's card using the colours gold, silver and black was the challenge with The Friday Mashup this week.
New Year's Eve reminds me of flares exploding in the air, champagne in hand, sparkles and sequins on dresses.
So, that's what I tried to portray on my card:

  • On a 3 1/4 by 4 1/4" piece of Silver glimmer paper, I die cut a star in the middle using a star framelit, then I rotated the same star framelit on the same spot at least 3 times to obtain this "explosing in air" effect. This was matted with Basic Black cardstock.
  • The year "2016" was die cut using the alphabet thinlet dies, and adhered them to the middle of the "explosion".
  • Gold sequins were randomly added around the date.
  • Champagne glasses, fron "Making Spirits Bright" were stamped on a separate  piece of Whisper White cardstock.  The glass was coloured with Wink of Stella glitter brush (gold), and the glass contents with the clear glitter.  The bubbles were cut out and adhered to the solution inside the glass.  The glasses were then cut out and adhered to the card front.
  • The basic card is Basic Black cardstock lined with design gold vellum paper.  Silver glitter ribbon was added around the vellum prior to adhering the vellum to the card base.
  • a row of gold sequins was adhered to the bottom ot the card front.
  • The image panel was added to the card front using dimensionals.
  • The sentiment was from "Good Greetings", embossed in gold and matted with gold glimmer paper.
Supplies Used: 
Stamps: Making Spirits Bright, Good Greetings
Ink: Black Memento, Versa Mark
Papers: Basic Black, Designer gold vellum, silver glimmer paper, gold glimmer paper, whisper white
Accessories: Gold sequins, Star Framelits, alphabet framelits, gold embossing powder, silver glimmer ribbon, wink of stella glitter brush (clear and gold), Fine tip glue pen, dimensionals

Saturday, October 4, 2014

Bright & Beautiful in Brown

This is day 3 of the 12 days of Christmas where I post 2 cards everyday.

Happy Card Making day!!  Hope you get into your craft room and make some cards today.

I don't usually use shades of brown in my Christmas cards, but today I made an exception.  I was inspired by the designer paper in the Trim the Tree designer paper pack.

I started with a Cherry Cobbler base layered with Very Vanilla cardstock embossed with Decorative Dots folder.
Then I matted a piece of designer paper with Crumb cake and adhered it in the middle of the card.
The image unit starts with a Crumb cake oval embossed with the Decorative dots folder.  I stamped 2 medium stars - one with Early Espresso on Very Vanilla card stock  and embossed with Clear embossing powder  - the other embossing it with White embossing powder on Crumb Cake cardstock.  The stars framelits was used to die cut both stars.  The tiny star on the top was stamped with Early Espresso and embossed with Clear embossing powder before die cutting with the smallest of the star framelit.
The Early Espresso star was adhered to the oval using dimensionals.  The Crumb Cake star was rotated so that the star points alternated and then adhered to the Early Espresso one with dimensionals.  A dimensional was used to attach the smallest star to the image unit.  On top of that is a champagne glimmer star punched with the small star punch.
Two banners were made.  The larger longer one was embossed with the Decorative Dots folder.  The smaller Very Vanilla one was stamped with the sentiment.  They were adhered together and attached to the DSP under one end of the oval.
Hint: Whenever I die cut glimmer paper, there is always some paper left over around the edges that can be used.  I just hate throwing that out.  So, I use the small star punch and punch as many stars as I can from the remnant.  I have one container for Champagne stars; one for silver stars.  They come in really handy when you need a star embellishment.

Stamp: Bright & Beautiful
Inks: Early Espresso, Versa Mark
Papers: Cherry Cobbler, Very Vanilla, Crumb Cake, Champagne glimmer, Trim the Tree DSP pack
Accessories: Decorative dots folder, Oval framelit, Star framelit, Small star punch, dimensionals, Clear embossing powder, White embossing powder

Friday, October 3, 2014

Bright & Beautiful Seasons's Greetings - a CASE

I cased this card from Sandi MacIver (Stamping with Sandy) .  I just loved the card so much when I saw it that I cased the entire card.

You can see why.  Isn't it gorgeous!!
Go to Sandi's blog here for directions as to how she made this card.

Stamp: Bright &Beautiful
Inks:Versa Mark
Papers: Garden Green, Brushed Gold cardstock, Trim the Tree DSP pack
Accessories: Star framelits, Gold embossing powder, Small star punch, dimensionals

Thursday, October 2, 2014

Bright & Beautiful Star Card

Today I made several different cards using the Bright & Beautiful stamp set.  I started with this star card which was made using the largest of the star framelit on a folded piece of Cherry Cobbler.  Just make sure one of the star points overlaps the fold preventing the framelit from cutting the card stock into 2 separate pieces.

The second layer of the star card is a piece of silver glimmer paper die cut using the second largest star framelit.  This was attached to the cherry cobbler star card.  Then I stamped the second largest star with Versa Mark and embossed it with white embossing powder.  After die cutting it with the star framelit it was attached to the silver glimmer paper.  Use tombo glue because nothing else seems to adhere to this glimmer paper.
Finally I stamped and embossed the smallest star on cherry cobbler cardstock and die cut it using the smallest star framelit.  I attached it to the embossed layer with a dimensional.  A large pearl finished the card off nicely.

Stamp: Bright & Beautiful
Ink: Versa Mark
Papers: Cherry Cobbler, Silver Glimmer
Accessories: Star framelits, white embossing powder, large pearl, dimensional, white taffeta ribbon (retired)

Wednesday, August 27, 2014

Star Ornament

This Christmas ornament is made using the Star Framelits and the stamp set "Bright & Beautiful".  It is very easy to make and the effect is stunning!


There are 8 layers to this ornament, all put together using dimensionals.
The first think I did was emboss using gold embossing powder on Very Vanilla cardstock, 2 each of the star stamps.  These were die cut using the Star Framelits.  In addition, I die cut the largest of the Star Framelits using Gold cardstock.
Then I built 2 halfs of the ornament - a large gold star, a medium one, a smaller one, and the tiny middle one - by adhering them together with dimensionals.  You will end up with 2 halves of the ornament.
Before adhering them together, I adhered some gold stretch cord to the back of one of the halves.  This will be the ornament hanger.
Now I adhered the 2 halves of the ornament together, and walla you have an ornament!  To finish the ornament I put a large pearl in the middle

Stamp: Bright & Beautiful
Ink:  Versa Mark
Papers: Very Vanilla, Gold cardstock
Accessories: Star Framelits, Gold embossing powder, stretch cord (non SU), dimensionals.


Monday, August 25, 2014

Star Birthday Cards - a CASE

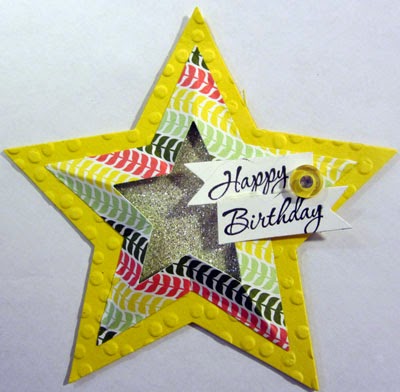
These cards are a CASE from a CASE I saw on Pinterest.  The person that I CASED the card from had CASED the card from the SU catalogue on Page 135.  I can't say that I noticed the card in the catalogue before now.  I guess I was just too busy looking at everything else.  Anyway, when I saw the cards on Pinterest, my interest was piqued, and I just had to make some of these cards.  Wendy Cranfield made an excellent video on You Tube here and I followed her instructions to make these cards.  Obviously you will also need the Star Framelits.

These are the 3 I made using the Star Framelits.  They were actually very easy to make.

The base card here is Strawberry Slush, with All Abloom DSP as well as Silver Glimmer paper.
The sentiment is from Memorable Moments, and I used Itty Bitty framelits to die cut them.  Since I didn't have any buttons that matched the card stock, I used Bitty Buttons with a piece of Strawberry Slush punched with an Itty Bitty flower punchie under neath it.

The lighting in this picture is not the greatest, but I wanted to show you how the card opened to become a stand alone card.,

Here the base card is Daffodil Delight with the top layer embossed with the Decorative Dots embossing folder.

Island Indigo is used as the base here.  also, I put the sentiment on the opposite side of the front of the card (mainly because I die cut it backwards)