Showing posts with label Slim Line card. Show all posts

Saturday, June 4, 2022

Lady bug Slim Line card using new In Colors - Hand Stamped Sentiments #390

 Well this turned out to be one colourful card!  All of the new In Colors in one card is very colourful and it takes a bit getting used to. 

Creating this card took me way, way out of my comfort zone but that is what challenges are for.  

I created this card for the color challenge at Hand Stamped Sentiments #390


Supplies Used:

Stamp:  Hello Ladybug

Inks:  Black Memento, Orchid Oasis, Sweet Sorbet

Papers:  Starry Sky, Basic White, Parakeet Party, Tahitian Tide, In Color 2022-2024 DSP (Sweet Sorbet and Parakeet Party)

Accessories:  Slim line card die, Ladybug Builder punch, Medium Daisy punch, Garden Gems, 1/8" metallic Sweet Sorbet mesh ribbon, Dimensionals


Tuesday, May 24, 2022

Time for a Cup of Tea - card #2 A Slimline

 This slim line card was partially cased from the card depicted on Pg. 12 of the new Annual catalogue.


To create the slimline card, an 8 1/2 by 7" piece of Old Olive card stock was scored at 3 1/2" on the 7" side.  This created an 8 1/2 by 3 1/2" card, a perfect size for the  the slim line envelopes shown on Pg. 137.

The card front is layered with a 3 1/4 by 8 1/4" piece of Basic White card stock upon which the rest of the card will be created.

First I created the background. Using pool party ink, and a blender brush, colour was applied to the center of the Basic White card stock piece.  The large leaf stamp was stamped randomly on this brushed background.  I stamped off before stamping  to create a softer look.  The die cut cups were built on this background.


The 4 cups were  die cut the using the outline tea cup die and the Tea Boutique DSP.  In addition, two cups were die cut using the die cup with the inlaid leaf pattern and Old Olive card stock.  These were added over the middle two die cut cups.

Two end cups

                                                            Other two cups

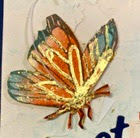
The tea bag and two flowers were stamped with Fresh Freesia ink and die cut.  One flower was also stamped using Crushed curry ink.  The sentiment was stamped with Old Olive ink on a strip of Basic White card stock.  The die cut tea bag and flowers were added as shown.
In colour matt decorative dots added to the front finished the card.

Supplies Used:
Stamp:  Cup of tea
Inks:  Old Olive, Fresh Freesia, Crushed Curry Pool Party
Papers:  Old Olive, Basic White, Tea Boutique DSP, Slim line envelope
Accessories:  Tea cup dies, In Color 2022-2024 Matte Decorative dots, Dimensionals, Blender Brushes


Friday, January 29, 2021

Art Gallery Slim Line Card - Try Stampin' on Tuesday #491

 I love making Slim Line card, and I adore the new Art Gallery bundle and its coordinating DSP. So I couldn't resist using the DSP on a Slim Line card for the sketch challenge with Try Stampin on Tuesday #491 As well I added the butterfly from "A Touch of Ink", giving it the water colour treatment. I used a different technique with the butterfly and the humming bird to give them a water colour look (see end of post)


Stamps:  Art Gallery, A Touch of Ink

Inks:  Night of Navy
Butterfly:  Night of Navy, Poppy Parade, Balmy Blue


Dimensions;
  • Thick Whisper White 7 by 9" scored at 3 1/2"
  • Night of Navy Card Stock 8 3/4 by 3 1/4"
  • Fine Art Floral Designer Series Paper 8 1/2 by 3"
  • Night of Navy 3 by 3" adhered to an Adhesive Sheet to die cut sentiment
  • Whisper White 4 by 4" for Butterfly and Hummingbird (on inside)
  • Night of Navy card stock 1/4 by 3" - strip near bottom


Accessories:
  • Floral Gallery Dies
  • Gilded Leafing
  • Gilded Gems
  • Dimensionals
Inside:


Techniques:


Both the butterfly and humming bird were stamped using the stamparatus.  The detailed image was first stamped with Black Memento ink on Whisper White (although watercolor paper could be used). Various colours of ink were applied directly to the solid counter part image using finger daubers, spritzed with water,  and then stamped directly over the detailed image. This gives a water colour look.
The colours did go outside the stamped lines, but when the butterfly and hummingbird were fussy cut this was not an issue.


Gild Leafing was applied to some of the butterfly.  Some glue was applied with the fine tipped glue pen, allowed to get tacky, and then the gild leafing was applied