Showing posts with label Best Birds. Show all posts

Friday, January 18, 2019

A Team Member's Anniversary Card

Anniversaries need to be celebrated, and when my team members reach an anniversary date of the time of their signing up with Stampin' Up I make a special card for them and either give it to them at a meeting of the team, or I mail it to then

In this particular case, this is her two year anniversary with Stampin' Up as well as a member of my team.

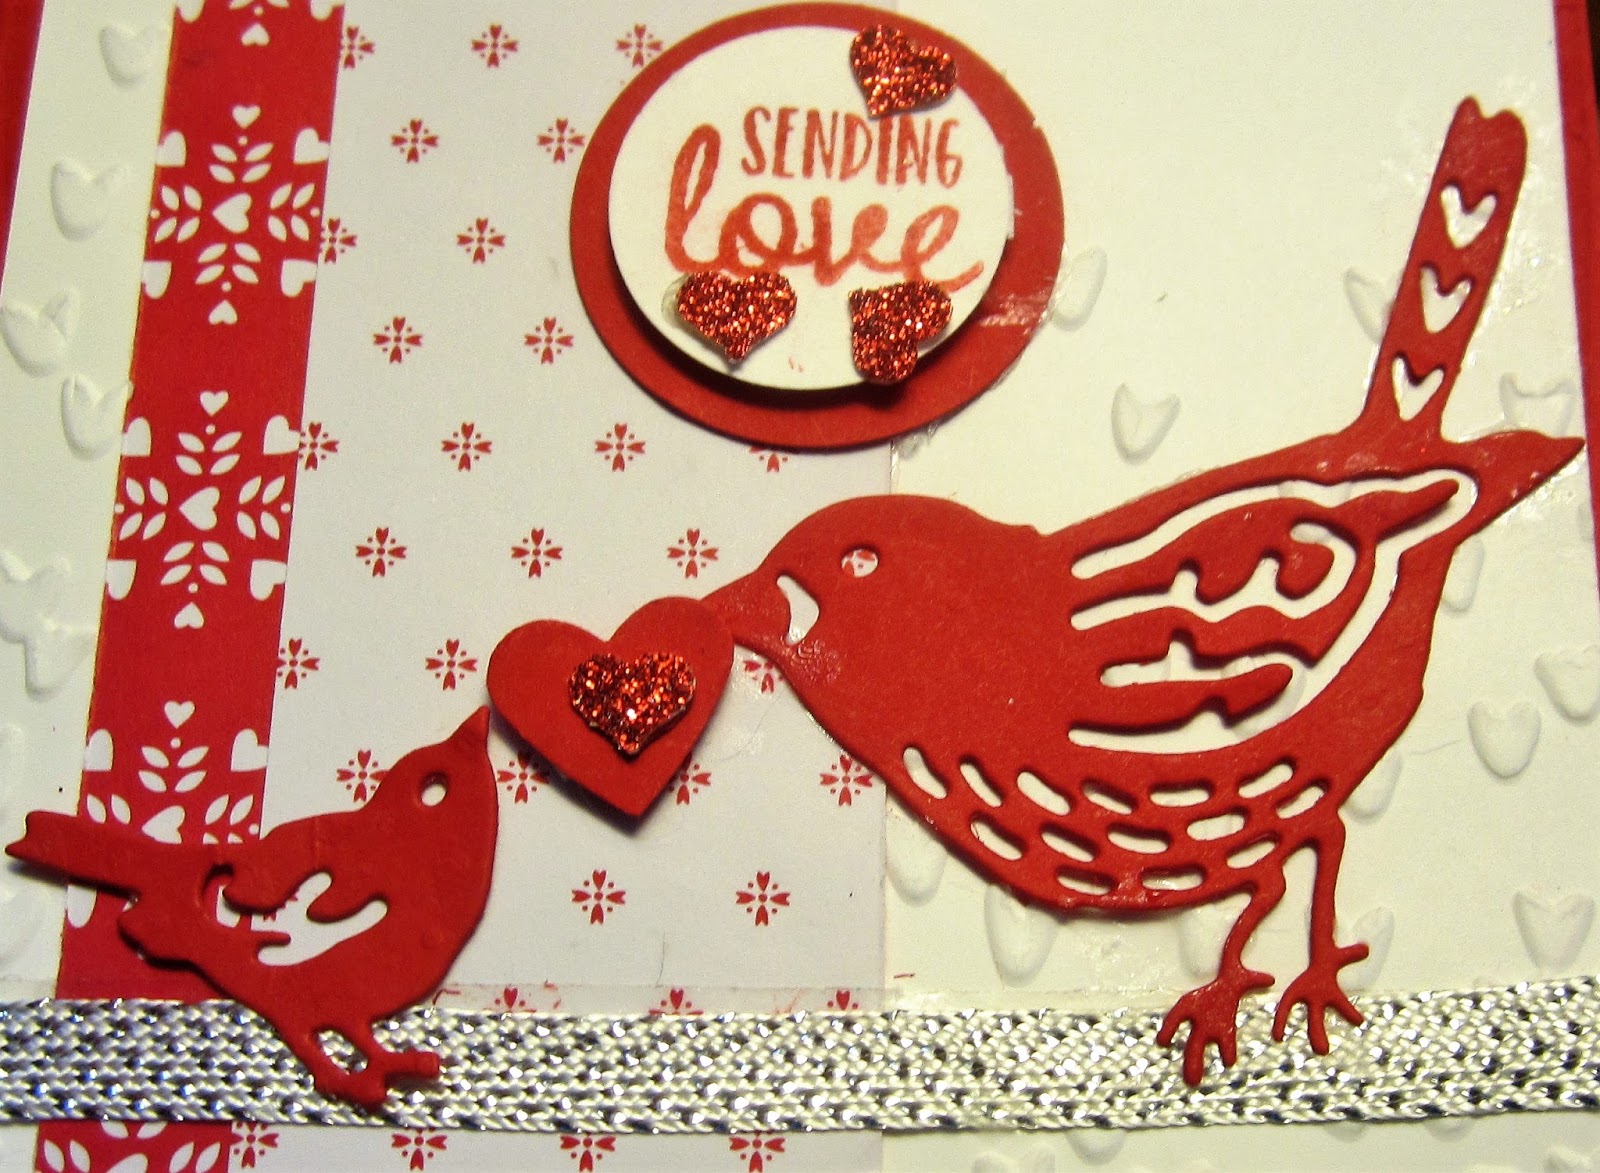
Here is the card I made for her.

I apologize for the editing of the pictures.  An editing program I usually use was giving me grief tonight.


I found the "Friendship's Sweetest Thoughts" stamp set when I was sorting through my stamps and thought it would be perfect for an anniversary card.

The base card  is Fresh Fig, layered with Whisper White card stock embossed with the Dot to Dot embossing folder.  At the far left I added a 2" strip of the patterned Vellum from the Floral Romance DSP. On top of that is a Whisper White lacy die cut which was cut using the Delicate Lace Edgelits. On the stitch line of this die cut I added a  piece of 1/8" Fresh Fig ribbon.


Tip: Adhere vellum  using the Sizzix adhesive sheets rather than tape or glue dots.


The image was coloured with ink pads and a blender pen.

 Tip: With the new ink pads it is difficult to 'squeeze' ink onto the inside of the lid. If ink is needed for colouring with a blender pen etc. place a clear acrylic block onto the ink pad and use the ink from that for colouring.

The image was die cut using the layering oval framelits and matted with a scallop oval in Fresh Fig card stock.  The two layers were adhered together using dimensionals..

The sentiment is from "Best Birds" and is stamped in Fresh Fig ink.  A triple bow is added to the left of the sentient with a glue dot.

To finish the card, I added tiny pearls to the center of each flower, and 3 larger pearls that I coloured with a Blackberry Bliss stampin' blend.  Some clear Wink of Stella was added to the canopy, flowers and cart.

Supplies Used:
Stamps:  Friendship's Sweetest Thoughts, Best Bird
Inks:  Black Memento, Sahara Sand, Fresh Fig, Petal Pink, Pear Pizzazz, Mossy Meadow
Papers:  Fresh Fig, Whisper White, Floral Romance DSP
Accessories:  Layering Oval Framelits, Delicate Lace Edgelits, 1/8" Fresh Fig ribbon, Wink of Stella , Pears, Dot to Dot Embossing Folder, Blender Pen  

Monday, October 15, 2018

50th Anniversary featuring Beautiful Promenade

The Hand of Man craft show is coming very soon, and as I was checking my inventory I realized that I needed a 50th wedding anniversary card.
I used the Beautiful Promenade stamp set with its coordinating "Beautiful Layers framelits " in a gold/Very Vanilla color scheme to make this 50th Anniversary card.

  • three flowers, and 6 leaves were embossed with gold embossing powder  on Shimmer White card stock and die cut.
  • they were arranged on a Very Vanilla layer embossed with the Tufted Embossing folder.

  • The edges of this layer was die cut using the shaping framelit and then mounted on a 4 by 5 1/4" piece of gold foil with the corners rounded with the corner rounder punch.
  • Some 1/2" gold edged Very Vanilla ribbon was placed around the lower half of this layer below the flowers and a bow added to the left side.

  • The number "50" were die cut from a Junior alphabet set that is now retired.  The rest of the sentiment from "Best Birds" was gold embossed on Very Vanilla and matted with gold foil.
  • gold rhinestones were added to the center of each flower.
Supplies Used:
Stamps:  Beautiful Promenade, Best Birds
Inks:  Versa Mark
Papers:  Thick Very Vanilla, Very Vanilla, Gold Foil
Accessories:  Gold embossing folder, Beautiful Layers thinlet dies, 1/2" gold rimmed very vanilla ribbon, gold rhinestones, junior alphabet die (retired), dimensionals, Tufted embossing folder.


Friday, May 25, 2018

Happy Anniversary Cake Soiree using Eclipse Technique

I'm really happy with the way this anniversary card turned out.

I opted to use a silver and white color scheme for this elegant card with just a hint of color on the flowers on the cake. Using the eclipse technique contributed to the elegance of this card.


The basic card is a top fold Thick Whisper White, layered with Silver Foil and then Whisper White embossed with the Sequins embossing folder.

Before adhering the embossed Whisper White layer to the Silver Foil layer, it was die cut with 2 sizes of oval framelits.  I did the same thing using Silver Foil.  The cake was built on the die cut oval, which was adhered to the silver foil layer.  The silver foil frame was added to the card front using foam adhesive strips (eclipse technique).  The embellishment at the upper right was made by silver embossing and die cutting one of the flowers and two leaves and adhering them with dimensionals.


Here's a side view of the eclipsed oval frame.


Sentiment is from "Best Birds"

Supplies Used:
Stamps:  Cake Soiree, Best Birds
Inks:  Versa Mark, Markers (Sea side foam, powder pink)
Papers:  Thick Whisper White, Silver Foil, Whisper White
Accessories:  Silver embossing powder, Sweet Cake Framelits, Layering Oval Framelits, Scattered Sequins embossing folder, Dimensionals


Saturday, April 15, 2017

Best Bird Birthday - Just Add Ink #355

I think spring is finally arriving. The temperature has been in the double digits the last couple of days, birds are coming to the bird bath, and squirrels are digging up their buried "spoils". The buds on the trees are starting to swell, but not too much is happening in the garden yet.  I guess that's to be expected because it was only a week ago that we had 2" of snow on the ground.

It's really nice to see and hear the spring birds when I go in the back yard - the fat robins, raucous black birds, chick-a-dees, nut hatches etc. Plus I still hear the Cardinals calling to each other across neighbours' yards.

When I saw the sketch challenge with Just Add Ink, I immediately visualized birds.  Crazy huh??

After building the card base using Soft Suede cardstock layered with Very Vanilla and Scenic Scenery DSP, I stamped and coloured the bird, flowers, and branch.  They were die cut using the coordinating framelits and the edges sponged to take away from the "cut" look and to give dimension to the images.

I used the layering circle framelits to die cut a circle from a piece of Very Vanilla cardstock that had been embossed with the chevron embossing folder.  The edge was sponged with Soft Suede ink.

A piece of burlap ribbon was adhered to the card front, and the branch and flowers were attached just below it and slightly overlapping it at one end.

The circle was added with dimensionals; the bird was added using dimensionals as well.  I placed a flower with a bud in the bird's mouth. And of course there are the rhinestones which I placed in the center of each flower.

The sentiment was added to the upper left circle.

Supplies Used:
Stamp: Best Bird
Inks: Black Memento, Crumb Cake, Soft Suede, Daffodil Delight, Basic Black marker, Melon Mambo, Old Olive
Accessories: Chevron embossing folder, Layering circles framelits, Birds & Blooms Thinlet dies, rhinestones, Burlap ribbon, dimensionals.


Monday, January 9, 2017

Best Birds Wedding Card

The Best Birds stamp set has proven to be a very versatile stamp set.  I have made a birthday card, a Valentine's Day card, and now a wedding card.

On a silver card stock base a Whisper White piece of card stock partially embossed with the Falling Petals embossing folder is layered.
A silver metallic ribbon (SAB) is adhered where the embossing ends.

Below the ribbon are attached two birds die cut in silver cardstock using the Birds & Blossoms framelits.  Two silver glimmer  wedding bands are held between the two birds.

Three flowers were stamped and then die cut and added to the left side of the card.  They were coloured with the silver marking pen and dazzling details added.

The sentiment was punched using the classic label punch.

Supplies Used:
Stamps: Best Birds
Inks: Black Memento, Silver marker
Papers: Silver card stock, Whisper White, silver glimmer
Accessories: 3/8" silver metallic ribbon, birds & blooms framelits, petite circle punches, dazzling details, glue dots, dimensionals, Falling petals embossing folder.

Sending Love - Create with Connie and Mary #439

It's another snowy day here in southern Ontario, thus another day to hibernate and play with my new "toys".
I'm starting classes this week, so I'm making cards different than the class cards, using the Best Birds stamp set, in order to show the versatility of this set.  My emphasis with classes this year is to focus on one stamp set at a time and making up to 4 different cards using that set.  This maximizes the use of the stamp set.
The card I've made using the sketch with Create with Connie and Mary is a Valentine card.  I noticed that one of the die cut birds has tiny hearts in the tail feathers, making it perfect for this type of card.
CCMC439

The basic Real Red card is layered with Whisper White card stock embossed with the Falling Petals embossing folder.
Two 2 1/2" strips of  Sealed with Love DSP are adhered on the left side of the card.  One piece if 2 1/2 by 4 1/4"; the other 2 1/2 by 4".
Two Real Red die cut birds were placed on a piece of silver metallic ribbon (SAB), with a small punched heart between them.


The sentiment, stamped in Real Red ink, is punched with a 1" circle punch layered with a 1 1/4" Real Red circle.
Some tiny Red Glimmer hearts (made by punching the Confetti heart border punch) were adhered around the sentiment.  Another one was adhered to the center of the heart between the birds.

Supplies Used:
Stamps: Best Birds, Sealed With Love
Inks: Real Red
Papers: Real Red, Whisper White, Sealed with Love DSP, Red Glimmer Paper
Accessories: Birds & Blooms framelits, Small heart punch, 1" circle punch, 1 1/4" circle punch, Confetti hearts border punch, 3/8" silver metallic ribbon (SAB)


Sunday, December 18, 2016

Best Bird Birthday - Hand Stamped Sentimehts #253

The challenge with Hand Stamped Sentiments is a colour one - Elegant Eggplant, Bermuda Bay and Pear Pizzazz
To make the card I used the Reverse Masking Technique using a mask made with a Labels Framelit die cut on a piece of thick cardstock. The tutorial I used was a video tutorial made by Patty Bennett


Using the largest of the Labels Framelits a template was die cut on a piece of thick cardstock.  A piece of 4 by 5 1/4" piece of Whisper White cardstock was affixed to the work surface using post it notes. The template was placed on the Whisper White piece and it was also affixed with post it notes.

Art Piece:
Elegant Eggplant was first applied in circular motions around the edges using a sponge, followed by Bermuda Bay and finally Pear Pizzazz.
The background stamp with the Best Birds stamp set was second generation stamped with Bermuda Bay over the center.
While the mask was still in place, the images from "Best Birds" stamp set were stamped as shown above.
After the mask was removed, the sentiment (with the help of the stamp-a-ma-jig) was stamped at the top of the art piece.


Card:
The basic card is Bermuda Bay layered with the Art Piece.  Before adhering the art piece to the card front a 1/8" stitched Bermuda Bay ribbon and bow were adhered to the left side.
Two butterflies were punched with the Elegant Butterfly punch - one if Bermuda Bay and one in Pear Pizzazz. The Bermuda Bay butterfly was cut in half and this half adhered to the Pear Pizzazz one.  Small slivers of Elegant Eggplant became the body and antennae of this butterfly.  The entire butterfly was then embossed with the Polka dot embossing folder.  Small rhinestones were adhered to the body and antennae tops.  It was attached with a glue dot.

Metal rimmed rhinestones were placed at both the upper and lower ends of the art piece.

Supplies Used:
Stamp: Best Birds
Inks: Black Memento, Elegant Eggplant, Bermuda Bay, Pear Pizzazz
Papers: Bermuda Bay, Whisper White, Pear Pizzazz
Accessories: Labels Framelits, 1/8" Bermuda Bay ribbon, Elegant Butterfly punch, rhinestones, Elegant polka dots embossing folder, metal rimmed rhinestones.


Wednesday, October 26, 2016

Hibiscus Happy Birthday - Hand Stamped Sentiments #249

Snow!!! Yes, snow is predicted for this area for tomorrow.  I'm so glad I brought my hibiscus in from the patio, and I think it's glad to be in where it's warm.  Already it has started blooming and I coloured the hibiscus in the card below the same as my plant's blooms.


The card base is Rose Red, layered with Whisper White
On the next layers, instead of DSP, Versa Mark was applied to a Decorative Seasonal mask and the Whisper White cardstock was embossed with Basic Black embossing powder.

A one inch strip of Rose Red cardstock was added across the card near the top, and a Rose Red banner extended from the right side to just below the doillie.

A white doillie was adhered to the card, and the image with its matted cardstock adhered to that.

The image, non SU, is a Hibiscus stamp coloured with alcohol in an aqua painter and ink pads.  The resultant image looks like it has been coloured with alcohol inks (and indeed it has).  Once coloured, the image is die cut using the oval framelits and adhered to the left side of the card.

Three pine branches were die cut with the Pretty pines framelit dies and adhered to the left side of the image.  A pine cone was placed behind and above these branches.  The pine cone was die cut in Tip Top Taupe and backed with copper foil.

The sentiment is from the "Best Birds" stamp set.

Supplies Used: 
Stamps: Best Birds, Hibiscus (non SU)
Inks: Black Memento, Versa Mark, Rose Red, Mon Mambo, Garden Green, Always Artichoke, Crushed Curry, Blushing Bride
Papers: Rose Red, Whisper White, Garden Green, Tip Top Taupe, Copper Foil
Accessories: Pretty Pines Framelits, Oval framelits, Washi punch, white doillie, black embossing powder, decorative seasonal mask, dimensionals, aqua painter with alcohol in it.