each day from now until the end of October , I will be posting one day of the Advent Calendar. It's like taking the Swiss Cheese approach to any task i.e break the task into small components.
Today I will give the list of supplies that are common throughout the calendar, but obviously supplies, accessories will vary with the design of the day.
With each day posting I will provide you with the list of those materials specific to the day.
Below is the calendar I made. I must admit it took me a long time, and I made it "my way", i.e. it is not identical to the one in the mini - similar, but not identical.
I mounted each "day" on a 12 by 12 of Very Vanilla card stock and adhered them only after I had them all completed (much like what is done is scrapbooking).
I have this one framed in a scrapbooking page frame but only because it is my demo one and want it to be protected by the glass in front. The glass can easily be put behind the calendar.
My son, who is the chocolate lover, said: "Mom, where are the chocolates?" So, my suggestion to those out there who have family members who are lovers of the chocolate in the calendars - provide a basket (you have made of course) with chocolates in them, and each day after the "viewing" they can select a chocolate. You might have to hide the chocolates after (just a tip)

Supplies used Throughout
- Stamp: 24 & Counting
- Inks: Chocolate chip, Garden Green, Cherry Cobbler
- Papers: Very Vanilla, Whisper White, Chocolate Chip, Garden Green, Frostwood Lodge Designer Paper
- Accessories: Peekaboo Frames Bigz L die
Day 1
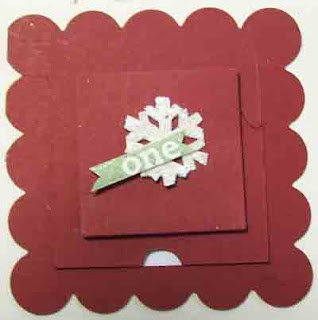
Stamp the image from the Day 1 stamp with Garden Green ink on Whisper white card stock twice.
Punch one image with the 1" square punch and mount on a 2 by 2" piece of Whisper White card stock
Stamp the image from the Day 1 stamp with Garden Green ink on Whisper white card stock twice.
Attach this 2 by 2" piece at the back of the die cut piece making sure it is centered and facing the right way up.
Cut out the snowflake image from the second one. Cover it with dazzling diamonds and mount it on the flip up lid of the Cherry cobbler die.
Using your scissors, carefully cut out the word "one" and notch both ends.
Mount it over the snowflake.
Optional: Spritz with smootch

3 comments:
How generous of you to share how to made the advent calendar in the SU mini. amd I love that you will just be giving one day at a time:)
such a generous stamper, to patiently do each day. TFS!!
Wow Maria I love it!! I bet that was a lot of work! It looks it!
Post a Comment