Showing posts with label 3D ornaments. Show all posts

Saturday, August 28, 2021

Merry & Bright- a Christmas Bauble card plus more

 I initially did not get the " Bright Bauble" bundle, thinking I was not going to make any 3d Christmas ornaments this year.  The pandemic has really put a wrench in my plans for local Craft shows to sell any items I make, and classes have been cancelled for another  year as well.

However, after careful consideration, I decided to make family and friends a 3D Christmas ornament this year. This bundle would be perfect for this.

But before I make ornaments I decided to make some cards using the Bauble as a focal point.  Idea!!  Why not make a card to match the ornament?
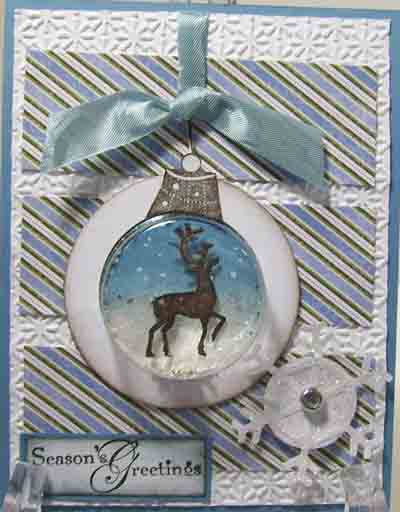
So here is my card:


I must admit I did not know where to start making this card, and whenever that is the case I select the DSP ( Whimsey & Wonder DSP) first selecting my  colour palette  from there( Mint Macaron, Misty Moonlight, Flirty Flamingo, Petal Petal Pink)


Because its a larger stamp, I used the stamparatus to stamp the image, and coloured it with Stampin' Blends and die cut it with the Delicate Bauble.  Before adding it to the card, I added Crystal Effects over the entire surface.  When it was dry, it was added to the card front using dimensionals.  Some 3/8" metallic Petal Pink ribbon was inserted through the top of the ornament (bauble) and adhered to the top of the card between the DSP and Basic White layers.  A bow made with the same ribbon is added to the top of the bauble.

The Mint Macaron card base is  5 1/2" square.  It is matted first with Basic White, followed by Whimsey & Wonder DSP.  I cut a panel of the reverse side of the DSP (Misty Moonlight) and adhered it to the middle of the DSP.  Before adhering it, I added some  silver foil die cut with the Basic Border die along each of the long sides.

Supplies Used:

Stamp:  Bright Baubles

Inks:  Black Memento, Stampin' Blends (Mint Macaron, Flirty Flamingo, Balmy Blue), Misty Moonlight

Papers:  

  • Mint Macaron 5 1/2 by 11 Scored at 5 1/2"
  • Basic White 5 1/4 by 5 1/4" (2 pieces) - one for the inside
  • Whimsey & Wonder DSP 5 by 5
  • Whimsey & Wonder DSP 3/4" by 5" for inside
  • Whimsey & Wonder DSP (reverse side) 2 3/4 by 5"
  • Champagne Foil 1 by 51/4" (2 pieces) - die cut with border die
  • Basic White 3 by 4  for image
Accessories:
  • Delicate Baubles dies
  • Basic Border dies
  • 3/8" metallic Petal Pink ribbon (retired)
  • Shimmer Crystal Effectds
  • Dimensionals
  • Glue dots

Below are some examples of 3D Ornaments


Monday, August 27, 2012

Holiday Ornament

After several experiments I finally got to make the ornament featured on the front of the Holiday catalogue, thanks this video tutorial here


Supplies Used:
Stamps:Ornament Keepsakes, Merry & Type
Inks: Old Olive, Real Red
Papers: Very Vanilla, Candlelight Christmas designer paper
Accessories: Holiday Ornament framelits, Designer Rosette die, 1 3/4" circle punch, Tulle ribbon, Linen thread, Dazzling diamonds, Vintage faceted button, Large pearl, glue gun, tombo glue, two way glut pen, small hole punch, White Baker's twine, 2 1/2" circle punch

Wednesday, December 14, 2011

Medallion Christmas Ornament - Challenge 151

This ornament combines a medallion with a rosette, a snowflake and a butterfly.  It's large and awesome!


1.  Cut 13 pieces of Designer series paper (I used Letters to Santa) 2" by 2"
2.  Fold each piece in half and unfold.
3.  With a pencil or the handle of a paint brush, roll each piece diagonally.  Unroll gently.
4.  Fold into a cone shape.  Do this for all 13 pieces.
5.  Using a hot glue gun, attach each piece to a circle punched with a 1 1/4" circle punch.
See video:


6. Insert a jumbo eyelet in one of the medallions and attach a cherry cobbler and white Baker's twine through it.
7. Using the snowflake die, die cut a snow flake in Whisper White card stock and apply dazzling diamonds.
Attach it to the center of the medallion using stampin dimensionals.
8. Now make the rosette using 1 1/4" by 12" Cherry Cobbler card stock scored every 1/4" on the Simply Scored tool.
9. Attach a 1" circle in Cherry Cobbler punch with the 1" circle punch
10. On top of that attach a Cherry cobbler button.
11. On top of the button attach a butterfly die cut using the Beautiful wings die and silver glimmer paper.
12. Three pearls in the center of the butterfly complete the ornament.

Repeat steps 7 to 12 for the other side of the medallion.


Side view


Close up of Rosette and Butterly

Materials:
Papers: Letters to Santa designer paper, Cherry Cobbler card stock, Whisper White card stock, Silver Glimmer Paper
Accessories: Punches:  1 1/4", 1"; Dies:  Snowflake, Beautiful wings. Other: Scoring tool, Cherry cobbler button, pearls, dimensionals, dazzling diamonds, hot glue gun, jumbo eyelt, cherry cobbler and white Baker's twine.

Wednesday, December 7, 2011

Lattice Die Ornament

I was inspired by Lynn Pratt's Lattice Die ornament which I saw on her blog here
I did a slight variation of the ornament - using 2 colors - red card stock  and  silver glimmer paper.


Using the lattice die cut 8 red and 8 silver glimmer lattices. 
Tip:   When using the glimmer paper in the big shot or punching it, peel one of the layers from the back o
Fold each lattice in half- good side to the inside
Glue a red and a silver glimmer half together using the two way glue pen.
Tip: Pay particular attention to the ends of the lattices making sure it is glued really well
Do this to all the halves until the ornament is complete.
Tie a ribbon to the finished ornament.

Sunday, November 13, 2011

Star Christmas Ornament

From a circle to a triangle to a star- another Christmas ornament.
This time I used strips of designer paper folded into a triangle, then made smaller triangles within the large ones. The end result is a star.
Gold glass glitter in the center finishes it off nicely.

I will do tutorials for both of the ornaments I have posted in the next few days.

Saturday, November 12, 2011

Circle Ribbon Punch Snowflake Ornament

I saw a similar ornament in a magazine and adapted it using Stampin' Up products. It is made by adhering 7 circles together.


If  you would like a tutorial on how to make this ornament please leave me a comment.

Tuesday, October 4, 2011

Christmas Ornaments -Two Kinds


In the first ornament, the Dasher stamp was embossed with gold embossing powder on a medium window sheet. A circle traced using the circumference of an empty button container was cut out just inside the trace lines. The image was rolled up and inserted into the ornament.  Silver chunky crystals  made it look like dasher's feet were in snow.
Check out Tami White's video here
The second ornament was made using matching colors of reinkers and  fine stampin glitter. Check out Tami White's video here

The ornaments were decorated using ribbon, mini glue dots and dazzling diamonds, red sticky tape and fine glitter, rub-ons and decor elements. We also made ornaments using the silver tinsel with buttons and tinsel and glitter.  The latter two would be great projects to do with children. Check the video here

Christmas will be here before you know it, so keep an eye on the sales and start making your ornaments.

Monday, September 26, 2011

Dasher Sweet Treat Cup Ornament - Paper Players #65

I seem to be slower than others in making cards and other 3D items using the sweet treat cups.  But now that I have started I see endless possibilities.  In this card, using the sketch challenge from Paper Players here I create an ornament, which of course is approprite for this time of year.


Stamps: Sweet Centers, Winter Post, Snow Swirled
Inks: Marina Mist, Early Espresso
Papers: Marina Mist, Whisper White, Letters to Santa designer Paper
Accessories: Sweet Treat Cup, 1 3/4" circle punch, 1" circle punch, Snowflake die #2, Starburst embossing folder, 3/8" Baja Breeze seam binding, dazzling diamonds, silver glass glitter, white acrylic paint, clear rhinestone brad, 2 1/2" circle punch


This close up of  the ornament with Dasher in it, shows a Marina Mist sky with snowflakes make using white acrylic paint dabbed on the sky using the end of a small paint brush.  The ground is covered with dazzling diamonds.
Dasher was stamped with Early Espresso ink, cut out and superimposed over the snow covered ground using dimensionals.  I also put some silver glass glitter which you can see at the bottom of the cup (you have to look carefully as I didn't want to put too much in there)

Tuesday, August 23, 2011

3D Ornaments - Paper Players Challenge #60

This week on the Paper Players Challenge, three images were to be used - odd numbers are more pleasing to the eye than even numbers.  Check out the PPC blog here

There are not only 3 images on this card, but the images are 3D.
For each ornament the image  from the Tree Trimmings stamp set was stamped 4 times, cut out, folded in half and mounted on a small oval.

Stamps: Tree Trimmings, Come to Bethlehem
Inks: Real Red, Early Espresso
Papers: Early Espresso, Whisper White, Early Espresso, Letters to Santa designer paper
Accessories: 1/2" Always Artichoke seam binding, Modern word label punch, dazzling diamonds, white gel pen

This side view shows the 3 D ornaments